ethrex
ethrex is a minimalist, stable, modular, fast, and ZK native Ethereum client built from the ground up with zero-knowledge proving in mind. Whether you’re running an L1 node or building an L2, ethrex provides the foundation for verifiable Ethereum execution.
Why ethrex?
| Feature | Description |
|---|---|
| Minimalist | ~100k lines of Rust vs 500k+ in mature clients. Less code means fewer bugs and faster iteration. |
| Multi-prover | Support for SP1, RISC Zero, ZisK, OpenVM, and TEEs. Choose the proving backend that fits your needs. |
| Unified L1/L2 | Same execution client for mainnet nodes and L2 rollups. Consistent behavior across layers. |
| ZK-Optimized | Data structures and algorithms designed to minimize proving overhead from day one. |
zkVM Integrations
ethrex integrates with multiple zero-knowledge virtual machines, giving you flexibility in how you prove Ethereum execution.
| zkVM | Organization | L1 Support | L2 Support | Status |
|---|---|---|---|---|
| SP1 | Succinct | ✓ | ✓ | Production |
| RISC Zero | RISC Zero | ✓ | ✓ | Production |
| ZisK | Polygon | ✓ | Planned | Experimental |
| OpenVM | Axiom | ✓ | Planned | Experimental |
| TEE (TDX) | Intel | — | ✓ | Production |
Tip
For L2 deployments, you can run multiple provers simultaneously for redundancy. See multi-prover deployment.
Quick Start
Run an L1 node:
# Install ethrex
cargo install ethrex

# Start syncing mainnet
ethrex --network mainnet
Deploy an L2:
# See the full deployment guide
# https://docs.ethrex.xyz/l2/deployment/overview.html
Architecture Highlights
ethrex’s architecture is optimized for both traditional execution and ZK proving:
- Stateless execution - Block execution can run with only the necessary witness data, enabling efficient proving
- Modular VM (LEVM) - Our EVM implementation is designed for clarity and easy auditing
- Optimized tries - Merkle Patricia Trie operations are tuned to reduce zkVM cycle counts
- Precompile patches - Cryptographic operations use zkVM-accelerated implementations when available
Learn More
- zkVM Integrations - Detailed guide to supported proving backends
- Benchmark Comparisons - Performance data vs other implementations
- Case Studies - How teams are using ethrex
- Architecture Overview - Deep dive into ethrex internals
Get Involved
- GitHub - Star us, open issues, contribute
- Telegram - Join the community chat
- Blog - Technical deep dives and updates
Getting started
Ethrex is a minimalist, stable, modular and fast implementation of the Ethereum protocol in Rust. The client supports running in two different modes:
- ethrex L1 - As a regular Ethereum execution client
- ethrex L2 - As a multi-prover ZK-Rollup (supporting SP1, RISC Zero and TEEs), where block execution is proven and the proof sent to an L1 network for verification, thus inheriting the L1’s security. Support for based sequencing is currently in the works.
Quickstart L1
Caution
Before starting, ensure your hardware meets the hardware requirements.
Follow these steps to sync an ethrex node on the Hoodi testnet.
MacOS
Install ethrex and lighthouse:
# create secrets directory and jwt secret
mkdir -p ethereum/secrets/
cd ethereum/
openssl rand -hex 32 | tr -d "\n" | tee ./secrets/jwt.hex

# install lighthouse and ethrex
brew install lambdaclass/tap/ethrex
brew install lighthouse
On one terminal:
ethrex --authrpc.jwtsecret ./secrets/jwt.hex --network hoodi
and on another one:
lighthouse bn --network hoodi --execution-endpoint http://localhost:8551 --execution-jwt ./secrets/jwt.hex --checkpoint-sync-url https://hoodi.checkpoint.sigp.io --http
Linux x86
Install ethrex and lighthouse:
Note
Go to https://github.com/sigp/lighthouse/releases/ and use the latest package there and replace that in the below commands
# create secrets directory and jwt secret
mkdir -p ethereum/secrets/
cd ethereum/
openssl rand -hex 32 | tr -d "\n" | tee ./secrets/jwt.hex

# install lighthouse and ethrex
curl -L https://github.com/lambdaclass/ethrex/releases/latest/download/ethrex-linux-x86_64 -o ethrex
chmod +x ethrex
curl -LO https://github.com/sigp/lighthouse/releases/download/v8.0.0/lighthouse-v8.0.0-x86_64-unknown-linux-gnu.tar.gz
tar -xvf lighthouse-v8.0.0-x86_64-unknown-linux-gnu.tar.gz
On one terminal:
./ethrex --authrpc.jwtsecret ./secrets/jwt.hex --network hoodi
and on another one:
./lighthouse bn --network hoodi --execution-endpoint http://localhost:8551 --execution-jwt ./secrets/jwt.hex --checkpoint-sync-url https://hoodi.checkpoint.sigp.io --http
For other CPU architectures, see the releases page.
Quickstart L2
Follow these steps to quickly launch a local L2 node. For advanced options and real deployments, see the links at the end.
MacOS
# install ethrex
brew install lambdaclass/tap/ethrex
ethrex l2 --dev
Linux x86
# install ethrex
curl -L https://github.com/lambdaclass/ethrex/releases/latest/download/ethrex-linux-x86_64 -o ethrex
chmod +x ethrex
./ethrex l2 --dev
For other CPU architectures, see the releases page.
Where to Start
-
Want to run ethrex in production as an execution client?
See Node operation for setup, configuration, monitoring, and best practices.
-
Interested in deploying your own L2?
See L2 rollup deployment for launching your own rollup, deploying contracts, and interacting with your L2.
-
Looking to contribute or develop?
Visit the Developer resources for local dev mode, testing, debugging, advanced CLI usage, and the CLI reference.
-
Want to understand how ethrex works?
Explore L1 fundamentals and L2 Architecture for deep dives into ethrex’s design, sync modes, networking, and more.
Hardware Requirements
NOTE: The guidance in this document applies to running an L1 (Ethereum) node. L2 deployments (sequencers, provers and related infra) have different hardware profiles and operational requirements — see the “L2” section below for details.
Hardware requirements depend primarily on the network you’re running — for example, Hoodi, Sepolia, or Mainnet.
General Recommendations
Across all networks, the following apply:
- Disk Type: Use high-performance NVMe SSDs. For multi-disk setups, software RAID 0 is recommended to maximize speed and capacity. Avoid hardware RAID, which can limit NVMe performance.
- RAM: Sufficient memory minimizes sync bottlenecks and improves stability under load.
- CPU: 4-8 Cores.
- x86-64 bit Processors must be compatible with the instruction set AVX2.
Disk and Memory Requirements by Network
| Network | Disk (Minimum) | Disk (Recommended) | RAM (Minimum) | RAM (Recommended) |
|---|---|---|---|---|
| Ethereum Mainnet | 500 GB | 1 TB | 32 GB | 64 GB |
| Ethereum Sepolia | 250 GB | 400 GB | 32 GB | 64 GB |
| Ethereum Hoodi | 60 GB | 100 GB | 32 GB | 64 GB |
L2
TBD
Installation
Ethrex is designed to run on Linux and macOS.
There are 4 supported methods to install ethrex:
After following the installation steps you should have a binary that can run an L1 client or a multi-prover ZK-rollup with support for SP1, RISC Zero and TEEs.
Install ethrex (binary distribution)
This guide explains how to quickly install the latest pre-built ethrex binary for your operating system.
Prerequisites
- curl (for downloading the binary)
Download the latest release
Download the latest ethrex release for your OS from the GitHub Releases page.
Linux x86_64
curl -L https://github.com/lambdaclass/ethrex/releases/latest/download/ethrex-linux-x86_64 -o ethrex
Linux x86_64 with GPU support (for L2 prover)
If you want to run an L2 prover with GPU acceleration, download the GPU-enabled binary:
curl -L https://github.com/lambdaclass/ethrex/releases/latest/download/ethrex-linux-x86_64-gpu -o ethrex
Linux ARM (aarch64)
curl -L https://github.com/lambdaclass/ethrex/releases/latest/download/ethrex-linux-aarch64 -o ethrex
Linux ARM (aarch64) with GPU support (for L2 prover)
If you want to run an L2 prover with GPU acceleration, download the GPU-enabled binary:
curl -L https://github.com/lambdaclass/ethrex/releases/latest/download/ethrex-linux-aarch64-gpu -o ethrex
macOS (Apple Silicon, aarch64)
curl -L https://github.com/lambdaclass/ethrex/releases/latest/download/ethrex-macos-aarch64 -o ethrex
Set execution permissions
Make the binary executable:
chmod +x ethrex
(Optional) Move to a directory in your $PATH
To run ethrex from anywhere, move it to a directory in your $PATH (e.g., /usr/local/bin):
sudo mv ethrex /usr/local/bin/
Verify the installation
Check that Ethrex is installed and working:
ethrex --version
Install ethrex (package manager)
Coming soon.
Installing ethrex (docker)
Run Ethrex easily using Docker containers. This guide covers pulling and running official images.
Prerequisites
- Docker installed and running
Pulling the Docker Image
Latest stable release:
docker pull ghcr.io/lambdaclass/ethrex:latest
Latest development build:
docker pull ghcr.io/lambdaclass/ethrex:main
Specific version:
docker pull ghcr.io/lambdaclass/ethrex:<version-tag>
Find available tags in the GitHub repo.
Running the Docker Image
Check the Image
Verify the image is working:
docker run --rm ghcr.io/lambdaclass/ethrex --version
Start an ethrex Node
Run the following command to start a node in the background:
docker run \
    --rm \
    -d \
    -v ethrex:/root/.local/share/ethrex \
    -p 8545:8545 \
    -p 8551:8551 \
    -p 30303:30303 \
    -p 30303:30303/udp \
    -p 9090:9090 \
    --name ethrex \
    ghcr.io/lambdaclass/ethrex \
    --http.addr 0.0.0.0 \
    --authrpc.addr 0.0.0.0
What this does:
- Starts a container named
ethrex - Publishes ports:
8545: JSON-RPC server (TCP)8551: Auth JSON-RPC server (TCP)30303: P2P networking (TCP/UDP)9090: Metrics (TCP)
- Mounts the Docker volume
ethrexto persist blockchain data
--http.addr 0.0.0.0 is required inside the container so the published port 8545 is reachable from the host. The flag only changes the container-internal bind; whether the RPC port is exposed beyond the host is still controlled by the -p 8545:8545 mapping (and any firewall in front of the host). Only enable additional JSON-RPC namespaces with --http.api eth,net,web3,... when you actually need them; admin_*, debug_*, and txpool_* are unauthenticated.
Tip: You can add more Ethrex CLI arguments at the end of the command as needed.
Managing the Container
View logs:
docker logs -f ethrex
Stop the node:
docker stop ethrex
Building ethrex from source
Build ethrex yourself for maximum flexibility and experimental features.
Prerequisites
- Rust toolchain (use
rustupfor easiest setup) - libclang (for RocksDB)
- Git
- solc (v0.8.31) (for L2 development)
L2 contracts
If you want to install ethrex for L2 development, you may set the COMPILE_CONTRACTS env var, so the binary has the necessary contract code.
export COMPILE_CONTRACTS=true
Install via cargo install
The fastest way to install ethrex from source:
cargo install --locked ethrex --git https://github.com/lambdaclass/ethrex.git
Optional features:
- Add
--features sp1,risc0to enable SP1 and/or RISC0 provers - Add
--features gpufor CUDA GPU support
Install a specific version:
cargo install --locked ethrex --git https://github.com/lambdaclass/ethrex.git --tag <version-tag>
Find available tags in the GitHub repo.
Verify installation:
ethrex --version
Build manually with cargo build
Clone the repository (replace <version-tag> with the desired version):
git clone --branch <version-tag> --depth 1 https://github.com/lambdaclass/ethrex.git
cd ethrex
Build the binary:
cargo build --bin ethrex --release
Optional features:
- Add
--features sp1,risc0to enable SP1 and/or RISC0 provers - Add
--features gpufor CUDA GPU support
The built binary will be in target/release/ethrex.
Verify the build:
./target/release/ethrex --version
(Optional) Move the binary to your $PATH:
sudo mv ./target/release/ethrex /usr/local/bin/
Running an Ethereum Node with ethrex
This section explains how to run an Ethereum L1 node using ethrex. Here you’ll find:
- Requirements for running a node (including the need for a consensus client)
- Step-by-step instructions for setup and configuration
- Guidance for both new and experienced users
If you already have a consensus client running, you can skip directly to the node startup instructions. Otherwise, continue to the next section for help setting up a consensus client.
Connecting to a consensus client
Ethrex is an execution client built for Ethereum networks after the merge. As a result, ethrex must operate together with a consensus client to fully participate in the network.
Consensus clients
There are several consensus clients and all of them work with ethrex. When choosing a consensus client we suggest you keep in mind client diversity.
Configuring ethrex
JWT secret
Consensus clients and execution clients communicate through an authenticated JSON-RPC API. The authentication is done through a jwt secret. Ethrex automatically generates the jwt secret and saves it to the current working directory by default. You can also use your own previously generated jwt secret by using the --authrpc.jwtsecret flag or JWTSECRET_PATH environment variable. If the jwt secret at the specified path does not exist ethrex will create it.
Auth RPC server
By default the server is exposed at http://localhost:8551 but both the address and the port can be modified using the --authrpc.addr and --authrpc.port flags respectively.
Example
ethrex --authrpc.jwtsecret path/to/jwt.hex --authrpc.addr localhost --authrpc.port 8551
Node startup
Supported networks
Ethrex is designed to support Ethereum mainnet and its testnets
| Network | Chain id | Supported sync modes |
|---|---|---|
| mainnet | 1 | snap |
| sepolia | 11155111 | snap |
| holesky | 17000 | full, snap |
| hoodi | 560048 | full, snap |
For more information about sync modes please read the sync modes document. Full syncing is the default, to switch to snap sync use the flag --syncmode snap
Run an Ethereum node
This guide will assume that you already installed ethrex and you know how to set up a consensus client to communicate with ethrex.
To sync with mainnet
ethrex --syncmode snap
To sync with sepolia
ethrex --network sepolia --syncmode snap
To sync with holesky
ethrex --network holesky
To sync with hoodi
ethrex --network hoodi
Once started, you should be able to check the sync status with:
curl http://localhost:8545 \
    -H 'content-type: application/json' \
    -d '{"jsonrpc":"2.0","method":"eth_syncing","params":[],"id":1}'
The answer should be:
{"id":1,"jsonrpc":"2.0","result":{"startingBlock":"0x0","currentBlock":"0x0","highestBlock":"0x0"}}
Run an Ethereum node with Docker
You can simply start a node with a Consensus client and ethrex as Execution client with Docker using the docker-compose.yaml
curl -L -o docker-compose.yaml https://raw.githubusercontent.com/lambdaclass/ethrex/refs/heads/main/docker-compose.yaml
docker compose up
Or you can set a different network:
ETHREX_NETWORK=hoodi docker compose up
For more details and configuration options:
Configuration
This page covers the basic configuration options for running an L1 node with ethrex. Full list of options can be found at the CLI reference
Sync Modes
Ethrex supports different sync modes for node operation:
- full: Downloads and verifies the entire chain.
- snap: Fast sync using state snapshots (recommended for most users).
Set the sync mode with:
ethrex --sync <mode>
File Locations
By default, ethrex stores its data in:
- Linux:
~/.local/share/ethrex - macOS:
~/Library/Application Support/ethrex
You can change the data directory with:
ethrex --datadir <path>
Ports
Default ports used by ethrex:
8545: JSON-RPC (HTTP)8551: Auth JSON-RPC30303: P2P networking (TCP/UDP)9090: Metrics
You can change ports with the corresponding flags: --http.port, --authrpc.port, --p2p.port, --discovery.port, --metrics.port.
The HTTP JSON-RPC and Auth RPC servers listen on 127.0.0.1 by default so a fresh install on a public host is not exposed to the open internet. P2P networking and metrics listen on 0.0.0.0. Use the corresponding --http.addr, --authrpc.addr, --metrics.addr flags to override.
The HTTP RPC also restricts which JSON-RPC namespaces it serves. By default only eth, net, and web3 are reachable; enable admin, debug, or txpool explicitly with --http.api, for example:
ethrex --http.api eth,net,web3,debug
--http.api is independent of --http.addr: it controls which methods are served on the port, not who can reach it. If you also need remote callers to reach the RPC port, pass --http.addr 0.0.0.0 — only do so when the node sits behind a trusted firewall or reverse proxy, since the admin_*, debug_*, and txpool_* namespaces are unauthenticated.
Log Levels
Control log verbosity with:
ethrex --log.level <level>
Levels: error, warn, info (default), debug, trace
Dev Mode (Localnet)
For local development and testing, you can use dev mode:
ethrex --dev
This runs a local network with block production and no external peers. This network has a list of predefined accounts with funds for testing purposes.
Monitoring and Metrics
Ethrex exposes metrics in Prometheus format on port 9090 by default. But the easiest way to monitor your node is to use the provided Docker Compose stack, which includes Prometheus and Grafana preconfigured. For that we are currently using port 3701, this will match the default in the future but for now if running the containers we expected to have the ethrex metrics exposed on port 3701.
Quickstart: Monitoring Stack with Docker Compose
-
Clone the repository:
git clone https://github.com/lambdaclass/ethrex.git cd ethrex/metrics -
Start the monitoring stack:
# Optional: if you have updated from a previous version, stop first the docker compose.
# docker compose -f docker-compose-metrics.yaml -f docker-compose-metrics-l1.overrides.yaml down
docker compose -f docker-compose-metrics.yaml -f docker-compose-metrics-l1.overrides.yaml up -d
Note: You might want to restart the docker containers in case of an update from a previous ethrex version to make sure the latest provisioned configurations are applied:
-
Run ethrex with metrics enabled:
Make sure to start ethrex with the
--metricsflag and set the port to3701:ethrex --authrpc.jwtsecret ./secrets/jwt.hex --network hoodi --metrics --metrics.port 3701
This will launch Prometheus and Grafana, already set up to scrape ethrex metrics.
Note: We depend on ethereum-metrics-exporter for some key metrics to define variables on the Grafana dashboards. For it to work properly we need the consensus client to expose its RPC endpoints. For example if you are running lighthouse you may need to add --http and --http-address 0.0.0.0 flags to it before the dashboards pick up all metrics. This won’t be needed in the near future
Logs
Ethrex logs are written to stdout by default. To enable file logging, you must specify the --log.dir argument, with this you’ll be able to have Promtail collect the logs and send them to Grafana Loki for log visualization.
- Promtail Configuration:
metrics/provisioning/promtail/promtail.yaml
The promtail configuration expects by default that logs are stored in ./logs (relative to the repo root). To correctly see the logs in Grafana, ensure that Promtail can access the logs directory:
- If running via Docker, ensure you map a volume to the log directory and pass
--log.dirto the container. - If running standalone, use
--log.dir ./logswhen running ethrex.
ethrex --log.dir ./logs ...
If you choose to use a different directory, you must set the ETHREX_LOGS_DIR environment variable when running the metrics stack to point to your custom logs directory.
ETHREX_LOGS_DIR=/path/to/your/logs docker compose -f docker-compose-metrics.yaml -f docker-compose-metrics-l1.overrides.yaml up
You can view the logs in Grafana by navigating to the logs row in our dashboard.
Running Docker Container Manually
If you run the ethrex Docker container manually (e.g., docker run ...) or use a custom docker-compose.yaml outside of this repository, you must ensure the logs are accessible to the monitoring stack.
The ethrex container writes logs to the directory specified by --log.dir. You should mount this directory to a location on your host machine that Promtail can access.
Example:
docker run -d \
  --name ethrex \
  -v $(pwd)/logs:/data/logs \
  ghcr.io/lambdaclass/ethrex:main \
  --datadir /data \
  --log.dir /data/logs
If you are using the provided monitoring stack in metrics/, it expects logs to be in the logs directory at the root of the repository (or ../logs relative to the metrics folder). Ensure your volume mount matches this expectation or update the Promtail volume configuration.
Accessing Metrics and Dashboards
- Prometheus: http://localhost:9091
- Grafana: http://localhost:3001
- Default login:
admin/admin - Prometheus is preconfigured as a data source
- Example dashboards are included in the repo
- Default login:
Metrics from ethrex will be available at http://localhost:3701/metrics in Prometheus format if you followed step 3.
For detailed information on the provided Grafana dashboards, see our L1 Dashboard document.
Custom Configuration
Your ethrex setup may differ from the default configuration. Check your endpoints at provisioning/prometheus/prometheus_l1_sync_docker.yaml.
Also if you have a centralized Prometheus or Grafana setup, you can adapt the provided configuration files to fit your environment, or even stop the docker containers that run Prometheus and/or Grafana leaving only the additional ethereum-metrics-exporter running alongside ethrex to export the metrics to your existing monitoring stack.
docker compose -f docker-compose-metrics.yaml -f docker-compose-metrics-l1.overrides.yaml up -d ethereum-metrics-exporter
For manual setup or more details, see the Prometheus documentation and Grafana documentation.
L1 Architecture
This section covers the internal architecture of ethrex as an Ethereum L1 execution client. It explains how the different components interact, how blocks flow through the system, and the design decisions behind the implementation.
- System Overview - High-level architecture and component interactions
- Block Execution Pipeline - How blocks are validated and executed
- Sync State Machine - Full sync and snap sync algorithms
- Crate Map - Overview of all crates and their responsibilities
System Overview
This document provides a high-level overview of ethrex’s L1 architecture as an Ethereum execution client.
Introduction
ethrex is a Rust implementation of an Ethereum execution client. It implements the Ethereum protocol specification, including:
- Block validation and execution
- State management via Merkle Patricia Tries
- P2P networking (devp2p stack)
- JSON-RPC API for external interaction
- Engine API for consensus client communication
High-Level Architecture
                                    ┌─────────────────────┐
                                    │   Consensus Client  │
                                    │  (Lighthouse, etc)  │
                                    └──────────┬──────────┘
                                               │ Engine API
                                               │ (JWT auth)
                                               ▼
┌──────────────────────────────────────────────────────────────────────────────┐
│                              ethrex Execution Client                          │
│                                                                               │
│  ┌─────────────┐     ┌──────────────┐     ┌────────────────────────────────┐ │
│  │   JSON-RPC  │     │  Engine API  │     │           P2P Network          │ │
│  │    Server   │     │   Handler    │     │  ┌────────┐  ┌──────────────┐  │ │
│  │             │     │              │     │  │DiscV4  │  │    RLPx      │  │ │
│  │ eth_*       │     │ engine_*     │     │  │        │  │  ┌────────┐  │  │ │
│  │ debug_*     │     │ forkchoice   │     │  │        │  │  │ eth/68 │  │  │ │
│  │ txpool_*    │     │ newPayload   │     │  │        │  │  │ snap/1 │  │  │ │
│  │ admin_*     │     │ getPayload   │     │  │        │  │  └────────┘  │  │ │
│  └──────┬──────┘     └──────┬───────┘     │  └────────┘  └──────────────┘  │ │
│         │                   │             └────────────────┬───────────────┘ │
│         │                   │                              │                 │
│         └───────────────────┼──────────────────────────────┘                 │
│                             │                                                 │
│                             ▼                                                 │
│  ┌───────────────────────────────────────────────────────────────────────┐   │
│  │                           Blockchain                                   │   │
│  │  ┌─────────────┐  ┌─────────────┐  ┌─────────────┐  ┌─────────────┐   │   │
│  │  │   Mempool   │  │  Payload    │  │ Fork Choice │  │   Block     │   │   │
│  │  │             │  │  Builder    │  │   Update    │  │  Pipeline   │   │   │
│  │  └─────────────┘  └─────────────┘  └─────────────┘  └─────────────┘   │   │
│  └───────────────────────────────────────────────────────────────────────┘   │
│                             │                                                 │
│                             ▼                                                 │
│  ┌───────────────────────────────────────────────────────────────────────┐   │
│  │                              EVM (LEVM)                                │   │
│  │  ┌─────────────┐  ┌─────────────┐  ┌─────────────┐  ┌─────────────┐   │   │
│  │  │Transaction  │  │   Opcode    │  │  Precompiled│  │    State    │   │   │
│  │  │ Execution   │  │   Handler   │  │  Contracts  │  │ Transitions │   │   │
│  │  └─────────────┘  └─────────────┘  └─────────────┘  └─────────────┘   │   │
│  └───────────────────────────────────────────────────────────────────────┘   │
│                             │                                                 │
│                             ▼                                                 │
│  ┌───────────────────────────────────────────────────────────────────────┐   │
│  │                             Storage                                    │   │
│  │  ┌───────────────────────────────────────────────────────────────┐    │   │
│  │  │                     Store (High-level API)                     │    │   │
│  │  └───────────────────────────────────────────────────────────────┘    │   │
│  │                    │                              │                    │   │
│  │         ┌──────────┴──────────┐        ┌─────────┴────────┐           │   │
│  │         ▼                     ▼        ▼                  ▼           │   │
│  │  ┌─────────────┐       ┌─────────────────┐       ┌───────────────┐    │   │
│  │  │  InMemory   │       │    RocksDB      │       │  State Trie   │    │   │
│  │  │  (Testing)  │       │  (Production)   │       │ (MPT + Flat)  │    │   │
│  │  └─────────────┘       └─────────────────┘       └───────────────┘    │   │
│  └───────────────────────────────────────────────────────────────────────┘   │
└──────────────────────────────────────────────────────────────────────────────┘
Core Components
1. Network Layer
The network layer handles all external communication:
JSON-RPC Server (crates/networking/rpc)
- Implements the Ethereum JSON-RPC specification
- Namespaces:
eth_*,debug_*,txpool_*,admin_*,web3_* - Validates and broadcasts incoming transactions
Engine API (crates/networking/rpc/engine)
- Communication channel with the consensus client
- Handles
engine_forkchoiceUpdatedV{1,2,3},engine_newPayloadV{1,2,3},engine_getPayloadV{1,2,3} - JWT authentication for security
- Triggers sync when receiving unknown block hashes
P2P Network (crates/networking/p2p)
- DiscV4: Node discovery protocol for finding peers
- RLPx: Encrypted transport layer for peer communication
- eth/68: Block and transaction propagation protocol
- snap/1: Snap sync protocol for fast state download
2. Blockchain Layer
The blockchain layer manages chain state and block processing:
Blockchain (crates/blockchain)
- Orchestrates block validation and execution
- Manages the mempool for pending transactions
- Handles fork choice updates from the consensus layer
- Coordinates payload building for block production
Mempool
- Stores pending transactions awaiting inclusion
- Filters transactions by gas price, nonce, and validity
- Supports transaction replacement (EIP-1559 and EIP-4844)
- Broadcasts new transactions to peers
Fork Choice
- Implements Ethereum’s fork choice rule
- Updates the canonical chain based on consensus client signals
- Handles chain reorganizations
3. Execution Layer
LEVM (Lambda EVM) (crates/vm/levm)
- Custom EVM implementation in Rust
- Executes smart contract bytecode
- Implements all EVM opcodes up to the latest hard fork
- Handles precompiled contracts
Block Execution Pipeline
- Validate block header
- Apply system-level operations (beacon root, block hash storage)
- Execute transactions in order
- Process withdrawals (post-Merge)
- Extract requests (post-Prague)
- Compute state root and verify against header
4. Storage Layer
Store (crates/storage)
- High-level API for all blockchain data
- Supports multiple backends: InMemory (testing), RocksDB (production)
- Manages block headers, bodies, receipts, and state
State Trie (crates/common/trie)
- Merkle Patricia Trie implementation
- Stores account states and contract storage
- Supports flat key-value storage for performance
- Handles trie node caching and persistence
Data Flow
Block Import (from P2P)
P2P Peer → Block Headers/Bodies → Syncer → Blockchain.add_block() → EVM.execute() → Store
- Syncer requests headers from peers
- Headers are validated (parent exists, timestamps, gas limits, etc.)
- Bodies are requested and matched to headers
- Blocks are executed in batches
- State is committed to storage
Block Import (from Consensus Client)
Consensus Client → engine_newPayloadV3 → Blockchain.add_block_pipeline() → EVM.execute() → Store
                 → engine_forkchoiceUpdated → Fork Choice Update → Canonical Chain Update
- Consensus client sends new payload via Engine API
- Block is validated and executed
- Fork choice update makes the block canonical
- Sync is triggered if the block’s parent is unknown
Transaction Lifecycle
User → JSON-RPC (eth_sendRawTransaction) → Mempool → Broadcast to Peers
                                                   → Include in Block
- Transaction arrives via JSON-RPC or P2P
- Validated for signature, nonce, balance, gas
- Added to mempool if valid
- Broadcast to connected peers
- Eventually included in a block by the payload builder
Sync Modes
Full Sync
Downloads and executes every block from genesis (or a known checkpoint):
- Request block headers from peers
- Request block bodies for each header
- Execute blocks in batches (1024 blocks per batch)
- Commit state after each batch
- Update fork choice when sync head is reached
Snap Sync
Downloads state directly instead of executing all historical blocks:
- Download block headers to find a recent “pivot” block
- Download account state trie leaves via snap protocol
- Download storage tries for accounts with storage
- Heal any missing trie nodes (state may have changed during download)
- Download bytecode for contract accounts
- Execute recent blocks (post-pivot) to catch up
See Sync State Machine for detailed documentation.
Concurrency Model
ethrex uses Tokio for async I/O with the following patterns:
- Async tasks for network I/O (RPC, P2P)
- Blocking tasks for CPU-intensive work (block execution, trie operations)
- Channels for inter-component communication (sync signals, mempool updates)
- RwLock/Mutex for shared state (mempool, peer table)
Configuration
Key configuration options:
| Option | Description | Default |
|---|---|---|
--network | Network to connect to | mainnet |
--datadir | Data directory for DB and keys | ~/.ethrex |
--syncmode | Sync mode (full or snap) | snap |
--authrpc.port | Engine API port | 8551 |
--http.addr | JSON-RPC HTTP bind address | 127.0.0.1 |
--http.port | JSON-RPC HTTP port | 8545 |
--http.api | JSON-RPC namespaces enabled over HTTP/WS | eth,net,web3 |
--discovery.port | P2P discovery port | 30303 |
See Configuration for the complete reference.
Next Steps
- Block Execution Pipeline - Deep dive into block processing
- Sync State Machine - Detailed sync algorithm documentation
- Crate Map - Overview of all crates and dependencies
Block Execution Pipeline
This document describes how ethrex validates and executes blocks, from receiving a block to committing state changes.
Overview
Block execution in ethrex follows the Ethereum specification closely. The pipeline handles:
- Block header validation
- System-level operations (beacon root contract, block hash storage)
- Transaction execution
- Withdrawal processing
- Request extraction (post-Prague)
- State root verification
Entry Points
Blocks enter the execution pipeline through two main paths:
1. P2P Sync (Syncer)
During synchronization, blocks are fetched from peers and executed in batches:
#![allow(unused)]
fn main() {
// crates/networking/p2p/sync.rs
Syncer::add_blocks() → Blockchain::add_blocks_in_batch() → execute each block
}
2. Engine API (engine_newPayloadV{1,2,3})
Post-Merge, the consensus client sends new blocks via the Engine API:
#![allow(unused)]
fn main() {
// crates/networking/rpc/engine/payload.rs
NewPayloadV3::handle() → Blockchain::add_block() → execute block
}
Block Header Validation
Before executing a block, its header is validated:
#![allow(unused)]
fn main() {
// crates/blockchain/blockchain.rs
fn validate_header(header: &BlockHeader, parent: &BlockHeader) -> Result<()>
}
Validation Checks
| Check | Description |
|---|---|
| Parent hash | Must match parent block’s hash |
| Block number | Must be parent.number + 1 |
| Timestamp | Must be > parent.timestamp |
| Gas limit | Must be within bounds of parent (EIP-1559) |
| Base fee | Must match calculated value (EIP-1559) |
| Difficulty | Must be 0 (post-Merge) |
| Nonce | Must be 0 (post-Merge) |
| Ommers hash | Must be empty hash (post-Merge) |
| Withdrawals root | Must match if Shanghai activated |
| Blob gas fields | Must be present if Cancun activated |
| Requests hash | Must match if Prague activated |
Execution Flow
┌─────────────────────────────────────────────────────────────────────┐
│                        Block Execution                               │
├─────────────────────────────────────────────────────────────────────┤
│                                                                      │
│  1. ┌────────────────────────────────────────────────────────────┐  │
│     │             System Operations (post-Cancun)                 │  │
│     │  • Store beacon block root (EIP-4788)                       │  │
│     │  • Store parent block hash (EIP-2935)                       │  │
│     └────────────────────────────────────────────────────────────┘  │
│                              │                                       │
│                              ▼                                       │
│  2. ┌────────────────────────────────────────────────────────────┐  │
│     │              Transaction Execution                          │  │
│     │  For each transaction:                                      │  │
│     │  • Validate signature and nonce                             │  │
│     │  • Check sender balance                                     │  │
│     │  • Execute in EVM                                           │  │
│     │  • Apply gas refunds                                        │  │
│     │  • Update account states                                    │  │
│     │  • Generate receipt                                         │  │
│     └────────────────────────────────────────────────────────────┘  │
│                              │                                       │
│                              ▼                                       │
│  3. ┌────────────────────────────────────────────────────────────┐  │
│     │              Withdrawal Processing (post-Shanghai)          │  │
│     │  For each withdrawal:                                       │  │
│     │  • Credit validator address with withdrawal amount          │  │
│     └────────────────────────────────────────────────────────────┘  │
│                              │                                       │
│                              ▼                                       │
│  4. ┌────────────────────────────────────────────────────────────┐  │
│     │              Request Extraction (post-Prague)               │  │
│     │  • Deposit requests from logs                               │  │
│     │  • Withdrawal requests from system contract                 │  │
│     │  • Consolidation requests from system contract              │  │
│     └────────────────────────────────────────────────────────────┘  │
│                              │                                       │
│                              ▼                                       │
│  5. ┌────────────────────────────────────────────────────────────┐  │
│     │                  State Finalization                         │  │
│     │  • Compute state root from account updates                  │  │
│     │  • Verify against header.state_root                         │  │
│     │  • Commit changes to storage                                │  │
│     └────────────────────────────────────────────────────────────┘  │
│                                                                      │
└─────────────────────────────────────────────────────────────────────┘
Transaction Execution
Each transaction goes through the following steps:
1. Pre-Execution Validation
#![allow(unused)]
fn main() {
// crates/blockchain/validate.rs
fn validate_transaction(tx: &Transaction, header: &BlockHeader) -> Result<()>
}- Signature recovery and validation
- Nonce check (must match account nonce)
- Gas limit check (must be <= block gas remaining)
- Balance check (must cover
gas_limit * gas_price + value) - Intrinsic gas calculation
- EIP-2930 access list validation
- EIP-4844 blob validation (if applicable)
2. EVM Execution
#![allow(unused)]
fn main() {
// crates/vm/levm/src/vm.rs
VM::execute() → Result<ExecutionReport>
}
The EVM executes the transaction bytecode:
- Contract Call: Execute target contract code
- Contract Creation: Deploy new contract, execute constructor
- Transfer: Simple value transfer (no code execution)
During execution:
- Opcodes are decoded and executed
- Gas is consumed for each operation
- State changes are tracked (but not committed)
- Logs are collected
- Errors revert all changes
3. Post-Execution
After EVM execution:
#![allow(unused)]
fn main() {
// crates/vm/levm/src/vm.rs
fn finalize_transaction() -> Receipt
}- Calculate gas refund (max 1/5 of gas used, post-London)
- Credit coinbase with priority fee
- Generate receipt with logs and status
- Update cumulative gas used
State Management
Account Updates
State changes are tracked as AccountUpdate structs:
#![allow(unused)]
fn main() {
pub struct AccountUpdate {
    pub address: Address,
    pub removed: bool,
    pub info: Option<AccountInfo>,       // balance, nonce, code_hash
    pub code: Option<Bytes>,             // bytecode if changed
    pub added_storage: HashMap<H256, U256>,
}
}
State Root Computation
After all transactions execute:
#![allow(unused)]
fn main() {
// crates/storage/store.rs
Store::apply_account_updates_batch(parent_hash, updates) -> StateTrieHash
}
This is one of the two merkleization backends (the other is used by add_block_pipeline):
- Load parent state trie
- Apply each account update to the trie
- For accounts with storage changes, update storage tries
- Compute new state root
- Verify it matches
header.state_root
Payload Building
When ethrex acts as a block producer (validator), it builds payloads:
#![allow(unused)]
fn main() {
// crates/blockchain/payload.rs
Blockchain::build_payload(template: Block) -> PayloadBuildResult
}
Building Process
-
Fetch transactions from mempool, filtered by:
- Base fee (must afford current base fee)
- Blob fee (for EIP-4844 transactions)
- Nonce ordering (consecutive nonces per sender)
-
Order transactions by effective tip (highest first)
-
Execute transactions until:
- Block gas limit reached
- No more valid transactions
- Blob limit reached (for blob transactions)
-
Finalize block:
- Apply withdrawals
- Extract requests
- Compute state root
- Compute receipts root
- Generate logs bloom
Payload Rebuilding
Payloads are rebuilt continuously until requested:
#![allow(unused)]
fn main() {
// crates/blockchain/payload.rs
Blockchain::build_payload_loop(payload, cancel_token)
}
This maximizes MEV by including the most profitable transactions available.
Error Handling
Block execution can fail for various reasons:
| Error | Cause | Recovery |
|---|---|---|
InvalidBlock::InvalidStateRoot | Computed state root doesn’t match header | Reject block |
InvalidBlock::InvalidGasUsed | Gas used doesn’t match header | Reject block |
InvalidBlock::InvalidTransaction | Transaction validation failed | Reject block |
EvmError::OutOfGas | Transaction ran out of gas | Revert transaction, continue block |
EvmError::InvalidOpcode | Unknown opcode encountered | Revert transaction, continue block |
Performance Considerations
Batch Execution
During sync, blocks are executed in batches (default 1024 blocks):
#![allow(unused)]
fn main() {
// crates/networking/p2p/sync.rs
const EXECUTE_BATCH_SIZE: usize = 1024;
}
This reduces database commits and improves throughput.
Parallel Trie Operations
Storage trie updates can be parallelized across accounts:
#![allow(unused)]
fn main() {
// Uses rayon for parallel iteration
account_updates.par_iter().map(|update| update_storage_trie(update))
}
State Caching
The EVM maintains a cache of accessed accounts and storage slots to minimize database reads during execution.
Hard Fork Handling
Block execution adapts based on the active hard fork:
#![allow(unused)]
fn main() {
// crates/common/types/chain_config.rs
impl ChainConfig {
    pub fn fork(&self, timestamp: u64) -> Fork { ... }
    pub fn is_cancun_activated(&self, timestamp: u64) -> bool { ... }
    pub fn is_prague_activated(&self, timestamp: u64) -> bool { ... }
}
}
Each fork may introduce:
- New opcodes (e.g.,
PUSH0in Shanghai) - New precompiles (e.g., point evaluation in Cancun)
- New system contracts (e.g., beacon root contract in Cancun)
- Changed gas costs
- New transaction types
Related Documentation
- LEVM Documentation - EVM implementation details
- Sync State Machine - How blocks flow during sync
- Crate Map - Overview of involved crates
Sync State Machine
This document describes the synchronization algorithms implemented in ethrex, including full sync and snap sync.
Overview
ethrex supports two synchronization modes:
| Mode | Description | Use Case |
|---|---|---|
| Full Sync | Downloads and executes every block | Maximum security, slower |
| Snap Sync | Downloads state directly, executes recent blocks | Faster initial sync |
Sync Manager Architecture
┌─────────────────────────────────────────────────────────────────┐
│                        SyncManager                               │
│  • Receives sync targets from Engine API / P2P                   │
│  • Tracks current sync mode (Full / Snap)                        │
│  • Coordinates Syncer for actual sync work                       │
└──────────────────────────────┬──────────────────────────────────┘
                               │
                               ▼
┌─────────────────────────────────────────────────────────────────┐
│                          Syncer                                  │
│  • Executes sync cycles                                          │
│  • Manages peer connections via PeerHandler                      │
│  • Handles both full and snap sync algorithms                    │
└─────────────────────────────────────────────────────────────────┘
Sync Triggers
Synchronization is triggered by:
- Engine API:
engine_forkchoiceUpdatedwith unknown head hash - P2P: Receiving block announcements for unknown blocks
- Startup: When local chain is behind network
#![allow(unused)]
fn main() {
// crates/networking/rpc/engine/fork_choice.rs
match apply_fork_choice(...) {
    Err(InvalidForkChoice::Syncing) => {
        syncer.sync_to_head(fork_choice_state.head_block_hash);
        // Return SYNCING status to consensus client
    }
}
}
Full Sync Algorithm
Full sync downloads blocks from the network and executes each one to reconstruct the state.
State Machine
                    ┌─────────────────┐
                    │   START SYNC    │
                    └────────┬────────┘
                             │
                             ▼
                    ┌─────────────────┐
         ┌─────────│  Request Headers │◄─────────────┐
         │         └────────┬────────┘              │
         │                  │                        │
         │                  ▼                        │
         │         ┌─────────────────┐              │
         │         │ Validate Headers│              │
         │         └────────┬────────┘              │
         │                  │                        │
         │                  ▼                        │
         │         ┌─────────────────┐              │
         │         │ Found Canonical │──No──────────┘
         │         │   Ancestor?     │
         │         └────────┬────────┘
         │                  │ Yes
         │                  ▼
         │         ┌─────────────────┐
         │         │  Request Bodies │◄─────────────┐
         │         └────────┬────────┘              │
         │                  │                        │
         │                  ▼                        │
         │         ┌─────────────────┐              │
         │         │ Execute Batch   │              │
         │         │ (1024 blocks)   │              │
         │         └────────┬────────┘              │
         │                  │                        │
         │                  ▼                        │
         │         ┌─────────────────┐              │
         │         │  More Blocks?   │──Yes─────────┘
         │         └────────┬────────┘
         │                  │ No
         │                  ▼
         │         ┌─────────────────┐
         └─Error───│   SYNC DONE     │
                   └─────────────────┘
Algorithm Details
#![allow(unused)]
fn main() {
// crates/networking/p2p/sync.rs
async fn sync_cycle_full(sync_head: H256, store: Store) -> Result<()>
}-
Find Chain Link
- Request headers backwards from sync_head
- Stop when reaching a canonical block (already known)
- This identifies the fork point
-
Store Headers
- Save all new headers to temporary storage
- Headers are stored in batches during download
-
Download Bodies
- Request bodies for stored headers
- Match bodies to headers by hash
- Maximum 64 bodies per request
-
Execute Blocks
- Execute in batches of 1024 blocks
- Each block is fully validated and executed
- State is committed after each batch
-
Update Fork Choice
- After all blocks executed, update canonical chain
- Set new head, safe, and finalized blocks
Key Constants
#![allow(unused)]
fn main() {
const EXECUTE_BATCH_SIZE: usize = 1024;      // Blocks per execution batch
const MAX_BLOCK_BODIES_TO_REQUEST: usize = 64; // Bodies per request
}
Snap Sync Algorithm
Snap sync downloads state directly from peers instead of executing all historical blocks.
State Machine
┌─────────────────────────────────────────────────────────────────────────────┐
│                           SNAP SYNC STATE MACHINE                            │
└─────────────────────────────────────────────────────────────────────────────┘

    ┌──────────────┐
    │  START SNAP  │
    │    SYNC      │
    └──────┬───────┘
           │
           ▼
    ┌──────────────┐     ┌─────────────────────────────────────────────────────┐
    │   Download   │     │  Download headers to find sync head                  │
    │   Headers    │────▶│  Store hashes for later body download               │
    └──────┬───────┘     └─────────────────────────────────────────────────────┘
           │
           ▼
    ┌──────────────┐     ┌─────────────────────────────────────────────────────┐
    │ Select Pivot │────▶│  Choose recent block as pivot (must not be stale)   │
    │    Block     │     │  Pivot block is target for state download           │
    └──────┬───────┘     └─────────────────────────────────────────────────────┘
           │
           ▼
    ┌──────────────┐     ┌─────────────────────────────────────────────────────┐
    │  Download    │────▶│  Request account ranges via SNAP protocol           │
    │  Accounts    │     │  Store account states to disk as snapshots          │
    └──────┬───────┘     └─────────────────────────────────────────────────────┘
           │
           ▼
    ┌──────────────┐     ┌─────────────────────────────────────────────────────┐
    │   Insert     │────▶│  Build account trie from downloaded leaves          │
    │  Accounts    │     │  Identify accounts with non-empty storage           │
    └──────┬───────┘     └─────────────────────────────────────────────────────┘
           │
           ▼
    ┌──────────────┐     ┌─────────────────────────────────────────────────────┐
    │  Download    │────▶│  For each account with storage:                     │
    │  Storage     │     │  Request storage ranges and build storage tries.    │
    │              │     │  Includes a healing loop to fix state trie changes. │
    └──────┬───────┘     └─────────────────────────────────────────────────────┘
           │
           ▼
    ┌──────────────┐     ┌─────────────────────────────────────────────────────┐
    │    Heal      │────▶│  Heal state trie (fill missing nodes)               │
    │    Tries     │     │  Heal storage tries for modified accounts           │
    └──────┬───────┘     └─────────────────────────────────────────────────────┘
           │
           ▼
    ┌──────────────┐     ┌─────────────────────────────────────────────────────┐
    │  Download    │────▶│  Download bytecode for all contract accounts        │
    │  Bytecode    │     │  Match by code hash                                 │
    └──────┬───────┘     └─────────────────────────────────────────────────────┘
           │
           ▼
    ┌──────────────┐
    │  SNAP SYNC   │
    │   COMPLETE   │
    └──────┬───────┘
           │
           ▼
    ┌──────────────┐     ┌─────────────────────────────────────────────────────┐
    │   Switch to  │────▶│  Execute recent blocks from pivot to head           │
    │  Full Sync   │     │  Continue with full sync for new blocks             │
    └──────────────┘     └─────────────────────────────────────────────────────┘
Phase 1: Header Download
Download all block headers from current head to sync target:
#![allow(unused)]
fn main() {
// crates/networking/p2p/sync.rs
async fn sync_cycle_snap(sync_head: H256, store: Store) -> Result<()>
}- Request headers in batches
- Store header hashes for later use
- Identify pivot block (recent block whose state we’ll download)
Phase 2: Pivot Selection
The pivot block must be:
- Recent enough to have state available on peers
- Not “stale” (older than SNAP_LIMIT * 12 seconds)
#![allow(unused)]
fn main() {
// crates/networking/p2p/sync.rs
fn block_is_stale(header: &BlockHeader) -> bool {
    calculate_staleness_timestamp(header.timestamp) < current_unix_time()
}

const SNAP_LIMIT: usize = 128; // Blocks before pivot is considered stale
}
If the pivot becomes stale during sync, a new pivot is selected:
#![allow(unused)]
fn main() {
async fn update_pivot(block_number: u64, ...) -> Result<BlockHeader>
}
Phase 3: Account Download
Download all account states at the pivot block:
#![allow(unused)]
fn main() {
// Uses SNAP protocol GetAccountRange messages
peers.request_account_range(start_hash, end_hash, snapshot_dir, pivot_header)
}- Accounts are saved to disk as RLP-encoded snapshots
- Each snapshot file contains a batch of (hash, account_state) pairs
- Process tracks code hashes for later bytecode download
Phase 4: Account Trie Construction
Build the account state trie from downloaded leaves:
#![allow(unused)]
fn main() {
async fn insert_accounts(store, storage_accounts, snapshots_dir, ...) -> (H256, accounts_with_storage)
}
For RocksDB backend:
- Ingest snapshot files directly via SST ingestion
- Build trie using sorted insertion algorithm
- Track accounts with non-empty storage root
Phase 5: Storage Download
For each account with storage, download storage slots:
#![allow(unused)]
fn main() {
peers.request_storage_ranges(storage_accounts, snapshots_dir, chunk_index, pivot_header)
}- Multiple accounts can be requested per message
- Large accounts are downloaded in chunks
- “Big accounts” (>4096 slots) are marked for healing instead
Phase 6: Trie Healing
State may have changed while downloading. Healing fixes inconsistencies:
State Trie Healing:
#![allow(unused)]
fn main() {
async fn heal_state_trie_wrap(state_root, store, peers, deadline, ...) -> bool
}- Walk trie from root
- Request missing nodes from peers
- Fill in gaps caused by state changes
Storage Trie Healing:
#![allow(unused)]
fn main() {
async fn heal_storage_trie(state_root, accounts, peers, store, ...) -> bool
}- For each account marked for healing
- Request missing storage trie nodes
- Verify storage roots match account state
Phase 7: Bytecode Download
Download contract bytecode:
#![allow(unused)]
fn main() {
peers.request_bytecodes(&code_hashes)
}- Code hashes collected during account download
- Bytecode downloaded in chunks (50,000 per batch)
- Verified by hashing and comparing to code_hash
Phase 8: Transition to Full Sync
After snap sync completes:
- Store pivot block body
- Update fork choice to pivot
- Switch sync mode to Full
- Execute any remaining blocks normally
P2P Protocols Used
eth/68 Protocol
Used for block header and body download:
| Message | Purpose |
|---|---|
GetBlockHeaders | Request headers by number or hash |
BlockHeaders | Response with headers |
GetBlockBodies | Request bodies by hash |
BlockBodies | Response with bodies |
snap/1 Protocol
Used for state download during snap sync:
| Message | Purpose |
|---|---|
GetAccountRange | Request accounts in hash range |
AccountRange | Response with accounts and proof |
GetStorageRanges | Request storage for accounts |
StorageRanges | Response with storage and proofs |
GetByteCodes | Request bytecode by hash |
ByteCodes | Response with bytecode |
GetTrieNodes | Request specific trie nodes |
TrieNodes | Response with nodes |
Error Recovery
Recoverable Errors
These errors cause sync to retry:
- Peer disconnection
- Invalid response from peer
- Timeout waiting for response
- Database errors (transient)
Non-Recoverable Errors
These errors cause sync to abort with warning:
- Snapshot file corruption
- Database corruption
- State root mismatch after healing
#![allow(unused)]
fn main() {
// crates/networking/p2p/sync.rs
impl SyncError {
    pub fn is_recoverable(&self) -> bool {
        match self {
            SyncError::Chain(_) | SyncError::Store(_) | ... => true,
            SyncError::CorruptDB | SyncError::SnapshotDecodeError(_) | ... => false,
        }
    }
}
}
Performance Optimizations
Parallel Operations
- Account trie insertion uses Rayon for parallelism
- Storage tries built in parallel across accounts
- Bytecode downloads are batched
Disk I/O
- Snapshot files written in batches to reduce writes
- RocksDB SST ingestion for fast account loading
- Temporary directories cleaned up after sync
Network
- Multiple peers used concurrently
- Peer scoring based on response time and validity
- Automatic peer rotation for failed requests
Metrics
Sync progress is tracked via metrics:
#![allow(unused)]
fn main() {
// crates/networking/p2p/metrics.rs
METRICS.account_tries_inserted     // Accounts added to trie
METRICS.storage_leaves_inserted    // Storage slots added
METRICS.current_step               // Current sync phase
METRICS.sync_head_hash             // Current sync target
}
Configuration
| Option | Description | Default |
|---|---|---|
--syncmode | Sync mode (full or snap) | snap |
EXECUTE_BATCH_SIZE | Blocks per batch (env var) | 1024 |
MIN_FULL_BLOCKS | Min blocks to full sync in snap mode | 10,000 |
Related Documentation
- Snap Sync Internals - Detailed snap sync documentation
- Block Execution Pipeline - How blocks are executed
- Networking - P2P protocol details
Note: For comprehensive snap sync documentation, see Snap Sync Internals.
Crate Map
This document provides an overview of all crates in the ethrex monorepo and their responsibilities.
Crate Dependency Graph
                              ┌─────────────────────────────────────┐
                              │           cmd/ethrex                │
                              │      (Main binary entry point)      │
                              └───────────────┬─────────────────────┘
                                              │
                    ┌─────────────────────────┼─────────────────────────┐
                    │                         │                         │
                    ▼                         ▼                         ▼
        ┌───────────────────┐     ┌───────────────────┐     ┌───────────────────┐
        │  networking/rpc   │     │  networking/p2p   │     │    blockchain     │
        │   (JSON-RPC API)  │     │  (P2P networking) │     │ (Chain management)│
        └─────────┬─────────┘     └─────────┬─────────┘     └─────────┬─────────┘
                  │                         │                         │
                  │                         │                         │
                  └─────────────────────────┼─────────────────────────┘
                                            │
                                            ▼
                              ┌─────────────────────────────┐
                              │           vm/levm           │
                              │    (EVM implementation)     │
                              └─────────────┬───────────────┘
                                            │
                                            ▼
                              ┌─────────────────────────────┐
                              │          storage            │
                              │     (Data persistence)      │
                              └─────────────┬───────────────┘
                                            │
                    ┌───────────────────────┼───────────────────────┐
                    │                       │                       │
                    ▼                       ▼                       ▼
        ┌───────────────────┐   ┌───────────────────┐   ┌───────────────────┐
        │    common/trie    │   │    common/rlp     │   │   common/types    │
        │ (Merkle Patricia) │   │ (RLP encoding)    │   │ (Core data types) │
        └───────────────────┘   └───────────────────┘   └───────────────────┘
Core Crates
ethrex-common
Purpose: Core data types and utilities shared across all crates.
Key Modules:
types/- Block, Transaction, Receipt, Account typestrie/- Merkle Patricia Trie implementationrlp/- RLP encoding/decodingcrypto/- Keccak hashing, signature recovery
Notable Types:
#![allow(unused)]
fn main() {
pub struct Block { header: BlockHeader, body: BlockBody }
pub struct Transaction { /* variants for Legacy, EIP-2930, EIP-1559, EIP-4844, EIP-7702 */ }
pub struct AccountState { nonce: u64, balance: U256, storage_root: H256, code_hash: H256 }
}
ethrex-storage
Purpose: Persistent storage layer with multiple backend support.
Key Components:
Store- High-level API for all blockchain dataStoreEnginetrait - Backend abstractionInMemoryStore- Testing backendRocksDBStore- Production backend
Stored Data:
| Table | Contents |
|---|---|
block_numbers | Block hash → block number |
canonical_block_hashes | Block number → canonical hash |
headers | Block hash → BlockHeader |
bodies | Block hash → BlockBody |
receipts | Block hash + index → Receipt |
account_trie_nodes | Node hash → trie node data |
storage_trie_nodes | Node hash → trie node data |
account_codes | Code hash → bytecode |
account_flatkeyvalue | Account flat key-value store |
storage_flatkeyvalue | Storage flat key-value store |
ethrex-blockchain
Purpose: Chain management, block validation, and mempool.
Key Components:
Blockchain- Main orchestrator for chain operationsMempool- Pending transaction poolfork_choice- Fork choice rule implementationpayload- Block building for validatorsvalidate- Block and transaction validation
Public API:
#![allow(unused)]
fn main() {
impl Blockchain {
    pub fn add_block(&self, block: Block) -> Result<(), ChainError>
    pub fn add_block_pipeline(&self, block: Block) -> Result<(), ChainError>
    pub fn validate_transaction(&self, tx: &Transaction) -> Result<(), MempoolError>
    pub fn build_payload(&self, template: Block) -> Result<PayloadBuildResult, ChainError>
    pub fn get_payload(&self, id: u64) -> Result<PayloadBuildResult, ChainError>
}
}
ethrex-vm / levm
Purpose: Ethereum Virtual Machine implementation.
Key Components:
VM- Main EVM execution engineEvmtrait - VM interface for different contexts- Opcode handlers (one per EVM opcode)
- Precompiled contracts
- Gas metering
Execution Flow:
#![allow(unused)]
fn main() {
impl VM {
    pub fn execute(&mut self) -> Result<ExecutionReport, VMError>
    fn execute_opcode(&mut self, opcode: u8) -> Result<(), VMError>
    fn call(&mut self, ...) -> Result<CallOutcome, VMError>
    fn create(&mut self, ...) -> Result<CreateOutcome, VMError>
}
}
ethrex-networking/rpc
Purpose: JSON-RPC API server.
Supported Namespaces:
eth_*- Standard Ethereum methods (HTTP, default-enabled)net_*- Network information (HTTP, default-enabled)web3_*- Web3 utilities (HTTP, default-enabled)debug_*- Debugging and tracing (HTTP, opt-in via--http.api)admin_*- Node administration (HTTP, opt-in via--http.api)txpool_*- Mempool inspection (HTTP, opt-in via--http.api)engine_*- Consensus client communication (auth-rpc port only, JWT-authenticated)
Namespaces not in the --http.api allowlist return MethodNotFound over HTTP/WS. The engine namespace is served exclusively on the authenticated RPC port and cannot be exposed via --http.api.
Architecture:
#![allow(unused)]
fn main() {
pub trait RpcHandler: Send + Sync {
    fn parse(params: &Option<Vec<Value>>) -> Result<Self, RpcErr>;
    async fn handle(&self, context: RpcApiContext) -> Result<Value, RpcErr>;
}
}
ethrex-networking/p2p
Purpose: Peer-to-peer networking stack.
Protocol Layers:
- DiscV4 - Node discovery
- RLPx - Encrypted transport
- eth/68 - Ethereum wire protocol
- snap/1 - Snap sync protocol
Key Components:
PeerHandler- Manages peer connectionsPeerTable- Tracks known peers and their scoresSyncer- Synchronization state machineSyncManager- Coordinates sync operations
Supporting Crates
ethrex-common/trie
Purpose: Merkle Patricia Trie implementation.
Features:
- Standard MPT operations (get, insert, delete)
- Proof generation and verification
- Sorted insertion for snap sync
- Flat key-value store integration
ethrex-common/rlp
Purpose: Recursive Length Prefix encoding.
Traits:
#![allow(unused)]
fn main() {
pub trait RLPEncode {
    fn encode(&self, buf: &mut dyn BufMut);
    fn encode_to_vec(&self) -> Vec<u8>;
}

pub trait RLPDecode: Sized {
    fn decode(rlp: &[u8]) -> Result<Self, RLPDecodeError>;
    fn decode_unfinished(rlp: &[u8]) -> Result<(Self, &[u8]), RLPDecodeError>;
}
}
ethrex-metrics
Purpose: Prometheus metrics collection.
Metric Categories:
- Block metrics (height, gas, execution time)
- Transaction metrics (types, counts, errors)
- P2P metrics (peers, messages, sync progress)
- RPC metrics (requests, latency)
ethrex-crypto
Purpose: Cryptographic primitives.
Features:
- Keccak-256 hashing
- ECDSA signature recovery
- BLS signatures (for beacon chain)
L2-Specific Crates
ethrex-l2
Purpose: L2 sequencer and prover integration.
Components:
- Sequencer logic
- State diff computation
- Prover interface
- L1 interaction (deposits, withdrawals)
ethrex-prover
Purpose: Zero-knowledge proof generation.
Supported Provers:
- SP1 (Succinct)
- RISC0
- TDX (Trusted Execution)
Test and Development Crates
ef-tests
Purpose: Ethereum Foundation test runner.
Runs official Ethereum tests to verify protocol compliance.
ethrex-dev
Purpose: Development mode utilities.
Features:
- Local development network
- Block import from files
- Test fixtures
Crate Features
Many crates support feature flags:
| Crate | Feature | Effect |
|---|---|---|
ethrex-storage | rocksdb | Enable RocksDB backend |
ethrex-blockchain | metrics | Enable Prometheus metrics |
ethrex-networking/p2p | sync-test | Testing utilities for sync |
ethrex-networking/p2p | experimental-discv5 | Enable discv5 node discovery (experimental) |
Adding New Functionality
When adding new features, consider:
-
Where does it belong?
- Pure data types →
ethrex-common - Database operations →
ethrex-storage - EVM changes →
ethrex-vm - Chain logic →
ethrex-blockchain - API endpoints →
ethrex-networking/rpc - P2P messages →
ethrex-networking/p2p
- Pure data types →
-
Dependency direction
- Lower-level crates should not depend on higher-level ones
- Common types flow down, behaviors flow up
-
Testing
- Unit tests in the crate
- Integration tests in
tests/directory - EF tests for protocol compliance
Related Documentation
- System Overview - How crates work together
- Block Execution - Execution flow across crates
- Sync State Machine - Sync implementation details
Fundamentals
This section covers the core concepts and technical details behind ethrex as an Ethereum execution client. Here you’ll find explanations about sync modes, networking, databases, security, and more.
Note
This section is a work in progress and will be updated with more content and examples soon.
Databases
Ethrex uses a versioning system to ensure we don’t run on invalid data if we restart the node after a breaking change to the DB structure. This system consists of a STORE_SCHEMA_VERSION constant, defined in crates/storage/lib.rs that must be increased after any breaking change and that is checked every time we start the node.
Networking
The network crate handles the ethereum networking protocols. This involves:
- Discovery protocol: built on top of udp and it is how we discover new nodes.
- devP2P: sits on top of tcp and is where the actual blockchain information exchange happens.
Implementation follows the official spec which can be found here. Also, we’ve been inspired by some geth code.
Discovery protocol
In the next section, we’ll be looking at the discovery protocol (discv4 to be more specific) and the way we have it set up. There are many points for improvement and here we discuss some possible solutions to them.
At startup, the discovery server launches three concurrent tokio tasks:
- The listen loop for incoming requests.
- A revalidation loop to ensure peers remain responsive.
- A recursive lookup loop to request new peers and keep our table filled.
Before starting these tasks, we run a startup process to connect to an array of initial nodes.
Before diving into what each task does, first, we need to understand how we are storing our nodes. Nodes are stored in an in-memory matrix which we call a Kademlia table, though it isn’t really a Kademlia table as we don’t thoroughly follow the spec but we take it as a reference, you can read more here. This table holds:
- Our
node_id: The node’s unique identifier computed by obtaining the keccak hash of the 64 bytes starting from index 1 of the encoded pub key. - A vector of 256
buckets which holds:peers: a vector of 16 elements of typePeersDatawhere we save the node record and other related data that we’ll see later.replacements: a vector of 16 elements ofPeersDatathat are not connected to us, but we consider them as potential replacements for those nodes that have disconnected from us.
Peers are not assigned to any bucket but they are assigned based on its to our node_id. Distance is defined by:
#![allow(unused)]
fn main() {
pub fn distance(node_id_1: H512, node_id_2: H512) -> usize {
    let xor = node_id_1 ^ node_id_2;
    let distance = U256::from_big_endian(xor.as_bytes());
    distance.bits().saturating_sub(1)
}
}
Startup
Before starting the server, we do a startup where we connect to an array of seeders or bootnodes. This involves:
- Receiving bootnodes via CLI params
- Inserting them into our table
- Pinging them to notify our presence, so they acknowledge us.
This startup is far from being completed. The current state allows us to do basic tests and connections. Later, we want to do a real startup by first trying to connect to those nodes we were previously connected. For that, we’d need to store nodes on the database. If those nodes aren’t enough to fill our table, then we also ping some bootnodes, which could be hardcoded or received through the cli. Current issues are opened regarding startup and nodes db.
Listen loop
The listen loop handles messages sent to our socket. The spec defines 6 types of messages:
- Ping: Responds with a
pongmessage. If the peer is not in our table we add it, if the corresponding bucket is already filled then we add it as a replacement for that bucket. If it was inserted we send apingfrom our end to get an endpoint proof. - Pong: Verifies that the
pongcorresponds to a previously sentping, if so we mark the peer as proven. - FindNodes: Responds with a
neighborsmessage that contains as many as the 16 closest nodes from the given target. A target is a pubkey provided by the peer in the message. The response can’t be sent in one packet as it might exceed the discv4 max packet size. So we split it into different packets. - Neighbors: First we verify that we have sent the corresponding
find_nodemessage. If so, we receive the peers, store them, and ping them. Also, everyfind_noderequest may have a tokioSenderattached, if that is the case, we forward the nodes from the message through the channel. This becomes useful when waiting for afind_noderesponse, something we do in the lookups. - ENRRequest: currently not implemented see here.
- ENRResponse: same as above.
Re-validations
Re-validations are tasks that are implemented as intervals, that is: they run an action every x whichever unit of time (currently configured to run every 30 seconds). The current flow of re-validation is as follows
- Every 30 seconds (by default) we ping the three least recently pinged peers: this may be fine now to keep simplicity, but we might prefer to choose three random peers instead to avoid the search which might become expensive as our buckets start to fill with more peers.
- In the next iteration we check if they have answered
- if they have: we increment the liveness field by one.
- otherwise: we decrement the liveness by a third of its value.
- If the liveness field is 0, we delete it and insert a new one from the replacements table.
Liveness checks are not part of the spec but are taken from geth, see here. This field is useful because it provides us with good criteria of which nodes are connected and we “trust” more. This trustiness is useful when deciding if we want to store this node in the database to use it as a future seeder or when establishing a connection in p2p.
Re-validations are another point of potential improvement. While it may be fine for now to keep simplicity at max, pinging the last recently pinged peers becomes quite expensive as the number of peers in the table increases. And it also isn’t very “just” in selecting nodes so that they get their liveness increased so we trust them more and we might consider them as a seeder. A possible improvement could be:
- Keep two lists: one for nodes that have already been pinged, and another one for nodes that have not yet been revalidated. Let’s call the former “a” and the second “b”.
- In the beginning, all nodes would belong to “a” and whenever we insert a new node, they would be pushed to “a”.
- We would have two intervals: one for pinging “a” and another for pinging to nodes in “b”. The “b” would be quicker, as no initial validation has been done.
- When picking a node to ping, we would do it randomly, which is the best form of justice for a node to become trusted by us.
- When a node from
bresponds successfully, we move it toa, and when one fromadoes not respond, we move it tob.
This improvement follows somewhat what geth does, see here.
Recursive Lookups
Recursive lookups are as with re-validations implemented as intervals. Their current flow is as follows:
- Every 30min we spawn three concurrent lookups: one closest to our pubkey and two others closest to randomly generated pubkeys.
- Every lookup starts with the closest nodes from our table. Each lookup keeps track of:
- Peers that have already been asked for nodes
- Peers that have been already seen
- Potential peers to query for nodes: a vector of up to 16 entries holding the closest peers to the pubkey. This vector is initially filled with nodes from our table.
- We send a
find_nodeto the closest 3 nodes (that we have not yet asked) from the pubkey. - We wait for the neighbors’ response and push or replace those who are closer to the potential peers.
- We select three other nodes from the potential peers vector and do the same until one lookup has no node to ask.
The way to do lookups isn’t part of the spec. Our implementation aligns with geth approach, see here.
An example of how you might build a network
Finally, here is an example of how you could build a network and see how they connect to each other:
We’ll have three nodes: a, b, and c, we’ll start a, then b setting a as a bootnode, and finally we’ll start c with b as bootnode we should see that c connects to both a and b and so all the network should be connected.
node a:
cargo run --release -- --network ./fixtures/genesis/kurtosis.json
We get the enode by querying the node_info and using jq:
curl -s http://localhost:8545 \
-X POST \
-H "Content-Type: application/json" \
--data '{"jsonrpc":"2.0","method":"admin_nodeInfo","params":[],"id":1}' \
| jq '.result.enode'
node b:
We start a new server passing the enode from node a as an argument. Also changing the database dir and the ports is needed to avoid conflicts.
cargo run --release -- --network ./fixtures/genesis/kurtosis.json --bootnodes=`NODE_A_ENODE` \
--datadir=ethrex_b --authrpc.port=8552 --http.port=8546 --p2p.port=30305 --discovery.port=30306
node c
Finally, with node_c we connect to node_b. When the lookup runs, node_c should end up connecting to node_a:
cargo run --release -- --network ./fixtures/genesis/kurtosis.json --bootnodes=`NODE_B_ENODE` \
--datadir=ethrex_c --authrpc.port=8553 --http.port=8547 --p2p.port=30308 --discovery.port=30310
We get the enode by querying the node_info and using jq:
curl -s http://localhost:8546 \
-X POST \
-H "Content-Type: application/json" \
--data '{"jsonrpc":"2.0","method":"admin_nodeInfo","params":[],"id":1}' \
| jq '.result.enode'
You could also spawn nodes from other clients and it should work as well.
Sync Modes
Full sync
Full syncing works by downloading and executing every block from genesis. This means that full syncing will only work for networks that started after The Merge, as ethrex only supports post merge execution.
Snap sync
For snap sync, you can view the main document here.
Snap Sync
API reference: https://github.com/ethereum/devp2p/blob/master/caps/snap.md
Terminology:
- Peers: Other Ethereum execution clients we are connected to, and which can respond to snap requests.
- Pivot: The block we have chosen to snap-sync to. The pivot block changes continually as it becomes too old, because nodes don’t serve old data (i.e. more than 128 blocks in the past). Read below for more details on this.
Concept
What
Executing all blocks to rebuild the state is slow. It is also not possible on ethrex, because we don’t support pre-merge execution. Therefore, we need to download the current state from our peers. The largest challenge in snap sync is downloading the state (the account state trie and storage state tries). Secondary concerns are downloading headers and bytecodes.
First solution: Fast-Sync
Fast-sync is the original method used in Ethereum to download a Patricia Merkle trie. The idea is to download the trie top-down, starting from the root, then recursively downloading child nodes until the entire trie is obtained.


There are two problems with this:
- Peers stop responding to node requests at some point. When requesting a trie node, you specify the state root for which you want the node. If the root is 128 or more blocks old, peers will not serve the request.
- Scanning the entire trie to find missing nodes is slow.
For the first problem: once peers stop serving nodes for a given root1, we stop fast-syncing, update the pivot, and restart the process. The naïve approach would be to download the new root and recursively fetch all its children, checking each time whether they already exist in the DB.
Example of a possible state after stopping fast sync due to staleness.

In the example, even if we find that node { hash: 0x317f, path: 0 } is correct, we still need to check all its children in the DB (in this case none are present).
To solve the second problem, we introduce an optimization, which is called the “Membatch”2. This allows us to maintain a new invariant:
If a node is present in the DB, then that node and all its children must be present.
This removes the need to explore entire subtrees: when walking down the trie, if a node is in the DB, the whole subtree can be skipped.
To maintain this invariant, we do the following:
- When we get a new node, we don’t immediately store it in the database. We keep track of the amount of every node’s children that are not yet in the database. As long as it’s not zero, we keep it in a separate in-memory structure “Membatch” instead of on the db.
- When a node has all of its children in the db, we commit it and recursively go up the tree to see if its parent needs to be committed, etc.
- When the nodes are written to the database, all its parents are deleted from the db, which preserves the subtree invariant. Because lower down nodes are always written first, we never delete a valid node.
Example of a possible state after stopping fast sync due to staleness with membatch.

Speeding up: Snap-Sync
Fast-sync is slow (ethrex fast-sync of a fresh “hoodi” state takes ~45 minutes—4.5× slower than snap-sync). To accelerate it, we use a key property of fast-sync:
Fast-sync can “heal” any partial trie that obeys the invariant, even if that trie is not consistent with any real on-chain state.
Snap sync exploits this by:
- downloading only the leaves (the accounts and storage slots) from any recent state
- assembling a trie from these leaves
- running fast-sync (“healing”) to repair it into a consistent trie. In our code, we call the fast-sync step “healing”.
Example run:
- We download the 4 accounts in the state trie from two different blocks

- We rebuild the trie

- We run the healing algorithm and get a correct tree at the end of it
This method alone provides up to a 4-5 times boost in performance, as computing the trie is way faster than downloading it.
Implementation
Generalized Flowchart of snapsync

Flags
When developing snap sync there are flags to take into account that are used only for testing:
-
If the
SKIP_START_SNAP_SYNCenvironment variable is set and isn’t empty, it will skip the step of downloading the leaves and will immediately begin healing. This simulates the behaviour of fast-sync. -
If debug assertions are on, the program will validate that the entire state and storage tries are valid by traversing the entire trie and recomputing the roots. If any is found to be wrong, it will print an error and exit the program. This is used for debugging purposes; a validation error here means that there is 100% a bug in snap sync.
-
--syncmode [full, default:snap]which defines what kind of sync we use. Full is executing each block, and isn’t possible on a fresh sync for mainnet and sepolia.
File Structure
The sync module is a component of the ethrex-p2p crate, found in crates/networking/p2p folder. The main sync functions are found in:
crates/networking/p2p/sync.rscrates/networking/p2p/peer_handler.rscrates/networking/p2p/sync/state_healing.rscrates/networking/p2p/sync/storage_healing.rscrates/networking/p2p/sync/code_collector.rs
Syncer and Sync Modes
The struct that handles the needed handles for syncing is the Syncer, and it has a variable to indicate if the snap mode is enabled. The Sync Modes are defined in sync.rs as follows.
#![allow(unused)]
fn main() {

/// Manager in charge the sync process
#[derive(Debug)]
pub struct Syncer {
    /// This is also held by the SyncManager allowing it to track the latest syncmode, without modifying it
    /// No outside process should modify this value, only being modified by the sync cycle
    snap_enabled: Arc<AtomicBool>,
    peers: PeerHandler,
    // Used for cancelling long-living tasks upon shutdown
    cancel_token: CancellationToken,
    blockchain: Arc<Blockchain>,
    /// This string indicates a folder where the snap algorithm will store temporary files that are
    /// used during the syncing process
    datadir: PathBuf,
}

pub enum SyncMode {
    #[default]
    Full,
    Snap,
}
}
The flow of the program in default mode is to start by doing snap sync, then we switch to fullsync at the end and continue catching up by executing blocks.
Downloading Headers
The first step is downloading all the headers, through the request_block_headers function. This function does the following steps:
- Request from peers the number of the sync_head that we received from the consensus client
- Divide the headers into discrete “chunks” to ask our peers
- Currently, the headers are divided into 800 chunks3
- Queue those chunks as tasks into a channel
- These tasks ask the peers for their data, and respond through a channel
- Read from the channel to get a task
- Finds the best free peers
- Spawn a new async job to ask the peer for the task
- If the channel for new is empty, check if everything is downloaded
- Read from the channel of responses
- Store the read result

Downloading Account Values
API
When downloading the account values, we use the snap function GetAccountRange. This request receives:
- rootHash: state_root of the block we’re trying to download
- startingHash: Account hash4 of the first to retrieve
- limitHash: Account hash after which to stop serving data
- responseBytes: Soft limit at which to stop returning data
This method returns the following
- accounts: List of consecutive accounts from the trie
- accHash: Hash of the account address (trie path)
- accBody: Account body in slim format
- proof: List of trie nodes proving the account range
The proof is a merkle proof of the accounts provided, and the root of that merkle must equal to the rootHash.
In ethrex this is checked by the verify_range function.
#![allow(unused)]
fn main() {
/// Verifies that the key value range belongs to the trie with the given root given the edge proofs for the range
/// Also returns true if there is more state to be fetched (aka if there are more keys to the right of the given range)
pub fn verify_range(
    root: H256,
    left_bound: &H256,
    keys: &[H256],
    values: &[ValueRLP],
    proof: &[Vec<u8>],
) -> Result<bool, TrieError>
}
We know we have finished a range if the last of the accounts downloaded is to the right of the bound we have set to the request, or if the verify_range returns true.
Dump to file
To avoid having all of the accounts in memory, when their size in memory exceeds 64MiB we dump them to a new file.
These files are a subfolder of the datadir folder called "account_state_snapshots".
For an optimization for faster insertion, these are stored ordered in the RocksDB sst file format.
Flowchart

Insertion of Accounts
The sst files in the "account_state_snapshots" subfolder are ingested into a RocksDB database. This provides an ordered array that is used for insertion.
More detailed documentation found in sorted_trie_insert.md.
Downloading Storage Slots
The download of the storage slots is conceptually similar to the download of accounts, but very different in implementation. The method uses the snap function GetStorageRanges. This request has the following parameters:
- rootHash: state_root of the block we’re trying to download
- accountHashes: List of all the account address hashes of the storage tries to serve
- startingHash: Storage slot hash of the first to retrieve
- limitHash: Storage slot hash after which to stop serving
- responseBytes: Soft limit at which to stop returning data
The parameters startingHash and limitHash are only read when accountHashes is a single account.
The return is similar to the one from GetAccountRange, but with multiple results, one for each account provided, with the following parameters:
- slots: List of list of consecutive slots from the trie (one list per account)
- slotHash: Hash of the storage slot key (trie path)
- slotData: Data content of the slot
- proof: List of trie nodes proving the slot range
From these parameters, there is a couple of difficulties that pop up.
- We need to know which accounts have storage that needs to be downloaded
- We need to know what storage root each account has to be able to verify it
To solve these issues we take two actions:
- Before we download the storage slots we ensure that the state trie is in a consistent complete state. This is accomplished by doing the insertion of accounts step first and then healing the trie. If during the storage slot download the pivot becomes stale, we heal the trie again with the new pivot, to keep the trie up to date.
- When inserting the accounts, we grab a list of all the accounts with their storage root. If the account is healed, we marked the storage root as
None, to indicate we should check in the DB what is the state of the storage root.
The time traveling problem
During snap sync development, we kept running into a problematic edge case: what we call “time traveling”. This is when a certain account is in state A at a certain pivot, then changes to B in the next pivot, then goes back to A on a subsequent pivot change. This was a huge source of problems because it broke an invariant we assumed to be true, namely:
- If an account changes its state on pivot change, we will encounter it during state healing. This is NOT true if the trie is hash based.
The reason for this is the time traveling scenario. When an account goes back to a state we already have on our database, we do not heal it (because we already have it), even though its state has changed. This means the code won’t realize the account has changed its storage root and won’t update it.
This should not be a problem in a path based trie (which we currently have), but it’s important to keep it in mind and make sure that whatever code we write keeps this time traveling edge case in mind and solves it.
Repeated Storage Roots
A large amount of the accounts with storage have exactly the same storage as other accounts.5 As such, when we are creating tasks for download, it’s important to group the tasks by storage root and not download them twice.
Big Accounts
Storage trie sizes have a very uneven distribution. Around 70% of all ethereum mainnet contracts have only 1 or 2 storage slots. However, a few contracts have more storage slots than all account leaves in the entire state trie. As such, the code needs to take this pareto distribution into account to download storage tries fast.
At the beginning of the algorithm, we divide the accounts into chunks of 300 storage roots and their corresponding accounts. We start downloading the storage slots, until we find an account whose storage doesn’t fit into a single request. This will be indicated by the proof field having the data indicating that there are still more nodes to download in that account.

When we reach that situation, we chunk the big account based on the “density”6 of storage slots we downloaded, following this code to get chunks of 10,000 slots7. We create the tasks to download those intervals, and store all of the intervals in a struct to check when everything for that account was properly downloaded.
#![allow(unused)]
fn main() {
    // start_hash_u256 is the hash of the address of the last slot
    // slot_count is the amount of slots we have downloaded
    // The division gives us the density (maximum possible slots/actual slots downloaded)
    // we want chunks of 10.000 slots, so we multiply those two numbers
    let storage_density = start_hash_u256 / slot_count;
    let slots_per_chunk = U256::from(10000);
    let chunk_size = storage_density
        .checked_mul(slots_per_chunk)
        .unwrap_or(U256::MAX);
}
Tasks API
#![allow(unused)]
fn main() {
struct StorageTask {
    // Index of the first storage account we want to download
    start_index: usize,
    // Index of the last storage account we want to download (not inclusive)
    end_index: usize,
    // startingHash, used when the task is downloading a single account
    start_hash: H256,
    // end_hash is Some if the task is to download a big task
    end_hash: Option<H256>,
}

struct StorageTaskResult {
    // Index of the first storage account we want to download
    start_index: usize,
    // Slots we have successfully downloaded with the hash of the slot + value
    account_storages: Vec<Vec<(H256, U256)>>,
    // Which peer answered the task, used for scoring
    peer_id: H256,
    // Index of the first storage account we still need to download
    remaining_start: usize,
    // Index of the last storage account we still need to download
    remaining_end: usize,
    // remaining_hash_range[0] is the hash of the last slot we downloaded (so we need to download starting from there)
    // remaining_hash_range[1] is the end_hash from the original StorageTask
    remaining_hash_range: (H256, Option<H256>),
}
}
Big Accounts Flow

Retry Limit
Currently, if ethrex has been downloading storages for more than 2 pivots, the node will stop trying to download storage, and fallback to heal (fast sync) all the storage accounts that were still missing downloads. This prevents snap sync from hanging due to an edge case we do not currently handle if an account time travels. See the “snap sync concerns” document for details on what this edge case is.
Downloading Bytecodes
Whenever an account is downloaded or healed we check if the code is not empty. If it isn’t, we store it for future download. This is added to a list, and when the list grows beyond a certain size it is written to disk. After the healing is done and we have a complete state and storage tree, we start with the download of bytecodes, chunking them to avoid memory overflow.
Forkchoice update
Once the entire state trie, all storage tries and contract bytecodes are downloaded, we switch the sync mode from snap to full, and we do an apply_forkchoice to mark the last pivot as the last block.
-
We update pivots based only on the timestamp, not on the peer response. According to the spec, stale roots return empty responses, but Byzantine peers may return empty responses at arbitrary times. Therefore, we rely on the rule that nodes must keep at least 128 blocks. Once
time > timestamp + 128 * 12we mark the pivot as stale. ↩ -
The membatch is an idea taken from geth, and the name comes from their code. The name should be updated to “pendingNodes” as it reflects its current use. ↩
-
This currently isn’t a named constant, we should change that ↩
-
All accounts and storages are sent and found through the hash of their address. Example: the account with address 0xf003 would be found through the 0x26c2…38c1 hash, and would be found before the account with address 0x0001 whose hash would be 0x49d0…49d5 ↩
-
This may be for a variety of reasons, but the most likely is ERC20 tokens that were deployed and never used. ↩
-
actually specific volume (maximum possible slots/actual slots downloaded) ↩
-
10_000 slots is a number chosen without hard data, we should review that number. ↩
Can an account disappear from Ethereum's state trie?
Can you delete accounts in Ethereum? Yes
How it happens
Ethereum accounts are broadly divided into two categories:
- Externally Owned Accounts (EOA): accounts for general users to transfer eth and call contracts.
- Contracts: which execute code and store data.
Creating EOA is done through sending ETH into a new address, at which point the account is created and added into the state trie.
Creating a contract can be done through the CREATE and CREATE2 opcode. Notably, those opcodes check that the account is created at an address where the code is empty and the nonce is zero, but it doesn’t check balance. As such, a contract can be created through taking over an existing account.
During the creation of a contract, the init_code is run which can include the self destruct opcode that deletes the contract in the same transaction it was created. Normally, this deletes an account that was created in the same transaction (because contracts are usually created over empty accounts) but in this case the account already existed because it already had some balance. This is the only edge case in which an account can go from existing to non-existing from one block to another after the Cancun fork.
How we found it
Snap-sync is broadly divided into two stages:
- Downloading the leaves of the state (account states) and storage tries (storage slots)
- Healing (reconciling the state).
Healing is needed because the leaves can be downloaded from disparate blocks, and to “fix” only the nodes of the trie that changed between blocks. In depth explanation.
We were working under the assumption that accounts were never deleted, so we adopted some specific optimizations. During the state healing stage every account that was “healed” was added into a list of accounts that needed to be checked for storage healing. When healing the storage of those accounts the algorithm requested their account states and expected them to be there to see if they had any storage that needed healing. This led to the storage healing threads panicking when they failed to find the account that was deleted.
During the test of snapsync mainnet, we started seeing that storage healing was panicking, so we added some logs to see what account hashes were being accessed and when were they healed vs accessed. Exploring the database we saw that the offending account was present in a previous state and missing in the next one, with the corresponding merkle proof matching the block state root. Originally we suspected a reorg, but searching the blocks we saw they were finalized in the chain.
The account state present indicated an account with nonce 0, no code and no storage but with balance. We didn’t have access to the account address, as the state trie only stores the hash of the account address so we turned to another strategy to find it. Using etherscan’s API allowing to search internal transactions from a block range, we explored the range where we knew the account existed in the state trie. Hashing all of the to and from of the transactions we found the transaction that deleted the account with a self destruct. Despite the account becoming a contract just during that transaction, we saw that 900 blocks before it was created with a transfer. The result of the self destruct was the transfer of 0.044 ETH from one account to another.
The specific transaction that created the contract: https://etherscan.io/tx/0xf23b2c233410141cda0c6d24f21f0074c494565bfd54ce008c5ce1b30b23b0da
Snap Sync Concerns
Code Improvement opportunities
Storage downloads
When downloading storages, there’s a possibility that storage leaves never finish downloading. This can happen if an account time travels (i.e. if it goes from state A to state B on a pivot change, then back to state A on a subsequent pivot). The reason for this is that we have an in-memory cache where we keep track of the storage root for every account that needs to be downloaded. On every state healing phase on a pivot change, we update the storage root of every account we encounter. However, if an account time travels, we will not encounter it during healing because we already had it, and thus our storage root for it will be wrong.
NOTE: this should no longer be a problem now that our trie is path based, because on every state healing phase we erase the account’s previous state. However, it’s important to keep this scenario in mind when developing snap sync; any change in how we handle our trie or our assumptions may run into a problem it does not properly handle time traveling accounts.
Handling the pivot and reorgs
We are currently asking the pivot from our peers. We should have a system for handling the pivot from our consensus client. We should also be able to understand if the new pivot received is a reorg. In that case, we can’t fullsync, but we can fast-sync between those pivots relatively easily.
Potential Bytecode Nonresponse
We are currently asking for all the bytecodes that we have seen, never checking if those bytecodes are currently in the tree. This isn’t a problem for most codes that are immutable, but EOA may change their code to be a delegated, and the old code may be deleted from other peers in that scenario. We should consider pruning the bytecode requests if one is downloaded during healing.
Performance
For performance, having an efficient cache of accounts that need to have their storage downloaded in memory is key, and we should avoid going to the db as much as possible. In particular in storage healing we start by trying to get all of the storage healing roots, and this can be sped up considerably if we avoid going to the db.
Improving debug
The functions validate_state_root and validate_storage_roots are very slow, as they rebuild the entire state trie in memory.
Code Quality
In general, snap sync lacks explanation comments that detail the functioning of the algorithm. Variables and structs should be renamed to make it properly readable.
Storage downloads
Request storages is a very hard function to read, as the data structures were constantly modified to introduce speed optimizations. As such, this function is critical to restructure and manage it taking into account memory concerns.
This function also has a lot of numeric constants inserted in the code directly, and should be handled better by having defined consts with explanations.
Healing
There are two healing challenges. We should have a single main algorithm for healing, not have the code duplicated across two files. On top of that, the Membatch structure should be replaced with “PendingNodes” as it’s a far more descriptive name.
Memory Concerns
Storage accounts
Currently, we use a struct accounts_by_root_hash that has an unbounded size in memory. When rewriting this algorithm we should make sure that we never use more than a certain amount of memory for it; the rest should be on disk.
Sorted Trie Insertion
This document describes the algorithm implemented in crates/common/trie/trie_sorted.rs
which is used to speed up the insertion time in snap sync.
During that step we are inserting all of the accounts state and storage
slots downloaded into the Ethereum world state Merkle Patricia Trie.
To know how that trie works, it’s recommended to read this primer first.
Concept
Naive algorithm: we insert keys in arbitrary (unsorted) order. This version requires O(n*log(n)) reads and writes to disk. This is because each insertion creates a new leaf, which modifies the hash of its parent branch recursively. We could avoid reads to disk by having the trie in memory, but this is unviable for large amounts of state data.
Example of the Naive implementation:

If the input data is sorted, the computation can be optimized to be O(n). In the example, just by reading 0x0EBB and 0x172E, we know that there is a branch node as root (because they start with different nibbles), and that the leaf will have a partial path of 0xEBB (because no node exists between 0x0EBB and 0x172E if it’s sorted). The root branch node we know exists and will be modified, so we don’t write until we have read all input.
Implementation
The implementation maintains three pointers:
- The current element being processed.
- The next input value.
- The parent of the current element.
All parents that can still be modified are stored in a “parent stack”. Based on these, the algorithm can determine the next write operation to perform.
Scenarios
Depending on the state of the three current pointers, one of 3 scenarios can happen:
Scenario 1: Current and next value are siblings with the current parent being the parent of both values. This happens when the parent and both values share the same number of nibbles at the beginning of their paths. In our example, all node paths start with 0x1 and then diverge.
In this scenario, we can compute the leaf for the current value, write it, update the parent to include a pointer to that leaf, and then continue.

Scenario 2: Current and next values are siblings of a new current parent. This happens when the parent shares less nibbles from their paths than what the siblings share. In our example, the current and next value share 0x17, while the parent only shares 0x1.
In this scenario, we know the leaf we need to compute from the current value so we write that. Furthermore, we know that we need a new branch at 0x17, so we create it and insert the leaf we just computed and insert it into the branch. The current parent is stored in the “parent stack”, and the new branch becomes the current parent.

Scenario 3: The current parent is not the parent of the next value. This happens when the parent doesn’t have all of the nibbles of its path.
In this scenario, we know the leaf we need to compute from the current value, so we write that. We change the current value to be the current parent, and the new current parent is popped from the “parent stack”.

These three scenarios keep repeating themselves until the trie is complete, at which point the algorithm returns a hash to the root node branch.
Inserting with extensions
In general, each write to disk is prepared to properly handle extensions as the write function knows what it’s writing and what was its parent and full path. As such, it can check if the insertion is a branch and if an extension is needed.
A specific edge case is the root node, which is assumed to always be a branch node, but the code has a special case check to see if the root node has a single child, in which case it changes to an extension or leaf as needed, while modifying the other nodes in the trie.
Concurrency
The slowest step in this process is flushing nodes to disk. To avoid stalling during writes, the algorithm uses an internal buffer that holds a fixed number of nodes. Once the buffer is filled, it creates a new task that writes it to disk in the background.
We want to limit the amount of buffers we can have, so we allocate a fixed number of buffers at the beginning and we use a channel for the algorithm to receive empty buffers and the writing task clears the buffer and sends it back through the channels.
These tasks are executed using a custom thread pool defined in
/crates/concurrency/concurrency.rs
Healing Algorithm Explanation and Documentation (Before Path Based)
Healing is the last step of Snap Sync. Snap begins the downloading of the state and storage tries by downloading the leaves (account states and storage slots), and from those leaves we reconstruct the intermediate nodes (branches and extension). Afterwards we may be left with a malformed trie, as that step will resume the download of leaves with a new state root if the old one times out.
The purpose of the healing algorithm is to “heal” that trie so that it ends up in a consistent state.
Healing Conceptually
The malformed trie is going to have large sections of the trie which are in a correct state, as we had all of the leaves in those sections and those accounts haven’t been modified in the blocks that happened concurrently to the snapsync algorithm.

Example of a trie where 3 leaves were downloaded in block 1 and 1 was downloaded in block 2. The trie root is different from the state root of block 2, as one of the leaf nodes was modified in block 2.
The algorithm attempts to rebuild the trie through downloading the missing nodes, starting from the top. If the node is present in the database that means that we have that and all of their child nodes present in the database. If not, we download the node and check if the children of the root are present, applying the algorithm recursively.

Iteration 1 of algorithm

Iteration 2 of algorithm

Iteration 3 of algorithm

Final state of trie after healing
Implementation
The algorithm is implemented in ethrex currently in crates/networking/p2p/sync/state_healings.rs and crates/networking/p2p/sync/storage_healing.rs. All of our code examples are from the account state trie.
API
The API used is the ethereum capability snap/1, documented at https://github.com/ethereum/devp2p/blob/master/caps/snap.md and for healing the only method used is GetTrieNodes. This method allows us to ask our peers for nodes in a trie. We ask the nodes by path to the node, not by hash.
#![allow(unused)]
fn main() {
pub struct GetTrieNodes {
    pub id: u64,
    pub root_hash: H256,
    // [[acc_path, slot_path_1, slot_path_2,...]...]
    // The paths can be either full paths (hash) or
    // only the partial path (compact-encoded nibbles)
    pub paths: Vec<Vec<Bytes>>,
    pub bytes: u64,
}
}
Staleness
The spec allows the nodes to stop responding if the request is older than 128 blocks. In that case, the response to the GetTrieNodes will be empty. As such, our algorithm checks periodically if the block is stale, and stops executing. In that scenario, we must be sure that we leave the storage in a consistent state at any given time and don’t break our invariants.
#![allow(unused)]
fn main() {
// Current Staleness logic code
// We check with a clock if we are stale
if !is_stale && current_unix_time() > staleness_timestamp {
    info!("state healing is stale");
    is_stale = true;
}
// We make sure that we have stored everything that we need to the database
if is_stale && nodes_to_heal.is_empty() && inflight_tasks == 0 {
  info!("Finished inflight tasks");
  db_joinset.join_all().await;
  break;
}
}
Membatch
Currently, our algorithm has an invariant, which is that if we have a node in storage we have its and all of its children are present. Therefore, when we download for a node if some of its children are missing we can’t immediately store it on disk. Our implementation currently stores the nodes in temporary structure called membatch, which stores the node and how many of its children are missing. When a child gets stored, we reduce the counter of missing children of the parent. If that numbers reaches 0, we write the parent to the database.
In code, the membatch is currently a HashMap<Nibbles, MembatchEntryValue> with the value being the following struct
#![allow(unused)]
fn main() {
pub struct MembatchEntryValue {
    /// The node to be flushed into storage
    node: Node,
    /// How many of the nodes that are child of this are not in storage
    children_not_in_storage_count: u64,
    /// Which is the parent of this node
    parent_path: Nibbles,
}
}
Known Optimization Issues
- Membatch gets cleared between iterations, while it could be preserved and the hash checked.
- When checking if a child is present in storage, we can also check if it’s in the membatch. If it is, we can skip that download and act like we have immediately downloaded that node.
- Membatch is currently a
HashMap, aBTreeMapor other structures may be faster in real use. - Storage healing receives as a parameter a list of accounts that need to be healed and it has to get their state before it can run. Doing those reads could be more efficient.
Introduction
Layer 2 (L2) solutions are protocols built on top of Ethereum to increase scalability and reduce transaction costs. L2s process transactions off-chain and, in the case of Rollups, they periodically post data or proofs back to Ethereum Layer 1, inheriting its security.
Ethrex is a framework that lets you launch your own L2 rollup or blockchain. With ethrex, you can deploy, run, and experiment with custom L2 networks, taking advantage of Ethereum’s security while enabling high throughput and low fees.
Get started with your L2
Check out the Quickstart L2 guide to start your rollup in just a command, or jump right into the Deploy an L2 for more detailed instructions.
Deploy an L2
This section provides step-by-step guides for deploying different types of ethrex L2 chains, including vanilla, validium, and based configurations, as well as a shared bridge enabled L2 and migrations between versions. Each guide outlines the necessary commands and parameters to successfully deploy and start an L2 node.
Use this section to choose the deployment method that best fits your needs and follow the instructions accordingly.
- Overview
- Deploying a vanilla ethrex L2
- Deploying a validium ethrex L2
- Deploying a based ethrex L2
- Ethrex <> Aligned
- Deploying a shared bridge enabled L2
- Deploying a fee token
- Upgrades
Deploying an ethrex L2
As outlined in the introduction, ethrex L2 offers a wide range of features to its users. The most common is a classic centralized L2 managed by an operator, which can be an individual or a DAO. ethrex L2 can also function as a Validium, which is similarly centralized and operator-managed, with the key difference that network data is not posted to L1 during settlement.
In addition to these classic functionalities, ethrex L2 provides a novel and continually evolving feature in the industry: ethrex L2 as a based rollup. Unlike the previous options, this is a permissionless and decentralized L2 sequencer—anyone can run a node and participate in the network.
In this section, we will cover how to deploy any of these options.
Note
This section focuses solely on the step-by-step process for deploying ethrex L2 in any of its forms. For a deeper understanding of how each mode works under the hood, refer to the Fundamentals section. To learn more about the architecture of each mode, see the Architecture section.
Before proceeding, note that this guide assumes you have ethrex installed. If you haven’t installed it yet, follow one of the methods in the Installation Guide. If you’re looking to build from source, don’t skip this section—we’ll cover that method here, as it is independent of the deployment approach you choose later.
Building from source (skip if ethrex is already installed)
Prerequisites
Ensure you have the following installed on your system:
- Rust and Cargo (install via rustup)
- Solidity compiler v0.8.31 (refer to Solidity documentation)
- SP1 Toolchain (if you plan to use SP1 proving, refer to SP1 documentation)
- RISC0 Toolchain (if you plan to use RISC0 proving, refer to RISC0 documentation)
- CUDA Toolkit 12.9 (if you plan to use GPU acceleration for SP1 or RISC0 proving)
-
Clone the official ethrex repository:
git clone https://github.com/lambdaclass/ethrex cd ethrex -
Install the binary to your
$PATH:# For dummy proving COMPILE_CONTRACTS=true cargo install --locked --path cmd/ethrex --bin ethrex --features l2,l2-sql # For SP1 CPU proving (very slow, not recommended) COMPILE_CONTRACTS=true cargo install --locked --path cmd/ethrex --bin ethrex --features l2,l2-sql,sp1 # For RISC0 CPU proving (very slow, not recommended) COMPILE_CONTRACTS=true cargo install --locked --path cmd/ethrex --bin ethrex --features l2,l2-sql,risc0 # For SP1 and RISC0 CPU proving (very slow, not recommended) COMPILE_CONTRACTS=true cargo install --locked --path cmd/ethrex --bin ethrex --features l2,l2-sql,sp1,risc0 # For SP1 GPU proving COMPILE_CONTRACTS=true cargo install --locked --path cmd/ethrex --bin ethrex --features l2,l2-sql,sp1,gpu # For RISC0 GPU proving COMPILE_CONTRACTS=true cargo install --locked --path cmd/ethrex --bin ethrex --features l2,l2-sql,risc0,gpu # For SP1 and RISC0 GPU proving COMPILE_CONTRACTS=true cargo install --locked --path cmd/ethrex --bin ethrex --features l2,l2-sql,sp1,risc0,gpuBy default
cargo installplaces the binary at~/.cargo/bin/ethrex(make sure that directory is on your$PATH). Add--forceto the commands above if you need to overwrite a previous installation.
Warning
If you want your verifying keys generation to be reproducible, prepend
PROVER_REPRODUCIBLE_BUILD=trueto the above command:PROVER_REPRODUCIBLE_BUILD=true COMPILE_CONTRACTS=true cargo install --locked --path cmd/ethrex --bin ethrex --features l2,l2-sql,sp1,risc0,gpu
Important
Compiling with both
sp1andrisc0features only makes the binary capable of both. Settlement requires every proof you mark as required at deploy time (e.g., passing both--sp1 trueand--risc0 trueinethrex l2 deploywill require both proofs).
Deploying a vanilla ethrex L2
In this section, we’ll cover how to deploy a vanilla ethrex L2 on a public network such as Holesky, Sepolia, or Mainnet.
Prerequisites
This guide assumes that you have ethrex installed and available in your PATH. If you haven’t installed it yet, follow one of the methods in the Installation Guide. If you want to build the binary from source, refer to the Building from source section and select the appropriate build option.
1. Deploy the Contracts
First, deploy and initialize the contracts on L1 using the ethrex l2 deploy command (for more details on the ethrex CLI, see the ethrex CLI Reference section):
ethrex l2 deploy \
  --eth-rpc-url <L1_RPC_URL> \
  --private-key <PRIVATE_KEY> \
  --genesis-l2-path <PATH_TO_L2_GENESIS_FILE> \
  --bridge-owner <COMMON_BRIDGE_OWNER_ADDRESS> \
  --on-chain-proposer-owner <ON_CHAIN_PROPOSER_OWNER_ADDRESS> \
  --committer.l1-address <L1_COMMITTER_ADDRESS> \
  --proof-sender.l1-address <L1_PROOF_SENDER_ADDRESS> \
  --env-file-path <PATH_TO_ENV_FILE> \
  --l2-gas-limit <L2_GAS_LIMIT> \
  --randomize-contract-deployment
Caution
Ensure you control the Committer and Proof Sender accounts, as they will be authorized as sequencers. These accounts will have control over the chain state.
Important
If you plan to prove your L2 using SP1, RISC0, or TDX, add the following extra arguments to the command above:
--sp1 trueto require SP1 proofs for validating batch execution and state settlement.
--sp1.verifier-addressto use an existing verifier instead of deploying one on the public network. Succinct Labs recommends their deployed canonical verifier gateways; see the list here.
--risc0 trueto require RISC0 proofs for validating batch execution and state settlement.
--risc0.verifier-addressto use an existing verifier instead of deploying one on the public network. RISC0 recommends their deployed canonical verifier gateways; see the list here.
--tdx trueto require TEE proofs for validating batch execution and state settlement.
--tdx.verifier-addressto use an existing verifier instead of deploying one on the public network. Do not pass this flag if you want to deploy a new verifier.Enabling multiple proving backends will require running multiple provers, one for each backend. Refer to the Run multiple provers section for more details.
If you enable more than one proving system (e.g., both
--sp1 trueand--risc0 true), all selected proving systems will be required (i.e., every batch must include a proof from each enabled system to settle on L1).
Important
Retrieve the deployed contract addresses from the console logs or the .env file generated during deployment (in the directory where you ran the command) for use in the next step.
Note
- Replace
L1_RPC_URLwith your preferred RPC provider endpoint.- Replace
PRIVATE_KEYwith the private key of an account funded on the target L1. This key will sign the transactions during deployment.- Replace
PATH_TO_L2_GENESIS_FILEwith the path to your L2 genesis file. A genesis example is available in the fixtures directory of the official GitHub repository. This file initializes theOnChainProposercontract with the genesis state root.- The
CommonBridgeandOnChainProposercontracts are upgradeable and ownable, with implementations behind proxies initialized during deployment. ReplaceCOMMON_BRIDGE_OWNER_ADDRESSandON_CHAIN_PROPOSER_OWNER_ADDRESSwith the address of the account you want as the owner. The owner can upgrade implementations or perform administrative actions; for more details, see the Architecture section.- The sequencer components (
L1CommitterandL1ProofSender) require funded accounts on the target L1 to advance the network. ReplaceL1_COMMITTER_ADDRESSandL1_PROOF_SENDER_ADDRESSwith the addresses of those accounts.- Replace
PATH_TO_ENV_FILEwith the path where you want to save the generated environment file. This file contains the deployed contract addresses and other configuration details needed to run the L2 node.- Replace
L2_GAS_LIMITwith the desired L2 block gas limit (defaults to30000000). This value is stored in theCommonBridgecontract and can be updated later by the bridge owner.- L1 contract deployment uses the
CREATE2opcode for deterministic addresses. To deploy non-deterministically, include the--randomize-contract-deploymentflag.
2. Start the L2 node
Once the contracts are deployed, start the L2 node:
ethrex l2 \
  --l1.bridge-address <COMMON_BRIDGE_ADDRESS> \
  --l1.on-chain-proposer-address <ON_CHAIN_PROPOSER_ADDRESS> \
  --block-producer.coinbase-address <L2_COINBASE_ADDRESS> \
  --proof-coordinator.l1-private-key <L1_PROOF_SENDER_PRIVATE_KEY> \
  --committer.l1-private-key <L1_COMMITTER_PRIVATE_KEY> \
  --eth.rpc-url <L1_RPC_URL> \
  --network <PATH_TO_L2_GENESIS_FILE> \
  --no-monitor
Caution
Replace
L1_COMMITTER_PRIVATE_KEYandL1_PROOF_SENDER_PRIVATE_KEYwith the private keys for theL1_COMMITTER_ADDRESSandL1_PROOF_SENDER_ADDRESSused in the deployment step, respectively.
Important
The L1 Committer and L1 Proof Sender accounts must be funded for the chain to advance.
Note
Replace
COMMON_BRIDGE_ADDRESSandON_CHAIN_PROPOSER_ADDRESSwith the proxy addresses for the CommonBridge and OnChainProposer contracts from the deployment step.Replace
L2_COINBASE_ADDRESSwith the address that will collect L2 block fees. To access these funds on L1, you’ll need to withdraw them (see the Withdrawals section for details).Replace
L1_PROOF_SENDER_PRIVATE_KEYandL1_COMMITTER_PRIVATE_KEYwith the private keys for theL1_PROOF_SENDER_ADDRESSandL1_COMMITTER_ADDRESSfrom the deployment step.Replace
L1_RPC_URLandPATH_TO_L2_GENESIS_FILEwith the same values used in the deployment step.Tune throughput with the gas caps:
- The L2 block gas limit is stored on-chain in the
CommonBridgecontract (set during deployment via--l2-gas-limit, defaults to 30000000). The sequencer fetches this value on startup. See Upgrades for how to view and update it.--committer.batch-gas-limit(env:ETHREX_COMMITTER_BATCH_GAS_LIMIT): Sets the gas limit per batch sent to L1—should be at or above the block gas limit.You can use either the environment variables or the flags to configure these values.
That’s it! You now have a vanilla ethrex L2 up and running. However, one key component is still missing: state proving. The L2 state is considered final only after a batch execution ZK proof is successfully verified on-chain. Generating these proofs requires running a dedicated prover, which is covered in the Run an ethrex L2 Prover section.
Deploying a validium ethrex L2
In this section, we’ll cover how to deploy a validium ethrex L2 on a public network such as Holesky, Sepolia, or Mainnet.
Prerequisites
This guide assumes that you have ethrex installed and available in your PATH. If you haven’t installed it yet, follow one of the methods in the Installation Guide. If you want to build the binary from source, refer to the Building from source section and select the appropriate build option.
1. Deploy the Contracts
First, deploy and initialize the contracts on L1 using the ethrex l2 deploy command (for more details on the ethrex CLI, see the ethrex CLI Reference section):
ethrex l2 deploy \
  --validium true \
  --eth-rpc-url <L1_RPC_URL> \
  --private-key <PRIVATE_KEY> \
  --genesis-l2-path <PATH_TO_L2_GENESIS_FILE> \
  --bridge-owner <COMMON_BRIDGE_OWNER_ADDRESS> \
  --on-chain-proposer-owner <ON_CHAIN_PROPOSER_OWNER_ADDRESS> \
  --committer.l1-address <L1_COMMITTER_ADDRESS> \
  --proof-sender.l1-address <L1_PROOF_SENDER_ADDRESS> \
  --env-file-path <PATH_TO_ENV_FILE> \
  --l2-gas-limit <L2_GAS_LIMIT> \
  --randomize-contract-deployment
Caution
Ensure you control the Committer and Proof Sender accounts, as they will be authorized as sequencers. These accounts will have control over the chain state.
Important
If you plan to prove your L2 using SP1, RISC0, or TEE, add the following extra arguments to the command above:
--sp1 trueto require SP1 proofs for validating batch execution and state settlement.
--sp1.verifier-addressto use an existing verifier instead of deploying one on the public network. Succinct Labs recommends their deployed canonical verifier gateways; see the list here.
--risc0 trueto require RISC0 proofs for validating batch execution and state settlement.
--risc0.verifier-addressto use an existing verifier instead of deploying one on the public network. RISC0 recommends their deployed canonical verifier gateways; see the list here.
--tdx trueto require TEE proofs for validating batch execution and state settlement.
--tdx.verifier-addressto use an existing verifier instead of deploying one on the public network. Do not pass this flag if you want to deploy a new verifier.Enabling multiple proving backends will require running multiple provers, one for each backend. Refer to the Run multiple provers section for more details.
If you enable more than one proving system (e.g., both
--sp1 trueand--risc0 true), all selected proving systems will be required (i.e., every batch must include a proof from each enabled system to settle on L1).
Important
Retrieve the deployed contract addresses from the console logs or the .env file generated during deployment (in the directory where you ran the command) for use in the next step.
Note
- Replace
L1_RPC_URLwith your preferred RPC provider endpoint.- Replace
PRIVATE_KEYwith the private key of an account funded on the target L1. This key will sign the transactions during deployment.- Replace
PATH_TO_L2_GENESIS_FILEwith the path to your L2 genesis file. A genesis example is available in the fixtures directory of the official GitHub repository. This file initializes theOnChainProposercontract with the genesis state root.- The
CommonBridgeandOnChainProposercontracts are upgradeable and ownable, with implementations behind proxies initialized during deployment. ReplaceCOMMON_BRIDGE_OWNER_ADDRESSandON_CHAIN_PROPOSER_OWNER_ADDRESSwith the address of the account you want as the owner. The owner can upgrade implementations or perform administrative actions; for more details, see the Architecture section.- The sequencer components (
L1CommitterandL1ProofSender) require funded accounts on the target L1 to advance the network. ReplaceL1_COMMITTER_ADDRESSandL1_PROOF_SENDER_ADDRESSwith the addresses of those accounts.- Replace
PATH_TO_ENV_FILEwith the path where you want to save the generated environment file. This file contains the deployed contract addresses and other configuration details needed to run the L2 node.- Replace
L2_GAS_LIMITwith the desired L2 block gas limit (defaults to30000000). This value is stored in theCommonBridgecontract and can be updated later by the bridge owner.- L1 contract deployment uses the
CREATE2opcode for deterministic addresses. To deploy non-deterministically, include the--randomize-contract-deploymentflag.
2. Start the L2 node
Once the contracts are deployed, start the L2 node:
ethrex l2 \
  --validium \
  --l1.bridge-address <COMMON_BRIDGE_ADDRESS> \
  --l1.on-chain-proposer-address <ON_CHAIN_PROPOSER_ADDRESS> \
  --block-producer.coinbase-address <L2_COINBASE_ADDRESS> \
  --proof-coordinator.l1-private-key <L1_PROOF_SENDER_PRIVATE_KEY> \
  --committer.l1-private-key <L1_COMMITTER_PRIVATE_KEY> \
  --eth.rpc-url <L1_RPC_URL> \
  --network <PATH_TO_L2_GENESIS_FILE> \
  --no-monitor
Caution
Replace
L1_COMMITTER_PRIVATE_KEYandL1_PROOF_SENDER_PRIVATE_KEYwith the private keys for theL1_COMMITTER_ADDRESSandL1_PROOF_SENDER_ADDRESSused in the deployment step, respectively.
Important
The L1 Committer and L1 Proof Sender accounts must be funded for the chain to advance.
Note
Replace
COMMON_BRIDGE_ADDRESSandON_CHAIN_PROPOSER_ADDRESSwith the proxy addresses for the CommonBridge and OnChainProposer contracts from the deployment step.Replace
L2_COINBASE_ADDRESSwith the address that will collect L2 block fees. To access these funds on L1, you’ll need to withdraw them (see the Withdrawals section for details).Replace
L1_PROOF_SENDER_PRIVATE_KEYandL1_COMMITTER_PRIVATE_KEYwith the private keys for theL1_PROOF_SENDER_ADDRESSandL1_COMMITTER_ADDRESSfrom the deployment step.Replace
L1_RPC_URLandPATH_TO_L2_GENESIS_FILEwith the same values used in the deployment step.Tune throughput with the gas caps:
- The L2 block gas limit is stored on-chain in the
CommonBridgecontract (set during deployment via--l2-gas-limit, defaults to 30000000). The sequencer fetches this value on startup. See Upgrades for how to view and update it.--committer.batch-gas-limit(env:ETHREX_COMMITTER_BATCH_GAS_LIMIT): Sets the gas limit per batch sent to L1—should be at or above the block gas limit.You can use either the environment variables or the flags to configure these values.
That’s it! You now have a validium ethrex L2 up and running. However, one key component is still missing: state proving. The L2 state is considered final only after a batch execution ZK proof is successfully verified on-chain. Generating these proofs requires running a dedicated prover, which is covered in the Run an ethrex L2 Prover section.
Deploying a based ethrex L2
TBD
Running Ethrex in Aligned Mode
This guide extends the Deploy an L2 overview and shows how to run an ethrex L2 with Aligned mode enabled.
For a comprehensive technical deep-dive into the Aligned integration architecture, see Aligned Layer Integration.
It assumes:
- You already installed the
ethrexbinary to your$PATH(for example from the repo root withcargo install --locked --path cmd/ethrex --bin ethrex --features l2,l2-sql,sp1 --force). - You have the ethrex repository checked out locally for the
maketargets referenced below.
Important: Aligned mode only supports SP1 proofs. The
sp1feature must be enabled when building with Aligned mode.
- Check How to Run (local devnet) for development or testing.
- Check How to Run (testnet) for a prod-like environment.
How to run (testnet)
Important
This guide assumes there is an L1 running with all Aligned environment set.
1. Generate the prover ELF/VK
From the ethrex repository root run:
make -C crates/l2 build-prover-sp1 # optional: GPU=true
This will generate the SP1 ELF program and verification key under:
crates/l2/prover/src/guest_program/src/sp1/out/riscv32im-succinct-zkvm-elfcrates/l2/prover/src/guest_program/src/sp1/out/riscv32im-succinct-zkvm-vk-u32
2. Deploying L1 Contracts
Run the deployer with the Aligned settings:
COMPILE_CONTRACTS=true \
ETHREX_L2_ALIGNED=true \
ETHREX_DEPLOYER_ALIGNED_AGGREGATOR_ADDRESS=<ALIGNED_AGGREGATOR_ADDRESS> \
ETHREX_L2_SP1=true \
ETHREX_DEPLOYER_RANDOMIZE_CONTRACT_DEPLOYMENT=true \
ethrex l2 deploy \
  --eth-rpc-url <ETH_RPC_URL> \
  --private-key <YOUR_PRIVATE_KEY> \
  --on-chain-proposer-owner <ON_CHAIN_PROPOSER_OWNER>  \
  --bridge-owner <BRIDGE_OWNER_ADDRESS>  \
  --genesis-l2-path fixtures/genesis/l2.json \
  --proof-sender.l1-address <PROOF_SENDER_L1_ADDRESS>
Note
This command requires the
COMPILE_CONTRACTSenv variable to be set, as the deployer needs the SDK to embed the proxy bytecode. In this step we are initializing theOnChainProposercontract with theALIGNED_PROOF_AGGREGATOR_SERVICE_ADDRESSand skipping the rest of verifiers; you can find the address for the aligned aggregator service here. Save the addresses of the deployed proxy contracts, as you will need them to run the L2 node. Accounts for the deployer, on-chain proposer owner, bridge owner, and proof sender must have funds. Add--bridge-owner-pk <PRIVATE_KEY>if you want the deployer to immediately callacceptOwnershipon behalf of that owner; otherwise, they can accept later.
3. Deposit funds to the AggregationModePaymentService contract from the proof sender
Aligned uses a quota-based payment model. You need to deposit ETH to obtain quota for proof submissions using the Aligned CLI.
First, clone the Aligned repository and build the CLI:
git clone https://github.com/yetanotherco/aligned_layer.git
cd aligned_layer
git checkout 54ca2471624700536561b6bd369ed9f4d327991e
Then run the deposit command:
cd aggregation_mode/cli

cargo run --release -- deposit \
  --private-key <PROOF_SENDER_PRIVATE_KEY> \
  --network <NETWORK> \
  --rpc-url <RPC_URL>
Where <NETWORK> is one of: devnet, hoodi, or mainnet.
Example for Hoodi testnet:
cargo run --release -- deposit \
  --private-key 0x... \
  --network hoodi \
  --rpc-url https://ethereum-hoodi-rpc.publicnode.com
Note: The deposit command sends a fixed amount of ETH (currently 0.0035 ETH) to the payment service contract. The contract addresses are automatically resolved based on the network parameter.
Monitoring Quota Balance
To check your remaining quota, you can query the AggregationModePaymentService contract directly:
# Get the payment service contract address for your network from Aligned docs
# Then query the quota balance for your proof sender address
cast call <PAYMENT_SERVICE_ADDRESS> "getQuota(address)(uint256)" <PROOF_SENDER_ADDRESS> --rpc-url <RPC_URL>
Monitor your quota balance regularly. When the L1ProofSender runs out of quota, you’ll see AlignedSubmitProofError with an insufficient quota message in the logs. Deposit more funds before this happens to avoid proof submission failures.
4. Running a node
Run the sequencer using the installed ethrex binary:
ethrex l2 \
  --watcher.block-delay 0 \
  --network fixtures/genesis/l2.json \
  --l1.bridge-address <BRIDGE_ADDRESS> \
  --l1.timelock-address <TIMELOCK_ADDRESS> \
  --l1.on-chain-proposer-address <ON_CHAIN_PROPOSER_ADDRESS> \
  --eth.rpc-url <ETH_RPC_URL> \
  --aligned \
  --aligned-network <ALIGNED_NETWORK>  \
  --block-producer.coinbase-address <COINBASE_ADDRESS>  \
  --committer.l1-private-key <COMMITTER_PRIVATE_KEY>  \
  --proof-coordinator.l1-private-key <PROOF_COORDINATOR_PRIVATE_KEY>  \
  --aligned.beacon-url <ALIGNED_BEACON_URL> \
  --aligned.resubmission-timeout 86400 \
  --datadir ethrex_l2 \
  --no-monitor
Both committer and proof coordinator should have funds.
Aligned params explanation:
--aligned: Enables aligned mode, enforcing all required parameters.--aligned.beacon-url: URL of the beacon client used by the Aligned SDK to verify proof aggregations, it has to support/eth/v1/beacon/blobs--aligned-network: Parameter used by the Aligned SDK. Available networks:devnet,hoodi,mainnet.--aligned.resubmission-timeout: Timeout in seconds before resending a proof not yet verified on-chain. Required when--alignedis enabled. Aligned typically aggregates once per day, so set this accordingly (e.g.86400for 24h).--aligned.from-block: (Optional) Starting L1 block number for proof aggregation search. Helps avoid scanning old blocks from before proofs were being sent. If not set, the search starts from the beginning.
If you can’t find a beacon client URL which supports that endpoint, you can run your own with lighthouse and ethrex:
Create secrets directory and jwt secret
mkdir -p ethereum/secrets/
openssl rand -hex 32 | tr -d "\n" | tee ./ethereum/secrets/jwt.hex
lighthouse bn --network <NETWORK> --execution-endpoint http://localhost:8551 --execution-jwt ./ethereum/secrets/jwt.hex --checkpoint-sync-url <CHECKPOINT_URL> --http --purge-db-force --supernode
ethrex --authrpc.jwtsecret ./ethereum/secrets/jwt.hex --network <NETWORK>
5. Running the Prover
In another terminal start the prover:
make -C crates/l2 init-prover-sp1 GPU=true # The GPU parameter is optional
Then you should wait until Aligned aggregates your proof. Note that proofs are typically aggregated every 24 hours.
How to run (local devnet)
Important
This guide assumes you have already generated the prover ELF/VK. See: Generate the prover ELF/VK
Set Up the Aligned Environment
-
Clone the Aligned repository and checkout the tested revision:
git clone git@github.com:yetanotherco/aligned_layer.git cd aligned_layer git checkout 54ca2471624700536561b6bd369ed9f4d327991e -
Edit the
aligned_layer/network_params.rsfile to send some funds to thecommitterandintegration_testaddresses:prefunded_accounts: '{ "0xf39Fd6e51aad88F6F4ce6aB8827279cffFb92266": { "balance": "100000000000000ETH" }, "0x70997970C51812dc3A010C7d01b50e0d17dc79C8": { "balance": "100000000000000ETH" }, ... "0xa0Ee7A142d267C1f36714E4a8F75612F20a79720": { "balance": "100000000000000ETH" }, + "0x4417092B70a3E5f10Dc504d0947DD256B965fc62": { "balance": "100000000000000ETH" }, + "0x3d1e15a1a55578f7c920884a9943b3b35d0d885b": { "balance": "100000000000000ETH" }, }'You can also decrease the seconds per slot in
aligned_layer/network_params.rs:# Number of seconds per slot on the Beacon chain seconds_per_slot: 4Change
ethereum-genesis-generatorto 5.2.3ethereum_genesis_generator_params: # The image to use for ethereum genesis generator image: ethpandaops/ethereum-genesis-generator:5.2.3 -
Make sure you have the latest version of kurtosis installed and start the ethereum-package:
cd aligned_layer
make ethereum_package_start
If you need to stop it run
make ethereum_package_rm -
Start the payments poller (in a new terminal):
cd aligned_layer
make agg_mode_payments_poller_start_ethereum_package
This starts PostgreSQL, runs migrations, and starts the payments poller.
-
Start the Aligned gateway (in a new terminal):
cd aligned_layer
make agg_mode_gateway_start_ethereum_package
The gateway will listen on
http://127.0.0.1:8089. -
Build and start the proof aggregator in dev mode (in a new terminal):
cd aligned_layer # Build the dev aggregator binary (uses mock proofs, no actual proving) AGGREGATOR=sp1 cargo build --manifest-path ./aggregation_mode/Cargo.toml --release --bin proof_aggregator_dev # Start the aggregator make proof_aggregator_start_dev_ethereum_package AGGREGATOR=sp1Note: The dev mode aggregator uses mock proofs for faster iteration. For production-like testing, use
make proof_aggregator_start_ethereum_package SP1_PROVER=cuda AGGREGATOR=sp1instead (requires more resources and a CUDA-capable GPU).
Initialize L2 node
-
Deploy the L1 contracts, specifying the
AlignedProofAggregatorServicecontract address:COMPILE_CONTRACTS=true \ ETHREX_L2_ALIGNED=true \ ETHREX_DEPLOYER_ALIGNED_AGGREGATOR_ADDRESS=0xcbEAF3BDe82155F56486Fb5a1072cb8baAf547cc \ ETHREX_L2_SP1=true \ make -C crates/l2 deploy-l1Note
This command requires the COMPILE_CONTRACTS env variable to be set, as the deployer needs the SDK to embed the proxy bytecode.
You will see that some deposits fail with the following error:
2025-10-13T19:44:51.600047Z ERROR ethrex::l2::deployer: Failed to deposit address=0x0002869e27c6faee08cca6b765a726e7a076ee0f value_to_deposit=0
2025-10-13T19:44:51.600114Z  WARN ethrex::l2::deployer: Failed to make deposits: Deployer EthClient error: eth_sendRawTransaction request error: insufficient funds for gas * price + value: have 0 want 249957710190063
This is because not all the accounts are pre-funded from the genesis.
-
Deposit funds to the AggregationModePaymentService contract from the proof sender using the Aligned CLI:
# From the aligned_layer repository root cd aggregation_mode/cli cargo run --release -- deposit \ --private-key 0x39725efee3fb28614de3bacaffe4cc4bd8c436257e2c8bb887c4b5c4be45e76d \ --network devnet \ --rpc-url http://localhost:8545 -
Start the L2 node:
ETHREX_ALIGNED_MODE=true \
ETHREX_ALIGNED_BEACON_URL=http://127.0.0.1:58801 \
ETHREX_ALIGNED_NETWORK=devnet \
ETHREX_PROOF_COORDINATOR_DEV_MODE=false \
SP1=true \
make -C crates/l2 init-l2
Suggestion: When running the integration test, consider increasing the
--committer.commit-timeto 2 minutes. This helps avoid having to aggregate the proofs twice. You can do this by adding the following flag to theinit-l2-no-metricstarget:--committer.commit-time 120000 -
Start the SP1 prover in a different terminal:
make -C crates/l2 init-prover-sp1 GPU=true # The GPU flag is optional
Aggregate proofs:
After some time, you will see that the l1_proof_verifier is waiting for Aligned to aggregate the proofs. In production, proofs are typically aggregated every 24 hours. For local testing, the proof aggregator started in step 8 will process proofs automatically.
If the aggregator is not running or you need to trigger a new aggregation cycle, run:
cd aligned_layer
make proof_aggregator_start_dev_ethereum_package AGGREGATOR=sp1
This will reset the last aggregated block counter and start processing queued proofs.
If successful, the l1_proof_verifier will print the following logs:
INFO ethrex_l2::sequencer::l1_proof_verifier: Proof for batch 1 aggregated by Aligned with commitment 0xa9a0da5a70098b00f97d96cee43867c7aa8f5812ca5388da7378454580af2fb7 and Merkle root 0xa9a0da5a70098b00f97d96cee43867c7aa8f5812ca5388da7378454580af2fb7
INFO ethrex_l2::sequencer::l1_proof_verifier: Batches verified in OnChainProposer, with transaction hash 0x731d27d81b2e0f1bfc0f124fb2dd3f1a67110b7b69473cacb6a61dea95e63321
Behavioral Differences in Aligned Mode
Prover
- Generates
Compressedproofs instead ofGroth16(used in standard mode). - Required because Aligned accepts compressed SP1 proofs.
- Only SP1 proofs are supported for Aligned mode.
Note: RISC0 support is not currently available in Aligned’s aggregation mode. The codebase retains RISC0 code paths (verifier IDs, merkle proof handling, contract logic) for future compatibility when Aligned re-enables RISC0 support.
Proof Sender
- Sends proofs to the Aligned Gateway instead of directly to the
OnChainProposercontract. - Uses a quota-based payment model (requires depositing to the
AggregationModePaymentServicecontract). - Tracks the last proof sent using the rollup store.
Proof Verifier
- Spawned only in Aligned mode (not used in standard mode).
- Monitors whether the next proof has been aggregated by Aligned using the
ProofAggregationServiceProvider. - Once verified, collects all already aggregated proofs and triggers the advancement of the
OnChainProposercontract by sending a single transaction.

OnChainProposer
- Uses
verifyBatchesAligned()instead ofverifyBatches()(used in standard mode). - Receives an array of proofs to verify.
- Delegates proof verification to the
AlignedProofAggregatorServicecontract.
Supported Networks
The Aligned SDK supports the following networks:
| Network | Chain ID | Gateway URL |
|---|---|---|
| Mainnet | 1 | https://mainnet.gateway.alignedlayer.com |
| Hoodi | 560048 | https://hoodi.gateway.alignedlayer.com |
| Devnet | 31337 | http://127.0.0.1:8089 |
Failure Recovery
For guidance on handling Aligned Layer failures and outages, see the Aligned Failure Recovery Guide.
Aligned Layer Failure Recovery Guide
This guide provides operators with procedures for handling various Aligned Layer failure scenarios when running ethrex L2 in Aligned mode.
SDK Version: This documentation is based on Aligned Aggregation Mode SDK revision
54ca2471624700536561b6bd369ed9f4d327991e.
WARNING: This document is intended to be iterated and improved with use and with ethrex and Aligned upgrades. If you encounter a scenario not covered here or find that a procedure needs adjustment, please contribute improvements.
Table of Contents
- Understanding the Aligned Integration
- Scenario 1: Aligned Stops Then Recovers
- Scenario 2: Aligned Loses a Proof Before Verification
- Scenario 3: Aligned Permanent Shutdown
- Scenario 4: Insufficient Quota Balance
- Scenario 5: Proof Marked as Invalid by Aligned
- Monitoring and Detection
Understanding the Aligned Integration
Before handling failures, understand the proof lifecycle in Aligned mode:
1. Prover generates compressed SP1 proof
2. L1ProofSender submits proof to Aligned Gateway (HTTP)
3. Aligned Gateway queues proof for aggregation
4. Aligned Aggregator aggregates multiple proofs (typically every 24 hours)
5. Aggregated proof is posted to L1 (AlignedProofAggregationService)
6. L1ProofVerifier polls for aggregation status
7. Once aggregated, L1ProofVerifier calls verifyBatchesAligned() on OnChainProposer
Key Components:
- L1ProofSender: Submits SP1 proofs to Aligned Gateway via HTTP
- L1ProofVerifier: Polls Aligned for aggregation status and triggers on-chain verification
- Aligned Gateway: Receives and queues proofs via HTTP REST API
- Aligned Aggregator: Aggregates proofs and posts to L1
Note: Aligned mode only supports SP1 proofs.
Scenario 1: Aligned Stops Then Recovers
Symptoms
- L1ProofSender logs show connection errors to Aligned Gateway
- Proofs are generated but not being sent
AlignedGetNonceErrorin logs (failed to get nonce from gateway)AlignedSubmitProofErrorin logs (HTTP request to gateway failed)
Note:
AlignedFeeEstimateErrorindicates your Ethereum RPC endpoints are failing, not Aligned. Fee estimation uses your configured--eth.rpc-urlto query L1 gas prices.
Impact
- Proofs queue locally in the rollup store
- Batch verification on L1 stalls
- No data loss - proofs remain in local storage
Recovery Steps
No manual intervention required. The system handles this automatically:
- L1ProofSender continuously retries sending proofs at the configured interval (
--proof-coordinator.send-interval, default 30000ms) - Once Aligned recovers, proofs will be submitted in order
- L1ProofVerifier will resume polling and verification
What to Monitor
Check L1ProofSender status
curl -X GET http://localhost:5555/health | jq '.proof_sender'
Watch logs for recovery
# Look for: "Submitting proof to Aligned" followed by "Submitted proof to Aligned"
Configuration Tips
- Consider increasing
--proof-coordinator.send-intervalduring known Aligned maintenance windows to reduce log noise
Scenario 2: Aligned Loses a Proof Before Verification
Symptoms
- Proof was successfully submitted (logs show “Submitted proof to Aligned”)
- L1ProofVerifier shows “Proof has not been aggregated by Aligned” for extended periods
- No aggregation event for the proof on Aligned’s side
Impact
- Chain verification is blocked at the lost proof’s batch number
- Proofs for subsequent batches continue to generate and queue
Automatic Recovery
The --aligned.resubmission-timeout flag (required in aligned mode) configures a time-based resubmission mechanism. If a proof has been sent to Aligned but on-chain verification has not advanced within the specified timeout (e.g. 86400 seconds = 24h), the L1ProofSender automatically resets its cursor and resends the proof. Look for the following log message:
ERROR Aligned verification timed out, attempting resubmission
If automatic resubmission resolves the issue, no manual intervention is needed. The steps below are for cases where manual investigation or intervention is required.
Manual Recovery Steps
Step 1: Confirm the Proof is Lost
Check what batch the system thinks it sent to Aligned:
-- Check the latest batch sent to Aligned gateway (SQL storage)
SELECT batch FROM latest_sent_to_aligned WHERE _id = 0;
Check if the proof exists locally:
-- Check if proof exists in the rollup store (SQL storage)
-- prover_type: 1 = RISC0, 2 = SP1
SELECT batch, prover_type, length(proof) as proof_size
FROM batch_proofs
WHERE batch = <BATCH_NUMBER>;
Find the nonce used for the batch:
When the L1ProofSender submits a proof to Aligned, it logs the batch number and the nonce used:
INFO ethrex_l2::sequencer::l1_proof_sender: Submitted proof to Aligned batch_number=5 nonce=42 task_id=...
Important: Pay attention to these logs and note down the batch_number → nonce mapping. The nonce is needed to verify if the gateway received the proof.
Check if Aligned has aggregated the proof on-chain:
Use the Aligned CLI’s verify-on-chain command:
cd aligned_layer/aggregation_mode/cli

cargo run --release -- verify-on-chain \
  --network <NETWORK> \
  --rpc-url <RPC_URL> \
  --beacon-url <BEACON_URL> \
  --proving-system sp1 \
  --vk-hash <VK_HASH_FILE> \
  --public-inputs <PUBLIC_INPUTS_FILE>
The L1ProofVerifier also continuously checks this - if it keeps logging “has not yet been aggregated” for an extended period, the proof likely wasn’t received by Aligned.
Check if the gateway received the proof:
The SDK provides get_receipts_for(address, nonce) to check if a proof is in the gateway’s database:
#![allow(unused)]
fn main() {
use aligned_sdk::gateway::AggregationModeGatewayProvider;

let gateway = AggregationModeGatewayProvider::new(network);
let receipts = gateway.get_receipts_for(proof_sender_address, Some(nonce)).await?;

for receipt in receipts {
    println!("Nonce: {}, Status: {}", receipt.nonce, receipt.status);
}
}
If the proof exists locally, latest_sent_to_aligned shows the batch was sent, but neither the gateway has a receipt nor Aligned has aggregated it after an extended period, the proof was likely lost.
Step 2: Reset the Aligned Cursor
The proof still exists in the database - the system just thinks it was already sent. Reset the latest_sent_to_aligned value to make the L1ProofSender resend it:
-- Reset to the batch before the lost one (SQL storage)
-- L1ProofSender will resend batch N on the next iteration
UPDATE latest_sent_to_aligned SET batch = <BATCH_NUMBER - 1> WHERE _id = 0;
For example, if batch 5 was lost:
UPDATE latest_sent_to_aligned SET batch = 4 WHERE _id = 0;
Note: It’s safe to resend a proof even if Aligned didn’t actually lose it. Aligned treats each submission with a different nonce as a separate entry, so the SDK will return
Okand queue the proof again. If the original proof was already aggregated, the L1ProofVerifier will find it when checking the commitment (which is deterministic based on vk + public inputs). The only downside is paying an extra aggregation fee for the duplicate submission.
Step 3: Wait for Automatic Resend
Once the pointer is reset:
- L1ProofSender will detect that batch N needs to be sent
- The existing proof will be retrieved from the database
- The proof will be resubmitted to Aligned
No proof regeneration is needed since the proof data is still stored locally.
Prevention
- Monitor proof submission success rates
- Set up alerts for proofs stuck in “not aggregated” state for >N minutes
- Keep the quota balance funded (see Scenario 4)
Scenario 3: Aligned Permanent Shutdown
Symptoms
- Sustained inability to connect to Aligned Gateway
- Aligned team confirms permanent shutdown or migration
Impact
- Critical: Batch verification on L1 is completely blocked
- Users cannot withdraw funds (withdrawals require batch verification)
- L2 can continue producing blocks but they won’t be finalized
Recovery Steps
This requires switching from Aligned mode to Standard mode.
Step 1: Stop the L2 Node
- Gracefully stop the sequencer
- This prevents new proofs from being generated in the wrong format
Step 2: Upgrade OnChainProposer Contract
The OnChainProposer contract needs to be reconfigured through a timelock upgrade. See the Upgrades documentation for the upgrade procedure.
Configuration changes:
- Set
ALIGNED_MODE = false - Enable the direct verifiers (
REQUIRE_SP1_PROOF,REQUIRE_RISC0_PROOF) - Set verifier contract addresses (
SP1_VERIFIER_ADDRESS,RISC0_VERIFIER_ADDRESS)
Step 3: Clear Incompatible Proofs
Proofs generated in Compressed format (for Aligned) are incompatible with Standard mode (Groth16). Delete all unverified proofs:
-- Get the last verified batch from L1 (check OnChainProposer.lastVerifiedBatch())
-- Then delete all proofs for batches after that
DELETE FROM batch_proofs WHERE batch > <LAST_VERIFIED_BATCH>;
Step 4: Restart Node in Standard Mode
Update your node configuration to disable Aligned mode:
# Remove Aligned-specific flags
ethrex l2 \
  # ... other flags ...
  # DO NOT include: --aligned
  # DO NOT include: --aligned-network
  # DO NOT include: --aligned.beacon-url
Step 5: Regenerate Proofs in Groth16 Format
- Restart the prover(s) - they will automatically generate Groth16 proofs (since
--alignedis not set) - ProofCoordinator will request proofs starting from
lastVerifiedBatch + 1 - L1ProofSender will submit directly to OnChainProposer.verifyBatches()
Scenario 4: Insufficient Quota Balance
Symptoms
- Proof submission fails with insufficient balance/quota errors
- L1ProofSender logs show:
AlignedSubmitProofErrorwith insufficient quota message
The error from the Aligned SDK looks like:
Submit error: Insufficient balance, address: 0x<YOUR_PROOF_SENDER_ADDRESS>
Impact
- New proofs cannot be submitted to Aligned
- Verification stalls for new batches
Recovery Steps
Step 1: Deposit More Funds
Using the Aligned CLI from the aligned_layer repository:
cd aligned_layer/aggregation_mode/cli

cargo run --release -- deposit \
  --private-key <PROOF_SENDER_PRIVATE_KEY> \
  --network <NETWORK> \
  --rpc-url <RPC_URL>
Where <NETWORK> is one of: devnet, hoodi, or mainnet.
Prevention
- Monitor the
AggregationModePaymentServicecontract for your address’s quota balance - Track proof submission frequency to estimate quota consumption
- Consider depositing a larger buffer to reduce maintenance frequency
Scenario 5: Proof Marked as Invalid by Aligned
Symptoms
- Logs show: “Proof is invalid, will be deleted”
- Aligned returns
InvalidProoferror during submission
Impact
- Invalid proof is automatically deleted from local storage
- Proof regeneration is triggered automatically
Recovery Steps
Automatic recovery - the system handles this:
- L1ProofSender detects
InvalidProoferror - Proof is deleted from rollup store
- ProofCoordinator detects missing proof
- New proof is requested from prover
- Fresh proof is submitted
Investigation
If proofs are repeatedly marked invalid:
- Check prover version compatibility: Ensure prover ELF/VK matches the deployed contract
- Verify public inputs: Mismatched batch data can cause invalid proofs
- Check Aligned network: Ensure you’re using the correct network (devnet/testnet/mainnet)
Monitoring and Detection
Key Log Messages
| Message | Component | Meaning |
|---|---|---|
Sending batch proof(s) to Aligned Layer | L1ProofSender | Proof submission starting |
Submitted proof to Aligned | L1ProofSender | Proof sent successfully |
Proof is invalid, will be deleted | L1ProofSender | Aligned rejected the proof |
Failed to create gateway | L1ProofSender | Gateway connection issue |
Proof aggregated by Aligned | L1ProofVerifier | Aggregation confirmed |
has not yet been aggregated | L1ProofVerifier | Waiting for aggregation |
Batches verified in OnChainProposer | L1ProofVerifier | On-chain verification complete |
Health Check Endpoint
curl -X GET http://localhost:5555/health | jq
The response includes:
proof_sender: L1ProofSender status and configurationnetwork: Aligned network being usedfee_estimate: Fee estimation type (instant/default)
Contract Error Codes
| Code | Meaning | Action |
|---|---|---|
00h | Use verifyBatches instead | Contract not in Aligned mode |
00m | Invalid Aligned proof | Proof will be deleted and regenerated |
00y | AlignedProofAggregator call failed | Check aggregator contract address |
00z | Aligned proof verification failed | Merkle proof invalid |
Summary
| Scenario | Automatic Recovery | Manual Intervention |
|---|---|---|
| Aligned temporary outage | Yes | None needed |
| Proof lost before verification | Yes (via --aligned.resubmission-timeout) | Reset latest_sent_to_aligned pointer if automatic resubmission fails |
| Aligned permanent shutdown | No | Switch to Standard mode |
| Insufficient quota balance | No | Deposit funds |
| Proof marked invalid | Yes | None needed |
References
Synchronous Composability (PoC)
Status
Development branch: sync_comp_poc
| Sync | Column 1 | Status |
|---|---|---|
| L1 -> L2 | Deposits | ✅ |
| L1 -> L2 | L2 contract calls from L1 | ✅ |
| L2 -> L1 | Withdrawals | ✅ |
| L2 -> L1 | L1 contract calls from L2 | ❌ |
| L2 -> L2 | 🔜 |
Commands
Prerequisites
- A fresh-cloned ethrex repository.
rexinstalled and available in your PATH. If you haven’t installed it yet, follow one of the methods in the rex repository.
Run a supernode
The following command will:
- Remove both L1 and L2 dev databases (to start from scratch).
- Start an ethrex supernode, i.e. an L1 execution client embedded with an L2 sequencer node.
rm -rf dev_ethrex_l*; RUSTFLAGS="-Awarnings" COMPILE_CONTRACTS=true RUST_LOG=off cargo run -r -F l2,l2-sql -- l2 --supernode --block-producer.coinbase-address $(rex a -z) --committer.l1-private-key 0x850643a0224065ecce3882673c21f56bcf6eef86274cc21cadff15930b59fc8c --proof-coordinator.l1-private-key 0xf296c7802555da2a5a662be70e078cbd38b44f96f8615ae529da41122ce8db05 --eth.rpc-url http://localhost:8545 --validium --no-monitor --datadir dev_ethrex_l2 --network ./fixtures/genesis/l2.json --http.port 1729 --committer.commit-time 86400000

# Same but enabling logs

rm -rf dev_ethrex_l*; RUSTFLAGS="-Awarnings" COMPILE_CONTRACTS=true RUST_LOG=info,ethrex_p2p=error,ethrex_l2::sequencer::l1_committer=debug cargo run -r -F l2,l2-sql -- l2 --supernode --block-producer.coinbase-address $(rex a -z) --committer.l1-private-key 0x850643a0224065ecce3882673c21f56bcf6eef86274cc21cadff15930b59fc8c --proof-coordinator.l1-private-key 0xf296c7802555da2a5a662be70e078cbd38b44f96f8615ae529da41122ce8db05 --eth.rpc-url http://localhost:8545 --validium --no-monitor --datadir dev_ethrex_l2 --network ./fixtures/genesis/l2.json --http.port 1729 --committer.commit-time 86400000
Testing L1 -> L2 synchronous composability
Synchronous Deposits
rex transfer 999999999999999999 0x67cad0d689b799f385d2ebcf3a626254a9074e12 0x41443995d9eb6c6d6df51e55db2b188b12fe0f80d32817e57e11c64acff1feb8
L1 contract calling into an L2 contract
# Deploy a Counter.sol contract in the L1

rex deploy --contract-path crates/l2/contracts/src/example/Counter.sol 0 0x41443995d9eb6c6d6df51e55db2b188b12fe0f80d32817e57e11c64acff1feb8 --remappings ""

# Update that contract state by statically calling a contract in the L2

rex send 0x3fe21258005ca065695d205aac21168259e58155 "update(address)" 0x67cad0d689b799f385d2ebcf3a626254a9074e12 --private-key 0x41443995d9eb6c6d6df51e55db2b188b12fe0f80d32817e57e11c64acff1feb8
Testing L2 -> L1 synchronous composability
Synchronous Withdrawals
# Deposit
rex transfer 999999999999999999 0x67cad0d689b799f385d2ebcf3a626254a9074e12 0x41443995d9eb6c6d6df51e55db2b188b12fe0f80d32817e57e11c64acff1feb8

# Withdrawal
rex l2 withdraw 111111111111111111 0x41443995d9eb6c6d6df51e55db2b188b12fe0f80d32817e57e11c64acff1feb8
Introduction
L1 -> L2 Synchronous Composability
Synchronous Deposits
Deposits are the process by which L1 users can enter L2 in some form. This process begins and ends on L1 through a series of steps:
- Initiate the deposit on L1:
- A user sends a transaction to L1, either via an ETH transfer to the
CommonBridgecontract or by calling thedepositfunction on the same contract. Both actions execute the same logic, which, upon successful execution, emits a log containing the necessary information for the sequencer of the corresponding L2 to process it. - This transaction must be included in a block, and that block must be finalized for the sequencer on the corresponding L2 to detect the log on L1.
- A user sends a transaction to L1, either via an ETH transfer to the
- Process the deposit on L2:
- When the sequencer processes this log, it includes a transaction in its mempool that mints the corresponding ETH to the recipient’s address, thereby ensuring the recipient has funds on L2.
- Commit the deposit process from L2 to L1:
- Eventually, the L2 batch that includes this mint transaction is sealed and committed to L1. This commit transaction must be included in an L1 block and finalized.
- The same batch is sent to a prover to generate a ZK proof validating the previously committed batch.
- Verify the deposit process from L2 to L1 (deposit finalization):
- Eventually, the batch execution proof is generated and returned to the sequencer, which submits it for verification on L1 via a
verifytransaction. - The
verifytransaction, assuming it is valid, must be included in an L1 block and finalized.
- Eventually, the batch execution proof is generated and returned to the sequencer, which submits it for verification on L1 via a
This 4-step process requires, by definition, that it occur across different L1 slots. The number of slots needed can vary based on L1’s configuration, but even assuming a sufficiently fast commit time, real-time proving to generate the proof quickly, and a sufficiently fast proof submission time, this process would still require at least 2 slots: the first is always mandatory to emit the log that the sequencer listens for, and with significant luck, finalization could occur in the next slot.
Synchronous Composability enables this entire process to happen within the same L1 slot. In other words, the transaction that initiates the deposit, the deposit processing on L2, the commit transaction for the batch that included the mint, the generation of the execution proof for that batch, and the verify transaction for the same batch all occur in the same L1 slot.
L1 Contract Calling into an L2 Contract
Another capability enabled by synchronous composability is the ability to call L2 contracts from L1.
A simple example of this would be updating the state of a counter on L1 with the current state of another counter that resides on L2.
Unlike deposits, which do not require synchronous composability to function normally, calling an L2 contract from L1 and using the result as part of the L1 execution is not possible without this feature.
L2 -> L1 Synchronous Composability
TBD
Rollup Requirements for SC and How We Addressed Them in the PoC
To achieve synchronous composability, our rollup needed to fulfill the following requirements:
- Reorg with L1: The rollup consumes unconfirmed L1 data and therefore must reorganize (reorg) with L1.
- Instant Settlement: The rollup must be able to settle within one L1 slot, requiring real-time proving.
- Coordinated Sequencing: The L2 proposer is the L1 proposer or works closely together (e.g., issues L1 inclusion preconfs).
We addressed these requirements in the following manner:
- For this PoC, we removed reorgs from the equation.
- Our L2 block builder would force a commit batch transaction after building a block that includes a scoped call. Assuming real-time proving by skipping verification, the commit transaction now serves as a settlement transaction.
- We extended the ethrex functionality with a supernode mode that operates essentially as an L1 and L2 node sharing both states. This allows the L1 to insert transactions into the L2 mempool and simulate the L2 state in real time, while the L2 can insert transactions into the L1 mempool and simulate the L1 state in real time.
Future work
TBD
Deploying an ethrex L2 with shared bridge enabled
In this section, we’ll cover how to deploy two ethrex L2 with shared bridge enabled on a devnet.
Prerequisites
This guide assumes that you have the ethrex repository cloned.
Steps
Change directory
Every command should be run under crates/l2
cd crates/l2
Start an L1
make init-l1
Deploy the first L2
On another terminal
ETHREX_SHARED_BRIDGE_DEPLOY_ROUTER=true make deploy-l1
Start the first L2
Replace L1_BRIDGE_ADDRESS, L1_ON_CHAIN_PROPOSER_ADDRESS and ROUTER_ADDRESS with the outputs of the previous command, you can also check it under cmd/.env.
../../target/release/ethrex \
	l2 \
	--watcher.block-delay 0 \
	--network ../../fixtures/genesis/l2.json \
	--http.port 1729 \
	--http.addr 0.0.0.0 \
	--metrics \
	--metrics.port 3702 \
	--datadir dev_ethrex_l2 \
	--l1.bridge-address <L1_BRIDGE_ADDRESS> \
	--l1.on-chain-proposer-address <L1_ON_CHAIN_PROPOSER_ADDRESS> \
	--eth.rpc-url http://localhost:8545 \
	--osaka-activation-time 1761677592 \
	--block-producer.coinbase-address 0x0007a881CD95B1484fca47615B64803dad620C8d \
	--block-producer.base-fee-vault-address 0x000c0d6b7c4516a5b274c51ea331a9410fe69127 \
	--block-producer.operator-fee-vault-address 0xd5d2a85751b6F158e5b9B8cD509206A865672362 \
	--block-producer.operator-fee-per-gas 1000000000 \
	--committer.l1-private-key 0x385c546456b6a603a1cfcaa9ec9494ba4832da08dd6bcf4de9a71e4a01b74924 \
	--proof-coordinator.l1-private-key 0x39725efee3fb28614de3bacaffe4cc4bd8c436257e2c8bb887c4b5c4be45e76d \
	--proof-coordinator.addr 127.0.0.1 \
    --l1.router-address <ROUTER_ADDRESS> \
    --watcher.l2-rpcs http://localhost:1730 \
    --watcher.l2-chain-ids 1730
Deploy the second L2
On another terminal
Copy the ../../fixtures/genesis/l2.json file to ../../fixtures/genesis/l2_2.json and modify chain id to 1730
Replace ROUTER_ADDRESS with the outputs of the first deploy
../../target/release/ethrex l2 deploy \
	--eth-rpc-url http://localhost:8545 \
	--private-key 0x385c546456b6a603a1cfcaa9ec9494ba4832da08dd6bcf4de9a71e4a01b74924 \
	--on-chain-proposer-owner 0x4417092b70a3e5f10dc504d0947dd256b965fc62 \
	--bridge-owner 0x4417092b70a3e5f10dc504d0947dd256b965fc62 \
	--deposit-rich \
	--private-keys-file-path ../../fixtures/keys/private_keys_l1.txt \
	--genesis-l1-path ../../fixtures/genesis/l1.json \
	--genesis-l2-path ../../fixtures/genesis/l2_2.json \
    --randomize-contract-deployment \
    --router.address <ROUTER_ADDRESS>
Start the second L2
Replace L1_BRIDGE_ADDRESS and L1_ON_CHAIN_PROPOSER_ADDRESS with the outputs of the previous command, you can also check it under cmd/.env.
And ROUTER_ADDRESS with the outputs of the first deploy
../../target/release/ethrex \
	l2 \
	--watcher.block-delay 0 \
	--network ../../fixtures/genesis/l2_2.json \
	--http.port 1730 \
	--http.addr 0.0.0.0 \
	--metrics \
	--metrics.port 3703 \
	--datadir dev_ethrex_l2_2 \
	--l1.bridge-address <L1_BRIDGE_ADDRESS> \
	--l1.on-chain-proposer-address <L1_ON_CHAIN_PROPOSER_ADDRESS> \
	--eth.rpc-url http://localhost:8545 \
	--osaka-activation-time 1761677592 \
	--block-producer.coinbase-address 0x0007a881CD95B1484fca47615B64803dad620C8d \
	--block-producer.base-fee-vault-address 0x000c0d6b7c4516a5b274c51ea331a9410fe69127 \
	--block-producer.operator-fee-vault-address 0xd5d2a85751b6F158e5b9B8cD509206A865672362 \
	--block-producer.operator-fee-per-gas 1000000000 \
	--committer.l1-private-key 0x385c546456b6a603a1cfcaa9ec9494ba4832da08dd6bcf4de9a71e4a01b74924 \
	--proof-coordinator.l1-private-key 0x39725efee3fb28614de3bacaffe4cc4bd8c436257e2c8bb887c4b5c4be45e76d \
	--proof-coordinator.addr 127.0.0.1 \
    --proof-coordinator.port 3901 \
    --l1.router-address <ROUTER_ADDRESS> \
    --watcher.l2-rpcs http://localhost:1729 \
    --watcher.l2-chain-ids 65536999
Start the prover
On another terminal
../../target/release/ethrex \
	l2 prover \
	--proof-coordinators tcp://127.0.0.1:3900 tcp://127.0.0.1:3901 \
	--backend exec
Deploying a Fee Token
This page is a work in progress.
For an overview of how fee tokens work in ethrex L2, see Fee Token.
Upgrades
From v7 to v8
Database migration (local node)
This migration applies to the L2 node database only (SQL-backed store). It does not change any on-chain contracts.
The messages table was renamed to l1_messages. Copy the data and then remove the old table:
INSERT INTO l1_messages
SELECT *
FROM messages;
Then delete the messages table.
From v8 to v9
Timelock upgrade (L1 contracts)
From ethrex v9 onwards, the Timelock contract manages access to the OnChainProposer (OCP). The OCP owner becomes the Timelock, and the deprecated authorizedSequencerAddresses mapping is replaced by Timelock roles.
What changes
- Sequencer permissions move to Timelock roles (
SEQUENCER). - Commit and verify transactions must target the Timelock, not the OCP.
- Governance and Security Council accounts control upgrades and emergency actions via the Timelock.
1) Deploy Timelock (proxy + implementation)
Deploy a Timelock proxy and implementation using your standard UUPS deployment flow. Record the proxy address; that is the address you will initialize and use later.
2) Initialize Timelock
Call the Timelock initializer on the proxy:
initialize(uint256 minDelay,address[] sequencers,address governance,address securityCouncil,address onChainProposer)
sequencersshould include the L1 committer and proof sender addresses (and any other accounts that should commit or verify).securityCouncilis typically the current OCP owner (ideally a multisig).governanceis the account that will schedule and execute timelocked upgrades.
3) Transfer OCP ownership to Timelock
From the current OCP owner, transfer ownership with transferOwnership(address).
Then accept ownership from the Timelock:
- Normal path: schedule and execute
acceptOwnership()through the Timelock (respectsminDelay). - Emergency path: the Security Council can call
emergencyExecuteon the Timelock with calldata foracceptOwnership()to accept immediately.
Note: acceptOwnership() must be executed by the Timelock (the pending owner), so it cannot be called directly from an EOA.
4) Configure the L2 node to use Timelock
This is required because the sequencer can no longer call the OCP directly once the Timelock is the owner. Set the Timelock address so commit and verify calls target the Timelock:
- CLI flag:
--l1.timelock-address <TIMELOCK_PROXY_ADDRESS> - Env var:
ETHREX_TIMELOCK_ADDRESS=<TIMELOCK_PROXY_ADDRESS>
The committer requires this address for non-based deployments, and the proof sender/verifier will use it when present.
Do this before restarting the sequencer after the ownership transfer. If the node keeps targeting the OCP after the transfer, commit/verify calls will revert (onlyOwner). If you point to the Timelock before the transfer, the Timelock will forward but the OCP will still reject it because the Timelock is not the owner yet.
5) Verify the migration
- OCP
owner()returns the Timelock address. - Sequencer addresses return
trueforhasRole(SEQUENCER, <addr>)on the Timelock. - The L2 node logs show commit/verify txs sent to the Timelock.
Database migration (local node)
This migration applies to the L2 node database only (SQL-backed store). It does not change any on-chain contracts.
The balance_diffs table added a new value_per_token column of type BLOB:
ALTER TABLE balance_diffs
ADD COLUMN value_per_token BLOB;
From v9 to v10
CommonBridge: L2 gas limit stored on-chain
From v10 onwards, the L2 block gas limit is stored in the CommonBridge contract as l2GasLimit. The sequencer fetches this value on startup instead of using a CLI flag.
Upgrade requirement
On existing deployments, l2GasLimit will default to 0 because initialize() has already run. This means _sendToL2 will revert for any non-zero gas limit, bricking the bridge until the owner calls setL2GasLimit().
After upgrading (with the contract paused), call setL2GasLimit before unpausing (see Updating the gas limit below). The contract must not be unpaused until l2GasLimit is set to a valid value. Otherwise all deposits and privileged transactions will revert.
CLI flag removed
The --block-producer.block-gas-limit flag has been removed. The sequencer now reads the gas limit from the CommonBridge contract on startup. Update any scripts or deployment configurations that use this flag.
Viewing the current gas limit
rex call <BRIDGE_ADDRESS> "l2GasLimit()" --rpc-url <L1_RPC_URL>
Updating the gas limit
Only the bridge owner can update the gas limit:
rex send <BRIDGE_ADDRESS> "setL2GasLimit(uint256)" <NEW_GAS_LIMIT> \
  --private-key <OWNER_PRIVATE_KEY> \
  --rpc-url <L1_RPC_URL>
After updating the on-chain value, restart the sequencer for it to take effect. Until the restart, the sequencer continues using the previous gas limit, which may cause a temporary mismatch with the on-chain value.
Run a prover
This section provides step-by-step guides for running an ethrex L2 prover, which is responsible for generating ZK proofs for L2 blocks. These proofs are then submitted to L1 for verification, finalizing the state of your L2.
Use this section to choose which prover setup best fits your already deployed ethrex L2 and follow the instructions accordingly.
- Overview
- Running an ethrex L2 SP1 prover
- Running an ethrex L2 RISC0 prover
- Running an ethrex L2 TDX prover
- Running multiple provers
Run an ethrex prover
Deploying the ethrex L2 contracts on L1 and starting the node isn’t everything when it comes to setting up your full ethrex L2 stack.
If you’ve been following the deployment guide, you should already have an ethrex L2 node running and connected to L1. If that’s not the case, I recommend reviewing that guide before proceeding.
The next step is to run the prover—the component responsible for generating ZK proofs for the L2 blocks. These proofs will then be sent to L1 for verification, finalizing the state of your L2.
In this section, we’ll cover how to run one or more ethrex L2 provers.
Note
This section focuses solely on the step-by-step process for running an ethrex L2 prover in any of its forms. For a deeper understanding of how this works under the hood, refer to the Fundamentals section. To learn more about the architecture of each mode, see the Architecture section.
Before proceeding, note that this guide assumes you have ethrex installed. If you haven’t installed it yet, follow one of the methods in the Installation Guide. If you’re looking to build from source, don’t skip this section—we’ll cover that method here, as it is independent of the deployment approach you choose later.
Building from source (skip if ethrex is already installed)
Prerequisites
Ensure you have the following installed on your system:
- Rust and Cargo (install via rustup)
- Solidity compiler v0.8.31 (refer to Solidity documentation)
- SP1 Toolchain (if you plan to use SP1 proving, refer to SP1 documentation)
- RISC0 Toolchain (if you plan to use RISC0 proving, refer to RISC0 documentation)
- CUDA Toolkit 12.9 (if you plan to use GPU acceleration for SP1 or RISC0 proving)
-
Clone the official ethrex repository:
git clone https://github.com/lambdaclass/ethrex cd ethrex -
Install the binary to your
$PATH:# For SP1 CPU proving (very slow, not recommended) cargo install --locked --path cmd/ethrex --bin ethrex --features l2,l2-sql,sp1 # For RISC0 CPU proving (very slow, not recommended) cargo install --locked --path cmd/ethrex --bin ethrex --features l2,l2-sql,risc0 # For SP1 and RISC0 CPU proving (very slow, not recommended) cargo install --locked --path cmd/ethrex --bin ethrex --features l2,l2-sql,sp1,risc0 # For SP1 GPU proving cargo install --locked --path cmd/ethrex --bin ethrex --features l2,l2-sql,sp1,gpu # For RISC0 GPU proving cargo install --locked --path cmd/ethrex --bin ethrex --features l2,l2-sql,risc0,gpu # For SP1 and RISC0 GPU proving cargo install --locked --path cmd/ethrex --bin ethrex --features l2,l2-sql,sp1,risc0,gpucargo installplaces the binary at~/.cargo/bin/ethrex; ensure that directory is on your$PATH. Add--forceif you need to reinstall.
Warning
If you want your verifying keys generation to be reproducible, prepend
PROVER_REPRODUCIBLE_BUILD=trueto the above command.Example:
PROVER_REPRODUCIBLE_BUILD=true COMPILE_CONTRACTS=true cargo install --locked --path cmd/ethrex --bin ethrex --features l2,l2-sql,sp1,risc0,gpu
Important
Building with both
sp1andrisc0features enabled only enables both backends. Settlement will require every proof you mark as required at deploy time (e.g., passing both--sp1 trueand--risc0 trueinethrex l2 deployrequires both proofs).
Run an ethrex L2 SP1 prover
In this section, we’ll guide you through the steps to run an ethrex L2 prover that utilizes SP1 for generating ZK proofs. These proofs are essential for validating batch execution and state settlement on your ethrex L2.
Prerequisites
- This guide assumes that you have ethrex installed with the SP1 feature and available in your PATH. If you haven’t installed it yet, follow one of the methods in the Installation Guide. If you want to build the binary from source, refer to the Building from source section and select the appropriate build option.
- This guide also assumes that you have already deployed an ethrex L2 with SP1 enabled. If you haven’t done so yet, please refer to one of the Deploying an ethrex L2 guides.
Start an ethrex L2 SP1 prover
Once you have your ethrex L2 deployed with SP1 enabled, you can start the SP1 prover using the following command:
ethrex l2 prover \
--backend sp1 \
--proof-coordinators http://localhost:3900
Important
Regardless of the installation method used for ethrex, make sure the binary you are using has SP1 support, and also GPU support if you intend to run an SP1 GPU prover.
Note
The flag
--proof-coordinatorsis used to specify one or more proof coordinator URLs. This is so because the prover is capable of proving ethrex L2 batches from multiple sequencers. We are particularly setting it tolocalhost:3900because the command above uses the port3900for the proof coordinator by default (to learn more about the proof coordinator, read the ethrex L2 sequencer and ethrex L2 prover sections). We choose SP1 as the backend to indicate the prover to generate SP1 proofs.
Troubleshooting
docker: Error response from daemon: could not select device driver "" with capabilities: [[gpu]]
If you encounter the following error when starting the SP1 prover with GPU support:
docker: Error response from daemon: could not select device driver "" with capabilities: [[gpu]]
This error indicates that Docker is unable to find a suitable GPU driver for running containers with GPU support. To resolve this issue, follow these steps:
- Install NVIDIA Container Toolkit: Ensure that you have the NVIDIA Container Toolkit installed on your system. This toolkit allows Docker to utilize NVIDIA GPUs. You can follow the installation instructions from the official NVIDIA documentation.
- Configure Docker to use the NVIDIA runtime: After installing the NVIDIA Container Toolkit, you need to configure Docker to use the NVIDIA runtime by default. You can do this by following the instructions in the Configuring Docker documentation.
Run an ethrex L2 RISC0 prover
In this section, we’ll guide you through the steps to run an ethrex L2 prover that utilizes RISC0 for generating ZK proofs. These proofs are essential for validating batch execution and state settlement on your ethrex L2.
Prerequisites
- This guide assumes that you have ethrex installed with the RISC0 feature and available in your PATH. If you haven’t installed it yet, follow one of the methods in the Installation Guide. If you want to build the binary from source, refer to the Building from source section and select the appropriate build option.
- This guide also assumes that you have already deployed an ethrex L2 with RISC0 enabled. If you haven’t done so yet, please refer to one of the Deploying an ethrex L2 guides.
Start an ethrex L2 RISC0 prover
Once you have your ethrex L2 deployed with RISC0 enabled, you can start the RISC0 prover using the following command:
ethrex l2 prover \
--backend risc0 \
--proof-coordinators http://localhost:3900
Important
Regardless of the installation method used for ethrex, make sure the binary you are using has RISC0 support, and also GPU support if you intend to run a RISC0 GPU prover.
Note
The flag
--proof-coordinatorsis used to specify one or more proof coordinator URLs. This is so because the prover is capable of proving ethrex L2 batches from multiple sequencers. We are particularly setting it tolocalhost:3900because the command above uses the port3900for the proof coordinator by default (to learn more about the proof coordinator, read the ethrex L2 sequencer and ethrex L2 prover sections). We choose RISC0 as the backend to indicate the prover to generate RISC0 proofs.
Run an ethrex TDX prover
In this section, we’ll guide you through the steps to run an ethrex L2 TDX prover for generating TEE proofs. These proofs are essential for validating batch execution and state settlement on your ethrex L2.
Prerequisites
- This guide assumes that you have already deployed an ethrex L2 with TDX enabled. If you haven’t done so yet, please refer to one of the Deploying an ethrex L2 guides.
- A machine with TDX support with the required setup.
Start an ethrex L2 TDX prover
There’s no official release of our ethrex L2 TDX prover yet, so you need to build ethrex from source. To do this, clone the ethrex repository and run:
git clone https://github.com/lambdaclass/ethrex.git

cd ethrex/crates/l2/tee/quote-gen

make run
Note
Refer to the TDX guide for more information on setting up and running the quote generator.
Run multiple provers
In this section, we’ll guide you through the steps to run multiple ethrex L2 provers for generating ZK proofs using different backends. These proofs are essential for validating batch execution and state settlement on your ethrex L2.
Prerequisites
- This guide assumes that you have already deployed an ethrex L2 with TDX enabled. If you haven’t done so yet, please refer to one of the Deploying an ethrex L2 guides.
Start multiple ethrex L2 provers
Once you have your ethrex L2 deployed with multiple proving backends enabled (SP1, RISC0, TDX), refer to the following guides to start each prover:
Each prover should be started in different machines to ensure they operate independently and efficiently. Make sure to configure each prover with the appropriate backend flag and proof coordinator URLs as specified in their respective guides.
Monitoring and Metrics
Ethrex exposes metrics in Prometheus format on port 9090 by default. The easiest way to monitor your node is to use the provided Docker Compose stack, which includes Prometheus and Grafana preconfigured.
Quickstart: Monitoring Stack with Docker Compose
-
Clone the repository:
git clone https://github.com/lambdaclass/ethrex.git cd ethrex/metrics -
Start the monitoring stack:
docker compose -f docker-compose-metrics.yaml -f docker-compose-metrics-l2.overrides.yaml up -d
This will launch Prometheus and Grafana, already set up to scrape ethrex metrics.
Accessing Metrics and Dashboards
- Prometheus: http://localhost:9091
- Grafana: http://localhost:3001
- Default login:
admin/admin - Prometheus is preconfigured as a data source
- Example dashboards are included in the repo
- Default login:
Metrics from ethrex will be available at http://localhost:9090/metrics in Prometheus format.
Custom Configuration
Your ethrex setup may differ from the default configuration. Check your endpoints at provisioning/prometheus/prometheus_l2.yaml.
For manual setup or more details, see the Prometheus documentation and Grafana documentation.
Admin API
This API exposes endpoints to manage the Sequencer.
Base URL
By default the server is listening on 127.0.0.1:5555 but can be configured with --admin-server.addr <address> --admin-server.port <port>
Endpoints
Health
Sequencer Health
Description
Performs a healthcheck on all the components of the sequencer returning a json with the status
Endpoint
GET /health
Example
curl -X GET http://localhost:5555/health
Admin server health
Description
Performs a healthcheck on the http admin server
Endpoint
GET /admin/health
Example
curl -X GET http://localhost:5555/admin/health
L1 Committer
Start Committer immediately
Description
Starts the committer immediately (with a delay of 0).
Endpoint
GET /committer/start
Example
curl -X GET http://localhost:5555/committer/start
Start Committer (with delay)
Description
Starts the committer with a configurable delay.
Endpoint
GET /committer/start/{delay}
Example
curl -X GET http://localhost:5555/committer/start/60000
Parameters
| Name | Type | Description |
|---|---|---|
| delay | number | Delay in milliseconds before starting the committer. |
Stop Committer
Description
Stops the committer.
Endpoint
GET /committer/stop
Example
curl -X GET http://localhost:5555/committer/stop
Rollup Stages and ethrex
This document explains how the L2Beat rollup stage definitions map to the current ethrex L2 stack.
Important Distinctions
Stages are properties of a deployed L2, whereas ethrex is a framework that different projects may configure and govern in their own way. In what follows we make two simplifying assumptions:
- If ethrex provides the functionality required to deploy a Stage X rollup, we consider ethrex capable of achieving Stage X, even if a particular deployment chooses not to enable some features.
- When we talk about ethrex L2 we are referring to ethrex in rollup mode, not Validium. In rollup mode, Ethereum L1 is the data availability layer; in Validium mode it is not.
The L2Beat framework evaluates decentralization specifically, not security from bugs. A Stage 2 rollup could still have vulnerabilities if the proof system is experimental or unaudited.
Stage 0
Stage 0 (“Full Training Wheels”) represents the basic operational requirements for a rollup.
Summary
| Requirement | Status | Details |
|---|---|---|
| Project calls itself a rollup | ✅ Met | Docs describe ethrex as a framework to launch an L2 rollup |
| L2 state roots posted on L1 | ✅ Met | Each committed batch stores newStateRoot in OnChainProposer |
| Data availability on L1 | ✅ Met | In rollup mode every batch must publish a non-zero EIP-4844 blob hash |
| Software to reconstruct state | ✅ Met | Node, blobs tooling, and prover docs describe how to rebuild state |
| Proper proof system used | ✅ Met | Batches verified using zkVM validity proofs (SP1/RISC0) or TDX attestations |
Detailed Analysis
Does the project call itself a rollup?
Yes. As stated in the introduction:
Ethrex is a framework that lets you launch your own L2 rollup or blockchain.
Are L2 state roots posted on L1?
Yes. Every time a batch is committed to the OnChainProposer on L1, the new L2 state root is sent and stored in the batchCommitments mapping as newStateRoot for that batch.
Does the project provide data availability on L1?
Yes. When committing a batch in rollup mode (non-validium), the transaction must include a non-zero blob hash, so a blob MUST be sent to the OnChainProposer on L1.
- The architecture docs state that the blob contains the RLP-encoded L2 blocks and fee configuration
- The blob commitment (
blobKZGVersionedHash) is included in the batch commitment and re-checked during proof verification
This means all data needed to reconstruct the L2 (transactions and state) is published on L1 as blobs.
Is software capable of reconstructing the rollup’s state available?
Yes.
- The L2 node provides the
ethrex l2 reconstructsubcommand to follow L1 commitments and reconstruct the state from blobs - The state reconstruction blobs doc explains how to generate and use blobs for replaying state
- The data availability and prover docs describe how published data is used to reconstruct and verify state
Does the project use a proper proof system?
Yes, assuming proofs are enabled.
ethrex supports multiple proving mechanisms:
- zkVM validity proofs: SP1 and RISC0
- TDX attestations: TEE-based verification
- Aligned Layer: Optional proof aggregation for cost efficiency
The OnChainProposer contract can be configured to require many combinations of these mechanisms. A batch is only verified on L1 if all configured proofs pass and their public inputs match the committed data (state roots, withdrawals, blobs, etc.).
Are there at least 5 external actors that can submit a fraud proof?
Not applicable. ethrex uses validity proofs, not fraud proofs. There is no on-chain “challenge game” where watchers submit alternate traces to invalidate a state root.
Stage 0 Assessment
ethrex L2 meets all Stage 0 requirements.
Stage 1
Stage 1 (“Limited Training Wheels”) requires that users have trustless exit guarantees, with a Security Council retaining only limited emergency powers.
Core Principle
“The only way (other than bugs) for a rollup to indefinitely block an L2→L1 message or push an invalid L2→L1 message is by compromising ≥75% of the Security Council.”
Summary
| Requirement | Status | Details |
|---|---|---|
| Censorship-resistant L2→L1 messages | ❌ Gap | Sequencer can indefinitely censor withdrawals; no forced-inclusion mechanism |
| Sequencer cannot push invalid messages | ✅ Met | Invalid withdrawals require contract/VK changes controlled by owner |
| ≥7-day exit window for non-SC upgrades | ✅ Met | Only owner can upgrade; no non-SC upgrade path exists |
Detailed Analysis
Can L2→L1 messages be censored?
Yes, this is the main Stage 1 gap.
The sequencer can indefinitely block/censor an L2→L1 message (e.g., a withdrawal) by simply not including the withdrawal transaction in an L2 block. This does not require compromising the owner/Security Council.
What’s missing: A forced-inclusion mechanism where users can submit their withdrawal directly on L1, and the sequencer must include it in a subsequent batch within a bounded time window or lose sequencing rights.
Note
This is the primary blocker for Stage 1 compliance. Implementing forced inclusion of withdrawals enforced by L1 contracts would address this gap.
Can the sequencer push invalid L2→L1 messages?
No. The sequencer cannot unilaterally make L1 accept an invalid L2→L1 message. This would require:
- Changing contract code
- Updating the verifying key in
OnChainProposer
Only the Security Council (owner) can perform those upgrades.
What about upgrades from entities outside the Security Council?
In ethrex L2 contracts, there are no entities other than the owner that can perform upgrades. Therefore:
- Upgrades initiated by entities outside the Security Council are not possible
- If such an upgrade path were introduced, it would need to provide the required 7-day exit window
Security Council Configuration
Both OnChainProposer and CommonBridge are upgradeable contracts controlled by a single owner address. ethrex itself does not hard-code a Security Council, but a deployment can introduce one by making the owner a multisig.
According to L2Beat requirements, the Security Council should have:
- At least 8 members
- ≥75% threshold for critical actions
- Diverse signers from different organizations/jurisdictions
Stage 1 Assessment
ethrex L2 does not meet Stage 1 requirements today.
The main gap is censorship-resistant L2→L1 messages. The sequencer can ignore withdrawal transactions indefinitely, and there is no forced-inclusion mechanism (unlike the existing forced-inclusion mechanism for deposits).
Path to Stage 1
To achieve Stage 1, ethrex would need:
- Forced withdrawal inclusion: Implement an L1 mechanism where users can submit withdrawals directly, with sequencer penalties for non-inclusion
- Security Council multisig: Deploy owner as an 8+ member multisig with ≥75% threshold
- Exit window enforcement: ethrex has Timelock functionality that gates the
OnChainProposer, but deployment configuration must enforce ≥7 day delays for non-emergency upgrades
Stage 2
Stage 2 (“No Training Wheels”) requires fully permissionless proving and tightly constrained emergency upgrade powers.
Summary
| Requirement | Status | Details |
|---|---|---|
| Permissionless validity proofs | ❌ Gap | Only authorized sequencers can commit and verify batches |
| ≥30-day exit window | ❌ Gap | No protocol-level exit window; UUPS upgrades have no mandatory delay |
| SC restricted to on-chain errors | ❌ Gap | Owner can pause/upgrade for any reason |
Detailed Analysis
Is the validity proof system permissionless?
No. In the standard OnChainProposer implementation (crates/l2/contracts/src/l1/OnChainProposer.sol), committing and verifying batches are restricted to authorized sequencer addresses only. Submitting proofs is not permissionless.
Do users have at least 30 days to exit before unwanted upgrades?
No. There is no protocol-level exit window tied to contract upgrades. UUPS upgrades can be executed by the owner without a mandatory delay.
Is the Security Council restricted to act only due to on-chain errors?
No. There is no built-in restriction that limits the owner to responding only to detected on-chain bugs. The owner can pause or upgrade contracts for any reason.
Stage 2 Assessment
ethrex L2 does not meet Stage 2 requirements.
Path to Stage 2
To achieve Stage 2, ethrex would need (in addition to Stage 1 requirements):
- Permissionless proving: Allow anyone to submit validity proofs for batches
- 30-day exit window: Implement mandatory delay for all contract upgrades
- Restricted SC powers: Limit Security Council actions to adjudicable on-chain bugs only
- Mature proof system: Battle-tested ZK provers with comprehensive security audits
Comparison with Other Rollups
Based Rollups
Based rollups delegate sequencing to Ethereum L1 validators rather than using a centralized sequencer. This is particularly relevant for ethrex as it implements based sequencing (currently in development).
| Project | Current Stage | Main Gaps | Proof System | Sequencer Model |
|---|---|---|---|---|
| ethrex L2 | Stage 0 | Forced inclusion, permissionless proving | Multi-proof (ZK + TEE) | Based (round-robin) |
| Taiko Alethia | Stage 0* | ZK not mandatory, upgrade delays | Multi-proof (SGX mandatory, ZK optional) | Based (permissionless) |
| Surge | Not deployed | N/A (template) | Based on Taiko stack | Based (L1 validators) |
Taiko Alethia is the first based rollup on mainnet. It requires two proofs per block: SGX (Geth) is mandatory, plus one of SGX (Reth), SP1, or RISC0. Critically, blocks can be proven with TEE only (no ZK) if both SGX verifiers are used. As of early 2025, only ~30% of blocks use ZK proofs. L2BEAT warns that “funds can be stolen if a malicious block is proven by compromised SGX instances.” Taiko plans to require 100% ZK coverage with the Shasta fork in Q4 2025.
*L2BEAT currently classifies Taiko as “not even Stage 0” because “the proof system is still under development.” However, Taiko has been a multi-prover based rollup since the Pacaya fork and the system is architecturally prepared for Stage 0. This appears to be a classification nuance rather than a fundamental gap.
Surge is a based rollup template by Nethermind, built on the Taiko stack and designed to target Stage 2 from inception. It removes centralized sequencing entirely, letting Ethereum validators handle transaction ordering. Not yet deployed as a production rollup.
ZK Rollups
| Project | Current Stage | Main Gaps | Proof System |
|---|---|---|---|
| ethrex L2 | Stage 0 | Forced inclusion, permissionless proving | Multi-proof (ZK + TEE) |
| Scroll | Stage 1 | 30-day window, multi-prover | ZK validity proofs |
| zkSync Era | Stage 0* | Evaluation pending, forced inclusion | ZK validity proofs |
| Starknet | Stage 1 | 30-day window, SC restrictions | ZK validity proofs (STARK) |
Scroll became the first ZK rollup to achieve Stage 1 (April 2025) through the Euclid upgrade, which introduced permissionless sequencing fallback and a 12-member Security Council with 75% threshold.
zkSync Era is currently experiencing a proof system pause due to a vulnerability, causing partial liveness failure. Previously, a critical bug in zk-circuits was discovered that could have led to $1.9B in potential losses if exploited.
*L2BEAT states they “haven’t finished evaluation” of zkSync Era’s Stage 1 elements - not that zkSync fails requirements. The main pending item is a forced inclusion mechanism. With 75% of proving already delegated to external provers and decentralized sequencing (ChonkyBFT) underway, zkSync appears architecturally Stage 1-ready.
Starknet reached Stage 1 but shares its SHARP verifier with other StarkEx rollups. The verifier can be changed by a 2/4 multisig with 8-day delay. The Security Council (9/12) retains instant upgrade capability. This shared verifier creates concentration risk across multiple chains.
Optimistic Rollups
| Project | Current Stage | Main Gaps | Proof System |
|---|---|---|---|
| Arbitrum One | Stage 1 | SC override power, 30-day window | Optimistic (fraud proofs) |
| Optimism | Stage 1 | Exit window, SC restrictions | Optimistic (fault proofs) |
Arbitrum One uses BoLD (Bounded Liquidity Delay) for permissionless fraud proofs - anyone can challenge state assertions. However, Arbitrum remains Stage 1 because the Security Council retains broad override powers. Stage 2 requires restricting SC to “provable bugs only” and extending exit windows to 30 days. The ~6.4 day withdrawal delay is inherent to the optimistic model.
Optimism has permissionless fault proofs but L2BEAT notes: “There is no exit window for users to exit in case of unwanted regular upgrades as they are initiated by the Security Council with instant upgrade power.” Both Arbitrum and Optimism are technically ready for Stage 2 but held back by intentional governance constraints, not technical limitations.
L2BEAT Risk Summary
| Project | Critical Warnings |
|---|---|
| Taiko Alethia | Funds at risk from compromised SGX; ZK optional; unverified contracts |
| Scroll | No upgrade delay; emergency verifier upgrade occurred Aug 2025 |
| zkSync Era | Proof system currently paused; prior $1.9B bug discovered |
| Starknet | Shared SHARP verifier; SC has instant upgrade power |
| Arbitrum One | Malicious upgrade risk; optimistic delay (~6.4 days) |
| Optimism | No exit window for SC upgrades; dispute game vulnerabilities |
Warning
All rollups carry risks. Even Stage 1 rollups retain Security Council powers that could theoretically be abused. Stage 2 remains unachieved by any production rollup as of early 2025.
Key Observations
- No rollup has achieved Stage 2 yet - All production rollups remain at Stage 0 or Stage 1
- Classification vs architecture gaps - Some rollups (Taiko, zkSync Era) are classified lower than their architecture supports due to L2BEAT evaluation timing or minor gaps
- Governance is the bottleneck - Arbitrum and Optimism have permissionless proofs but are held at Stage 1 by intentional Security Council powers, not technical limitations
- Based rollups are newer - Taiko and ethrex are pioneering based sequencing, both at Stage 0
- Multi-proof is emerging - ethrex, Taiko, and Scroll are all exploring multi-proof systems for enhanced security
Recommendations
For Stage 1 Compliance
-
Implement forced withdrawal inclusion
- Users can submit withdrawal requests directly to L1
- Sequencer must include within N blocks or face penalties
- Fallback mechanism if sequencer fails to include
-
Deploy Security Council as multisig
- 8+ diverse signers
- 75%+ threshold (e.g., 6/8)
- Document emergency procedures
-
Add upgrade timelock
- Minimum 7-day delay for non-emergency upgrades
- Emergency path requires SC threshold
For Future Stage 2 Transition
-
Open proof submission
- Remove sequencer-only restriction on
verifyBatches() - Anyone can submit valid proofs
- Remove sequencer-only restriction on
-
Extend exit window to 30+ days
- Mandatory delay on all upgrade paths
- Clear user notification mechanism
-
Formalize SC restrictions
- On-chain governance limiting SC powers
- Transparent criteria for emergency actions
-
Proof system maturity
- Comprehensive security audits
- Multiple independent prover implementations
- Operational track record
Conclusion
ethrex L2 currently satisfies all Stage 0 requirements and provides a solid foundation for rollup deployments.
The path to Stage 1 is clear but requires implementing censorship-resistant withdrawals through a forced-inclusion mechanism. This is the primary gap preventing Stage 1 compliance.
Stage 2 requires additional work on permissionless proving, extended exit windows, and formal restrictions on Security Council powers.
| Stage | Status | Primary Blocker |
|---|---|---|
| Stage 0 | ✅ Met | - |
| Stage 1 | ❌ Not met | Forced inclusion for withdrawals |
| Stage 2 | ❌ Not met | Permissionless proving, 30-day exit window |
References
L2Beat Resources
Rollup Comparisons
- Taiko Alethia on L2Beat
- Scroll on L2Beat
- zkSync Era on L2Beat
- Starknet on L2Beat
- Arbitrum One on L2Beat
- Optimism on L2Beat
- Surge: A Based Rollup Template
ethrex Documentation
Architecture
This section provides an overview of the architecture of an L2 rollup built with ethrex. Here you’ll find:
- High-level diagrams and explanations of the main components
- Details on how the sequencer, prover, and other modules interact
- Information about aligned mode, the prover, the sequencer, and more
Use this section to understand how the different parts of an ethrex L2 fit together. The overview is a good place to start.
General overview of the ethrex L2 stack
This document aims to explain how the Lambda ethrex L2 and all its moving parts work.
Intro
At a high level, the way an L2 works is as follows:
- There is a contract in L1 that tracks the current state of the L2. Anyone who wants to know the current state of the chain need only consult this contract.
- Every once in a while, someone (usually the sequencer, but could be a decentralized network, or even anyone at all in the case of a based contestable rollup) builds a batch of new L2 blocks and publishes it to L1. We will call this the
commitL1 transaction. - For L2 batches to be considered finalized, a zero-knowledge proof attesting to the validity of the batch needs to be sent to L1, and its verification needs to pass. If it does, everyone is assured that all blocks in the batch were valid and thus the new state is. We call this the
verificationL1 transaction.
We omitted a lot of details in this high level explanation. Some questions that arise are:
- What does it mean for the L1 contract to track the state of L2? Is the entire L2 state kept on it? Isn’t it really expensive to store a bunch of state on an Ethereum smart contract?
- What does the ZK proof prove exactly?
- How do we make sure that the sequencer can’t do anything malicious if it’s the one proposing blocks and running every transaction?
- How does someone go in and out of the L2, i.e., how do you deposit money from L1 into L2 and then withdraw it? How do you ensure this can’t be tampered with? Bridges are by far the most vulnerable part of blockchains today and going in and out of the L2 totally sounds like a bridge.
Below some answers to these questions, along with an overview of all the moving parts of the system.
How do you prove state?
Now that general purpose zkVMs exist, most people have little trouble with the idea that you can prove execution. Just take the usual EVM code you wrote in Rust, compile to some zkVM target instead and you’re mostly done. You can now prove it.
What’s usually less clear is how you prove state. Let’s say we want to prove a new L2 batch of blocks that were just built. Running the ethrex execute_block function on a Rust zkVM for all the blocks in the batch does the trick, but that only proves that you ran the VM correctly on some previous state/batch. How do you know it was the actual previous state of the L2 and not some other, modified one?
In other words, how do you ensure that:
- Every time the EVM reads from some storage slot (think an account balance, some contract’s bytecode), the value returned matches the actual value present on the previous state of the chain.
For this, the VM needs to take as a public input the previous state of the L2, so the prover can show that every storage slot it reads is consistent with it, and the verifier contract on L1 can check that the given public input is the actual previous state it had stored. However, we can’t send the entire previous state as public input because it would be too big; this input needs to be sent on the verification transaction, and the entire L2 state does not fit on it.
To solve this, we do what we always do: instead of having the actual previous state be the public input, we build a Merkle Tree of the state and use its root as the input. Now the state is compressed into a single 32-byte value, an unforgeable representation of it; if you try to change a single bit, the root will change. This means we now have, for every L2 batch, a single hash that we use to represent it, which we call the batch commitment (we call it “commitment” and not simply “state root” because, as we’ll see later, this won’t just be the state root, but rather the hash of a few different values including the state root).
The flow for the prover is then roughly as follows:
- Take as public input the previous batch commitment and the next (output) batch commitment.
- Execute all blocks in the batch to prove its execution is valid. Here “execution” means more than just transaction execution; there’s also header validation, transaction validation, etc. (essentially all the logic
ethrexneeds to follow when executing and adding a new block to the chain). - For every storage slot read, present and verify a merkle path from it to the previous state root (i.e. previous batch commitment).
- For every storage slot written, present and verify a merkle path from it to the next state root (i.e. next batch commitment).
As a final note, to keep the public input a 32 byte value, instead of passing the previous and next batch commitments separately, we hash the two of them and pass that. The L1 contract will then have an extra step of first taking both commitments and hashing them together to form the public input.
These two ideas will be used extensively throughout the rest of the documentation:
- Whenever we need to add some state as input, we build a merkle tree and use its root instead. Whenever we use some part of that state in some way, the prover provides merkle paths to the values involved. Sometimes, if we don’t care about efficient inclusion proofs of parts of the state, we just hash the data altogether and use that instead.
- To keep the batch commitment (i.e. the value attesting to the entire state of the chain) a 32 byte value, we hash the different public inputs into one. The L1 contract is given all the public inputs on
commit, checks their validity and then squashes them into one through hashing.
Reconstructing state/Data Availability
Warning
The state diff mechanism is retained here for historical and conceptual reference.
Ethrex now publishes RLP-encoded blocks (with fee configs) in blobs.
The principles of verification and compression described below still apply conceptually to this new model.
While using a merkle root as a public input for the proof works well, there is still a need to have the state on L1. If the only thing that’s published to it is the state root, then the sequencer could withhold data on the state of the chain. Because it is the one proposing and executing blocks, if it refuses to deliver certain data (like a merkle path to prove a withdrawal on L1), people may not have any place to get it from and get locked out of the chain or some of their funds.
This is called the Data Availability problem. As discussed before, sending the entire state of the chain on every new L2 batch is impossible; state is too big. As a first next step, what we could do is:
- For every new L2 batch, send as part of the
committransaction the list of transactions in the batch. Anyone who needs to access the state of the L2 at any point in time can track allcommittransactions, start executing them from the beginning and reconstruct the state.
This is now feasible; if we take 200 bytes as a rough estimate for the size of a single transfer between two users (see this post for the calculation on legacy transactions) and 128 KB as a reasonable transaction size limit we get around ~650 transactions at maximum per commit transaction (we are assuming we use calldata here, blobs can increase this limit as each one is 128 KB and we could use multiple per transaction).
Going a bit further, instead of posting the entire transaction, we could just post which accounts have been modified and their new values (this includes deployed contracts and their bytecode of course). This can reduce the size a lot for most cases; in the case of a regular transfer as above, we only need to record balance updates of two accounts, which requires sending just two (address, balance) pairs, so (20 + 32) * 2 = 104 bytes, or around half as before. Some other clever techniques and compression algorithms can push down the publishing cost of this and other transactions much further.
This is called state diffs. Instead of publishing entire transactions for data availability, we only publish whatever state they modified. This is enough for anyone to reconstruct the entire state of the chain.
Detailed documentation on the state diffs spec.
How do we prevent the sequencer from publishing the wrong state diffs?
Once again, state diffs have to be part of the public input. With them, the prover can show that they are equal to the ones returned by the VM after executing all blocks in the batch. As always, the actual state diffs are not part of the public input, but their hash is, so the size is a fixed 32 bytes. This hash is then part of the batch commitment. The prover then assures us that the given state diff hash is correct (i.e. it exactly corresponds to the changes in state of the executed blocks).
There’s still a problem however: the L1 contract needs to have the actual state diff for data availability, not just the hash. This is sent as part of calldata of the commit transaction (actually later as a blob, we’ll get to that), so the sequencer could in theory send the wrong state diff. To make sure this can’t happen, the L1 contract hashes it to make sure that it matches the actual state diff hash that is included as part of the public input.
With that, we can be sure that state diffs are published and that they are correct. The sequencer cannot mess with them at all; either it publishes the correct state diffs or the L1 contract will reject its batch.
Compression
Because state diffs are compressed to save space on L1, this compression needs to be proven as well. Otherwise, once again, the sequencer could send the wrong (compressed) state diffs. This is easy though, we just make the prover run the compression and we’re done.
EIP 4844 (a.k.a. Blobs)
Warning
The explanations below originally refer to state diffs, but the same blob-based mechanism now carries RLP-encoded block data and their associated fee configs.
While we could send state diffs through calldata, there is a (hopefully) cheaper way to do it: blobs. The Ethereum Cancun upgrade introduced a new type of transaction where users can submit a list of opaque blobs of data, each one of size at most 128 KB. The main purpose of this new type of transaction is precisely to be used by rollups for data availability; they are priced separately through a blob_gas market instead of the regular gas one and for all intents and purposes should be much cheaper than calldata.
Using EIP 4844, our state diffs would now be sent through blobs. While this is cheaper, there’s a new problem to address with it. The whole point of blobs is that they’re cheaper because they are only kept around for approximately two weeks and ONLY in the beacon chain, i.e. the consensus side. The execution side (and thus the EVM when running contracts) does not have access to the contents of a blob. Instead, the only thing it has access to is a KZG commitment of it.
This is important. If you recall, the way the L1 ensured that the state diff published by the sequencer was correct was by hashing its contents and ensuring that the hash matched the given state diff hash. With the contents of the state diff now no longer accessible by the contract, we can’t do that anymore, so we need another way to ensure the correct contents of the state diff (i.e. the blob).
The solution is through a proof of equivalence between polynomial commitment schemes. The idea is as follows: proofs of equivalence allow you to show that two (polynomial) commitments point to the same underlying data. In our case, we have two commitments:
- The state diff commitment calculated by the sequencer/prover.
- The KZG commitment of the blob sent on the commit transaction (recall that the blob should just be the state diff).
If we turn the first one into a polynomial commitment, we can take a random evaluation point through Fiat Shamir and prove that it evaluates to the same value as the KZG blob commitment at that point. The commit transaction then sends the blob commitment and, through the point evaluation precompile, verifies that the given blob evaluates to that same value. If it does, the underlying blob is indeed the correct state diff.
Our proof of equivalence implementation follows Method 1 here. What we do is the following:
Prover side
-
Take the state diff being committed to as
409632-byte chunks (these will be interpreted as field elements later on, but for now we don’t care). Call these chunks , withiranging from 0 to 4095. -
Build a merkle tree with the as leaves. Note that we can think of the merkle root as a polynomial commitment, where the
i-th leaf is the evaluation of the polynomial on thei-th power of , the4096-th root of unity on , the field modulus of theBLS12-381curve. Call this polynomial . This is the same polynomial that the L1 KZG blob commits to (by definition). Call the L1 blob KZG commitment and the merkle root we just computed . -
Choose
xas keccak(, ) and calculate the evaluation ; call ity. To do this calculation, because we only have the , the easiest way to do it is through the barycentric formula. IMPORTANT: we are taking the ,x,y, and as elements of , NOT the native field used by our prover. The evaluation thus is: -
Set
xandyas public inputs. All the above shows the verifier on L1 that we made a polynomial commitment to the state diff, that its evaluation onxisy, and thatxwas chosen through Fiat-Shamir by hashing the two commitments.
Verifier side
- When committing to the data on L1 send, as part of the calldata, a kzg blob commitment along with an opening proving that it evaluates to
yonx. The contract, through the point evaluation precompile, checks that both:- The commitment’s hash is equal to the versioned hash for that blob.
- The evaluation is correct.
Transition to RLP-encoded Blocks
The state diff approach has been deprecated. While it provided a more compact representation, it only guaranteed the availability of the modified state, not the original transactions themselves. To ensure that transactions are also publicly available, Ethrex now publishes RLP-encoded blocks, together with their corresponding fee configurations, directly in blobs (see Transaction fees).
This new approach guarantees both transaction and state availability, at the cost of higher data size. According to our internal measurements (block_vs_state_diff_measurements.md), sending block lists in blobs instead of state diffs decreases the number of transactions that can fit in a single blob by approximately 2× for ETH transfers and 3× for ERC20 transfers.
L1<->L2 communication
To communicate between L1 and L2, we use two mechanisms called Privileged transactions, and L1 messages. In this section we talk a bit about them, first going through the more specific use cases for Deposits and Withdrawals.
Deposits
The mechanism for depositing funds to L2 from L1 is explained in detail in “Deposits”.
Withdrawals
The mechanism for withdrawing funds from L2 back to L1 is explained in detail in “Withdrawals”.
Recap
Batch Commitment
An L2 batch commitment contains:
- The new L2 state root.
- The latest block’s hash
- The KZG versioned hash of the blobs published by the L2
- The rolling hash of the processed privileged transactions
- The Merkle root of the withdrawal logs
These are committed as public inputs of the zk proof that validates a new L2 state.
L1 contract checks
Commit transaction
For the commit transaction, the L1 verifier contract receives the batch commitment, as defined previously, for the new batch.
The contract will then:
- Check that the batch number is the immediate successor of the last committed batch.
- Check that the batch has not been committed already.
- Check that the
lastBlockHashis not zero. - If privileged transactions were processed, it checks the submitted hash against the one in the
CommonBridgecontract. - If withdrawals were processed, it publishes them to the
CommonBridgecontract. - It checks that a blob was published if the L2 is running as a rollup, or that no blob was published if it’s running as a validium.
- Calculate the new batch commitment and store it.
Verify transaction
On a verification transaction, the L1 contract receives the following:
- The batch number.
- The RISC-V Zero-Knowledge proof of the batch execution (if enabled).
- The SP1 Zero-Knowledge proof of the batch execution (if enabled).
- The TDX Zero-Knowledge proof of the batch execution (if enabled).
The contract will then:
- Check that the batch number is the immediate successor of the last verified batch.
- Check that the batch has been committed.
- It removes the pending transaction hashes from the
CommonBridgecontract. - It verifies the public data of the proof, checking that the data committed in the
commitBatchcall matches the data in the public inputs of the proof. - Pass the proof and public inputs to the verifier and assert the proof passes.
- If the proof passes, finalize the L2 state, setting the latest batch as the given one and allowing any withdrawals for that batch to occur.
What the sequencer cannot do
- Forge Transactions: Invalid transactions (e.g. sending money from someone who did not authorize it) are not possible, since part of transaction execution requires signature verification. Every transaction has to come along with a signature from the sender. That signature needs to be verified; the L1 verifier will reject any block containing a transaction whose signature is not valid.
- Withhold State: Every L1
committransaction needs to send the corresponding state diffs for it and the contract, along with the proof, make sure that they indeed correspond to the given batch. TODO: Expand with docs on how this works. - Mint money for itself or others: The only valid protocol transaction that can mint money for a user is an L1 deposit. Every one of these mint transactions is linked to exactly one deposit transaction on L1. TODO: Expand with some docs on the exact details of how this works.
What the sequencer can do
The main thing the sequencer can do is CENSOR transactions. Any transaction sent to the sequencer could be arbitrarily dropped and not included in blocks. This is not completely enforceable by the protocol, but there is a big mitigation in the form of an escape hatch.
TODO: Explain this in detail.
Ethrex L2 sequencer
Components
The L2 Proposer is composed of the following components:
Block Producer
Creates Blocks with a connection to the auth.rpc port.
L1 Watcher
This component monitors the L1 for new deposits made by users. For that, it queries the CommonBridge contract on L1 at regular intervals (defined by the config file) for new DepositInitiated() events. Once a new deposit event is detected, it creates the corresponding deposit transaction on the L2. It also periodically fetches the BlobBaseFee from L1 (at a configured interval), which is used to compute the L1 fees.
L1 Transaction Sender (a.k.a. L1 Committer)
As the name suggests, this component sends transactions to the L1. But not any transaction, only commit and verify transactions.
Commit transactions are sent when the Proposer wants to commit to a new batch of blocks. These transactions contain the batch data to be committed in the L1.
Verify transactions are sent by the Proposer after the prover has successfully generated a proof of block execution to verify it. These transactions contain the new state root of the L2, the hash of the state diffs produced in the block, the root of the withdrawals logs merkle tree and the hash of the processed deposits.
Proof Coordinator
The Proof Coordinator is a simple TCP server that manages communication with a component called the Prover. The Prover acts as a simple TCP client that makes requests to prove a block to the Coordinator. It responds with the proof input data required to generate the proof. Then, the Prover executes a zkVM, generates the Groth16 proof, and sends it back to the Coordinator.
The Proof Coordinator centralizes the responsibility of determining which block needs to be proven next and how to retrieve the necessary data for proving. This design simplifies the system by reducing the complexity of the Prover, it only makes requests and proves blocks.
For more information about the Proof Coordinator, the Prover, and the proving process itself, see the Prover Docs.
L1 Proof Sender
The L1 Proof Sender is responsible for interacting with Ethereum L1 to manage proof verification. Its key functionalities include:
- Connecting to Ethereum L1 to send proofs for verification.
- Dynamically determine required proof types based on active verifier contracts (
REQUIRE_<prover>_PROOF). - Ensure blocks are verified in the correct order by invoking the
verify(..)function in theOnChainProposercontract. Upon successful verification, an event is emitted to confirm the block’s verification status. - Operating on a configured interval defined by
proof_send_interval_ms.
Configuration
Configuration is done either by CLI flags or through environment variables. Run cargo run --release --bin ethrex -- l2 --help in the repository’s root directory to see the available CLI flags and envs.
ethrex-prover for L2
Intro
The prover consists of two main components: handling incoming proving data from the L2 sequencer, specifically from the ProofCoordinator component, and the actual zkVM running and generating proofs of execution.
In summary, the prover manages the inputs from the ProofCoordinator and then calls the zkVM to perform the proving process and generate the zero-knowledge proof (groth16 for on-chain verification, or a compressed STARK for verification via Aligned Layer).
Workflow
The ProofCoordinator monitors requests for new jobs from the Prover, which are sent when the prover is available. Upon receiving a new job, the Prover generates the proof, after which the Prover sends the proof back to the ProofCoordinator.
sequenceDiagram
    participant zkVM
    participant Prover
    participant ProofCoordinator
    Prover->>+ProofCoordinator: BatchRequest(commit_hash, prover_type)
    ProofCoordinator-->>-Prover: BatchResponse(batch_number, inputs, format)
    Prover->>+zkVM: Prove(inputs)
    zkVM-->>-Prover: generates zk proof
    Prover->>+ProofCoordinator: ProofSubmit(batch_number, proof)
    ProofCoordinator-->>-Prover: ProofSubmitACK(batch_number)
Batch assignment protocol
When a prover sends a BatchRequest, the coordinator decides what to respond based on the following checks, evaluated in order:
-
Prover type check: is the prover’s type (SP1, RISC0, Exec, TDX) in the set of proof types required by this deployment? If not, the coordinator responds with
ProverTypeNotNeeded. This is a permanent rejection — the prover binary is incompatible with this coordinator’s configuration. -
Resolve next batch: the coordinator computes the next batch to prove as
1 + latest_verified_batch_proof(the batch immediately after the last one verified on-chain). -
Proof already exists: does a proof from this prover type already exist for the batch? If so, the coordinator responds with an empty
BatchResponse— there’s nothing for this prover to do right now. -
Batch existence: does the batch exist in the database?
- If the batch does not exist and the prover’s code version matches the coordinator’s, the prover is simply ahead of the proposer. The coordinator responds with an empty
BatchResponse. - If the batch does not exist and the versions differ, the prover is stale: future batches will be created with the coordinator’s version. The coordinator responds with
VersionMismatch.
- If the batch does not exist and the prover’s code version matches the coordinator’s, the prover is simply ahead of the proposer. The coordinator responds with an empty
-
Version match: the batch exists, so its public input must also exist (they are stored atomically). The coordinator looks up the input for the prover’s code version. If not found, the batch was created with a different version — the coordinator responds with
VersionMismatch. -
Happy path: the batch exists, has no proof for this type yet, and has input matching the prover’s version. The coordinator responds with a full
BatchResponsecontaining the batch number, input data, and proof format.
Prover-side handling
| Coordinator response | Prover action |
|---|---|
BatchResponse (with data) | Prove the batch, submit the proof |
BatchResponse (empty) | Sleep, retry later |
VersionMismatch | Log version mismatch warning, sleep, retry later |
ProverTypeNotNeeded | Log error, skip this coordinator, continue with others |
References
For running the prover, see Deploy an L2. For developer-focused setup and run instructions, see Running the Prover. For comprehensive details on the internals of the prover, see ethrex-prover.
TDX execution module
This document has documentation related to proving ethrex blocks using TDX.
Usage
Note
- Running the following without an L2 running will continuously throw the error:
Error sending quote: Failed to get ProverSetupAck: Connection refused (os error 111). If you want to run this in a proper setup go to the Running section.- The quote generator runs in a QEMU, to quit it press
CTRL+A X.
On a machine with TDX support with the required setup go to quote-gen and run
make run
What is TDX?
TDX is an Intel technology implementing a Trusted Execution Environment. Such an environment allows verifying certain code was executed without being tampered with or observed.
These verifications (attestations) are known as “quotes” and contain signatures verifying the attestation was generated by a genuine processor, the measurements at the time, and a user-provided piece of data binding the proof.
The measurements are saved to four Run Time Measurement Registers (RTMR), with each RTMR representing a boot stage. This is analogous to how PCRs work.
Usage considerations
Do not hardcode quote verification parameters as they might change.
It’s easy to silently overlook non-verified areas such as accidentally leaving login enabled, or not verifying the integrity of the state.
Boot sequence
- Firmware (OVMF here) is loaded (and hashed into RTMR[0])
- UKI is loaded (and hashed into a RTMR)
- kernel and initrd are extracted from the UKI and executed
- root partition is verified using the
roothash=value provided on the kernel cmdline and thehashpartition with the dm-verity merkle tree - root partition is mounted read-only
- (WIP) systemd executes the payload
Image build components
For reproducibility of images and hypervisor runtime we use Nix.
hypervisor.nix
This builds the modified (with patches for TDX support) qemu, and TDX-specific VBIOS (OVMF) and exports a script to run a given image (the parameters, specifically added devices, affect the measurements).
service.nix
This contains the quote-gen service. Its hash changes every time a non-gitignored file changes.
image.nix
Exports an image that uses UKI and dm-verity to generate an image where changing any component changes the hash of the bootloader (the UKI image), which is measured by the BIOS.
Running
You can enable the prover by setting ETHREX_L2_TDX=true.
For development purposes, you can use the flag ETHREX_TDX_DEV_MODE=true to disable quote verification. This allows you to run the quote generator even without having TDX-capable hardware.
Ensure the proof coordinator is reachable at 172.17.0.1. You can bring up the network by first starting the L2 components:
// cd crates/l2
make init ETHREX_L2_TDX=true PROOF_COORDINATOR_ADDRESS=0.0.0.0
And in another terminal, running the VM:
// cd crates/l2
make -C tee/quote-gen run
Troubleshooting
unshare: write failed /proc/self/uid_map: Operation not permitted
If you get this error when building the image, it’s probably because your OS has unprivileged userns restricted by default. You can undo this by running the following commands as root, or running the build as root while disabling sandboxing.
sysctl kernel.unprivileged_userns_apparmor_policy=0
sysctl kernel.apparmor_restrict_unprivileged_userns=0
RTMR/MRTD mismatch
If any code or dependencies changed, the measurements will change.
To obtain the new measurements, first you obtain the quote by running the prover (you don’t need to have the l2 running). Its output will contain Sending quote <very long hex string>.
This usually causes a RTMR1 mismatch. The easiest way to obtain the new RTMR values is by looking at the printed quote for the next 96 bytes after the RTMR0, corresponding to RTMR1||RTMR2 (48 bytes each).
More generally, you can generate a report with DCAP.verifyAndAttestOnChain(quote) which validates and extracts the report.
Look at bytes 341..485 of the output for RTMRs and bytes 149..197 for the MRTD.
For example, the file quote.example contains a quote, which can be turned into the following report:
00048100000000b0c06f000000060103000000000000000000000000005b38e33a6487958b72c3c12a938eaa5e3fd4510c51aeeab58c7d5ecee41d7c436489d6c8e4f92f160b7cad34207b00c100000000000000000000000000000000000000000000000000000000000000000000000000000000000000000000000000000000000000000000001000000000e702060000000000

91eb2b44d141d4ece09f0c75c2c53d247a3c68edd7fafe8a3520c942a604a407de03ae6dc5f87f27428b2538873118b7 # MRTD

000000000000000000000000000000000000000000000000000000000000000000000000000000000000000000000000000000000000000000000000000000000000000000000000000000000000000000000000000000000000000000000000000000000000000000000000000000000000000000000000000000000000000000000000000000000000000000000000

4f3d617a1c89bd9a89ea146c15b04383b7db7318f41a851802bba8eace5a6cf71050e65f65fd50176e4f006764a42643 # RTMR0
53827a034d1e4c7f13fd2a12aee4497e7097f15a04794553e12fe73e2ffb8bd57585e771951115a13ec4d7e6bc193038 # RTMR1
2ca1a728ff13c36195ad95e8f725bf00d7f9c5d6ed730fb8f50cccad692ab81aefc83d594819375649be934022573528 # RTMR2
000000000000000000000000000000000000000000000000000000000000000000000000000000000000000000000000 # RTMR3

39618efd10b14136ab416d6acfff8e36b23533a90000000000000000000000000000000000000000000000000000000000000000000000000000000000000000
Interacting with the L2
This section explains how to interact with your L2 rollup built with ethrex. Here you’ll find guides for:
- Depositing and withdrawing assets
- Connecting wallets like MetaMask
- Deploying smart contracts
- Maintaining and operating the sequencer
- Interacting with shared bridge
Use these guides to perform common actions and manage your L2 network.
Deposit assets into the L2
To transfer ETH from Ethereum L1 to your L2 account, you need to use the CommonBridge as explained in this section.
Prerequisites for L1 deposit
- An L1 account with sufficient ETH balance, for developing purposes you can use:
- Address:
0x8943545177806ed17b9f23f0a21ee5948ecaa776 - Private Key:
0xbcdf20249abf0ed6d944c0288fad489e33f66b3960d9e6229c1cd214ed3bbe31
- Address:
- The address of the deployed
CommonBridgecontract. - An Ethereum utility tool like Rex
Making a deposit
Making a deposit in the Bridge, using Rex, is as simple as:
# Format: rex l2 deposit <AMOUNT> <PRIVATE_KEY> <BRIDGE_ADDRESS> [L1_RPC_URL]
rex l2 deposit 50000000 0xbcdf20249abf0ed6d944c0288fad489e33f66b3960d9e6229c1cd214ed3bbe31 0x65dd6dc5df74b7e08e92c910122f91d7b2d5184f
Verifying the updated L2 balance
Once the deposit is made you can verify the balance has increased with:
# Format: rex l2 balance <ADDRESS> [RPC_URL]
rex l2 balance 0x8943545177806ed17b9f23f0a21ee5948ecaa776
For more information on what you can do with the CommonBridge see Ethrex L2 contracts.
Withdraw assets from the L2
This section explains how to withdraw funds from the L2 through the native bridge.
Prerequisites for L2 withdrawal
- An L2 account with sufficient ETH balance, for developing purposes you can use:
- Address:
0x8943545177806ed17b9f23f0a21ee5948ecaa776 - Private Key:
0xbcdf20249abf0ed6d944c0288fad489e33f66b3960d9e6229c1cd214ed3bbe31
- Address:
- The address of the deployed
CommonBridgeL2 contract (note here that we are calling the L2 contract instead of the L1 as in the deposit case). If not specified, You can use:CommonBridgeL2:0x000000000000000000000000000000000000ffff
- An Ethereum utility tool like Rex.
Making a withdrawal
Using Rex, we simply run the rex l2 withdraw command, which uses the default CommonBridge address.
# Format: rex l2 withdraw <AMOUNT> <PRIVATE_KEY> [RPC_URL]
rex l2 withdraw 5000 0xbcdf20249abf0ed6d944c0288fad489e33f66b3960d9e6229c1cd214ed3bbe31
If the withdrawal is successful, the hash will be printed like this:
Withdrawal sent: <L2_WITHDRAWAL_TX_HASH>
...
Claiming the withdrawal
After making a withdrawal, it has to be claimed in the L1, through the L1 CommonBridge contract.
For that, we can use the Rex command rex l2 claim-withdraw, with the tx hash obtained in the previous step.
But first, it is necessary to wait for the block that includes the withdrawal to be verified.
# Format: rex l2 claim-withdraw <L2_WITHDRAWAL_TX_HASH> <PRIVATE_KEY> <BRIDGE_ADDRESS> [L1_RPC_URL] [RPC_URL]
rex l2 claim-withdraw <L2_WITHDRAWAL_TX_HASH> 0xbcdf20249abf0ed6d944c0288fad489e33f66b3960d9e6229c1cd214ed3bbe31 0x65dd6dc5df74b7e08e92c910122f91d7b2d5184f
Verifying the withdrawal
Once the withdrawal is made you can verify the balance has decreased in the L2 with:
rex l2 balance 0x8943545177806ed17b9f23f0a21ee5948ecaa776
And also increased in the L1:
rex balance 0x8943545177806ed17b9f23f0a21ee5948ecaa776
Connect a Wallet
You can connect your L2 network to MetaMask to interact with your rollup using a familiar wallet interface.
Add Your L2 Network to MetaMask
- Open MetaMask and click the network dropdown.
- Select “Add custom network”.
- Enter your L2 network details:
- Network Name: (choose any name, e.g. “My L2 Rollup”)
- RPC URL:
http://localhost:1729(or your L2 node’s RPC endpoint) - Chain ID: (use the chain ID from your L2 genesis config)
- Currency Symbol: (e.g. ETH)
- Block Explorer URL: (optional, can be left blank)
- Save the network.
You can now use MetaMask to send transactions and interact with contracts on your L2.
Tip: If you are running the L2 node on a remote server, replace
localhostwith the server’s IP or domain.
Deploy a Contract to L2
You can deploy smart contracts to your L2 using rex, a simple CLI tool for interacting with Ethereum-compatible networks.
1. Generate the Contract Bytecode
First, compile your Solidity contract to get the deployment bytecode. You can use solc (v0.8.31) for this:
solc --bin MyContract.sol -o out/
The bytecode will be in out/MyContract.bin
2. Deploy with rex
Use the following command to deploy your contract:
rex deploy --rpc-url http://localhost:1729 <BYTECODE> 0 <PRIVATE_KEY>
- Replace
<BYTECODE>with the hex string from your compiled contract (e.g., contents ofMyContract.bin) - Replace
<PRIVATE_KEY>with your wallet’s private key. It must have funds in L2 - Adjust the
--rpc-urlif your L2 node is running elsewhere
For more details and advanced usage, see the rex repository.
Blockscout for ethrex L2
TBD
L2 Hub
TBD
Interacting with the shared bridge
This document details different scenarios for interacting with shared bridge enabled L2s.
Prerequisites
This guide assumes you already have two L2s running with the shared bridge enabled. Refer to Deploy a shared bridge enabled L2
ETH Transfer
Check balances
Check the balances before sending the transfer
rex balance 0xe25583099ba105d9ec0a67f5ae86d90e50036425 http://localhost:1729 # Receiver balance on first L2
rex balance 0x8943545177806ed17b9f23f0a21ee5948ecaa776 http://localhost:1730 # Sender balance on second L2
Send the transfer
rex send --rpc-url http://localhost:1730 --private-key 0xbcdf20249abf0ed6d944c0288fad489e33f66b3960d9e6229c1cd214ed3bbe31 --value 10000000000000001 0x000000000000000000000000000000000000FFFF 'sendToL2(uint256,address,uint256,bytes)' 65536999 0xe25583099ba105d9ec0a67f5ae86d90e50036425 100000 "" --gas-price 3946771033
Check balances
After some time the balances should change (about 1-2 minutes)
rex balance 0xe25583099ba105d9ec0a67f5ae86d90e50036425 http://localhost:1729 # Receiver balance on first L2
rex balance 0x8943545177806ed17b9f23f0a21ee5948ecaa776 http://localhost:1730 # Sender balance on second L2
Contract Call
Add the contract
Create a Counter.sol file with the following content
// SPDX-License-Identifier: MIT
pragma solidity ^0.8.20;

contract Counter {
    uint256 public count;

    function increment() external {
        count += 1;
    }

    function get() external view returns (uint256) {
        return count;
    }
}
Deploy the contract
rex deploy --rpc-url http://localhost:1729 --remappings 0 --contract-path ./Counter.sol 0 0xbcdf20249abf0ed6d944c0288fad489e33f66b3960d9e6229c1cd214ed3bbe31
Save the contract address for the next steps:
export COUNTER_ADDRESS=<COUNTER_ADDRESS>
Check counter value
rex call $COUNTER_ADDRESS "get()" --rpc-url http://localhost:1729
Increase the counter from the other L2
rex send --rpc-url http://localhost:1730 --private-key 0xbcdf20249abf0ed6d944c0288fad489e33f66b3960d9e6229c1cd214ed3bbe31 0x000000000000000000000000000000000000FFFF 'sendToL2(uint256,address,uint256,bytes)' 65536999 $COUNTER_ADDRESS 100000 d09de08a --gas-price 3946771033
Check counter value
rex call $COUNTER_ADDRESS "get()" --rpc-url http://localhost:1729
Contract Call and ETH Transfer
Add the contract
Create a Counter.sol file with the following content (The increment function is now payable)
// SPDX-License-Identifier: MIT
pragma solidity ^0.8.20;

contract Counter {
    uint256 public count;

    function increment() external payable {
        count += 1;
    }

    function get() external view returns (uint256) {
        return count;
    }
}
Deploy the contract
rex deploy --rpc-url http://localhost:1729 --remappings 0 --contract-path ./Counter.sol 0 0xbcdf20249abf0ed6d944c0288fad489e33f66b3960d9e6229c1cd214ed3bbe31
Save the contract address for the next steps:
export COUNTER_ADDRESS=<COUNTER_ADDRESS>
Check counter value
rex call $COUNTER_ADDRESS "get()" --rpc-url http://localhost:1729
Check counter balance
rex balance $COUNTER_ADDRESS http://localhost:1729
Increase the counter from the other L2
rex send --rpc-url http://localhost:1730 --private-key 0xbcdf20249abf0ed6d944c0288fad489e33f66b3960d9e6229c1cd214ed3bbe31 --value 1000 0x000000000000000000000000000000000000FFFF 'sendToL2(uint256,address,uint256,bytes)' 65536999 $COUNTER_ADDRESS 100000 d09de08a --gas-price 3946771033
Check counter value
rex call $COUNTER_ADDRESS "get()" --rpc-url http://localhost:1729
Check counter balance
rex balance $COUNTER_ADDRESS http://localhost:1729
Troubleshooting
If you can’t deploy the counter contract, either because of Transaction intrinsic gas overflow or because the transaction is never included in a block.
Retry the deploy command adding --priority-gas-price and --gas-price with the same value, increment it by 10 until it deploys correctly.
Fundamentals
In L2 mode, the ethrex code is repurposed to run a rollup that settles on Ethereum as the L1.
The main differences between this mode and regular ethrex are:
- In regular rollup mode, there is no consensus; the node is turned into a sequencer that proposes blocks for the chain. In based rollup mode, consensus is achieved by a mechanism that rotates sequencers, enforced by the L1.
- Block execution is proven using a RISC-V zkVM (or attested to using TDX, a Trusted Execution Environment) and its proofs (or signatures/attestations) are sent to L1 for verification.
- A set of Solidity contracts to be deployed to the L1 are included as part of chain initialization.
- Two new types of transactions are included: deposits (native token mints) and withdrawals.
At a high level, the following new parts are added to the node:
- A
proposercomponent, in charge of continually creating new blocks from the mempool transactions. This replaces the regular flow that an Ethereum L1 node has, where new blocks come from the consensus layer through theforkChoiceUpdate->getPayload->NewPayloadEngine API flow in communication with the consensus layer. - A
proversubsystem, which itself consists of two parts:- A
proverClientthat takes new blocks from the node, proves them, then sends the proof back to the node to send to the L1. This is a separate binary running outside the node, as proving has very different (and higher) hardware requirements than the sequencer. - A
proverServercomponent inside the node that communicates with the prover, sending witness data for proving and receiving proofs for settlement on L1.
- A
- L1 contracts with functions to commit to new state and then verify the state transition function, only advancing the state of the L2 if the proof verifies. It also has functionality to process deposits and withdrawals to/from the L2.
- The EVM is lightly modified with new features to process deposits and withdrawals accordingly.
Ethrex L2 documentation
For general documentation, see:
- Architecture overview for a high-level view of the ethrex L2 stack.
- Smart contracts has information on L1 and L2 smart contracts including steps to upgrade and transfer ownership.
- Based sequencing contains ethrex’s roadmap for becoming based.
- State diffs explains the mechanism needed to provide data availability.
- How asset deposits and withdrawals work.
- Fee token
- Exit window and Timelock for upgrade safety mechanisms.
- Aligned Layer Integration details how ethrex L2 integrates with Aligned Layer for proof aggregation and verification.
- Distributed proving explains how the proof coordinator, proof sender, and provers interact to enable parallel proving and multi-batch L1 verification.
State diffs
Warning
Data availability through
state diffshas been deprecated in #5135.
See theTransition to RLP encoded blockssection here for more details.
This architecture was inspired by MatterLabs’ ZKsync pubdata architecture.
To provide data availability for our blockchain, we need to publish enough information on every commit transaction to be able to reconstruct the entire state of the L2 from the beginning by querying the L1.
The data needed is:
- The nonce and balance of every
EOA. - The nonce, balance, and storage of every contract account. Note that storage here is a mapping
(U256 → U256), so there are a lot of values inside it. - The bytecode of every contract deployed on the chain.
- All withdrawal Logs.
After executing a batch of L2 blocks, the EVM will return the following data:
- A list of every storage slot modified in the batch, with their previous and next values. A storage slot is a mapping
(address, slot) -> value. Note that, in a batch, there could be repeated writes to the same slot. In that case, we keep only the latest write; all the others are discarded since they are not needed for state reconstruction. - The bytecode of every newly deployed contract. Every contract deployed is then a pair
(address, bytecode). - A list of withdrawal logs (as explained in milestone 1 we already collect these and publish a merkle root of their values as calldata, but we still need to send them as the state diff).
- A list of triples
(address, nonce_increase, balance)for every modified account. Thenonce_increaseis a value that says by how much the nonce of the account was increased in the batch (this could be more than one as there can be multiple transactions for the account in the batch). The balance is just the new balance value for the account.
The full state diff sent for each batch will then be a sequence of bytes encoded as follows. We use the notation un for a sequence of n bits, so u16 is a 16-bit sequence and u96 a 96-bit one, we don’t really care about signedness here; if we don’t specify it, the value is of variable length and a field before it specifies it.
- The first byte is a
u8: the version header. For now it should always be one, but we reserve it for future changes to the encoding/compression format. - Next come the block header info of the last block in the batch:
- The
tx_root,receipts_rootandparent_hashareu256values. - The
gas_limit,gas_used,timestamp,block_numberandbase_fee_per_gasareu64values.
- The
- Next the
ModifiedAccountslist. The first two bytes (u16) are the amount of element it has, followed by its entries. Each entry correspond to an altered address and has the form:- The first byte is the
typeof the modification. The value is au8, constrained to the range[1; 23], computed by adding the following values:1if the balance of the EOA/contract was modified.2if the nonce of the EOA/contract was modified.4if the storage of the contract was modified.8if the contract was created and the bytecode is previously unknown.16if the contract was created and the bytecode is previously known.
- The next 20 bytes, a
u160, is the address of the modified account. - If the balance was modified (i.e.
type & 0x01 == 1), the next 32 bytes, au256, is the new balance of the account. - If the nonce was modified (i.e.
type & 0x02 == 2), the next 2 bytes, au16, is the increase in the nonce. - If the storage was modified (i.e.
type & 0x04 == 4), the next 2 bytes, au16, is the number of storage slots modified. Then come the sequence of(key_u256, new_value_u256)key value pairs with the modified slots. - If the contract was created and the bytecode is previously unknown (i.e.
type & 0x08 == 8), the next 2 bytes, au16, is the length of the bytecode in bytes. Then come the bytecode itself. - If the contract was created and the bytecode is previously known (i.e.
type & 0x10 == 16), the next 32 bytes, au256, is the hash of the bytecode of the contract. - Note that values
8and16are mutually exclusive, and iftypeis greater or equal to4, then the address is a contract. Each address can only appear once in the list.
- The first byte is the
- Next the
WithdrawalLogsfield:- First two bytes are the number of entries, then come the tuples
(to_u160, amount_u256, tx_hash_u256).
- First two bytes are the number of entries, then come the tuples
- Next the
PrivilegedTransactionLogsfield:- First two bytes are the number of entries, then come the tuples
(to_u160, value_u256).
- First two bytes are the number of entries, then come the tuples
- In case of the only changes on an account are produced by withdrawals, the
ModifiedAccountsfor that address field must be omitted. In this case, the state diff can be computed by incrementing the nonce in one unit and subtracting the amount from the balance.
To recap, using || for byte concatenation and [] for optional parameters, the full encoding for state diffs is:
version_header_u8 ||
// Last Block Header info
tx_root_u256 || receipts_root_u256 || parent_hash_u256 ||
gas_limit_u64 || gas_used_u64 || timestamp_u64 ||
block_number_u64 || base_fee_per_gas_u64
// Modified Accounts
number_of_modified_accounts_u16 ||
(
  type_u8 || address_u160 || [balance_u256] || [nonce_increase_u16] ||
  [number_of_modified_storage_slots_u16 || (key_u256 || value_u256)... ] ||
  [bytecode_len_u16 || bytecode ...] ||
  [code_hash_u256]
)...
// Withdraw Logs
number_of_withdraw_logs_u16 ||
(to_u160 || amount_u256 || tx_hash_u256) ...
// Privileged Transactions Logs
number_of_privileged_transaction_logs_u16 ||
(to_u160 || value_u256) ...
The sequencer will then make a commitment to this encoded state diff (explained in the EIP 4844 section how this is done) and send on the commit transaction:
- Through calldata, the state diff commitment (which is part of the public input to the proof).
- Through the blob, the encoded state diff.
Note
As the blob is encoded as 4096 BLS12-381 field elements, every 32-bytes chunk cannot be greater than the subgroup
rsize:0x73eda753299d7d483339d80809a1d80553bda402fffe5bfeffffffff00000001. i.e., the most significant byte must be less than0x73. To avoid conflicts, we insert a0x00byte before every 31-bytes chunk to ensure this condition is met.
Comparative Analysis: Transaction Volume in Blobs Using State Diffs and Transaction Lists
The following are results from measurements conducted to understand the efficiency of blob utilization in an ethrex L2 network through the simulation of different scenarios with varying transaction complexities (e.g., ETH transfers, ERC20 transfers, and other complex smart contract interactions) and data encoding strategies, with the final goal of estimating the approximate number of transactions that can be packed into a single blob using state diffs versus full transaction lists, thereby optimizing calldata costs and achieving greater scalability.
Measurements (Amount of transactions per batch)
ETH Transfers
| Blob Payload | Batch 2 | Batch 3 | Batch 4 | Batch 5 | Batch 6 | Batch 7 | Batch 8 | Batch 9 | Batch 10 | Batch 11 |
|---|---|---|---|---|---|---|---|---|---|---|
| State Diff | 2373 | 2134 | 2367 | 2141 | 2191 | 2370 | 2309 | 2361 | 2375 | 2367 |
| Block List | 913 | 871 | 886 | 935 | 1019 | 994 | 1002 | 1011 | 1012 | 1015 |
ERC20 Transfers
| Blob Payload | Batch 2 | Batch 3 | Batch 4 | Batch 5 | Batch 6 | Batch 7 | Batch 8 | Batch 9 | Batch 10 | Batch 11 |
|---|---|---|---|---|---|---|---|---|---|---|
| State Diff | 1942 | 1897 | 1890 | 1900 | 1915 | 1873 | 1791 | 1773 | 1867 | 1858 |
| Block List | 655 | 661 | 638 | 638 | 645 | 644 | 615 | 530 | 532 | 532 |
Summary
| Blob Payload | Avg. ETH Transfers per Batch | Avg. ERC20 Transfers per Batch |
|---|---|---|
| State Diff | 2298 | 1870 |
| Block List | 965 | 609 |
Conclusion
Sending block lists in blobs instead of state diffs decreases the number of transactions that can fit in a single blob by approximately 2x for ETH transfers and 3x for ERC20 transfers.
How these measurements were done
Prerequisites
- Fresh cloned ethrex repository
- The spammer and measurer code provided in the appendix set up for running (you can create a new cargo project and copy the code there)
Steps
1. Run an L2 ethrex:
For running the measurements, we need to run an ethrex L2 node. For doing that, change your current directory to ethrex/crates/l2 in your fresh-cloned ethrex and run the following in a terminal:
ETHREX_COMMITTER_COMMIT_TIME=120000 MEMPOOL_MAX_SIZE=1000000 make init-l2-dev
This will set up and run an ethrex L2 node in dev mode with a mempool size big-enough to be able to handle the spammer transactions. And after this you should see the ethrex L2 monitor running.
2. Run the desired transactions spammer
Important
Wait a few seconds after running the L2 node to make sure it’s fully up and running before starting the spammer, and to ensure that the rich account used by the spammer has funds.
In another terminal, change your current directory to the spammer code you want to run (either ETH or ERC20) and run:
cargo run
It’s ok not to see any logs or prints as output, since the spammer code doesn’t print anything.
If you go back to the terminal where the L2 node is running, you should start seeing the following:
- The mempool table growing in size as transactions are being sent to the L2 node.
- In the L2 Blocks table, new blocks with
#Txsgreater than 0 being created as the spammer transactions are included in blocks. - Every 2 minutes (or the time you set in
ETHREX_COMMITTER_COMMIT_TIME), new batches being created in the L2 Batches table.
3. Run the measurer
Important
- Wait until enough batches are created before running the measurer.
- Ignore the results of the first 2/3 batches, since they contain other transactions created during the L2 node initialization.
In another terminal, change your current directory to the measurer code and run:
cargo run
This will start printing the total number of transactions included in each batch until the last committed one.
Note
- The measurer will query batches starting from batch 1 and will continue indefinitely until it fails to find a batch (e.g. because the L2 node hasn’t created it yet), so it is ok to see an error at the end of the output once the measurer reaches a batch that hasn’t been created yet.
Appendix
ETH Transactions Spammer
Note
This is using ethrex v6.0.0
main.rs
use ethrex_common::{
Address, U256,
types::{EIP1559Transaction, Transaction, TxKind},
};
use ethrex_l2_rpc::signer::{LocalSigner, Signable, Signer};
use ethrex_l2_sdk::send_generic_transaction;
use ethrex_rpc::EthClient;
use tokio::time::sleep;
use url::Url;
#[tokio::main]
async fn main() {
let chain_id = 65536999;
let senders = vec![
"7a738a3a8ee9cdbb5ee8dfc1fc5d97847eaba4d31fd94f89e57880f8901fa029",
"8cfe380955165dd01f4e33a3c68f4e08881f238fbbea71a2ab407f4a3759705b",
"5bb463c0e64039550de4f95b873397b36d76b2f1af62454bb02cf6024d1ea703",
"3c0924743b33b5f06b056bed8170924ca12b0d52671fb85de1bb391201709aaf",
"6aeeda1e7eda6d618de89496fce01fb6ec685c38f1c5fccaa129ec339d33ff87",
]
.iter()
.map(|s| Signer::Local(LocalSigner::new(s.parse().expect("invalid private key"))))
.collect::<Vec<Signer>>();
let eth_client: EthClient =
EthClient::new(Url::parse("http://localhost:1729").expect("Invalid URL"))
.expect("Failed to create EthClient");
let mut nonce = 0;
loop {
for sender in senders.clone() {
let signed_tx = generate_signed_transaction(nonce, chain_id, &sender).await;
send_generic_transaction(ð_client, signed_tx.into(), &sender)
.await
.expect("Failed to send transaction");
sleep(std::time::Duration::from_millis(10)).await;
}
nonce += 1;
}
}
async fn generate_signed_transaction(nonce: u64, chain_id: u64, signer: &Signer) -> Transaction {
Transaction::EIP1559Transaction(EIP1559Transaction {
nonce,
value: U256::one(),
gas_limit: 250000,
max_fee_per_gas: u64::MAX,
max_priority_fee_per_gas: 10,
chain_id,
to: TxKind::Call(Address::random()),
..Default::default()
})
.sign(&signer)
.await
.expect("failed to sign transaction")
}
Cargo.toml
[package]
name = "tx_spammer"
version = "0.1.0"
edition = "2024"

[dependencies]
ethrex-sdk = { git = "https://github.com/lambdaclass/ethrex.git", tag = "v6.0.0" }
ethrex-common = { git = "https://github.com/lambdaclass/ethrex.git", tag = "v6.0.0" }
ethrex-l2-rpc = { git = "https://github.com/lambdaclass/ethrex.git", tag = "v6.0.0" }
ethrex-rpc = { git = "https://github.com/lambdaclass/ethrex.git", tag = "v6.0.0" }

tokio = { version = "1", features = ["full"] }
url = "2"
hex = "0.4"
Measurer
A simple program that queries the L2 node for batches and blocks, counting the number of transactions in each block, and summing them up per batch.
main.rs
use reqwest::Client;
use serde_json::{Value, json};

#[tokio::main]
async fn main() -> Result<(), Box<dyn std::error::Error>> {
    let mut batch = 1;

    loop {
        let (first, last) = fetch_batch(batch).await;
        let mut txs = 0u64;
        for number in first as u64..=last as u64 {
            txs += fetch_block(number).await;
        }
        println!("Total transactions in batch {}: {}", batch, txs);

        batch += 1;
    }
}

async fn fetch_batch(number: u64) -> (i64, i64) {
    // Create the JSON body equivalent to the --data in curl
    let body = json!({
        "method": "ethrex_getBatchByNumber",
        "params": [format!("0x{:x}", number), false],
        "id": 1,
        "jsonrpc": "2.0"
    });

    // Create a blocking HTTP client
    let client = Client::new();

    // Send the POST request
    let response = client
        .post("http://localhost:1729")
        .header("Content-Type", "application/json")
        .json(&body)
        .send()
        .await
        .expect("Failed to send request")
        .json::<Value>()
        .await
        .unwrap();

    let result = &response["result"];
    let first_block = &result["first_block"].as_i64().unwrap();
    let last_block = &result["last_block"].as_i64().unwrap();
    (*first_block, *last_block)
}

async fn fetch_block(number: u64) -> u64 {
    // Create the JSON body equivalent to the --data in curl
    let body = json!({
        "method": "eth_getBlockByNumber",
        "params": [format!("0x{:x}", number), false],
        "id": 1,
        "jsonrpc": "2.0"
    });

    // Create a blocking HTTP client
    let client = Client::new();

    // Send the POST request
    let response = client
        .post("http://localhost:1729")
        .header("Content-Type", "application/json")
        .json(&body)
        .send()
        .await
        .expect("Failed to send request")
        .json::<Value>()
        .await
        .unwrap();

    let result = &response["result"];
    let transactions = &result["transactions"];
    transactions.as_array().unwrap().len() as u64
}
Cargo.toml
[package]
name = "measurer"
version = "0.1.0"
edition = "2024"

[dependencies]
reqwest = { version = "0.11", features = ["json"] }
serde_json = "1.0"
tokio = { version = "1", features = ["full"] }
ERC20 Transactions Spammer
main.rs
use ethrex_blockchain::constants::TX_GAS_COST;
use ethrex_common::{
Address, U256,
types::{EIP1559Transaction, GenericTransaction, Transaction, TxKind, TxType},
};
use ethrex_l2_rpc::signer::{LocalSigner, Signable, Signer};
use ethrex_l2_sdk::{
build_generic_tx, calldata::encode_calldata, create_deploy, send_generic_transaction,
wait_for_transaction_receipt,
};
use ethrex_rpc::{EthClient, clients::Overrides};
use tokio::time::sleep;
use url::Url;
// ERC20 compiled artifact generated from this tutorial:
// https://medium.com/@kaishinaw/erc20-using-hardhat-a-comprehensive-guide-3211efba98d4
// If you want to modify the behaviour of the contract, edit the ERC20.sol file,
// and compile it with solc.
const ERC20: &str = include_str!("./TestToken.bin").trim_ascii();
#[tokio::main]
async fn main() {
let chain_id = 65536999;
let signer = Signer::Local(LocalSigner::new(
"39725efee3fb28614de3bacaffe4cc4bd8c436257e2c8bb887c4b5c4be45e76d"
.parse()
.expect("invalid private key"),
));
let eth_client: EthClient =
EthClient::new(Url::parse("http://localhost:1729").expect("Invalid URL"))
.expect("Failed to create EthClient");
let contract_address = erc20_deploy(eth_client.clone(), &signer)
.await
.expect("Failed to deploy ERC20 contract");
let senders = vec![
"7a738a3a8ee9cdbb5ee8dfc1fc5d97847eaba4d31fd94f89e57880f8901fa029",
"8cfe380955165dd01f4e33a3c68f4e08881f238fbbea71a2ab407f4a3759705b",
"5bb463c0e64039550de4f95b873397b36d76b2f1af62454bb02cf6024d1ea703",
"3c0924743b33b5f06b056bed8170924ca12b0d52671fb85de1bb391201709aaf",
"6aeeda1e7eda6d618de89496fce01fb6ec685c38f1c5fccaa129ec339d33ff87",
]
.iter()
.map(|s| Signer::Local(LocalSigner::new(s.parse().expect("invalid private key"))))
.collect::<Vec<Signer>>();
claim_erc20_balances(contract_address, eth_client.clone(), senders.clone())
.await
.expect("Failed to claim ERC20 balances");
let mut nonce = 1;
loop {
for sender in senders.clone() {
let signed_tx =
generate_erc20_transaction(nonce, chain_id, &sender, ð_client, contract_address)
.await;
send_generic_transaction(ð_client, signed_tx.into(), &sender)
.await
.expect("Failed to send transaction");
println!(
"Sent transaction with nonce {} for address {}",
nonce,
sender.address()
);
sleep(std::time::Duration::from_millis(10)).await;
}
nonce += 1;
}
}
// Given an account vector and the erc20 contract address, claim balance for all accounts.
async fn claim_erc20_balances(
contract_address: Address,
client: EthClient,
accounts: Vec<Signer>,
) -> eyre::Result<()> {
for account in accounts {
let claim_balance_calldata = encode_calldata("freeMint()", &[]).unwrap();
let claim_tx = build_generic_tx(
&client,
TxType::EIP1559,
contract_address,
account.address(),
claim_balance_calldata.into(),
Default::default(),
)
.await
.unwrap();
let tx_hash = send_generic_transaction(&client, claim_tx, &account)
.await
.unwrap();
wait_for_transaction_receipt(tx_hash, &client, 1000)
.await
.unwrap();
}
Ok(())
}
async fn deploy_contract(
client: EthClient,
deployer: &Signer,
contract: Vec<u8>,
) -> eyre::Result<Address> {
let (_, contract_address) =
create_deploy(&client, deployer, contract.into(), Overrides::default()).await?;
eyre::Ok(contract_address)
}
async fn erc20_deploy(client: EthClient, deployer: &Signer) -> eyre::Result<Address> {
let erc20_bytecode = hex::decode(ERC20).expect("Failed to decode ERC20 bytecode");
deploy_contract(client, deployer, erc20_bytecode).await
}
async fn generate_erc20_transaction(
nonce: u64,
chain_id: u64,
signer: &Signer,
client: &EthClient,
contract_address: Address,
) -> GenericTransaction {
let send_calldata = encode_calldata(
"transfer(address,uint256)",
&[
ethrex_l2_common::calldata::Value::Address(Address::random()),
ethrex_l2_common::calldata::Value::Uint(U256::one()),
],
)
.unwrap();
let tx = build_generic_tx(
client,
TxType::EIP1559,
contract_address,
signer.address(),
send_calldata.into(),
Overrides {
chain_id: Some(chain_id),
value: None,
nonce: Some(nonce),
max_fee_per_gas: Some(i64::MAX as u64),
max_priority_fee_per_gas: Some(10_u64),
gas_limit: Some(TX_GAS_COST * 100),
..Default::default()
},
)
.await
.unwrap();
tx
}
Cargo.toml
[package]
name = "tx_spammer"
version = "0.1.0"
edition = "2024"

[dependencies]
ethrex-sdk = { git = "https://github.com/lambdaclass/ethrex.git", tag = "v6.0.0" }
ethrex-common = { git = "https://github.com/lambdaclass/ethrex.git", tag = "v6.0.0" }
ethrex-l2-rpc = { git = "https://github.com/lambdaclass/ethrex.git", tag = "v6.0.0" }
ethrex-rpc = { git = "https://github.com/lambdaclass/ethrex.git", tag = "v6.0.0" }
tokio = { version = "1", features = ["full"] }
ethrex-l2-common = { git = "https://github.com/lambdaclass/ethrex.git", tag = "v6.0.0" }
ethrex-blockchain = { git = "https://github.com/lambdaclass/ethrex.git", tag = "v6.0.0" }
url = "2"
hex = "0.4"
eyre = "0.6"
TestToken.bin
608060405234801561000f575f5ffd5b506040518060400160405280600881526020017f46756e546f6b656e0000000000000000000000000000000000000000000000008152506040518060400160405280600381526020017f46554e0000000000000000000000000000000000000000000000000000000000815250816003908161008b9190610598565b50806004908161009b9190610598565b5050506100b83369d3c21bcecceda10000006100bd60201b60201c565b61077c565b5f73ffffffffffffffffffffffffffffffffffffffff168273ffffffffffffffffffffffffffffffffffffffff160361012d575f6040517fec442f0500000000000000000000000000000000000000000000000000000000815260040161012491906106a6565b60405180910390fd5b61013e5f838361014260201b60201c565b5050565b5f73ffffffffffffffffffffffffffffffffffffffff168373ffffffffffffffffffffffffffffffffffffffff1603610192578060025f82825461018691906106ec565b92505081905550610260565b5f5f5f8573ffffffffffffffffffffffffffffffffffffffff1673ffffffffffffffffffffffffffffffffffffffff1681526020019081526020015f205490508181101561021b578381836040517fe450d38c0000000000000000000000000000000000000000000000000000000081526004016102129392919061072e565b60405180910390fd5b8181035f5f8673ffffffffffffffffffffffffffffffffffffffff1673ffffffffffffffffffffffffffffffffffffffff1681526020019081526020015f2081905550505b5f73ffffffffffffffffffffffffffffffffffffffff168273ffffffffffffffffffffffffffffffffffffffff16036102a7578060025f82825403925050819055506102f1565b805f5f8473ffffffffffffffffffffffffffffffffffffffff1673ffffffffffffffffffffffffffffffffffffffff1681526020019081526020015f205f82825401925050819055505b8173ffffffffffffffffffffffffffffffffffffffff168373ffffffffffffffffffffffffffffffffffffffff167fddf252ad1be2c89b69c2b068fc378daa952ba7f163c4a11628f55a4df523b3ef8360405161034e9190610763565b60405180910390a3505050565b5f81519050919050565b7f4e487b71000000000000000000000000000000000000000000000000000000005f52604160045260245ffd5b7f4e487b71000000000000000000000000000000000000000000000000000000005f52602260045260245ffd5b5f60028204905060018216806103d657607f821691505b6020821081036103e9576103e8610392565b5b50919050565b5f819050815f5260205f209050919050565b5f6020601f8301049050919050565b5f82821b905092915050565b5f6008830261044b7fffffffffffffffffffffffffffffffffffffffffffffffffffffffffffffffff82610410565b6104558683610410565b95508019841693508086168417925050509392505050565b5f819050919050565b5f819050919050565b5f61049961049461048f8461046d565b610476565b61046d565b9050919050565b5f819050919050565b6104b28361047f565b6104c66104be826104a0565b84845461041c565b825550505050565b5f5f905090565b6104dd6104ce565b6104e88184846104a9565b505050565b5b8181101561050b576105005f826104d5565b6001810190506104ee565b5050565b601f82111561055057610521816103ef565b61052a84610401565b81016020851015610539578190505b61054d61054585610401565b8301826104ed565b50505b505050565b5f82821c905092915050565b5f6105705f1984600802610555565b1980831691505092915050565b5f6105888383610561565b9150826002028217905092915050565b6105a18261035b565b67ffffffffffffffff8111156105ba576105b9610365565b5b6105c482546103bf565b6105cf82828561050f565b5f60209050601f831160018114610600575f84156105ee578287015190505b6105f8858261057d565b86555061065f565b601f19841661060e866103ef565b5f5b8281101561063557848901518255600182019150602085019450602081019050610610565b86831015610652578489015161064e601f891682610561565b8355505b6001600288020188555050505b505050505050565b5f73ffffffffffffffffffffffffffffffffffffffff82169050919050565b5f61069082610667565b9050919050565b6106a081610686565b82525050565b5f6020820190506106b95f830184610697565b92915050565b7f4e487b71000000000000000000000000000000000000000000000000000000005f52601160045260245ffd5b5f6106f68261046d565b91506107018361046d565b9250828201905080821115610719576107186106bf565b5b92915050565b6107288161046d565b82525050565b5f6060820190506107415f830186610697565b61074e602083018561071f565b61075b604083018461071f565b949350505050565b5f6020820190506107765f83018461071f565b92915050565b610e8c806107895f395ff3fe608060405234801561000f575f5ffd5b506004361061009c575f3560e01c80635b70ea9f116100645780635b70ea9f1461015a57806370a082311461016457806395d89b4114610194578063a9059cbb146101b2578063dd62ed3e146101e25761009c565b806306fdde03146100a0578063095ea7b3146100be57806318160ddd146100ee57806323b872dd1461010c578063313ce5671461013c575b5f5ffd5b6100a8610212565b6040516100b59190610b05565b60405180910390f35b6100d860048036038101906100d39190610bb6565b6102a2565b6040516100e59190610c0e565b60405180910390f35b6100f66102c4565b6040516101039190610c36565b60405180910390f35b61012660048036038101906101219190610c4f565b6102cd565b6040516101339190610c0e565b60405180910390f35b6101446102fb565b6040516101519190610cba565b60405180910390f35b610162610303565b005b61017e60048036038101906101799190610cd3565b610319565b60405161018b9190610c36565b60405180910390f35b61019c61035e565b6040516101a99190610b05565b60405180910390f35b6101cc60048036038101906101c79190610bb6565b6103ee565b6040516101d99190610c0e565b60405180910390f35b6101fc60048036038101906101f79190610cfe565b610410565b6040516102099190610c36565b60405180910390f35b60606003805461022190610d69565b80601f016020809104026020016040519081016040528092919081815260200182805461024d90610d69565b80156102985780601f1061026f57610100808354040283529160200191610298565b820191905f5260205f20905b81548152906001019060200180831161027b57829003601f168201915b5050505050905090565b5f5f6102ac610492565b90506102b9818585610499565b600191505092915050565b5f600254905090565b5f5f6102d7610492565b90506102e48582856104ab565b6102ef85858561053e565b60019150509392505050565b5f6012905090565b6103173369d3c21bcecceda100000061062e565b565b5f5f5f8373ffffffffffffffffffffffffffffffffffffffff1673ffffffffffffffffffffffffffffffffffffffff1681526020019081526020015f20549050919050565b60606004805461036d90610d69565b80601f016020809104026020016040519081016040528092919081815260200182805461039990610d69565b80156103e45780601f106103bb576101008083540402835291602001916103e4565b820191905f5260205f20905b8154815290600101906020018083116103c757829003601f168201915b5050505050905090565b5f5f6103f8610492565b905061040581858561053e565b600191505092915050565b5f60015f8473ffffffffffffffffffffffffffffffffffffffff1673ffffffffffffffffffffffffffffffffffffffff1681526020019081526020015f205f8373ffffffffffffffffffffffffffffffffffffffff1673ffffffffffffffffffffffffffffffffffffffff1681526020019081526020015f2054905092915050565b5f33905090565b6104a683838360016106ad565b505050565b5f6104b68484610410565b90507fffffffffffffffffffffffffffffffffffffffffffffffffffffffffffffffff8110156105385781811015610529578281836040517ffb8f41b200000000000000000000000000000000000000000000000000000000815260040161052093929190610da8565b60405180910390fd5b61053784848484035f6106ad565b5b50505050565b5f73ffffffffffffffffffffffffffffffffffffffff168373ffffffffffffffffffffffffffffffffffffffff16036105ae575f6040517f96c6fd1e0000000000000000000000000000000000000000000000000000000081526004016105a59190610ddd565b60405180910390fd5b5f73ffffffffffffffffffffffffffffffffffffffff168273ffffffffffffffffffffffffffffffffffffffff160361061e575f6040517fec442f050000000000000000000000000000000000000000000000000000000081526004016106159190610ddd565b60405180910390fd5b61062983838361087c565b505050565b5f73ffffffffffffffffffffffffffffffffffffffff168273ffffffffffffffffffffffffffffffffffffffff160361069e575f6040517fec442f050000000000000000000000000000000000000000000000000000000081526004016106959190610ddd565b60405180910390fd5b6106a95f838361087c565b5050565b5f73ffffffffffffffffffffffffffffffffffffffff168473ffffffffffffffffffffffffffffffffffffffff160361071d575f6040517fe602df050000000000000000000000000000000000000000000000000000000081526004016107149190610ddd565b60405180910390fd5b5f73ffffffffffffffffffffffffffffffffffffffff168373ffffffffffffffffffffffffffffffffffffffff160361078d575f6040517f94280d620000000000000000000000000000000000000000000000000000000081526004016107849190610ddd565b60405180910390fd5b8160015f8673ffffffffffffffffffffffffffffffffffffffff1673ffffffffffffffffffffffffffffffffffffffff1681526020019081526020015f205f8573ffffffffffffffffffffffffffffffffffffffff1673ffffffffffffffffffffffffffffffffffffffff1681526020019081526020015f20819055508015610876578273ffffffffffffffffffffffffffffffffffffffff168473ffffffffffffffffffffffffffffffffffffffff167f8c5be1e5ebec7d5bd14f71427d1e84f3dd0314c0f7b2291e5b200ac8c7c3b9258460405161086d9190610c36565b60405180910390a35b50505050565b5f73ffffffffffffffffffffffffffffffffffffffff168373ffffffffffffffffffffffffffffffffffffffff16036108cc578060025f8282546108c09190610e23565b9250508190555061099a565b5f5f5f8573ffffffffffffffffffffffffffffffffffffffff1673ffffffffffffffffffffffffffffffffffffffff1681526020019081526020015f2054905081811015610955578381836040517fe450d38c00000000000000000000000000000000000000000000000000000000815260040161094c93929190610da8565b60405180910390fd5b8181035f5f8673ffffffffffffffffffffffffffffffffffffffff1673ffffffffffffffffffffffffffffffffffffffff1681526020019081526020015f2081905550505b5f73ffffffffffffffffffffffffffffffffffffffff168273ffffffffffffffffffffffffffffffffffffffff16036109e1578060025f8282540392505081905550610a2b565b805f5f8473ffffffffffffffffffffffffffffffffffffffff1673ffffffffffffffffffffffffffffffffffffffff1681526020019081526020015f205f82825401925050819055505b8173ffffffffffffffffffffffffffffffffffffffff168373ffffffffffffffffffffffffffffffffffffffff167fddf252ad1be2c89b69c2b068fc378daa952ba7f163c4a11628f55a4df523b3ef83604051610a889190610c36565b60405180910390a3505050565b5f81519050919050565b5f82825260208201905092915050565b8281835e5f83830152505050565b5f601f19601f8301169050919050565b5f610ad782610a95565b610ae18185610a9f565b9350610af1818560208601610aaf565b610afa81610abd565b840191505092915050565b5f6020820190508181035f830152610b1d8184610acd565b905092915050565b5f5ffd5b5f73ffffffffffffffffffffffffffffffffffffffff82169050919050565b5f610b5282610b29565b9050919050565b610b6281610b48565b8114610b6c575f5ffd5b50565b5f81359050610b7d81610b59565b92915050565b5f819050919050565b610b9581610b83565b8114610b9f575f5ffd5b50565b5f81359050610bb081610b8c565b92915050565b5f5f60408385031215610bcc57610bcb610b25565b5b5f610bd985828601610b6f565b9250506020610bea85828601610ba2565b9150509250929050565b5f8115159050919050565b610c0881610bf4565b82525050565b5f602082019050610c215f830184610bff565b92915050565b610c3081610b83565b82525050565b5f602082019050610c495f830184610c27565b92915050565b5f5f5f60608486031215610c6657610c65610b25565b5b5f610c7386828701610b6f565b9350506020610c8486828701610b6f565b9250506040610c9586828701610ba2565b9150509250925092565b5f60ff82169050919050565b610cb481610c9f565b82525050565b5f602082019050610ccd5f830184610cab565b92915050565b5f60208284031215610ce857610ce7610b25565b5b5f610cf584828501610b6f565b91505092915050565b5f5f60408385031215610d1457610d13610b25565b5b5f610d2185828601610b6f565b9250506020610d3285828601610b6f565b9150509250929050565b7f4e487b71000000000000000000000000000000000000000000000000000000005f52602260045260245ffd5b5f6002820490506001821680610d8057607f821691505b602082108103610d9357610d92610d3c565b5b50919050565b610da281610b48565b82525050565b5f606082019050610dbb5f830186610d99565b610dc86020830185610c27565b610dd56040830184610c27565b949350505050565b5f602082019050610df05f830184610d99565b92915050565b7f4e487b71000000000000000000000000000000000000000000000000000000005f52601160045260245ffd5b5f610e2d82610b83565b9150610e3883610b83565b9250828201905080821115610e5057610e4f610df6565b5b9291505056fea2646970667358221220c2ace90351a6254148d1d6fc391d67d42f65e41f9290478674caf67a0ec34ec964736f6c634300081b0033
Reconstructing state or Data Availability
Rollups, unlike validiums, need to have their state on L1. If the only thing that’s published to it is the state root, then the sequencer could withhold data on the state of the chain. Because it is the one proposing and executing blocks, if it refuses to deliver certain data (like a merkle path to prove a withdrawal on L1), people may not have any place to get it from and get locked out of the chain or some of their funds.
This is called the Data Availability problem. Sending the entire state of the chain on every new L2 batch is impossible; state is too big. As a first next step, what we could do is:
- For every new L2 batch, send as part of the
committransaction the list of transactions in the batch. Anyone who needs to access the state of the L2 at any point in time can track allcommittransactions, start executing them from the beginning and reconstruct the state.
This is now feasible; if we take 200 bytes as a rough estimate for the size of a single transfer between two users (see this post for the calculation on legacy transactions) and 128 KB as a reasonable transaction size limit we get around ~650 transactions at maximum per commit transaction (we are assuming we use calldata here, blobs can increase this limit as each one is 128 KB and we could use multiple per transaction).
Going a bit further, instead of posting the entire transaction, we could just post which accounts have been modified and their new values (this includes deployed contracts and their bytecode of course). This can reduce the size a lot for most cases; in the case of a regular transfer as above, we only need to record balance updates of two accounts, which requires sending just two (address, balance) pairs, so (20 + 32) * 2 = 104 bytes, or around half as before. Some other clever techniques and compression algorithms can push down the publishing cost of this and other transactions much further.
This is called state diffs. Instead of publishing entire transactions for data availability, we only publish whatever state they modified. This is enough for anyone to reconstruct the entire state of the chain.
Detailed documentation on the state diffs spec.
How do we prevent the sequencer from publishing the wrong state diffs?
Once again, state diffs have to be part of the public input. With them, the prover can show that they are equal to the ones returned by the VM after executing all blocks in the batch. As always, the actual state diffs are not part of the public input, but their hash is, so the size is a fixed 32 bytes. This hash is then part of the batch commitment. The prover then assures us that the given state diff hash is correct (i.e. it exactly corresponds to the changes in state of the executed blocks).
There’s still a problem however: the L1 contract needs to have the actual state diff for data availability, not just the hash. This is sent as part of calldata of the commit transaction (actually later as a blob, we’ll get to that), so the sequencer could in theory send the wrong state diff. To make sure this can’t happen, the L1 contract hashes it to make sure that it matches the actual state diff hash that is included as part of the public input.
With that, we can be sure that state diffs are published and that they are correct. The sequencer cannot mess with them at all; either it publishes the correct state diffs or the L1 contract will reject its batch.
Compression
Because state diffs are compressed to save space on L1, this compression needs to be proven as well. Otherwise, once again, the sequencer could send the wrong (compressed) state diffs. This is easy though, we just make the prover run the compression and we’re done.
EIP 4844 (a.k.a. Blobs)
While we could send state diffs through calldata, there is a (hopefully) cheaper way to do it: blobs. The Ethereum Cancun upgrade introduced a new type of transaction where users can submit a list of opaque blobs of data, each one of size at most 128 KB. The main purpose of this new type of transaction is precisely to be used by rollups for data availability; they are priced separately through a blob_gas market instead of the regular gas one and for all intents and purposes should be much cheaper than calldata.
Using EIP 4844, our state diffs would now be sent through blobs. While this is cheaper, there’s a new problem to address with it. The whole point of blobs is that they’re cheaper because they are only kept around for approximately two weeks and ONLY in the beacon chain, i.e. the consensus side. The execution side (and thus the EVM when running contracts) does not have access to the contents of a blob. Instead, the only thing it has access to is a KZG commitment of it.
This is important. If you recall, the way the L1 ensured that the state diff published by the sequencer was correct was by hashing its contents and ensuring that the hash matched the given state diff hash. With the contents of the state diff now no longer accessible by the contract, we can’t do that anymore, so we need another way to ensure the correct contents of the state diff (i.e. the blob).
The solution is to make the prover take the KZG commitment as a public input and the KZG proof as a private input, compute the state diffs after correctly executing a batch of blocks, and verify the proof to check that the commitment binds to the correct state diffs.
Because the KZG commitment is a public input, we can use the BLOBHASH EVM opcode to retrieve the blob rolling hash (which is just the hash of the KZG commitment and some other constant data) and compare it to the public input KZG commitment (which needs to be hashed too).
Execution witness
The purpose of the execution witness is to allow executing blocks without having access to the whole Ethereum state, as it wouldn’t fit in a zkVM program. It contains only the state values needed during the execution.
An execution witness contains all the initial state values (state nodes, codes, storage keys, block headers) that will be read or written to during the blocks’ execution.
An execution witness is created from a prior execution of the blocks. This execution can be done by a synced node, and it would expose the data to a RPC endpoint. This is the debug_executionWitness endpoint which is implemented by ethrex and other clients.
If this endpoint is not available, the prover needs to do the following:
- execute the blocks (also called “pre-execution”) to identify which state values will be accessed.
- log every initial state value accessed or updated during this execution.
- retrieve an MPT proof for each value, linking it (or its non-existence) to the initial state root hash, using the
eth_getProofRPC endpoint of a synced node.
Steps 1 and 2 are data collection steps only - no validation is performed at this stage. The actual validation happens later inside the zkVM guest program. Step 3 involves more complex logic due to potential issues when restructuring the pruned state trie after value removals. In sections initial state validation and final state validation we explain what are pruned tries and in which case they get restructured.
If a value is removed during block execution (meaning it existed initially but not finally), two pathological cases can occur where the witness lacks sufficient information to update the trie structure correctly:
Case 1
Here, only leaf 1 is part of the execution witness, so we lack the proof (and thus the node data) for leaf 2. After removing leaf 1, branch 1 becomes redundant. During trie restructuring, it’s replaced by leaf 3, whose path is the path of leaf 2 concatenated with a prefix nibble (k) representing the choice taken at the original branch 1, and keeping leaf 2’s value.
branch1 = {c_1, c_2, ..., c_k, ..., c_16} # Only c_k = hash(leaf2) is non-empty
leaf2 = {value, path}
leaf3 = {value, concat(k, path)} # New leaf replacing branch1 and leaf2
Without leaf 2’s data, we cannot construct leaf 3. The solution is to fetch the final state proof for the key of leaf 2. This yields an exclusion proof containing leaf 3. By removing the prefix nibble k, we can reconstruct the original path and value of leaf 2. This process might need to be repeated if similar restructuring occurred at higher levels of the trie.
Case 2
In this case, restructuring requires information about branch/ext 2 (which could be a branch or extension node), but this node might not be in the witness. Checking the final extension node might seem sufficient to deduce branch/ext 2 in simple scenarios. However, this fails if similar restructuring occurred at higher trie levels involving more removals, as the final extension node might combine paths from multiple original branches, making it ambiguous to reconstruct the specific missing branch/ext 2 node.
Comparative Analysis: debug_executionWitness Latency
This document presents the results of measurements conducted to analyze the latency improvements of the debug_executionWitness RPC method across different configurations.
Note
All measurements were obtained using an RPC node running on the same machine, avoiding network-related latency.
Each configuration was measured over a different block range at different points in time. While block characteristics vary, the sample sizes are large enough to provide meaningful comparisons.
Configurations
- Pre-Serialized (added in PR #5956): Execution witnesses are generated during payload execution, converted to
RpcExecutionWitness, and stored as pre-serialized JSON bytes in the database. On read, the bytes are parsed directly toserde_json::Valuewithout any additional traversal or serialization. - Pre-Generated: Execution witnesses are generated during payload execution and stored in the database (but require
encode_subtrie()traversal and serialization on each read). - On-Demand: Execution witnesses are generated when calling
debug_executionWitness.
Measurements
| Metric | Pre-Serialized | Pre-Generated | On-Demand |
|---|---|---|---|
| Total Blocks Analyzed | 199 | 176 | 176 |
| Min Time | 6 ms | 3 ms | 56 ms |
| Max Time | 268 ms | 255 ms | 521 ms |
| Average Time | 94 ms | 131 ms | 242 ms |
| Median Time | 91 ms | 130 ms | 224 ms |
| Block Range | 24335714 – 24335912 | 24191178 – 24191353 | 24190748 – 24190923 |
Conclusions
Pre-Serialized vs On-Demand
The average latency drops from 242 ms (on-demand) to 94 ms (pre-serialized), representing an improvement of approximately 61%. Median latency shows a similar improvement, decreasing from 224 ms to 91 ms.
Pre-Serialized vs Pre-Generated
The average latency drops from 131 ms (pre-generated) to 94 ms (pre-serialized), representing an additional improvement of approximately 28%. This improvement comes from eliminating the encode_subtrie() depth-first traversal that was previously performed on every read to convert ExecutionWitness to RpcExecutionWitness.
Pre-Generated vs On-Demand
The average latency drops from 242 ms (on-demand) to 131 ms (pre-generated), representing an improvement of approximately 46%. Median latency shows a similar improvement, decreasing from 224 ms to 130 ms.
Overall
Pre-serialized execution witnesses exhibit the tightest latency distribution. On-demand requests frequently experience high-latency spikes due to witness generation at request time. Pre-generating and pre-serializing execution witnesses during payload execution effectively eliminates most of these spikes and results in more predictable response times.
How These Measurements Were Done
These metrics were obtained from an ethrex node synced to the Ethereum mainnet.
Each configuration was measured over a contiguous range of blocks, and latency was recorded for each request.
How to Get Metrics
-
Ensure the node is synced.
Use the--precompute-witnessesflag to generate and store execution witnesses upon receiving anewPayloadmessage. -
Enable debug logging for
ethrex-replayby editingsrc/main.rs:21:add_directive(Directive::from(tracing::Level::DEBUG)) -
Run
ethrex-replayusing the--endlessflag:cargo run -r -- blocks --endless --rpc-url [RPC_URL] -
Filter logs to capture execution witness latency:
cargo run -r -- blocks --endless --rpc-url [RPC_URL] 2>&1 | grep --line-buffered 'Got execution witness for block' | tee execution_witness_times.txt -
Post-process the captured measurements to compute min, max, average, and median latencies.
Appendix
Full Measurement Data
Pre-Serialized
Total blocks analyzed: 199
| Block Number | Time (ms) |
|---|---|
| 24335714 | 110 |
| 24335715 | 87 |
| 24335716 | 97 |
| 24335717 | 71 |
| 24335718 | 62 |
| 24335719 | 105 |
| 24335720 | 62 |
| 24335721 | 72 |
| 24335722 | 33 |
| 24335723 | 98 |
| 24335724 | 95 |
| 24335725 | 139 |
| 24335726 | 61 |
| 24335727 | 88 |
| 24335728 | 81 |
| 24335729 | 97 |
| 24335730 | 73 |
| 24335731 | 126 |
| 24335732 | 112 |
| 24335733 | 120 |
| 24335734 | 66 |
| 24335735 | 106 |
| 24335736 | 87 |
| 24335737 | 97 |
| 24335738 | 161 |
| 24335739 | 27 |
| 24335740 | 114 |
| 24335741 | 85 |
| 24335742 | 133 |
| 24335743 | 36 |
| 24335744 | 164 |
| 24335745 | 129 |
| 24335746 | 44 |
| 24335747 | 46 |
| 24335748 | 36 |
| 24335749 | 141 |
| 24335750 | 145 |
| 24335751 | 119 |
| 24335752 | 112 |
| 24335753 | 78 |
| 24335754 | 82 |
| 24335755 | 142 |
| 24335756 | 21 |
| 24335757 | 131 |
| 24335758 | 99 |
| 24335759 | 77 |
| 24335760 | 107 |
| 24335761 | 97 |
| 24335762 | 132 |
| 24335763 | 78 |
| 24335764 | 83 |
| 24335765 | 48 |
| 24335766 | 131 |
| 24335767 | 83 |
| 24335768 | 60 |
| 24335769 | 59 |
| 24335770 | 147 |
| 24335771 | 75 |
| 24335772 | 70 |
| 24335773 | 146 |
| 24335774 | 78 |
| 24335775 | 104 |
| 24335776 | 94 |
| 24335777 | 97 |
| 24335778 | 106 |
| 24335779 | 91 |
| 24335780 | 57 |
| 24335781 | 60 |
| 24335782 | 186 |
| 24335783 | 122 |
| 24335784 | 53 |
| 24335785 | 143 |
| 24335786 | 79 |
| 24335787 | 83 |
| 24335788 | 100 |
| 24335789 | 68 |
| 24335790 | 114 |
| 24335791 | 64 |
| 24335792 | 102 |
| 24335793 | 132 |
| 24335794 | 67 |
| 24335795 | 111 |
| 24335796 | 73 |
| 24335797 | 96 |
| 24335798 | 77 |
| 24335799 | 38 |
| 24335800 | 171 |
| 24335801 | 140 |
| 24335802 | 78 |
| 24335803 | 105 |
| 24335804 | 75 |
| 24335805 | 107 |
| 24335806 | 84 |
| 24335807 | 78 |
| 24335808 | 39 |
| 24335809 | 107 |
| 24335810 | 108 |
| 24335811 | 146 |
| 24335812 | 82 |
| 24335813 | 118 |
| 24335814 | 87 |
| 24335815 | 86 |
| 24335816 | 82 |
| 24335817 | 97 |
| 24335818 | 106 |
| 24335819 | 31 |
| 24335820 | 158 |
| 24335821 | 86 |
| 24335822 | 71 |
| 24335823 | 77 |
| 24335824 | 73 |
| 24335825 | 113 |
| 24335826 | 41 |
| 24335827 | 137 |
| 24335828 | 92 |
| 24335829 | 81 |
| 24335830 | 100 |
| 24335831 | 119 |
| 24335832 | 80 |
| 24335833 | 85 |
| 24335834 | 6 |
| 24335835 | 45 |
| 24335836 | 171 |
| 24335837 | 134 |
| 24335838 | 268 |
| 24335839 | 79 |
| 24335840 | 169 |
| 24335841 | 158 |
| 24335842 | 23 |
| 24335843 | 164 |
| 24335844 | 97 |
| 24335845 | 104 |
| 24335846 | 93 |
| 24335847 | 19 |
| 24335848 | 119 |
| 24335849 | 78 |
| 24335850 | 121 |
| 24335851 | 79 |
| 24335852 | 138 |
| 24335853 | 74 |
| 24335854 | 92 |
| 24335855 | 106 |
| 24335856 | 82 |
| 24335857 | 83 |
| 24335858 | 74 |
| 24335859 | 77 |
| 24335860 | 41 |
| 24335861 | 91 |
| 24335862 | 17 |
| 24335863 | 91 |
| 24335864 | 118 |
| 24335865 | 109 |
| 24335866 | 85 |
| 24335867 | 84 |
| 24335868 | 74 |
| 24335869 | 73 |
| 24335870 | 90 |
| 24335871 | 102 |
| 24335872 | 85 |
| 24335873 | 109 |
| 24335874 | 42 |
| 24335875 | 72 |
| 24335876 | 130 |
| 24335877 | 67 |
| 24335878 | 109 |
| 24335879 | 102 |
| 24335880 | 75 |
| 24335881 | 120 |
| 24335882 | 74 |
| 24335883 | 85 |
| 24335884 | 82 |
| 24335885 | 94 |
| 24335886 | 95 |
| 24335887 | 57 |
| 24335888 | 108 |
| 24335889 | 41 |
| 24335890 | 131 |
| 24335891 | 156 |
| 24335892 | 105 |
| 24335893 | 119 |
| 24335894 | 91 |
| 24335895 | 64 |
| 24335896 | 139 |
| 24335897 | 144 |
| 24335898 | 86 |
| 24335899 | 40 |
| 24335900 | 52 |
| 24335901 | 180 |
| 24335902 | 121 |
| 24335903 | 42 |
| 24335904 | 66 |
| 24335905 | 70 |
| 24335906 | 92 |
| 24335907 | 104 |
| 24335908 | 82 |
| 24335909 | 85 |
| 24335910 | 78 |
| 24335911 | 97 |
| 24335912 | 86 |
Pre-Generated
Total blocks analyzed: 176
| Block Number | Time (ms) |
|---|---|
| 24191178 | 103 |
| 24191179 | 156 |
| 24191180 | 61 |
| 24191181 | 127 |
| 24191182 | 103 |
| 24191183 | 126 |
| 24191184 | 132 |
| 24191185 | 106 |
| 24191186 | 97 |
| 24191187 | 136 |
| 24191188 | 64 |
| 24191189 | 212 |
| 24191190 | 50 |
| 24191191 | 167 |
| 24191192 | 132 |
| 24191193 | 131 |
| 24191194 | 97 |
| 24191195 | 124 |
| 24191196 | 99 |
| 24191197 | 99 |
| 24191198 | 113 |
| 24191199 | 104 |
| 24191200 | 113 |
| 24191201 | 135 |
| 24191202 | 157 |
| 24191203 | 120 |
| 24191204 | 120 |
| 24191205 | 131 |
| 24191206 | 186 |
| 24191207 | 116 |
| 24191208 | 108 |
| 24191209 | 44 |
| 24191210 | 181 |
| 24191211 | 119 |
| 24191212 | 114 |
| 24191213 | 111 |
| 24191214 | 135 |
| 24191215 | 167 |
| 24191216 | 61 |
| 24191217 | 155 |
| 24191218 | 131 |
| 24191219 | 143 |
| 24191220 | 4 |
| 24191221 | 139 |
| 24191222 | 66 |
| 24191223 | 246 |
| 24191224 | 194 |
| 24191225 | 111 |
| 24191226 | 153 |
| 24191227 | 30 |
| 24191228 | 136 |
| 24191229 | 152 |
| 24191230 | 112 |
| 24191231 | 124 |
| 24191232 | 123 |
| 24191233 | 116 |
| 24191234 | 71 |
| 24191235 | 187 |
| 24191236 | 89 |
| 24191237 | 226 |
| 24191238 | 145 |
| 24191239 | 130 |
| 24191240 | 120 |
| 24191241 | 189 |
| 24191242 | 3 |
| 24191243 | 197 |
| 24191244 | 117 |
| 24191245 | 142 |
| 24191246 | 144 |
| 24191247 | 143 |
| 24191248 | 166 |
| 24191249 | 106 |
| 24191250 | 35 |
| 24191251 | 236 |
| 24191252 | 141 |
| 24191253 | 121 |
| 24191254 | 109 |
| 24191255 | 165 |
| 24191256 | 125 |
| 24191257 | 128 |
| 24191258 | 130 |
| 24191259 | 89 |
| 24191260 | 126 |
| 24191261 | 124 |
| 24191262 | 118 |
| 24191263 | 147 |
| 24191264 | 108 |
| 24191265 | 136 |
| 24191266 | 159 |
| 24191267 | 98 |
| 24191268 | 157 |
| 24191269 | 98 |
| 24191270 | 100 |
| 24191271 | 145 |
| 24191272 | 119 |
| 24191273 | 150 |
| 24191274 | 119 |
| 24191275 | 107 |
| 24191276 | 127 |
| 24191277 | 41 |
| 24191278 | 236 |
| 24191279 | 147 |
| 24191280 | 86 |
| 24191281 | 205 |
| 24191282 | 117 |
| 24191283 | 172 |
| 24191284 | 122 |
| 24191285 | 39 |
| 24191286 | 177 |
| 24191287 | 143 |
| 24191288 | 118 |
| 24191289 | 115 |
| 24191290 | 146 |
| 24191291 | 115 |
| 24191292 | 173 |
| 24191293 | 143 |
| 24191294 | 118 |
| 24191295 | 86 |
| 24191296 | 159 |
| 24191297 | 133 |
| 24191298 | 154 |
| 24191299 | 132 |
| 24191300 | 118 |
| 24191301 | 141 |
| 24191302 | 111 |
| 24191303 | 179 |
| 24191304 | 86 |
| 24191305 | 37 |
| 24191306 | 171 |
| 24191307 | 255 |
| 24191308 | 211 |
| 24191309 | 138 |
| 24191310 | 133 |
| 24191311 | 173 |
| 24191312 | 153 |
| 24191313 | 109 |
| 24191314 | 135 |
| 24191315 | 181 |
| 24191316 | 128 |
| 24191317 | 85 |
| 24191318 | 126 |
| 24191319 | 121 |
| 24191320 | 83 |
| 24191321 | 214 |
| 24191322 | 197 |
| 24191323 | 180 |
| 24191324 | 141 |
| 24191325 | 160 |
| 24191326 | 128 |
| 24191327 | 86 |
| 24191328 | 181 |
| 24191329 | 158 |
| 24191330 | 84 |
| 24191331 | 178 |
| 24191332 | 134 |
| 24191333 | 117 |
| 24191334 | 128 |
| 24191335 | 152 |
| 24191336 | 139 |
| 24191337 | 136 |
| 24191338 | 170 |
| 24191339 | 131 |
| 24191340 | 136 |
| 24191341 | 181 |
| 24191342 | 126 |
| 24191343 | 123 |
| 24191344 | 168 |
| 24191345 | 68 |
| 24191346 | 42 |
| 24191347 | 249 |
| 24191348 | 172 |
| 24191349 | 178 |
| 24191350 | 127 |
| 24191351 | 150 |
| 24191352 | 138 |
| 24191353 | 32 |
On-Demand
Total blocks analyzed: 176
| Block Number | Time (ms) |
|---|---|
| 24190748 | 228 |
| 24190749 | 286 |
| 24190750 | 308 |
| 24190751 | 290 |
| 24190752 | 272 |
| 24190753 | 334 |
| 24190754 | 208 |
| 24190755 | 189 |
| 24190756 | 118 |
| 24190757 | 367 |
| 24190758 | 128 |
| 24190759 | 411 |
| 24190760 | 226 |
| 24190761 | 179 |
| 24190762 | 451 |
| 24190763 | 489 |
| 24190764 | 350 |
| 24190765 | 254 |
| 24190766 | 304 |
| 24190767 | 220 |
| 24190768 | 154 |
| 24190769 | 521 |
| 24190770 | 56 |
| 24190771 | 311 |
| 24190772 | 436 |
| 24190773 | 226 |
| 24190774 | 235 |
| 24190775 | 216 |
| 24190776 | 222 |
| 24190777 | 259 |
| 24190778 | 165 |
| 24190779 | 232 |
| 24190780 | 197 |
| 24190781 | 206 |
| 24190782 | 424 |
| 24190783 | 209 |
| 24190784 | 232 |
| 24190785 | 213 |
| 24190786 | 262 |
| 24190787 | 190 |
| 24190788 | 233 |
| 24190789 | 206 |
| 24190790 | 178 |
| 24190791 | 277 |
| 24190792 | 167 |
| 24190793 | 329 |
| 24190794 | 408 |
| 24190795 | 368 |
| 24190796 | 160 |
| 24190797 | 221 |
| 24190798 | 208 |
| 24190799 | 296 |
| 24190800 | 256 |
| 24190801 | 222 |
| 24190802 | 131 |
| 24190803 | 318 |
| 24190804 | 270 |
| 24190805 | 179 |
| 24190806 | 220 |
| 24190807 | 201 |
| 24190808 | 205 |
| 24190809 | 279 |
| 24190810 | 252 |
| 24190811 | 140 |
| 24190812 | 378 |
| 24190813 | 221 |
| 24190814 | 325 |
| 24190815 | 241 |
| 24190816 | 186 |
| 24190817 | 193 |
| 24190818 | 174 |
| 24190819 | 327 |
| 24190820 | 210 |
| 24190821 | 208 |
| 24190822 | 195 |
| 24190823 | 244 |
| 24190824 | 80 |
| 24190825 | 128 |
| 24190826 | 363 |
| 24190827 | 231 |
| 24190828 | 286 |
| 24190829 | 368 |
| 24190830 | 198 |
| 24190831 | 293 |
| 24190832 | 275 |
| 24190833 | 309 |
| 24190834 | 219 |
| 24190835 | 91 |
| 24190836 | 319 |
| 24190837 | 269 |
| 24190838 | 292 |
| 24190839 | 193 |
| 24190840 | 203 |
| 24190841 | 188 |
| 24190842 | 124 |
| 24190843 | 305 |
| 24190844 | 236 |
| 24190845 | 179 |
| 24190846 | 148 |
| 24190847 | 280 |
| 24190848 | 208 |
| 24190849 | 265 |
| 24190850 | 197 |
| 24190851 | 225 |
| 24190852 | 266 |
| 24190853 | 181 |
| 24190854 | 225 |
| 24190855 | 256 |
| 24190856 | 216 |
| 24190857 | 374 |
| 24190858 | 225 |
| 24190859 | 296 |
| 24190860 | 175 |
| 24190861 | 171 |
| 24190862 | 406 |
| 24190863 | 236 |
| 24190864 | 196 |
| 24190865 | 184 |
| 24190866 | 265 |
| 24190867 | 172 |
| 24190868 | 123 |
| 24190869 | 470 |
| 24190870 | 184 |
| 24190871 | 244 |
| 24190872 | 172 |
| 24190873 | 99 |
| 24190874 | 387 |
| 24190875 | 209 |
| 24190876 | 207 |
| 24190877 | 133 |
| 24190878 | 161 |
| 24190879 | 223 |
| 24190880 | 217 |
| 24190881 | 234 |
| 24190882 | 261 |
| 24190883 | 203 |
| 24190884 | 234 |
| 24190885 | 263 |
| 24190886 | 193 |
| 24190887 | 211 |
| 24190888 | 168 |
| 24190889 | 344 |
| 24190890 | 88 |
| 24190891 | 399 |
| 24190892 | 191 |
| 24190893 | 244 |
| 24190894 | 140 |
| 24190895 | 195 |
| 24190896 | 275 |
| 24190897 | 121 |
| 24190898 | 462 |
| 24190899 | 291 |
| 24190900 | 192 |
| 24190901 | 183 |
| 24190902 | 268 |
| 24190903 | 294 |
| 24190904 | 277 |
| 24190905 | 271 |
| 24190906 | 190 |
| 24190907 | 222 |
| 24190908 | 109 |
| 24190909 | 335 |
| 24190910 | 252 |
| 24190911 | 91 |
| 24190912 | 143 |
| 24190913 | 414 |
| 24190914 | 73 |
| 24190915 | 457 |
| 24190916 | 93 |
| 24190917 | 148 |
| 24190918 | 479 |
| 24190919 | 156 |
| 24190920 | 80 |
| 24190921 | 421 |
| 24190922 | 411 |
| 24190923 | 220 |
Deposits
This document contains a detailed explanation of how asset deposits work.
Native ETH deposits
This section explains step by step how native ETH deposits work.
On L1:
-
The user sends ETH to the
CommonBridgecontract. Alternatively, they can also calldepositand specify the address to receive the deposit in (thel2Recipient). -
The bridge adds the deposit’s hash to the
pendingTxHashes. We explain how to compute this hash in “Generic L1->L2 messaging” -
The bridge emits a
PrivilegedTxSentevent:bytes memory callData = abi.encodeCall(ICommonBridgeL2.mintETH, (l2Recipient)); emit PrivilegedTxSent( 0xffff, // sender in L2 (the L2 bridge) 0xffff, // to (the L2 bridge) transactionId, msg.value, // value gasLimit, callData );
Off-chain:
- On each L2 node, the L1 watcher processes
PrivilegedTxSentevents, each adding aPrivilegedL2Transactionto the L2 mempool. - The privileged transaction is an EIP-2718 typed transaction, somewhat similar to an EIP-1559 transaction, but with some changes. For this case, the important difference is that the sender of the transaction is set by our L1 bridge. This enables our L1 bridge to “forge” transactions from any sender, even arbitrary addresses like the L2 bridge.
- Privileged transactions sent by the L2 bridge don’t deduct from the bridge’s balance their value.
In practice, this means ETH equal to the transaction’s
valueis minted.
On L2:
- The privileged transaction calls
mintETHon theCommonBridgeL2with the intended recipient as parameter. - The bridge verifies the sender is itself, which can only happen for deposits sent through the L1 bridge.
- The bridge sends the minted ETH to the recipient. In case of failure, it initiates an ETH withdrawal for the same amount.
Back on L1:
- A sequencer commits a batch on L1 including the privileged transaction.
- The
OnChainProposerasserts the included privileged transactions exist and are included in order. - The
OnChainProposernotifies the bridge of the consumed privileged transactions and they are removed frompendingTxHashes.
---
title: User makes an ETH deposit
---
sequenceDiagram
    box rgb(33,66,99) L1
        actor L1Alice as Alice
        participant CommonBridge
        participant OnChainProposer
    end

    actor Sequencer

    box rgb(139, 63, 63) L2
        actor CommonBridgeL2
        actor L2Alice as Alice
    end

    L1Alice->>CommonBridge: sends 42 ETH
    CommonBridge->>CommonBridge: pendingTxHashes.push(txHash)
    CommonBridge->>CommonBridge: emit PrivilegedTxSent

    CommonBridge-->>Sequencer: receives event
    Sequencer-->>CommonBridgeL2: mints 42 ETH and<br>starts processing tx
    CommonBridgeL2->>CommonBridgeL2: calls mintETH
    CommonBridgeL2->>L2Alice: sends 42 ETH

    Sequencer->>OnChainProposer: publishes batch
    OnChainProposer->>CommonBridge: consumes pending deposits
    CommonBridge-->>CommonBridge: pendingTxHashes.pop()
ERC20 deposits through the native bridge
This section explains step by step how native ERC20 deposits work.
On L1:
-
The user gives the
CommonBridgeallowance via anapprovecall to the L1 token contract. -
The user calls
depositERC20on the bridge, specifying the L1 and L2 token addresses, the amount to deposit, along with the intended L2 recipient. -
The bridge locks the specified L1 token amount in the bridge, updating the mapping with the amount locked for the L1 and L2 token pair. This ensures that L2 token withdrawals don’t consume L1 tokens that weren’t deposited into that L2 token (see “Why store the provenance of bridged tokens?” for more information).
-
The bridge emits a
PrivilegedTxSentevent:emit PrivilegedTxSent( 0, // amount (unused) 0xffff, // to (the L2 bridge) depositId, 0xffff, // sender in L2 (the L2 bridge) gasLimit, callData );
Off-chain:
- On each L2 node, the L1 watcher processes
PrivilegedTxSentevents, each adding aPrivilegedL2Transactionto the L2 mempool. - The privileged transaction is an EIP-2718 typed transaction, somewhat similar to an EIP-1559 transaction, but with some changes. For this case, the important difference is that the sender of the transaction is set by our L1 bridge. This enables our L1 bridge to “forge” transactions from any sender, even arbitrary addresses like the L2 bridge.
On L2:
- The privileged transaction performs a call to
mintERC20on theCommonBridgeL2from the L2 bridge’s address, specifying the address of the L1 and L2 tokens, along with the amount and recipient. - The bridge verifies the sender is itself, which can only happen for deposits sent through the L1 bridge.
- The bridge calls
l1Address()on the L2 token, to verify it matches the received L1 token address. - The bridge calls
crosschainMinton the L2 token, minting the specified amount of tokens and sending them to the L2 recipient. In case of failure, it initiates an ERC20 withdrawal for the same amount.
Back on L1:
- A sequencer commits a batch on L1 including the privileged transaction.
- The
OnChainProposerasserts the included privileged transactions exist and are included in order. - The
OnChainProposernotifies the bridge of the consumed privileged transactions and they are removed frompendingTxHashes.
---
title: User makes an ERC20 deposit
---
sequenceDiagram
    box rgb(33,66,99) L1
        actor L1Alice as Alice
        participant L1Token
        participant CommonBridge
        participant OnChainProposer
    end

    actor Sequencer

    box rgb(139, 63, 63) L2
        participant CommonBridgeL2
        participant L2Token
        actor L2Alice as Alice
    end

    L1Alice->>L1Token: approves token transfer
    L1Alice->>CommonBridge: calls depositERC20
    CommonBridge->>CommonBridge: pendingTxHashes.push(txHash)
    CommonBridge->>CommonBridge: emit PrivilegedTxSent

    CommonBridge-->>Sequencer: receives event
    Sequencer-->>CommonBridgeL2: starts processing tx
    CommonBridgeL2->>CommonBridgeL2: calls mintERC20

    CommonBridgeL2->>L2Token: calls l1Address
    L2Token->>CommonBridgeL2: returns address of L1Token

    CommonBridgeL2->>L2Token: calls crosschainMint
    L2Token-->>L2Alice: mints 42 tokens

    Sequencer->>OnChainProposer: publishes batch
    OnChainProposer->>CommonBridge: consumes pending deposits
    CommonBridge-->>CommonBridge: pendingTxHashes.pop()
Why store the provenance of bridged tokens?
As said before, storing the provenance of bridged tokens or, in other words, how many tokens were sent from each L1 token to each L2 token, ensures that L2 token withdrawals don’t unlock L1 tokens that weren’t deposited into another L2 token.
This can be better understood with an example:
---
title: Attacker exploits alternative bridge without token provenance
---
sequenceDiagram
    box rgb(33,66,99) L1
        actor L1Eve as Eve
        actor L1Alice as Alice
        participant CommonBridge
    end

    box rgb(139, 63, 63) L2
        participant CommonBridgeL2
        actor L2Alice as Alice
        actor L2Eve as Eve
    end

    Note over L1Eve,L2Eve: Alice does a normal deposit
    L1Alice ->> CommonBridge: Deposits 100 Foo tokens into FooL2
    CommonBridge -->> CommonBridgeL2: Notifies deposit
    CommonBridgeL2 ->> L2Alice: Sends 100 FooL2 tokens

    Note over L1Eve,L2Eve: Eve does a deposit to ensure the L2 token they control is registered with the bridge
    L1Eve ->> CommonBridge: Deposits 1 Foo token into Bar
    CommonBridge -->> CommonBridgeL2: Notifies deposit
    CommonBridgeL2 ->> L2Eve: Sends 1 Bar token

    Note over L1Eve,L2Eve: Eve does a malicious withdrawal of Alice's funds
    L2Eve ->> CommonBridgeL2: Withdraws 101 Bar tokens into Foo
    CommonBridgeL2 -->> CommonBridge: Notifies withdrawal
    CommonBridge ->> L1Eve: Sends 101 Foo tokens
Generic L1->L2 messaging
Privileged transactions are signaled by the L1 bridge through PrivilegedTxSent events.
These events are emitted by the CommonBridge contract on L1 and processed by the L1 watcher on each L2 node.
event PrivilegedTxSent (
    address indexed from,
    address indexed to,
    uint256 indexed transactionId,
    uint256 value,
    uint256 gasLimit,
    bytes data
);
As seen before, this same event is used for native deposits, but with the from artificially set to the L2 bridge address, which is also the to address.
For tracking purposes, we might want to know the hash of the L2 transaction. We can compute it as follows:
keccak256(
    bytes.concat(
        bytes20(from),
        bytes20(to),
        bytes32(transactionId),
        bytes32(value),
        bytes32(gasLimit),
        keccak256(data)
    )
)
Address Aliasing
To prevent attacks where a L1 impersonates an L2 contract, we implement Address Aliasing like Optimism (albeit with a different constant, to prevent confusion).
The attack prevented would’ve looked like this:
- An L2 contract gets deployed at address A
- Someone malicious deploys a contract at the same address (through deterministic deployments, etc)
- The malicious contract sends a privileged transaction, which can steal A’s resources on the L2
By modifying the address of L1 contracts by adding a constant, we prevent this attack since both won’t have the same address.
Forced Inclusion
Each transaction is given a deadline for processing. If the sequencer is unwilling to include a privileged transaction before this timer expires, batches stop being processed and the chain halts until the sequencer processes every expired transaction.
After an extended downtime, the sequencer can catch up by sending batches made solely out of privileged transactions.
---
title: Sequencer goes offline
---
sequenceDiagram
    box rgb(33,66,99) L1
        actor L1Alice
        actor Sequencer
        participant CommonBridge
        participant OnChainProposer
    end

    L1Alice ->> CommonBridge: Sends a privileged transaction

    Note over Sequencer: Sequencer goes offline for a long time
    Sequencer ->> OnChainProposer: Sends batch as usual
    OnChainProposer ->> Sequencer: Error
    Note over Sequencer: Operator configures the sequencer to catch up
    Sequencer ->> OnChainProposer: Sends batch of only privileged transactions
    OnChainProposer ->> Sequencer: OK
    Sequencer ->> OnChainProposer: Sends batch with remaining expired privileged transactions, along with other transactions
    OnChainProposer ->> Sequencer: OK
    Note over Sequencer: Sequencer is now caught up
    Sequencer ->> OnChainProposer: Sends batch as usual
    OnChainProposer ->> Sequencer: OK
Limitations
Due to the gas cost of computing rolling hashes, there is a limit to how many deposits can be handled in a single batch.
To prevent the creation of invalid batches, we enforce a maximum cap on deposits per batch in the l1_committer.
We also enforce the same maximum cap per block in the block_producer, to avoid situations where the l1_committer could get stuck if a single block contains more deposits than the configured batch cap.
Withdrawals
This document contains a detailed explanation of how asset withdrawals work.
Native ETH withdrawals
This section explains step by step how native ETH withdrawals work.
On L2:
-
The user sends a transaction calling
withdraw(address _receiverOnL1)on theCommonBridgeL2contract, along with the amount of ETH to be withdrawn. -
The bridge sends the withdrawn amount to the burn address.
-
The bridge calls
sendMessageToL1(bytes32 data)on theMessengercontract, withdatabeing:bytes32 data = keccak256(abi.encodePacked(ETH_ADDRESS, ETH_ADDRESS, _receiverOnL1, msg.value))The
ETH_ADDRESSis an arbitrary address we use, meaning the “token” to transfer is ETH. -
Messengeremits anL1Messageevent, with the address of the L2 bridge contract anddataas topics, along with a unique message ID.
Off-chain:
- On each L2 node, the L1 watcher extracts
L1Messageevents, generating a merkle tree with the hashed messages as leaves. The merkle tree format is explained in the “L1MessageMerkle tree” section below.
On L1:
- A sequencer commits the batch on L1, publishing the merkle tree’s root with
publishWithdrawalson the L1CommonBridge. - The user submits a withdrawal proof when calling
claimWithdrawalon the L1CommonBridge. The proof can be obtained by callingethrex_getWithdrawalProofin any L2 node, after the batch containing the withdrawal transaction was verified in the L1. - The bridge asserts the proof is valid and wasn’t previously claimed.
- The bridge sends the locked funds specified in the
L1Messageto the user.
---
title: User makes an ETH withdrawal
---
sequenceDiagram
    box rgb(139, 63, 63) L2
        actor L2Alice as Alice
        participant CommonBridgeL2
        participant Messenger
    end

    actor Sequencer

    box rgb(33,66,99) L1
        participant OnChainProposer
        participant CommonBridge
        actor L1Alice as Alice
    end

    L2Alice->>CommonBridgeL2: withdraws 42 ETH
    CommonBridgeL2->>CommonBridgeL2: burns 42 ETH
    CommonBridgeL2->>Messenger: calls sendMessageToL1
    Messenger->>Messenger: emits L1Message event

    Messenger-->>Sequencer: receives event

    Sequencer->>OnChainProposer: publishes batch
    OnChainProposer->>CommonBridge: publishes L1 message root

    L1Alice->>CommonBridge: submits withdrawal proof
    CommonBridge-->>CommonBridge: asserts proof is valid
    CommonBridge->>L1Alice: sends 42 ETH
ERC20 withdrawals through the native bridge
This section explains step by step how native ERC20 withdrawals work.
On L2:
-
The user calls
approveon the L2 tokens to allow the bridge to transfer the asset. -
The user sends a transaction calling
withdrawERC20(address _token, address _receiverOnL1, uint256 _value)on theCommonBridgeL2contract. -
The bridge calls
crosschainBurnon the L2 token, burning the amount to be withdrawn by the user. -
The bridge fetches the address of the L1 token by calling
l1Address()on the L2 token contract. -
The bridge calls
sendMessageToL1(bytes32 data)on theMessengercontract, withdatabeing:bytes32 data = keccak256(abi.encodePacked(_token.l1Address(), _token, _receiverOnL1, _value)) -
Messengeremits anL1Messageevent, with the address of the L2 bridge contract anddataas topics, along with a unique message ID.
Off-chain:
- On each L2 node, the L1 watcher extracts
L1Messageevents, generating a merkle tree with the hashed messages as leaves. The merkle tree format is explained in the “L1MessageMerkle tree” section below.
On L1:
- A sequencer commits the batch on L1, publishing the
L1MessagewithpublishWithdrawalson the L1CommonBridge. - The user submits a withdrawal proof when calling
claimWithdrawalERC20on the L1CommonBridge. The proof can be obtained by callingethrex_getWithdrawalProofin any L2 node, after the batch containing the withdrawal transaction was verified in the L1. - The bridge asserts the proof is valid and wasn’t previously claimed, and that the locked tokens mapping contains enough balance for the L1 and L2 token pair to cover the transfer.
- The bridge transfers the locked tokens specified in the
L1Messageto the user and discounts the transferred amount from the L1 and L2 token pair in the mapping.
---
title: User makes an ERC20 withdrawal
---
sequenceDiagram
    box rgb(139, 63, 63) L2
        actor L2Alice as Alice
        participant L2Token
        participant CommonBridgeL2
        participant Messenger
    end

    actor Sequencer

    box rgb(33,66,99) L1
        participant OnChainProposer
        participant CommonBridge
        participant L1Token
        actor L1Alice as Alice
    end

    L2Alice->>L2Token: approves token transfer
    L2Alice->>CommonBridgeL2: withdraws 42 of L2Token
    CommonBridgeL2->>L2Token: burns the 42 tokens
    CommonBridgeL2->>Messenger: calls sendMessageToL1
    Messenger->>Messenger: emits L1Message event

    Messenger-->>Sequencer: receives event

    Sequencer->>OnChainProposer: publishes batch
    OnChainProposer->>CommonBridge: publishes L1 message root

    L1Alice->>CommonBridge: submits withdrawal proof
    CommonBridge->>L1Token: transfers tokens
    L1Token-->>L1Alice: sends 42 tokens
Generic L2->L1 messaging
First, we need to understand the generic mechanism behind it:
L1Message
To allow generic L2->L1 messages, a system contract is added which allows sending arbitrary data. This data is emitted as L1Message events, which nodes automatically extract from blocks.
#![allow(unused)]
fn main() {
struct L1Message {
    tx_hash: H256,    // L2 transaction where it was included
    from: Address,    // Who sent the message in L2
    data_hash: H256,  // Hashed payload
    message_id: U256, // Unique message ID
}
}
L1Message Merkle tree
When sequencers commit a new batch, they include the merkle root of all the L1Messages inside the batch.
That way, L1 contracts can verify some data was sent from a specific L2 sender.
---
title: L1Message Merkle tree
---
flowchart TD

    Msg2[L1Message<sub>2</sub>]
    Root([Root])
    Node1([Node<sub>1</sub>])
    Node2([Node<sub>2</sub>])

    Root --- Node1
    Root --- Node2

    subgraph Msg1["L1Message<sub>1</sub>"]
        direction LR

        txHash1["txHash<sub>1</sub>"]
        from1["from<sub>1</sub>"]
        dataHash1["hash(data<sub>1</sub>)"]
        messageId1["messageId<sub>1</sub>"]

        txHash1 --- from1
        from1 --- dataHash1
        dataHash1 --- messageId1
    end

    Node1 --- Msg1
    Node2 --- Msg2
As shown in the diagram, the leaves of the tree are the hash of each encoded L1Message.
Messages are encoded by packing, in order:
- the transaction hash that generated it in the L2
- the address of the L2 sender
- the hashed data attached to the message
- the unique message ID
Bridging
On the L2 side, for the case of asset bridging, a contract burns some assets. It then sends a message to the L1 containing the details of this operation:
- From: L2 token address that was burnt
- To: L1 token address that will be withdrawn
- Destination: L1 address that can claim the deposit
- Amount: how much was burnt
When the batch is committed on the L1, the OnChainProposer notifies the bridge which saves the message tree root.
Once the batch containing this transaction is verified, the user can claim their funds on the L1.
To do this, they compute a merkle proof for the included batch and call the L1 CommonBridge contract.
This contract then:
- Checks that the batch is verified
- Ensures the withdrawal wasn’t already claimed
- Computes the expected leaf
- Validates that the proof leads from the leaf to the root of the message tree
- Gives the funds to the user
- Marks the withdrawal as claimed
Ethrex L2 contracts
There are two L1 contracts: OnChainProposer and CommonBridge. Both contracts are deployed using UUPS proxies, so they are upgradeable.
L1 Contracts
CommonBridge
The CommonBridge is an upgradeable smart contract that facilitates cross-chain transfers between L1 and L2.
State Variables
pendingTxHashes: Array storing hashed pending privileged transactionsbatchWithdrawalLogsMerkleRoots: Mapping of L2 batch numbers to merkle roots of withdrawal logsdeposits: Tracks how much of each L1 token was deposited for each L2 token (L1 → L2 → amount)claimedWithdrawalIDs: Tracks which withdrawals have been claimed by message IDON_CHAIN_PROPOSER: Address of the contract that can commit and verify batchesL2_BRIDGE_ADDRESS: Constant address (0xffff) representing the L2 bridge
Core Functionality
-
Deposits (L1 → L2)
deposit(): Allows users to deposit ETH to L2depositERC20(): Allows users to deposit ERC20 tokens to L2receive(): Fallback function for ETH deposits, forwarding to the sender’s address on the L2sendToL2(): Sends arbitrary data to L2 via privileged transaction
Internally the deposit functions will use the
SendValuesstruct defined as:struct SendValues { address to; // Target address on L2 uint256 gasLimit; // Maximum gas for L2 execution uint256 value; // The value of the transaction bytes data; // Calldata to execute on the target L2 contract }This expressivity allows for arbitrary cross-chain actions, e.g., depositing ETH then interacting with an L2 contract.
-
Withdrawals (L2 → L1)
claimWithdrawal(): Withdraw ETH fromCommonBridgevia Merkle proofclaimWithdrawalERC20(): Withdraw ERC20 tokens fromCommonBridgevia Merkle proofpublishWithdrawals(): Privileged function to add merkle root of L2 withdrawal logs tobatchWithdrawalLogsMerkleRootsmapping to make them claimable
-
Transaction Management
getPendingTransactionHashes(): Returns pending privileged transaction hashesremovePendingTransactionHashes(): Removes processed privileged transactions (only callable by OnChainProposer)getPendingTransactionsVersionedHash(): Returns a versioned hash of the firstnumberof pending privileged transactions
OnChainOperator
The OnChainProposer is an upgradeable smart contract that ensures the advancement of the L2. It’s used by sequencers to commit batches of L2 blocks and verify their proofs.
State Variables
batchCommitments: Mapping of batch numbers to submittedBatchCommitmentInfostructslastVerifiedBatch: The latest verified batch number (all batches ≤ this are considered verified)lastCommittedBatch: The latest committed batch number (all batches ≤ this are considered committed)authorizedSequencerAddresses: Mapping of authorized sequencer addresses that can commit and verify batches
Core Functionality
-
Batch Commitment
commitBatch(): Commits a batch of L2 blocks by storing its commitment data and publishing withdrawalsrevertBatch(): Removes unverified batches (only callable when paused)
-
Proof Verification
verifyBatches(): Verifies one or more consecutive batches using RISC0, SP1, or TDX proofsverifyBatchesAligned(): Verifies multiple batches in sequence using aligned proofs with Merkle verification
L2 Contracts
CommonBridgeL2
The CommonBridgeL2 is an L2 smart contract that facilitates cross-chain transfers between L1 and L2.
State Variables
L1_MESSENGER: Constant address (0x000000000000000000000000000000000000FFFE) representing the L2-to-L1 messenger contractBURN_ADDRESS: Constant address (0x0000000000000000000000000000000000000000) used to burn ETH during withdrawalsETH_TOKEN: Constant address (0xEeeeeEeeeEeEeeEeEeEeeEEEeeeeEeeeeeeeEEeE) representing ETH as a token
Core Functionality
-
ETH Operations
withdraw(): Initiates ETH withdrawal to L1 by burning ETH on L2 and sending a message to L1mintETH(): Transfers ETH to a recipient (called by privileged L1 bridge transactions). If it fails a withdrawal is queued.
-
ERC20 Token Operations
mintERC20(): Attempts to mint ERC20 tokens on L2 (only callable by the bridge itself via privileged transactions). If it fails a withdrawal is queued.tryMintERC20(): Internal function that validates token L1 address and performs a cross-chain mintwithdrawERC20(): Initiates ERC20 token withdrawal to L1 by burning tokens on L2 and sending a message to L1
-
Cross-Chain Messaging
_withdraw(): Private function that sends withdrawal messages to L1 via the L2-to-L1 messenger- Uses keccak256 hashing to encode withdrawal data for L1 processing
-
Access Control
onlySelf: Modifier ensuring only the bridge contract itself can call privileged functions- Validates that privileged operations (like minting) are only performed by the bridge
Messenger
The Messenger is a simple L2 smart contract that enables cross-chain communication. It supports L2 to L1 messaging by emitting L1Message events for sequencers to pick up (currently used exclusively for withdrawals), and L2 to L2 messaging by emitting L2Message events.
State Variables
lastMessageId: Counter that tracks the ID of the last emitted message (incremented before each message is sent)BRIDGE: Constant address (0x000000000000000000000000000000000000FFff) representing theCommonBridgeL2contract
Core Functionality
-
Message Sending
sendMessageToL1(): Sends a message to L1 by emitting anL1Messageevent with the sender, data, andlastMessageId. Only theCommonBridgeL2contract can call this function.sendMessageToL2(): Sends a message to another L2 chain by emitting anL2Messageevent. Only theCommonBridgeL2contract can call this function.
-
Access Control
onlyBridge: Modifier ensuring only theCommonBridgeL2contract can call messaging functions
Upgrade the contracts
To upgrade a contract, you have to create the new contract and, as the original one, inherit from OpenZeppelin’s UUPSUpgradeable. Make sure to implement the _authorizeUpgrade function and follow the proxy pattern restrictions.
Once you have the new contract, you need to do the following three steps:
-
Deploy the new contract
rex deploy <NEW_IMPLEMENTATION_BYTECODE> 0 <DEPLOYER_PRIVATE_KEY> -
Upgrade the proxy by calling the method
upgradeToAndCall(address newImplementation, bytes memory data). Thedataparameter is the calldata to call on the new implementation as an initialization, you can pass an empty stream.rex send <PROXY_ADDRESS> 'upgradeToAndCall(address,bytes)' <NEW_IMPLEMENTATION_ADDRESS> <INITIALIZATION_CALLDATA> --private-key <PRIVATE_KEY>Note: The
OnChainProposeris owned by the Timelock contract. You cannot callupgradeToAndCallon the OCP directly — it will revert withonlyOwner. The call must be routed through the Timelock. See Timelock for the available paths (schedule + execute with delay, oremergencyExecutefor immediate execution by the Security Council).The same applies to any operation restricted by
onlyOwneron the OCP (e.g.,pause,unpause). -
Check the proxy updated the pointed address to the new implementation. It should return the address of the new implementation:
curl <L1_RPC_URL> -d '{"jsonrpc": "2.0", "id": "1", "method": "eth_getStorageAt", "params": ["<PROXY_ADDRESS>", "0x360894a13ba1a3210667c828492db98dca3e2076cc3735a920a3ca505d382bbc", "latest"]}'
Transfer ownership
The contracts are Ownable2Step, that means that whenever you want to transfer the ownership, the new owner have to accept it to effectively apply the change. This is an extra step of security, to avoid accidentally transfer ownership to a wrong account. You can make the transfer in these steps:
-
Start the transfer:
rex send <PROXY_ADDRESS> 'transferOwnership(address)' <NEW_OWNER_ADDRESS> --private-key <CURRENT_OWNER_PRIVATE_KEY> -
Accept the ownership:
rex send <PROXY_ADDRESS> 'acceptOwnership()' --private-key <NEW_OWNER_PRIVATE_KEY>
Based sequencing
This section covers the fundamentals of “based” rollups in the context of L2s built with ethrex.
What is a Based Rollup?
A based rollup is a type of Layer 2 (L2) rollup that relies on the Ethereum mainnet (L1) for sequencing and ordering transactions, instead of using its own independent sequencer. This design leverages Ethereum’s security and neutrality for transaction ordering, making the rollup more trust-minimized and censorship-resistant.
Important
This documentation is about the current state of the
basedfeature development and not about the final implementation. It is subject to change as the feature evolves and there still could be unmitigated issues.
Note
This is an extension of the ethrex-L2-Sequencer documentation and is intended to be merged with it in the future.
Components
In addition to the components outlined in the ethrex-L2-Sequencer documentation, the based feature introduces new components to enable decentralized L2 sequencing. These additions enhance the system’s ability to operate across multiple nodes, ensuring resilience, scalability, and state consistency.
Sequencer State
Note
While not a traditional component, the Sequencer State is a fundamental element of the
basedfeature and deserves its own dedicated section.
The based feature decentralizes L2 sequencing, moving away from a single, centralized Sequencer to a model where multiple nodes can participate, with only one acting as the lead Sequencer at any time. This shift requires nodes to adapt their behavior depending on their role, leading to the introduction of the Sequencer State. The Sequencer State defines two possible modes:
Sequencing: The node is the lead Sequencer, responsible for proposing and committing new blocks to the L2 chain.Following: The node is not the lead Sequencer and must synchronize with and follow the blocks proposed by the current lead Sequencer.
To keep the system simple and avoid intricate inter-process communication, the Sequencer State is implemented as a global state, accessible to all Sequencer components. This design allows each component to check the state and adjust its operations accordingly. The State Updater component manages this global state.
State Updater
The State Updater is a new component tasked with maintaining and updating the Sequencer State. It interacts with the Sequencer Registry contract on L1 to determine the current lead Sequencer and adjusts the node’s state based on this information and local conditions. Its responsibilities include:
- Periodic Monitoring: The State Updater runs at regular intervals, querying the
SequencerRegistrycontract to identify the current lead Sequencer. - State Transitions: It manages transitions between
SequencingandFollowingstates based on these rules:- If the node is designated as the lead Sequencer, it enters the
Sequencingstate. - If the node is not the lead Sequencer, it enters the
Followingstate. - When a node ceases to be the lead Sequencer, it transitions to
Followingand reverts any uncommitted state to ensure consistency with the network. - When a node becomes the lead Sequencer, it transitions to
Sequencingonly if it is fully synced (i.e., has processed all blocks up to the last committed batch). If not, it remains inFollowinguntil it catches up.
- If the node is designated as the lead Sequencer, it enters the
This component ensures that the node’s behavior aligns with its role, preventing conflicts and maintaining the integrity of the L2 state across the network.
Block Fetcher
Decentralization poses a risk: a lead Sequencer could advance the L2 chain without sharing blocks, potentially isolating other nodes. To address this, the OnChainProposer contract (see ethrex-L2-Contracts documentation) has been updated to include an RLP-encoded list of blocks committed in each batch. This makes block data publicly available on L1, enabling nodes to reconstruct the L2 state if needed.
The Block Fetcher is a new component designed to retrieve these blocks from L1 when the node is in the Following state. Its responsibilities include:
- Querying L1: It queries the
OnChainProposercontract to identify the last committed batch. - Scouting Transactions: Similar to how the L1 Watcher monitors deposit transactions, the Block Fetcher scans L1 for commit transactions containing the RLP-encoded block list.
- State Reconstruction: It uses the retrieved blocks to rebuild the L2 state, ensuring the node remains synchronized with the network.
Note
Currently, the Block Fetcher is the primary mechanism for nodes to sync with the lead Sequencer. Future enhancements will introduce P2P gossiping to enable direct block sharing between nodes, improving efficiency.
Contracts
In addition to the components described above, the based feature introduces new contracts and modifies existing ones to enhance decentralization, security, and transparency. Below are the key updates and additions:
Note
This is an extension of the ethrex-L2-Contracts documentation and is intended to be merged with it in the future.
OnChainProposer (Modified)
The OnChainProposer contract, which handles batch proposals and management on L1, has been updated with the following modifications:
- New Constant:
A public constant
SEQUENCER_REGISTRYhas been added. This constant holds the address of theSequencerRegistrycontract, linking the two contracts for sequencer management. - Modifier Update:
The
onlySequencermodifier has been renamed toonlyLeadSequencer. It now checks whether the caller is the current lead Sequencer, as determined by theSequencerRegistrycontract. This ensures that only the designated leader can commit batches. - Initialization:
The
initializemethod now accepts the address of theSequencerRegistrycontract as a parameter. During initialization, this address is set to theSEQUENCER_REGISTRYconstant, establishing the connection between the contracts. - Batch Commitment:
The
commitBatchmethod has been revised to improve data availability and streamline sequencer validation:- It now requires an RLP-encoded list of blocks included in the batch. This list is published on L1 to ensure transparency and enable verification.
- The list of sequencers has been removed from the method parameters. Instead, the
SequencerRegistrycontract is now responsible for tracking and validating sequencers.
- Event Modification:
The
BatchCommittedevent has been updated to include the batch number of the committed batch. This addition enhances traceability and allows external systems to monitor batch progression more effectively. - Batch Verification:
The
verifyBatchesmethod has been made more flexible and decentralized:- The method has no access control modifier, allowing anyone—not just the lead Sequencer—to verify batches.
- It supports verifying one or more consecutive batches in a single transaction. Only one valid verification is required to advance the L2 state. This change improves resilience and reduces dependency on a single actor.
SequencerRegistry (New Contract)
The SequencerRegistry is a new contract designed to manage the pool of Sequencers and oversee the leader election process in a decentralized manner.
-
Registration:
- Anyone can register as a Sequencer by calling the
registermethod and depositing a minimum collateral of 1 ETH. This collateral serves as a Sybil resistance mechanism, ensuring that only committed participants join the network. - Sequencers can exit the registry by calling the
unregistermethod, which refunds their 1 ETH collateral upon successful deregistration.
- Anyone can register as a Sequencer by calling the
-
Leader Election: The leader election process operates on a round-robin basis to fairly distribute the lead Sequencer role:
- Single Sequencer Case: If only one Sequencer is registered, it remains the lead Sequencer indefinitely.
- Multiple Sequencers: When two or more Sequencers are registered, the lead Sequencer rotates every 32 batches. This ensures that no single Sequencer dominates the network for an extended period.
-
Future Leader Prediction: The
futureLeaderSequencermethod allows querying the lead Sequencer for a batch n batches in the future. The calculation is based on the following logic:Inputs:
sequencers: An array of registered Sequencer addresses.currentBatch: The next batch to be committed, calculated aslastCommittedBatch() + 1from theOnChainProposercontract.nBatchesInTheFuture: A parameter specifying how many batches ahead to look.targetBatch: Calculated ascurrentBatch+nBatchesInTheFuture.BATCHES_PER_SEQUENCER: A constant set to 32, representing the number of batches each lead Sequencer gets to commit.
Logic:
uint256 _currentBatch = IOnChainProposer(ON_CHAIN_PROPOSER).lastCommittedBatch() + 1;
uint256 _targetBatch = _currentBatch + nBatchesInTheFuture;
uint256 _id = _targetBatch / BATCHES_PER_SEQUENCER;
address _leader = sequencers[_id % sequencers.length];
Example: Assume 3 Sequencers are registered:
[S0, S1, S2], and the current committed batch is 0:- For batches 0–31:
_id = 0 / 32 = 0, 0 % 3 = 0, lead Sequencer =S0. - For batches 32–63:
_id = 32 / 32 = 1, 1 % 3 = 1, lead Sequencer =S1. - For batches 64–95:
_id = 64 / 32 = 2, 2 % 3 = 2, lead Sequencer =S2. - For batches 96–127:
_id = 96 / 32 = 3, 3 % 3 = 0, lead Sequencer =S0.
This round-robin rotation repeats every 96 committed batches (32 committed batches per Sequencer × 3 Sequencers), ensuring equitable distribution of responsibilities.
Roadmap
Special thanks to Lorenzo and Kubi, George, and Louis from Gattaca, Jason from Fabric, and Matthew from Spire Labs for their feedback and suggestions.
Note
This document is still under development, and everything stated in it is subject to change after feedback and iteration. Feedback is more than welcome.
Important
We believe that Gattaca’s model—permissionless with preconfs using L1 proposers (either directly or through delegations) as L2 sequencers—is the ideal approach. However, this model cannot achieve permissionlessness until the deterministic lookahead becomes available after Fusaka. In the meantime, we consider the Spire approach, based on a Dutch auction, to be the most suitable for our current needs. It is important to note that Rogue cannot implement a centralized mechanism for offering preconfs, so we have chosen to prioritize a permissionless structure before enabling preconfirmations. This initial approach is decentralized and permissionless but not based yet. Although sequencing rights aren’t currently guaranteed to the L1 proposer, there will be incentives for L1 proposers to eventually participate in the L2, moving toward Justin Drake’s definition.
From the beginning, ethrex was conceived not just as an Ethereum L1 client, but also as an L2 (ZK Rollup). This means anyone will be able to use ethrex to deploy an EVM-equivalent, multi-prover (supporting SP1, RISC Zero, and TEEs) based rollup with just one command. We recently wrote a blog post where we expand this idea more in depth.
The purpose of this document is to provide a high-level overview of how ethrex will implement its based rollup feature.
State of the art
Members of the Ethereum Foundation are actively discussing and proposing EIPs to integrate based sequencing into the Ethereum network. Efforts are also underway to coordinate and standardize the components required for these based rollups; one such initiative is FABRIC.
The following table provides a high-level comparison of different based sequencing approaches, setting the stage for our own proposal.
Note
This table compares the different based rollups in the ecosystem based on their current development state, not their final form.
| Based Rollup | Protocol | Sequencer Election | Proof System | Preconfs | Additional Context |
|---|---|---|---|---|---|
| Taiko Alethia (Taiko Labs) | Permissioned | Fixed Deterministic Lookahead | Multi-proof (sgxGeth (TEE), and sgxReth (ZK/TEE)) | Yes | - |
| Gattaca’s Based OP (Gattaca + Lambdaclass) | Permissioned | Round Robin | Single Proof (optimistic) | Yes | For phase 1, the Sequencer/Gateway was centralized. For phase 2 (current phase) the Sequencer/Gateway is permissioned. |
| R1 | Permissionless | Total Anarchy | Multi-proof (ZK, TEE, Guardian) | No | R1 is yet to be specified but plans are for it to be built on top of Surge and Taiko’s Stack. They’re waiting until Taiko is mature enough to have preconfs |
| Surge (Nethermind) | Permissionless | Total Anarchy | Multi-proof (ZK, TEE, Guardian) | No | Surge is built on top of Taiko Alethia but it’s tuned enough to be a Stage 2 rollup. Surge is not designed to compete with existing rollups for users or market share. Instead, it serves as a technical showcase, experimentation platform, and reference implementation. |
| Spire (Spire Labs) | Permissionless | Dutch Auction | Single Proof (optimistic) | Yes | - |
| Rogue (LambdaClass) | Permissionless | Dutch Auction | Multi-Proof (ZK + TEE) | Not Yet | We are prioritizing decentralization and permissionlessness at the expense of preconfirmations until the deterministic lookahead is available after Fusaka |
Other based rollups not mentioned will be added later.
Ethrex proposal for based sequencing
According to Justin Drake’s definition of “based”, being “based” implies that the L1 proposers are the ones who, at the end of the day, sequence the L2, either directly or by delegating the responsibility to a third party.
However, today, the “based” ecosystem is very immature. Despite the constant efforts of various teams, no stack is fully prepared to meet this definition. Additionally, L1 proposers do not have sufficient economic incentives to be part of the protocol.
But there’s a way out. As mentioned in Spire’s “What is a based rollup?”
The key to this definition is that sequencing is “driven” by a base layer and not controlled by a completely external party.
Following this, our proposal’s main focus is decentralization and low operation cost, and we don’t want to sacrifice them in favor of preconfirmations or composability.
Considering this, after researching existing approaches, we concluded that a decentralized, permissionless ticket auction is the most practical first step for ethrex’s based sequencing solution.
Ultimately, we aim to align with Gattaca’s model for based sequencing and collaborate with FABRIC efforts to standardize based rollups and helping interoperability.
Rogue and many upcoming rollups will be following this approach.
Benefits of our approach
The key benefits of our approach to based sequencing are:
- Decentralization and Permissionlessness from the Get-Go: We’ve decentralized ethrex L2 by allowing anyone to participate in the L2 block proposal; actors willing to participate on it can do this permissionlessly, as the execution ticket auction approach we are taking provides a governance free leader election mechanism.
- Robust Censorship Resistance: By being decentralized and permissionless, and with the addition of Sequencer challenges, we increased the cost of censorship in the protocol.
- Low Operational Cost: We strived to make the sequencer operating costs as low as possible by extending the sequencing window, allowing infrequent L1 finalization for low traffic periods.
- Configurability: We intentionally designed our protocol to be configurable at its core. This allows different rollup setups to be tailored based on their unique needs, ensuring optimal performance, efficiency, and UX.
Key points
Terminology
- Ticket: non-transferable right of a Sequencer to build and commit an L2 batch. One or more are auctioned during each auction period.
- Sequencing Period: the period during which a ticket holder has sequencing rights.
- Auction Period: the period during which the auction is performed.
- Auction Challenge: instance within a sequencing period where lead Sequencer sequencing rights can be challenged.
- Challenge Period: the period during which a lead sequencer can be challenged.
- Allocated Period: the set of contiguous sequencing periods allocated among the winners of the corresponding auctioning period -during an auctioning period, multiple sequencing periods are auctioned, the set of these is the allocated period.
- L2 batch: A collection of L2 blocks submitted to L1 in a single transaction.
- Block/Batch Soft-commit Message: A signed P2P message from the Lead Sequencer publishing a new block or sealed batch.
- Commit Transaction: An L1 transaction submitted by the Lead Sequencer to commit to an L2 batch execution. It is also called Batch Commitment.
- Sequencer: An L2 node registered in the designated L1 contract.
- Lead Sequencer: The Sequencer currently authorized to build L2 blocks and post L2 batches during a specific L1 block.
- Follower: Non-Lead Sequencer nodes, which may be Sequencers awaiting leadership or passive nodes.
How it will work
As outlined earlier, sequencing rights for future blocks are allocated through periodic ticket auctions. To participate, sequencers must register and provide collateral. Each auction occurs during a designated auction period, which spans a defined range of L1 blocks. These auctions are held a certain number of blocks in advance of the allocated period.
During each auction period, a configurable number of tickets are auctioned off. Each ticket grants its holder the right to sequence transactions during one sequencing period within the allocated period. However, at the time of the auction, the specific sequencing period assigned to each ticket remains undetermined. Once the auction period ends, the sequencing periods are randomly assigned (shuffled) among the ticket holders, thereby determining which sequencing period each ticket corresponds to.
Parameters like the amount of tickets auctioned (i.e. amount of sequencing periods per allocated period), the duration of the auction periods, the duration of the sequencing periods, and more, are configurable. This configurability is not merely a feature but a deliberate and essential design choice. The complete list of all configurable parameters can be found under the “Protocol details” section.
- Sequencers individually opt in before auction period
nends, providing collateral via an L1 contract. This registration is a one-time process per Sequencer. - During the auction, registered Sequencers bid for sequencing rights for a yet-to-be-revealed sequencing period within the allocated period.
- At the auction’s conclusion, sequencing rights for the sequencing periods within the allocated period are assigned among the ticket holders.
- Finally, Sequencers submit L2 batch transactions to L1 during their assigned sequencing period (note: this step does not immediately follow step 3, as additional auctions and sequencing might occur in-between).
In each sequencing period, the Lead Sequencer is initially determined through a bidding process. However, this position can be contested by other Sequencers who are willing to pay a higher price than the winning bid. The number of times such challenges can occur within a single sequencing period is configurable, allowing for control over the stability of the leadership. Should a challenge succeed, the challenging Sequencer takes over as the Lead Sequencer for the remainder of the period, and the original Lead Sequencer is refunded a portion of their bid corresponding to the time left in the period. For example, if a challenge is successful at the midpoint of the sequencing period, the original Lead Sequencer would be refunded half of their bid.
The following example assumes a sequencing period of 1 day, 1 auction challenge per hour with challenge periods of 1 hour.
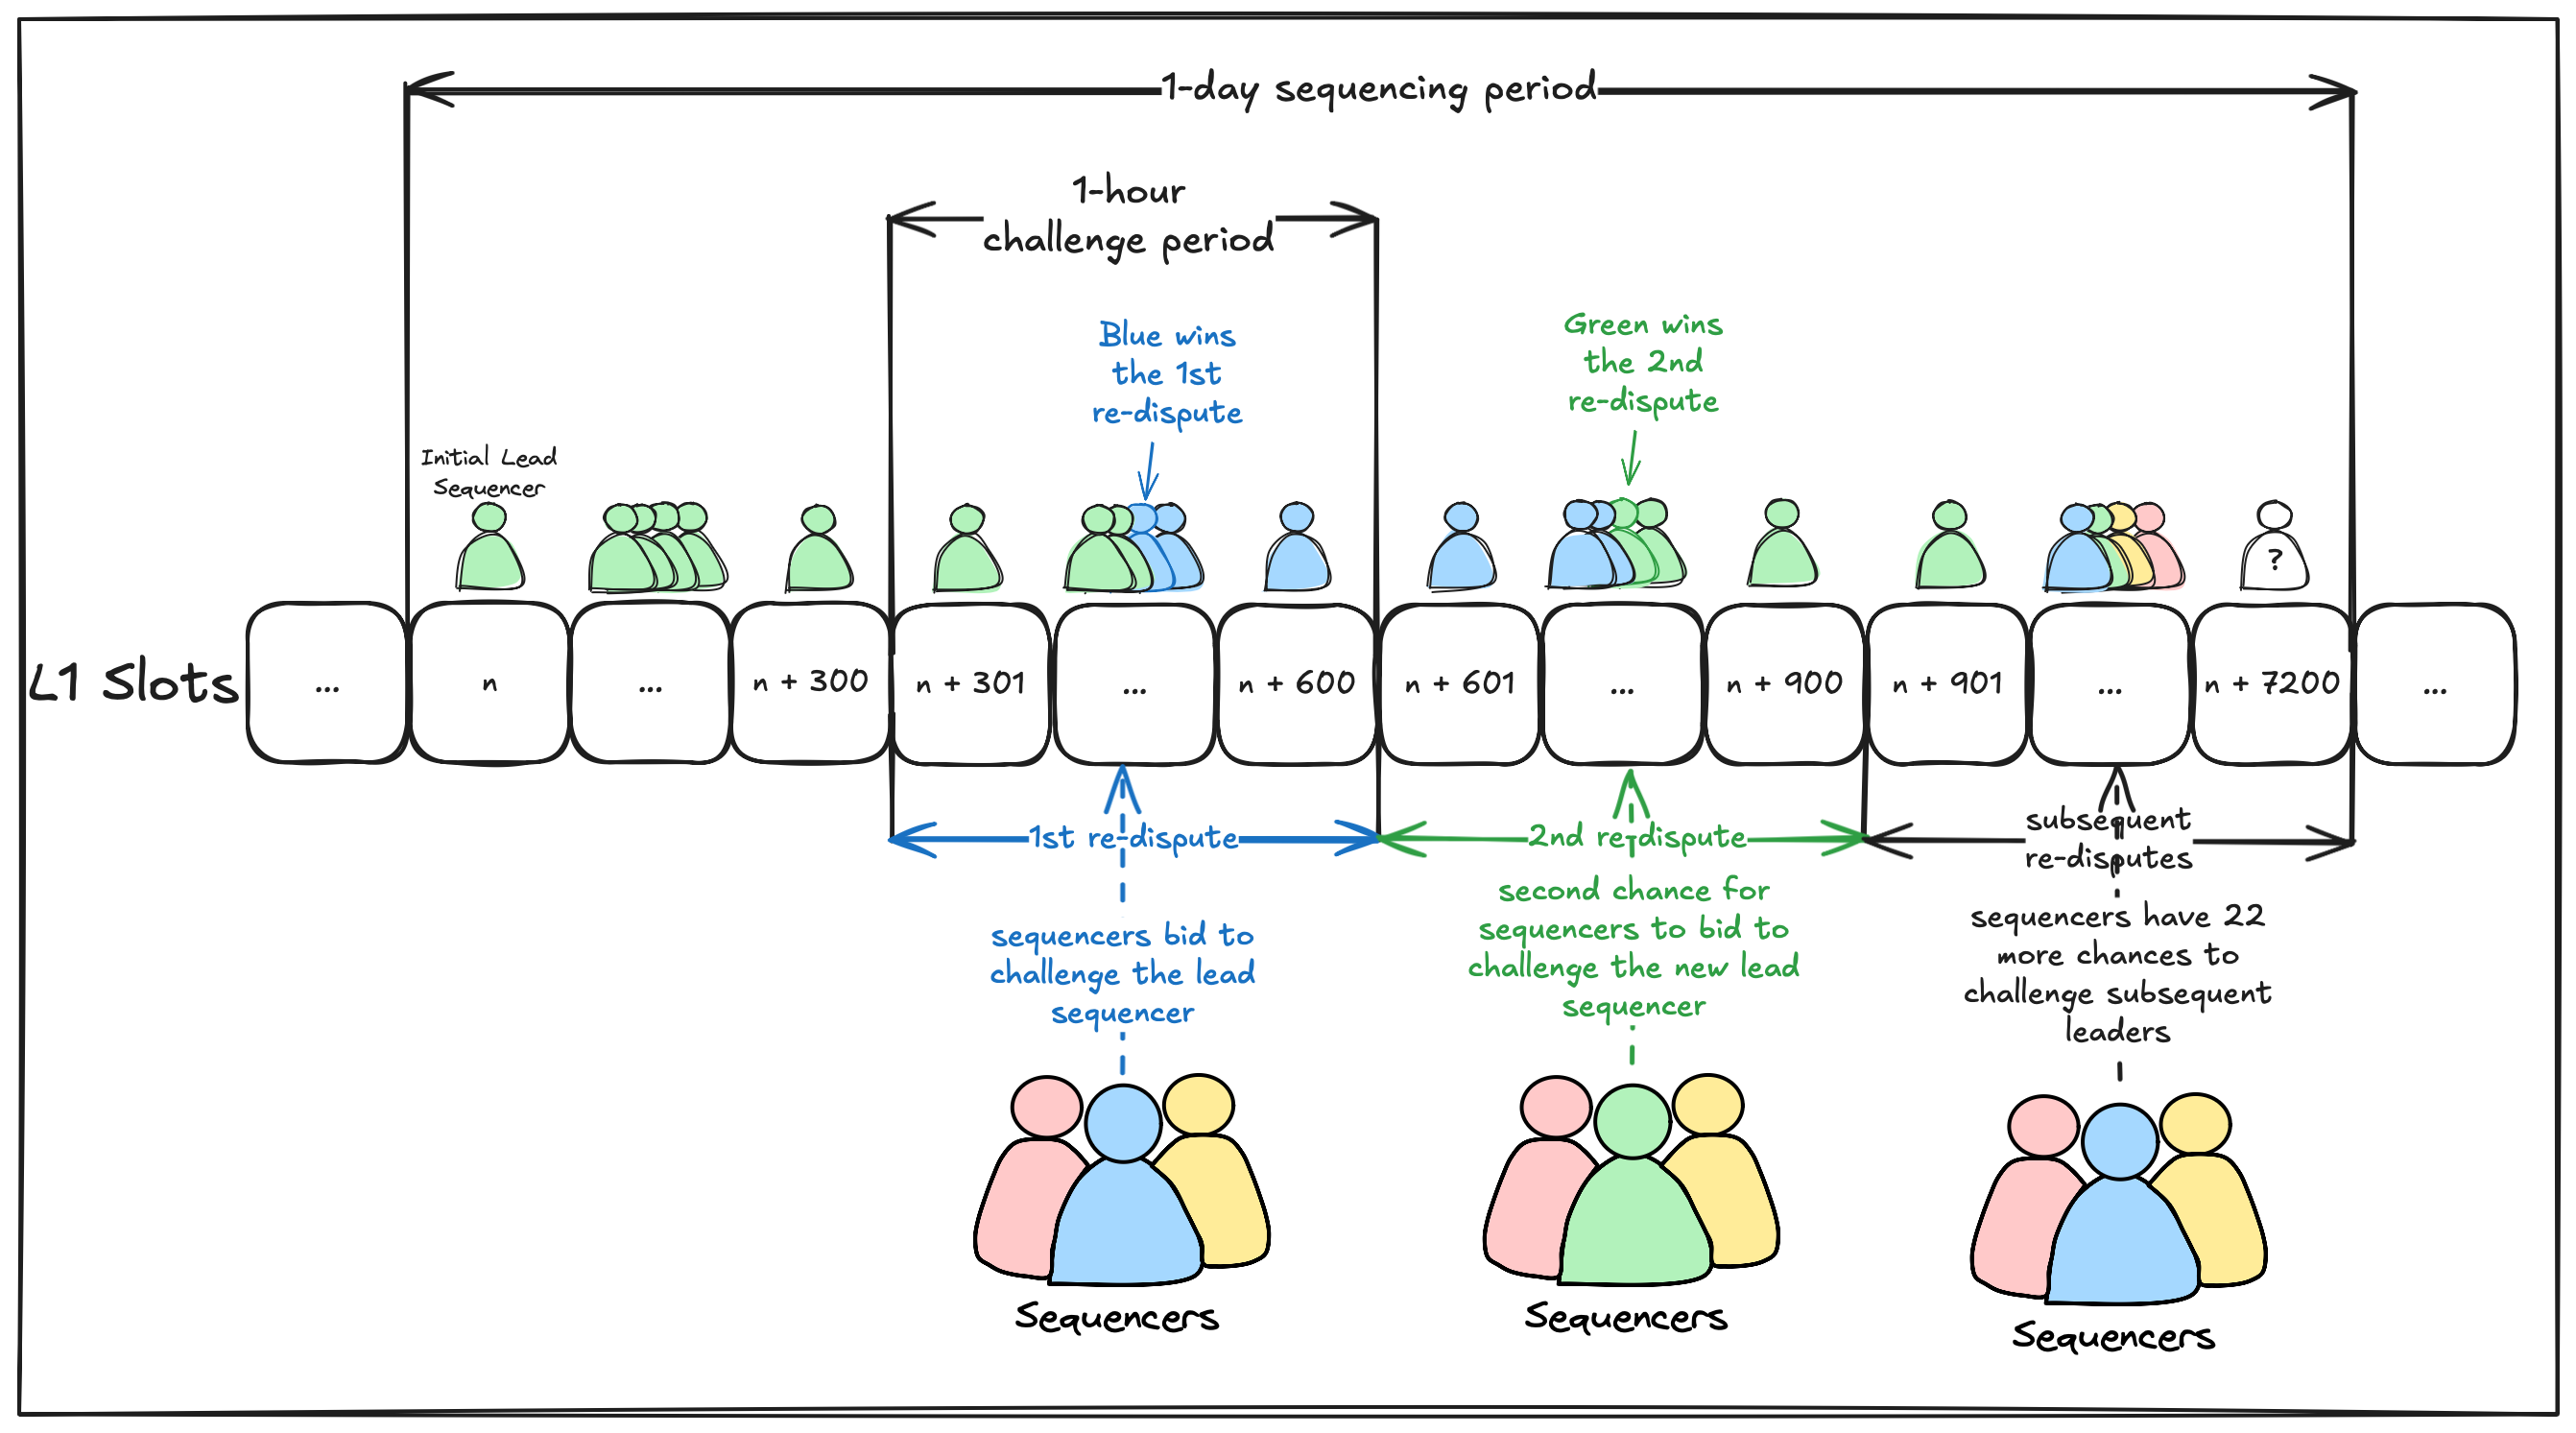
- Auction winner (Sequencer green) starts as the lead Sequencer of the sequencing period.
- No one can challenge the lead in the first hour.
- During the second hour, the first auction challenge starts, and multiple Sequencers bid to challenge the lead. Finally, the lead Sequencer is overthrown and the new lead (Sequencer blue) starts sequencing.
- In the third hour a new auction challenge opens and the former lead Sequencer takes back the lead.
- Until the last hour of the sequencing period, the same cycle repeats having many leader changes.
To ensure L2 liveness in this decentralized protocol, Sequencers must participate in a peer-to-peer (P2P) network. The diagram below illustrates this process:
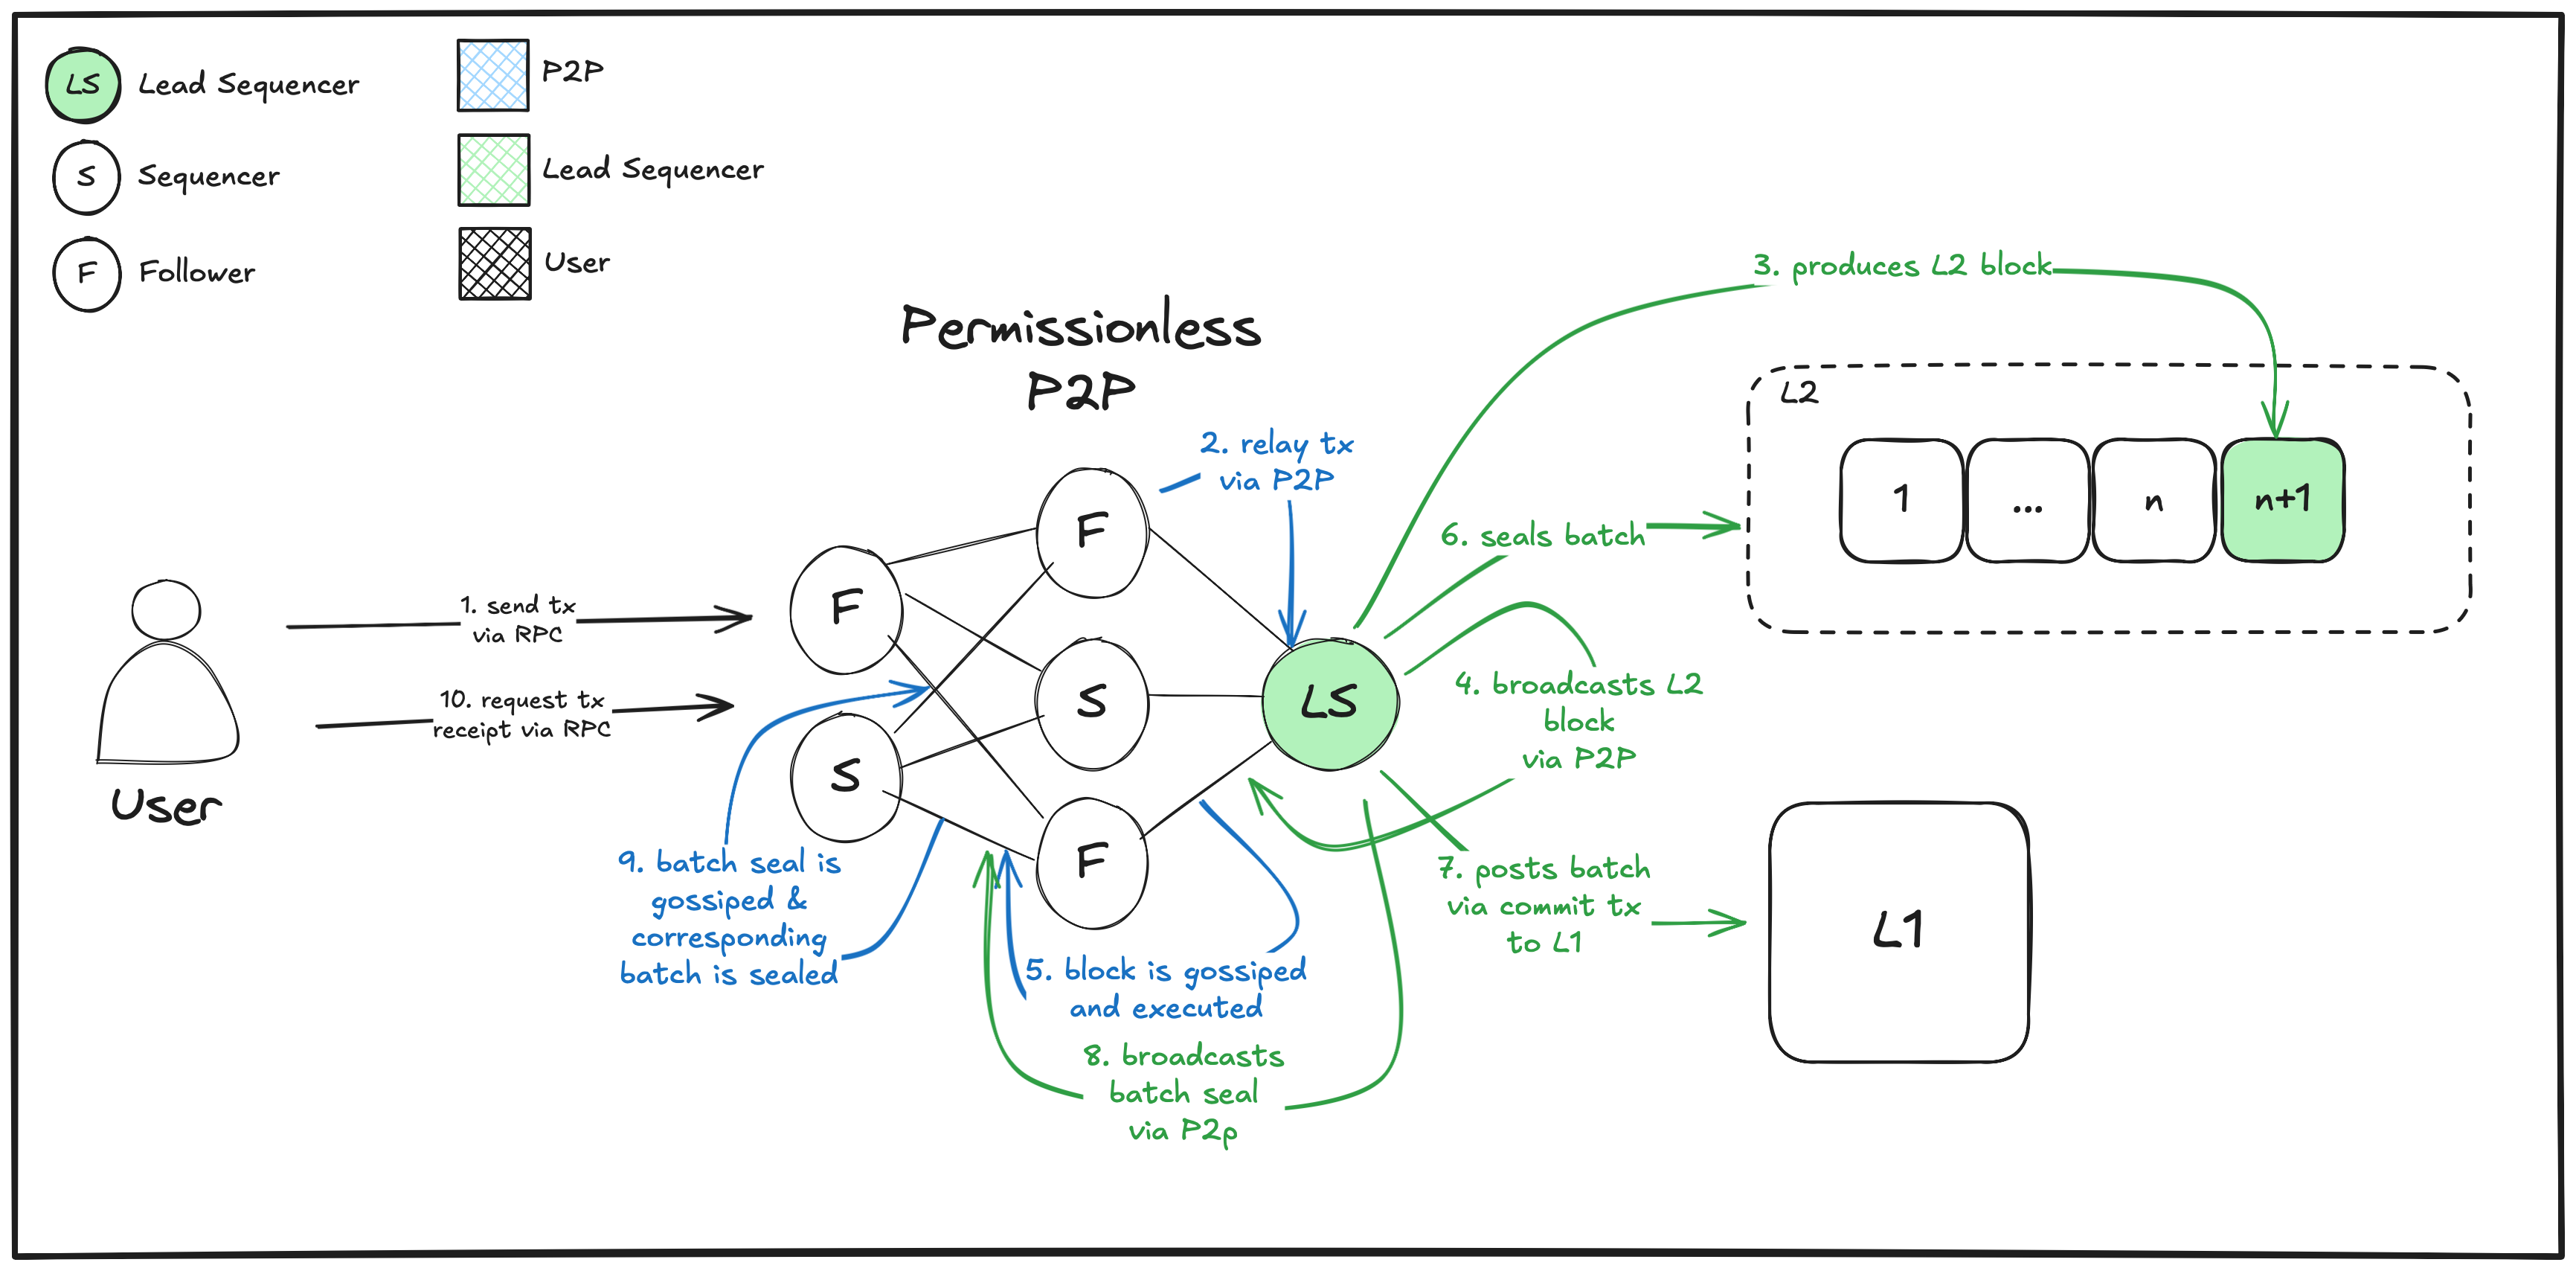
- A User: sends a transaction to the network.
- Any node: Gossips in the P2P a received transaction. So every transaction lives in a public distributed mempool
- The Lead Sequencer: Produces an L2 block including that transaction.
- The Lead Sequencer: Broadcasts the L2 block, including the transaction, to the network via P2P.
- Any node: Executes the block, gossips it, and keeps its state up to date.
- The Lead Sequencer: Seals the batch in L2.
- The Lead Sequencer: Posts the batch to the L1 in a single transaction.
- The Lead Sequencer: Broadcasts the “batch sealed” message to the network via P2P.
- Any node: Seals the batch locally and gossips the message.
- A User: Receives a non-null receipt for the transaction.
Protocol details
Additional Terminology
- Next Batch: The L2 batch being built by the lead Sequencer.
- Up-to-date Nodes: Nodes that have the last committed batch in their storage and only miss the next batch.
- Following: We say that up-to-date nodes are following the lead Sequencer.
- Syncing: Nodes are syncing if they are not up-to-date. They’ll stop syncing after they reach the following state.
- Verify Transaction: An L1 transaction submitted by anyone to verify a ZK proof to an L2 batch execution.
Network participants
- Sequencer Nodes: Nodes that have opted in to serve as Sequencers.
- Follower Nodes: State or RPC Nodes.
- Prover Nodes:
By default, every ethrex L2 node begins as a Follower Node. A process will periodically query the L1 smart contract registry for the Lead Sequencer’s address and update each node’s state accordingly.
Network parameters
A list of all the configurable parameters of the network.
- Sequencing period duration
- Auction period duration
- Number of sequencing periods in an allocated period
- Time between auction and allocated period
- L2 block time
- Minimum collateral in ETH for Sequencers registration
- Withdrawal delay for Sequencers that quit the protocol
- Initial ticket auction price multiplier
- Batch verification time limit
- Amount of auction challenges within a sequencing period
- Challenge period duration
- Time between auction challenges
- Challenge price multiplier
Lead Sequencer election
- Aspiring Lead Sequencers must secure sequencing rights through a Dutch auction in advance, enabling them to post L2 batches to L1.
- Sequencing rights are tied to tickets: one ticket grants the right to sequence and post batches during a specific sequencing period.
- For each sequencing period within an allocated period, sequencing rights are randomly assigned from the pool of ticket holders.
- Each auction period determines tickets for the nth epoch ahead (configurable).
- Once Ethereum incorporates deterministic lookahead (e.g., EIP-7917), the Lead Sequencer for a given L1 slot will be the current proposer, provided they hold a ticket.
Auction challenges
- During a sequencing period, other Sequencers can pay a higher price than the winning bid to challenge the Lead Sequencer.
- This can only happen a configurable number of times per sequencing period.
- After a successful challenge, the current Lead Sequencer is replaced by the challenging sequencer for the rest of the Sequencing Period and is refunded the portion of its bid corresponding to the remaining sequencing period (e.g. half of its bid if it loses half of its sequencing period).
Sequencers registry
- L1 contract that manages Sequencer registration and ticket auctions for sequencing rights.
- Sequencers can register permissionlessly by providing a minimum collateral in ETH.
- Sequencers may opt out of an allocated period by not purchasing tickets for that period.
- Sequencers can unregister and withdraw their collateral after a delay.
Lead Sequencers role
- Build L2 blocks and post L2 batches to the L1 within the sequencing period.
- Broadcast to the network:
- Transactions.
- Sequenced blocks as they are built.
- Batch seal messages to prompt the network to seal the batch locally.
- Serve state.
Follower nodes role
- Broadcast to the network:
- Transactions.
- Sequenced blocks.
- Batch seal messages.
- Store incoming blocks sequentially.
- Seal batches upon receiving batch seal messages (after storing all batch blocks).
- Serve state.
- Monitor the L1 contract for batch updates and reorgs.
Prover nodes role
- For this stage, it is the Sequencers’ responsibility to prove their own batches.
- The prover receives the proof generation inputs of a batch from another node and returns a proof.
Batch commitment/proposal
Tip
To enrich the understanding of this part, we suggest reading ethrex L2 High-Level docs as this only details the diff with what we already have.
- Only lead Sequencer can post batches.
- Lead Sequencer batches are accepted during their sequencing period and rejected outside this period.
- Batch commitment now includes posting the list of blocks in the batch to the L1 for data availability.
Batch verification
Tip
To enrich the understanding of this part, we suggest reading ethrex L2 High-Level docs as this only details the diff with what we already have.
- Anyone can verify batches.
- Only one valid verification is required to advance the network.
- Valid proofs include the blocks of the batch being verified.
- In this initial version, the lead Sequencer is penalized if they fail to correctly verify the batches they post.
P2P
- Ethrex’s L1 P2P network will be used to gossip transactions and for out-of-date nodes to sync.
- A new capability will be added for gossipping L2 blocks and batch seal messages (
NewBlockandBatchSealed). - The
NewBlockmessage includes an RLP-encoded list of transactions in the block, along with metadata for re-execution and validation. It is signed, and receivers must verify the signature (additional data may be required in practice). - The
SealedBatchmessage specifies the batch number and the number of blocks it contains (additional data may be needed in practice). - Follower Nodes must validate all messages. They add
NewBlocks to storage sequentially and seal the batch when theSealedBatchmessage arrives. If a node’s current block isnand it receives blockn + 2, it queuesn + 2, waits forn + 1, adds it, then processesn + 2. Similarly, a SealedBatch message includes block numbers, and the node delays sealing until all listed blocks are stored.
Syncing
Nodes that join a live network will need to sync up to the latest state.
For this we’ll divide nodes into two different states:
- Following nodes: These will keep up-to-date via the based P2P.
- Syncing nodes: These will sync via 2 different mechanisms:
- P2P Syncing: This is the same as full-sync and snap-sync on L1, but with some changes.
- L1 Syncing: Also used by provers to download batches from the L1.
- In practice, these methods will compete to sync the node.
Downsides
Below we list some of the risks and known issues we are aware of that this protocol introduces. Some of them were highlighted thanks to the feedback of different teams that took the time to review our first draft.
- Inconsistent UX: If a Sequencer fails to include its batch submit transaction in the L1, the blocks it contains will simply be reorged out once the first batch of the next sequencer is published. Honest sequencers can avoid this by not building new batches some slots before their turn ends. The next Sequencer can, in turn, start building their first batch earlier to avoid dead times. This is similar to Taiko’s permissioned network, where sequencers coordinate to stop proposing 4 slots before their turn ends to avoid reorgs.
- Batch Stealing: Lead Sequencers that fail to publish their batches before their sequencing period ends might have their batches “stolen” by the next Lead Sequencer, which can republish those batches as their own. We can mitigate in the same way as the last point.
- Long Finalization Times: Since publishing batches to L1 is infrequent, users might experience long finalization times during low traffic periods. We can solve this by assuming a transaction in an L2 block transmitted through P2P will eventually be published to L1, and punishing Sequencers that don’t include some of their blocks in a batch.
- Temporary Network Blinding: A dishonest Sequencer may blind the network if they don’t gossip blocks nor publish the batches to the L1 as part of the commit transactions’ calldata. While the first case alone is mitigated through an L1 syncing mechanism, if the necessary data to sync is not available we can’t rely on it. In this case, the prover ensures this doesn’t happen by requiring the batch as a public input to the proof verification. That way, the bad batch can’t be verified, and will be reverted.
- High-Fee Transactions Hoarding: A dishonest Sequencer might not share high-fee transactions with the Lead Sequencer with the hope of processing them once it’s their turn to be Lead Sequencer. This is a non-issue, since transaction senders can simply propagate their transaction themselves, either by sending it to multiple RPC providers, or to their own node.
- Front-running and Sandwiching Attacks: Lead Sequencers have the right to reorder transactions as they like and we expect they’ll use this to extract MEV, including front-running and sandwiching attacks, which impact user experience. We don’t have plans to address this at the protocol level, but we expect solutions to appear at the application level, same as in L1.
- No Sequencers Scenario: If a sequencing period has no elected Lead Sequencer, we establish Full Anarchy during that period, so anyone can advance the chain. This is a last resort, and we don’t expect this happening in practice.
Conclusion
To preserve decentralization and permissionlessness, we chose ticket auctions for leader election, at the expense of preconfirmations and composability.
As mentioned at the beginning, this approach does not fully align with Justin Drake’s definition of “based” rollups but is “based enough” to serve as a starting point. Although the current design cannot guarantee that sequencing rights are assigned exclusively to the L1 proposer for each slot, we’re interested in achieving this, and will do so once the conditions are met, namely, that L1 proposer lookahead is available.
So what about “based” Ethrex tomorrow? Eventually, there will be enough incentives for L1 proposers to either run their own L2 Sequencers or delegate their L1 rights to an external one. At that stage, the auction and assignment of L2 sequencing rights will be linked to the current L1 proposer or their delegated Sequencer. Periods may also adjust as lookahead tables, such as the Deterministic Lookahead Proposal or RAID, become viable.
This proposal is intentionally minimalistic and adaptable for future refinements. How this will change and adapt to future necessities is something we don’t know right now, and we don’t care about it until those necessities arrive; this is Lambda’s engineering philosophy.
Further considerations
The following are things we are looking to tackle in the future, but which are not blockers for our current work.
- Ticket Pricing Strategies.
- Delegation Processes.
- Preconfirmations.
- Bonding.
- L1 Reorgs Handling.
References and acknowledgements
The following links, repos, and projects have been important in the development of this document, we have learned a lot from them and want to thank and acknowledge them.
Context
Intro to based rollups
- Based Rollups by Justin Drake (current accepted definition)
- Based Rollups by Spire
- Based Rollups by Taiko
- Based Rollups by Gattaca
Based rollups benefits
Based rollups + extra steps
Misc
Execution tickets
- Execution Tickets
- Execution Tickets vs Execution Auctions
- Economic Analysis of Execution Tickets
- Beyond the Stars: An Introduction to Execution Tickets on Ethereum
Current based rollups
- Rogue (LambdaClass)
- Surge (Nethermind)
- Taiko Alethia (Taiko Labs)
- Whitelisted preconfers:
- Based OP (Gattaca + Lambdaclass)
- R1
- Minimal Rollup (OpenZeppelin)
Educational sources
Transaction Fees
This page describes the different types of transaction fees that the Ethrex L2 rollup can charge and how they can be configured.
Note
Privileged transactions are exempt from all fees.
Priority Fee
The priority fee works exactly the same way as on Ethereum L1.
It is an additional tip paid by the transaction sender to incentivize the sequencer to prioritize the inclusion of their transaction.
The priority fee is always forwarded directly to the sequencer’s coinbase address.
Base Fee
The base fee follows the same rules as the Ethereum L1 base fee. It adjusts dynamically depending on network congestion to ensure stable transaction pricing.
By default, base fees are burned. However, a sequencer can configure a base fee vault address to receive the collected base fees instead of burning them.
ethrex l2 --block-producer.base-fee-vault-address <l2-base-fee-vault-address>
Caution
If the base fee vault and coinbase addresses are the same, its balance will change in a way that differs from the standard L1 behavior, which may break assumptions about EVM compatibility.
Operator Fee
The operator fee represents an additional per-gas cost charged by the sequencer to cover the operational costs of maintaining the L2 infrastructure.
This fee works similarly to the base fee — it is multiplied by the gas used for each transaction.
All collected operator fees are deposited into a dedicated operator fee vault address.
To set the operator fee amount:
ethrex l2 --block-producer.operator-fee-per-gas <amount-in-wei>
To set the operator fee vault address:
ethrex l2 --block-producer.operator-fee-vault-address <operator-fee-vault-address>
Caution
If the operator fee vault and coinbase addresses are the same, its balance will change in a way that differs from the standard L1 behavior, which may break assumptions about EVM compatibility.
Fee Calculation
When executing a transaction, all gas-related fees are subject to the max_fee_per_gas value defined in the transaction.
This value acts as an absolute cap over the sum of all fee components.
This means that the effective priority fee is capped to ensure the total does not exceed max_fee_per_gas.
Specifically:
effective_priority_fee_per_gas = min(
    max_priority_fee_per_gas,
    max_fee_per_gas - base_fee_per_gas - operator_fee_per_gas
)
Then, the total fees are calculated as:
total_fees = (base_fee_per_gas + operator_fee_per_gas + priority_fee_per_gas) * gas_used
This behavior ensures that transaction senders never pay more than max_fee_per_gas * gas_used, even when the operator fee is enabled.
Important
The current
effective_gas_pricefield in the transaction receipt does not include the operator fee component.
Therefore,effective_gas_price * gas_usedwill only reflect the base + priority portions of the total cost.
Important
The
eth_gasPriceRPC endpoint has been modified to include theoperator_fee_per_gasvalue when the operator fee mechanism is active.
This means that the value returned byeth_gasPricecorresponds tobase_fee_per_gas + operator_fee_per_gas + estimated_gas_tip.
L1 Fees
L1 fees represent the cost of posting data from the L2 to the L1.
Each transaction is charged based on the amount of L1 Blob space it occupies (the size of the transaction when RLP-encoded).
Each time a transaction is executed, the sequencer calculates its RLP-encoded size. Then, the L1 fee for that transaction is computed as:
l1_fee = blob_base_fee_per_byte * tx_encoded_size
An additional amount of gas (l1_gas) is added to the transaction execution so that:
l1_gas * gas_price = l1_fee
This guarantees that the total amount charged to the user never exceeds gas_limit * gas_price, while transparently accounting for the L1 posting cost.
Importantly, this process happens automatically — users do not need to perform any additional steps.
Calls to eth_estimateGas already inherit this behavior and will include the extra gas required for the L1 fee.
The computed L1 fee is deducted from the sender’s balance and transferred to the L1 Fee Vault address.
The blob base fee per byte is derived from the L1 BlobBaseFee.
The L1Watcher periodically fetches the BlobBaseFee from L1 (at a configured interval) and uses it to compute:
blob_base_fee_per_byte = (l1_fee_per_blob_gas * GAS_PER_BLOB) / SAFE_BYTES_PER_BLOB
See the Data availability section here for more information about how data availability works.
L1 fee is deactivated by default. To activate it, configure the L1 fee vault address:
ethrex l2 --block-producer.l1-fee-vault-address <l1-fee-vault-address>
To configure the interval at which the BlobBaseFee is fetched from L1:
ethrex l2 --block-producer.blob-base-fee-update-interval <milliseconds>
Caution
If the L1 fee vault and coinbase addresses are the same, its balance will change in a way that differs from the standard L1 behavior, which may break assumptions about EVM compatibility.
Useful RPC Methods
The following custom RPC methods are available to query fee-related parameters directly from the L2 node.
Each method accepts a single argument: the block_number to query historical or current values.
| Method Name | Description | Example |
|---|---|---|
ethrex_getBaseFeeVaultAddress | Returns the address configured to receive the base fees collected in the specified block. | ethrex_getBaseFeeVaultAddress {"block_number": 12345} |
ethrex_getOperatorFeeVaultAddress | Returns the address configured as the operator fee vault in the specified block. | ethrex_getOperatorFeeVaultAddress {"block_number": 12345} |
ethrex_getOperatorFee | Returns the operator fee per gas value active at the specified block. | ethrex_getOperatorFee {"block_number": 12345} |
ethrex_getL1BlobBaseFee | Returns the L1 blob base fee per gas fetched from L1 and used for L1 fee computation at the specified block. | ethrex_getL1BlobBaseFee {"block_number": 12345} |
Exit Window
An exit window is a time window, or period, during which users can opt to exit the network before the execution of an upgrade or system modification. The purpose of exit windows in L2 rollups is to protect users from unwanted changes to the system, such as those mentioned above.
The Stages Framework defines exit windows for rollup upgrades with subtle differences between stages. For Stage 1 rollups, updates initiated outside the Security Council require an exit window of at least 7 days, though the Security Council can upgrade instantly. For Stage 2 rollups, the Security Council can upgrade immediately only if a bug is detected on-chain; otherwise, the exit window should be at least 30 days. This period may vary if there is a withdrawal delay, as it is subtracted from the total exit window.
The ethrex L2 stack provides this security functionality through a Timelock contract that is deployed and configured with the exit window duration, which we will learn more about in the next section.
How exit windows work
Before understanding how exit windows work, it is necessary to keep in mind which specific functionality of the L1 contracts we need to protect. For this, we recommend reading in advance about the OnChainProposer and CommonBridge contracts in the contracts fundamentals section. To make it simpler, we will initially focus only on the upgrade logic, as the same logic applies to the rest of the modifications.
All our contracts are UUPSUpgradeable (an upgradeability pattern recommended by OpenZeppelin). In particular, to upgrade this type of contract, the operator must call the upgradeToAndCall function, which invokes an internal function called _authorizeUpgrade. It is recommended to override this function by implementing authorization logic. This is the function we must protect in the case of both contracts, and we do so by “delaying” its execution.
Currently, the function used to upgrade the contracts is protected by an onlyOwner modifier, which verifies that the caller corresponds to the owner of the contract (all L1 contracts but the Timelock are Ownable2StepUpgradeable), configured during its initialization. In other words, only the owner can call it. Keeping this in mind is important for understanding how we implement the functionality.
As mentioned earlier, exit windows must prevent the instantaneous execution of upgrades and modifications to the system (from now on, operations). This is achieved through the aforementioned Timelock contract, which introduces a notion of “delay” to the execution of operations.
To accomplish this, the Timelock contract divides the execution of operations into two steps:
- A first step where the operation is scheduled.
- A second step that finally executes the previously scheduled operation.
In the scheduling step, the information corresponding to the operation (calldata, target address, value, etc.) is stored in the contract’s storage along with the timestamp from which the operation can be executed (essentially the current timestamp at the time of scheduling plus the delay configured during the contract’s initialization). The caller is also granted an operation ID.
It is in the second and final step where the previously scheduled operation is executed. This occurs if and only if the waiting time has been met (i.e., the timestamp at the time of executing the operation is greater than or equal to the operation’s timestamp stored in the contract’s storage). It is worth noting that any attempt to execute prior to the fulfillment of the waiting time will revert. The contract offers additional functionality to check the status of operations and thus avoid reverting execution attempts.
We achieve an exit window by configuring the Timelock contract as the owner of the L1 contracts. In this way, it is the only one capable of executing upgrades on the L1 contracts, and it will do so through the scheduling and execution of operations, which provide the desired delay. With this, it is sufficient to add the onlyOwner modifier to the functions we want to execute with a certain delay.
Settlement window
Also known as “withdrawal delay”, the settlement window is the batch verification delay that needs to be fulfilled for the sequencer to be able to verify a committed batch, even if the proof is already available for verification.
The goal of the settlement window is to give enough time to the rollup operator to react in the event of a bug exploit in the L2 before the state is settled on the L1 and, thus, irreversible.
As said before, the settlement window must be taken into account to calculate the real exit window.
Who owns the Timelock
There’s no such thing as a unique owner of the Timelock necessarily. Timelock is a TimelockController, which is also an AccessControl, so we can define different roles and assign them to different entities. By “owner” of the Timelock, we refer to the account that has the role to update the contract (i.e. the one that can modify the delay).
That said, whoever owns the Timelock decides its functioning. In our stack, the owner of the contract is established during its initialization, and then that owner can transfer the ownership to another account if desired.
It’s worth noting that the designated security council can execute operations instantly in case of emergencies, so it’s crucial that the members are trustworthy and committed to the network’s security. The Stages Framework recommends that the security council be in the form of a multisig composed of at least 8 people with a consensus threshold of 75%, and the participants in the set need to be decentralized and diverse enough, possibly coming from different companies and jurisdictions.
In the case of our Timelock, the owner is not the only one who can act on it. In fact, it is recommended that the security council only act in specific emergencies. The Timelock is also AccessControl, which means it has special functionality for managing accesses, in this case, in the form of roles.
TimelockController defines two roles in its business logic: the “proposer” and the “executor.” The first is enabled to schedule operations and cancel them, while the second is enabled to execute them. These roles are assigned to a given set of addresses during the contract’s initialization.
We define two additional roles besides the defaults: the “sequencer” and the “security council.” The first is confined to performing settlement operations (meaning it cannot operate as “proposer” or “executor”), while the second is enabled to revert batches, pause and unpause contracts, and execute emergency operations (i.e., without delay).
How are Timelock upgrades protected
Today, we only expose two types of modifications to our Timelock contract:
- Upgrade of the contract itself.
- Update of the delay time.
An interesting question is how we protect users from instantaneous executions of these types of operations. One might think of a scenario where the Timelock owner updates the delay to 0 to execute a malicious operation, having removed the exit window for users; or perhaps upgrade the Timelock contract by removing the delay logic with the same objective.
We solve this by making the Timelock itself the only one capable of invoking the corresponding functions for those operations. In this way, if the contract owner wants to push a malicious upgrade or modification to the “protector” contract, they must comply with the configured delay at the time of proposing the operation. For example, if a malicious or compromised owner wishes to set the delay to 0, they must wait the duration of the current exit window for the execution of their malicious operation, thus giving users sufficient time to exit the network.
Timelock Contract
The Timelock contract gates access to the OnChainProposer (OCP) contract. Changes to the OCP can only be made by first interacting with the Timelock, which manages permissions based on roles assigned to different users.
Timelock Roles
- Sequencers: Can commit and verify batches.
- Governance: Can schedule and execute operations, respecting a delay. In practice this could be the role of a DAO, though it depends on the implementation.
- Security Council: Can bypass the minimum delay for executing any operation that the Timelock can execute. It can also manage other roles in the Timelock.
Sequencers will send commitBatch, verifyBatches, and verifyBatchesAligned to the Timelock, and this will execute the operations in the OnChainProposer. Eventually there will be Timelock logic, and there will be a time window between commitment and proof verification for security reasons.
The Governance is able to schedule important operations like contract upgrades respecting the minimum time window for the L2 participants to exit in case of undesired updates. Not only can they make changes in the logic of the OnChainProposer, but they can also update the Timelock itself.
The Security Council is designed as a powerful entity that can execute anything within the Timelock or OnChainProposer without delay. We call it security council because its actions are limitless, as it can upgrade any of the contracts whenever it wants, so ideally it should be a multisig composed of many diverse members, and it should be able to take action only if 75% of members agree. Ideally, in a more mature rollup the Security Council would have fewer permissions and would only need to act upon bugs detected on-chain if such a mechanism exists.
We call this mechanism of executing without delay the emergencyExecute.
Basic Functionalities
These are the things that we can do with the Timelock:
- Schedule:
schedule(...)andscheduleBatch(...) - Execute:
execute(...)andexecuteBatch(...) - Cancel:
cancel(bytes32 id) - Update Delay:
updateDelay(uint256 newDelay)
When an operation is scheduled, the Governance role may cancel it or, after the established delay, execute it. The delay can be updated, always respecting the current delay to do so.
It also has a few utility functions:
getMinDelay(): current minimum delay for new schedules.hashOperation(...),hashOperationBatch(...): pure helpers to compute ids.getTimestamp(id),getOperationState(id),isOperation*: query operation status.
Remember that Timelock inherits from TimelockControllerUpgradeable (which itself extends AccessControlUpgradeable) and UUPSUpgradeable, so it will inherit their behavior as well.
Important Remarks
Operation ID collision
Every scheduled operation is identified by a 32-byte operation id. This ID is determined by hashing fields like the target address, value transferred, data, predecessor, and salt. Two operations with the same fields will result in the same ID. That’s why, if we want to schedule the same operation more than once, we should probably use a salt. Example: If for some reason we want to schedule the pause of the OnChainProposer and we use salt zero, the next time we schedule that same operation we’ll have to change the salt (assuming no predecessor was specified) in order for the id to be different.
Cancelling a scheduled operation
cancel(bytes32 id) requires the operation id. You typically get it by:
- Reading it from the
CallScheduled(id, ...)event emitted byschedule/scheduleBatch, or - Computing it yourself (off-chain), or
- Calling
hashOperation(...)/hashOperationBatch(...)on-chain to compute it.
Note that:
hashOperation(...) = keccak256(abi.encode(target, value, data, predecessor, salt))hashOperationBatch(...) = keccak256(abi.encode(targets, values, payloads, predecessor, salt))
Fee Token Overview
Ethrex lets L2 transactions pay execution costs with an ERC-20 instead of ETH. A fee-token-enabled transaction behaves like a normal call or transfer, but the sequencer locks fees in the ERC-20 and distributes them (sender refund, coinbase priority fee, base-fee vault, operator vault, L1 data fee) using the hooks in l2_hook.rs.
Key requirements:
- The token must implement
IFeeToken(seecrates/l2/contracts/src/example/FeeToken.sol), which extendsIERC20L2and adds thelockFee/payFeeentry points consumed by the sequencer. lockFeemust reserve funds when invoked by the l2 bridge (the L2 bridge/COMMON_BRIDGE_L2_ADDRESS), andpayFeemust release or burn those funds when the transaction finishes.- The token address must be registered in the L2
FeeTokenRegistrysystem contract (0x…fffc). Registration happens through the L1CommonBridgeby callingregisterNewFeeToken(address); only the bridge owner can do this, and the call queues a privileged transaction that the sequencer forces on L2. Likewise,unregisterFeeToken(address)removes it.
Fee token ratios are also updated through the same privileged transaction path (deposits from L1 to L2). This is because we want the changes to be done through the L1, and via an owner that we want to be the same as the owner in the L1 bridge.
Minimal Contract Surface
contract FeeToken is ERC20, IFeeToken {
    address internal constant BRIDGE = 0x000000000000000000000000000000000000FFFF;

    ...

    modifier onlyBridge() {
        require(msg.sender == BRIDGE, "only bridge");
        _;
    }
    function lockFee(address payer, uint256 amount)
        external
        override(IFeeToken)
        onlyBridge
    {
        _transfer(payer, BRIDGE, amount);
    }

    function payFee(address receiver, uint256 amount)
        external
        override(IFeeToken)
        onlyBridge
    {
        if (receiver == address(0)) {
            _burn(BRIDGE, amount);
        } else {
            _transfer(BRIDGE, receiver, amount);
        }
    }
}
For deployment and operator steps, see Deploying a Fee Token.
User Workflow
Once a token is registered, users can submit fee-token transactions:
- Instantiate an
EthClientconnected to L2 and create a signer. - Build a
TxType::FeeTokentransaction withbuild_generic_tx, settingOverrides::fee_token = Some(<token>)and the desiredvalue/ calldata. - Send the transaction with
send_generic_transactionand wait for the receipt.
Fee locking and distribution happen automatically inside l2_hook.rs.
Minimal Cargo.toml
[package]
name = "fee-token-client"
version = "0.1.0"
edition = "2024"

[dependencies]
anyhow = "1.0.86"
hex = "0.4.3"
secp256k1 = { version = "0.30.0", default-features = false, features = ["global-context", "recovery", "rand"] }
tokio = { version = "1.41.1", features = ["macros", "rt-multi-thread"] }
url = { version = "2.5.4", features = ["serde"] }
ethrex_l2_sdk = { package = "ethrex-sdk", git = "https://github.com/lambdaclass/ethrex", tag = "v6.0.0" }
ethrex-rpc = { git = "https://github.com/lambdaclass/ethrex", tag = "v6.0.0" }
ethrex-common = { git = "https://github.com/lambdaclass/ethrex", tag = "v6.0.0" }
ethrex-l2-rpc = { git = "https://github.com/lambdaclass/ethrex", tag = "v6.0.0" }
use anyhow::Result;
use ethrex_l2_sdk::{build_generic_tx, send_generic_transaction};
use ethrex_rpc::clients::eth::{EthClient, Overrides};
use ethrex_common::types::TxType;
use ethrex_common::{Address, Bytes, U256};
use ethrex_l2_sdk::wait_for_transaction_receipt;
use ethrex_l2_rpc::signer::{LocalSigner, Signer};
use secp256k1::SecretKey;
use url::Url;

#[tokio::main]
async fn main() -> Result<()> {
    // 1. Connect and create the signer.
    let l2 = EthClient::new(Url::parse("http://localhost:1729")?)?;
    let private_key = SecretKey::from_slice(&hex::decode("<hex-private-key>")?)?;
    let signer = Signer::Local(LocalSigner::new(private_key));

    // 2. Build the fee-token transaction.
    let fee_token: Address = "<fee-token-address>".parse()?;
    let recipient: Address = "<recipient-address>".parse()?;
    let mut tx = build_generic_tx(
        &l2,
        TxType::FeeToken,
        recipient,
        signer.address(),
        Bytes::default(),
        Overrides {
            fee_token: Some(fee_token),
            value: Some(U256::from(100_000u64)),
            ..Default::default()
        },
    )
    .await?;

    // 3. Send and wait for the receipt.
    let tx_hash = send_generic_transaction(&l2, tx, &signer).await?;
    wait_for_transaction_receipt(tx_hash, &l2, 100).await?;
    Ok(())
}
Shared Bridge
Introduction
If a user wants to transfer funds from L2-A to an account on L2-B, the conventional process involves several steps: withdrawing assets from L2-A to Ethereum, claiming the unlocked funds on Ethereum, and then depositing those assets from Ethereum to L2-B. These multiple steps degrade the UX, and two of them require transactions on Ethereum, which are often expensive. This inefficiency arises because there is currently no direct communication channel between different L2s, forcing all interactions to route through their common hub: Ethereum.
The Shared Bridge feature changes this by enabling seamless message passing between L2s. As a result, a user can achieve the same transfer by interacting only with the source chain (L2-A), with the outcome eventually reflecting on the destination chain (L2-B).
While the user performs just one interaction and waits for the result, a similar process to the conventional flow occurs behind the scenes. In the following sections, we’ll explore how it works.
High-Level Overview
To understand the behind-the-scenes mechanics, we’ll revisit the earlier example. For a quick recap, here’s a high-level breakdown of what happens when Alice (on L2-A) wants to send ETH to Bob (on L2-B):

- Source L2 (L2-A, Alice’s side): Alice invokes the
sendToL2function on theCommonBridgeL2contract, specifying the destination chain ID (L2-B), Bob’s address on L2-B, the ETH amount to send, the gas limit she is willing to consume for the final transaction on L2-B (this gas is burned on L2-A), and optionally the calldata for any custom transaction to execute on L2-B. - Source L2 Sequencer (L2-A): Alice’s transaction is included in a block on L2-A. Eventually, a batch containing that block is sealed, and a commitment is submitted to L1 (Ethereum). This commitment includes, among other things, the list of balances to transfer to destination L2s, as well as the hashes of all messages addressed to those L2s.
- Source L2 Prover (L2-A): A zero-knowledge (ZK) proof is generated to validate the commitment for the batch containing Alice’s message to Bob.
- Source L2 Sequencer (L2-A): Once the prover delivers the ZK proof, it is submitted to L1 for verification. If the proof is valid, the commitment is marked as verified, the message is considered settled, the funds are transferred between bridges via the Router contract on L1, and the list of transaction hashes is stored in the respective target bridges.
- Destination L2 Sequencer (L2-B): A dedicated process periodically polls a permissioned set of sequencers from other L2s to check for newly emitted messages. It receives Alice’s message to Bob preemptively (i.e., possibly before the message is fully settled on L1). Upon receipt, it verifies the message’s validity by checking whether the message hash is already present in its own bridge. If the message hash is not yet present (the batch has not been verified on L1), the message is discarded and retried in the next iteration. If the message validates, it is processed, and the transferred ETH is minted to Bob’s address on L2-B.
Eventually, the sequencer commits and verifies a batch containing the received and processed messages in the OnChainProposer, clearing their hashes from the pending message hash list in the CommonBridge contract.
Protocol Details
Cross-chain Messaging
A cross-chain message directed from a source L2 to a destination L2 is essentially an event emitted by the CommonBridgeL2 contract within a block on the source L2. These events are triggered upon successful invocations of the sendToL2 function in the CommonBridgeL2.
During batch preparation on the source L2, cross-chain messages are collected. For each target L2, a list of message hashes is constructed, and the balance diffs generated by the messages are calculated. These values are included in the batch commitment submitted to L1 by the L1Committer.
Once the L1Committer prepares the inputs for the prover, the prover requests them and initiates generation of the ZK proof for the specific batch. As part of this process, the prover recomputes hashes of the cross-chain messages and the balance diffs, returning them to be used as public values during on-chain verification. Upon completing proof generation, the prover sends it back to the sequencer—specifically, to the ProofCoordinator.
After the prover delivers the ZK proof validating the batch prepared by the L1Committer, the L1Sender submits it along with the public values for on-chain verification. On-chain, before verifying the proof itself, the submitted public values are compared against the previously committed ones, confirming that the hashes of cross-chain messages and the balance diffs match. If verification succeeds, the involved cross-chain messages are deemed settled, and the state is transferred from the source bridge to the corresponding destination bridges.
To execute a cross-chain message on the destination L2, the message(s) must first be settled on L1. Additionally, the Watcher on the destination L2 must obtain them in advance via internal communication among permissioned sequencers.
While the source L2’s batch is being prepared and verified, the destination L2 has already preemptively acquired its corresponding messages. This is feasible because L2s with the Shared Bridge feature enabled are aware of the other sequencers participating in the same Shared Bridge ecosystem. The Watcher—a sequencer component originally designed to handle L1-incoming privileged transactions—periodically scans for relevant correspondence across the permissioned set of L2s. Upon receiving potential matches, the L2 queries its CommonBridge contract on L1 to validate the message (i.e., confirm it has been settled) before processing it. If the message is not yet validated, it is discarded and retried in the next polling iteration.
Replay Attack
Once a cross-chain message is settled on L1, the destination L2’s sequencer processes it. To do so, it constructs a privileged transaction from the message’s payload and adds it to the mempool only if the hash of this constructed transaction does not match the hash of any previously executed transaction. Hash collisions are prevented, among other measures, by incorporating the source L2’s chain ID and the message’s nonce (as recorded on the source L2). Each L2 maintains a mapping in its corresponding CommonBridgeL2 contract, using the destination chain ID as the key and the message nonce as the value.
State Availability
Cross-chain messages are forcibly included in recipient chains (see Forced Inclusion). In adverse scenarios—such as a sequencer shutdown, loss of communication with the source L2, or the destination L2’s inability to retrieve messages directly—a security mechanism must enable recovery of these messages from L1. This fallback is not yet implemented. However, the necessary data is already available on L1 to support this functionality since the state of the L2 lives in the blobs, so it’d be available as long as the blob containing the L2’s data is available.
Proving
Batch proving encompasses several tasks, including recomputing cross-chain messages hashes within the batch and the associated balance diffs. These values are returned as part of the guest program execution output and serve as public inputs for on-chain proof verification.
Source L2 not available
In situations where the destination L2 is unable to retrieve the relevant messages directly, because the source l2 is not available, we need a mechanism to still be able to retrieve them. What should be done is
- The destination L2 should periodically scan the L1 and store the blobs sent on the commitBatch call of the source L2.
- Run the state reconstruct command
- Initialize a sequencer with the reconstructed state
- Use that sequencer as the source for getting the messages
Keep in mind that since you are not the owner of that source L2, the chain will not advance, but you will still be able to get all pending messages to execute, as long as they were previously verified.
Forced Inclusion
Once a cross-chain message is settled, each target commonBridge receives, along with the resulting ETH value, a list of all message hashes with their associated timestamps. When a batch is verified, the prover outputs the rolling hash of the received messages processed in the batch, and the included message hashes are removed from the bridge after verification.
A message is considered expired if a certain deadline is reached and it has not yet been included in a batch on the destination chain. The commonBridge then prevents the sequencer from committing batches that contain non-privileged transactions (deposits and received messages) until all expired messages are included.
Rollbacks
Once a cross-chain message is settled, there is no rollback mechanism in scenarios where the destination L2 either cannot or chooses not to execute the transaction. Forced Inclusion guarantees that the destination sequencer will eventually have to execute the received message in order to include non-privileged transactions in a batch. Therefore, once a message is settled, the user waits for the destination L2 to include the message, just as when the user performs a deposit to that L2.
Recommendations
We advise not to register more than 100 chains, since this will incur a high cost when verifying a batch (About 1.6M gas), due to the transfers between bridges.
Ethrex L2 Integration with Aligned Layer
This document provides a comprehensive technical overview of how ethrex L2 integrates with Aligned Layer for proof aggregation and verification.
Table of Contents
- Overview
- What is Aligned Layer?
- Architecture
- Component Details
- Smart Contract Integration
- Configuration
- Behavioral Differences
- Error Handling
- Monitoring
Overview
Ethrex L2 supports two modes of proof verification:
- Standard Mode: Proofs are verified directly on L1 via smart contract verifiers (SP1Verifier, RISC0Verifier, TDXVerifier)
- Aligned Mode: Proofs are sent to Aligned Layer for aggregation, then verified on L1 via the
AlignedProofAggregatorServicecontract
Aligned mode offers significant cost savings by aggregating multiple proofs before on-chain verification, reducing the gas cost per proof verification.
Key Benefits of Aligned Mode
- Lower verification costs: Proof aggregation amortizes verification costs across multiple proofs
- Multi-batch verification: Multiple L2 batches can be verified in a single L1 transaction (via
verifyBatchesAligned()) - Compressed proofs: Uses STARK compressed format instead of Groth16, optimized for aggregation
What is Aligned Layer?
Aligned Layer is a proof aggregation and verification infrastructure for Ethereum. It provides:
- Proof Aggregation Service: Collects proofs from multiple sources and aggregates them
- Batcher: Receives individual proofs and batches them for aggregation
- On-chain Verification: Verifies aggregated proofs via the
AlignedProofAggregatorServicecontract - SDK: Client libraries for submitting proofs and checking verification status
Supported Proving Systems
Ethrex L2 supports the following proving systems with Aligned:
| Prover Type | Aligned ProvingSystemId | Notes |
|---|---|---|
| SP1 | ProvingSystemId::SP1 | Compressed STARK format |
| RISC0 | ProvingSystemId::Risc0 | Compressed STARK format |
Architecture
High-Level System Flow
┌──────────────────┐
│      Prover      │ (Separate binary)
│    (SP1/RISC0)   │
└────────┬─────────┘
         │ TCP
         ▼
┌─────────────────────────────────────────────────────────────────────────────┐
│                              ETHREX L2 NODE                                 │
├─────────────────────────────────────────────────────────────────────────────┤
│                                                                             │
│  ┌──────────────────┐    ┌──────────────────┐    ┌──────────────────┐       │
│  │ ProofCoordinator │───▶│  L1ProofSender   │───▶│  Aligned Batcher │       │
│  │   (TCP Server)   │    │                  │    │   (WebSocket)    │       │
│  └────────┬─────────┘    └────────┬─────────┘    └────────┬─────────┘       │
│           │                       │                       │                 │
│           ▼                       ▼                       │                 │
│  ┌─────────────────────────────────────┐                  │                 │
│  │          RollupStorage              │                  │                 │
│  │     (Proofs, Batch State)           │                  │                 │
│  └─────────────────────────────────────┘                  │                 │
│                                                           │                 │
└───────────────────────────────────────────────────────────┼─────────────────┘
                                                            │
                                                            ▼
┌─────────────────────────────────────────────────────────────────────────────┐
│                           ALIGNED LAYER                                     │
├─────────────────────────────────────────────────────────────────────────────┤
│  ┌──────────────────┐    ┌──────────────────┐    ┌──────────────────┐       │
│  │  Proof Batcher   │───▶│ Proof Aggregator │───▶│  L1 Settlement   │       │
│  │                  │    │   (SP1/RISC0)    │    │                  │       │
│  └──────────────────┘    └──────────────────┘    └──────────────────┘       │
└─────────────────────────────────────────────────────────────────────────────┘
                                                            │
                                                            ▼
┌─────────────────────────────────────────────────────────────────────────────┐
│                              ETHEREUM L1                                    │
├─────────────────────────────────────────────────────────────────────────────┤
│  ┌─────────────────────────────────┐    ┌──────────────────────────────┐    │
│  │      OnChainProposer            │───▶│ AlignedProofAggregatorService│    │
│  │  (verifyBatchesAligned())       │    │   (Merkle proof validation)  │    │
│  └─────────────────────────────────┘    └──────────────────────────────┘    │
└─────────────────────────────────────────────────────────────────────────────┘
Note
The Prover runs as a separate binary outside the L2 node, connecting via TCP to the ProofCoordinator. For deployment instructions, see Running Ethrex in Aligned Mode.
Component Interactions
Proof Sender Flow (Aligned Mode)
The proof sender tracks the last sent proof in the rollup storage and submits compressed proofs to the Aligned Batcher.
Proof Verifier Flow (Aligned Mode)
The proof verifier:
- Queries
lastVerifiedBatchfromOnChainProposer - Checks proof aggregation status via
AlignedProofAggregatorService - Calls
verifyBatchesAligned()onOnChainProposer - Which internally calls
verifyProofInclusion()on the aggregator service
Component Details
1. L1ProofSender (l1_proof_sender.rs)
The L1ProofSender handles submitting proofs to Aligned Layer.
Key Responsibilities:
- Monitors for completed proofs in the rollup store
- Sends compressed proofs to the Aligned Batcher via WebSocket
- Tracks the last sent batch proof number
- Handles nonce management for the Aligned batcher
Aligned-Specific Logic:
#![allow(unused)]
fn main() {
async fn send_proof_to_aligned(
    &self,
    batch_number: u64,
    batch_proofs: impl IntoIterator<Item = &BatchProof>,
) -> Result<(), ProofSenderError> {
    // Estimate fee from Aligned
    let fee_estimation = Self::estimate_fee(self).await?;

    // Get nonce from Aligned batcher
    let nonce = get_nonce_from_batcher(self.network.clone(), self.signer.address()).await?;

    for batch_proof in batch_proofs {
        // Build verification data for Aligned
        let verification_data = VerificationData {
            proving_system: match prover_type {
                ProverType::RISC0 => ProvingSystemId::Risc0,
                ProverType::SP1 => ProvingSystemId::SP1,
            },
            proof: batch_proof.compressed(),
            proof_generator_addr: self.signer.address(),
            vm_program_code: Some(vm_program_code),  // ELF or VK
            pub_input: Some(batch_proof.public_values()),
            verification_key: None,
        };

        // Submit to Aligned batcher
        submit(self.network.clone(), &verification_data, fee_estimation, wallet, nonce).await?;
    }
}
}
See the Configuration section for AlignedConfig details.
2. L1ProofVerifier (l1_proof_verifier.rs)
The L1ProofVerifier monitors Aligned Layer for aggregated proofs and triggers on-chain verification.
Key Responsibilities:
- Polls Aligned Layer to check if proofs have been aggregated
- Collects Merkle proofs of inclusion for verified proofs
- Batches multiple verified proofs into a single L1 transaction
- Calls
verifyBatchesAligned()on the OnChainProposer contract
Verification Flow:
#![allow(unused)]
fn main() {
async fn verify_proofs_aggregation(&self, first_batch_number: u64) -> Result<Option<H256>> {
    let mut sp1_merkle_proofs_list = Vec::new();
    let mut risc0_merkle_proofs_list = Vec::new();

    // For each consecutive batch
    loop {
        for (prover_type, proof) in proofs_for_batch {
            // Build verification data
            let verification_data = match prover_type {
                ProverType::SP1 => AggregationModeVerificationData::SP1 {
                    vk: self.sp1_vk,
                    public_inputs: proof.public_values(),
                },
                ProverType::RISC0 => AggregationModeVerificationData::Risc0 {
                    image_id: self.risc0_vk,
                    public_inputs: proof.public_values(),
                },
            };

            // Check if proof was aggregated by Aligned
            if let Some((merkle_root, merkle_path)) =
                self.check_proof_aggregation(verification_data).await?
            {
                aggregated_proofs.insert(prover_type, merkle_path);
            }
        }

        // Collect merkle proofs for this batch
        sp1_merkle_proofs_list.push(sp1_merkle_proof);
        risc0_merkle_proofs_list.push(risc0_merkle_proof);
    }

    // Send single transaction to verify all batches
    let calldata = encode_calldata(
        "verifyBatchesAligned(uint256,uint256,bytes32[][],bytes32[][])",
        &[first_batch, last_batch, sp1_proofs, risc0_proofs]
    );

    send_verify_tx(calldata, target_address).await
}
}
3. Prover Modification
In Aligned mode, the prover generates Compressed proofs instead of Groth16 proofs.
Proof Format Selection:
#![allow(unused)]
fn main() {
pub enum ProofFormat {
    /// Groth16 - EVM-friendly, for direct on-chain verification
    Groth16,
    /// Compressed STARK - For Aligned Layer aggregation
    Compressed,
}
}
BatchProof Types:
#![allow(unused)]
fn main() {
pub enum BatchProof {
    /// For direct on-chain verification (Standard mode)
    ProofCalldata(ProofCalldata),
    /// For Aligned Layer submission (Aligned mode)
    ProofBytes(ProofBytes),
}

pub struct ProofBytes {
    pub prover_type: ProverType,
    pub proof: Vec<u8>,           // Compressed STARK proof
    pub public_values: Vec<u8>,   // Public inputs
}
}
Smart Contract Integration
OnChainProposer Contract
The OnChainProposer.sol contract supports both verification modes:
State Variables:
/// True if verification is done through Aligned Layer
bool public ALIGNED_MODE;

/// Address of the AlignedProofAggregatorService contract
address public ALIGNEDPROOFAGGREGATOR;

/// Verification keys per git commit hash and verifier type
mapping(bytes32 commitHash => mapping(uint8 verifierId => bytes32 vk))
    public verificationKeys;
Standard Verification (verifyBatches):
function verifyBatches(
    uint256 firstBatchNumber,
    bytes[] calldata risc0BlockProofs,
    bytes[] calldata sp1ProofsBytes,
    bytes[] calldata tdxSignatures
) external onlyOwner whenNotPaused {
    require(!ALIGNED_MODE, "008");  // Use verifyBatchesAligned instead

    // Loops over _verifyBatchInternal() for each batch,
    // verifying proofs directly via verifier contracts
}
Aligned Verification (verifyBatchesAligned):
function verifyBatchesAligned(
    uint256 firstBatchNumber,
    uint256 lastBatchNumber,
    bytes32[][] calldata sp1MerkleProofsList,
    bytes32[][] calldata risc0MerkleProofsList
) external onlyOwner whenNotPaused {
    require(ALIGNED_MODE, "00h");  // Use verifyBatches instead

    for (uint256 i = 0; i < batchesToVerify; i++) {
        bytes memory publicInputs = _getPublicInputsFromCommitment(batchNumber);

        if (REQUIRE_SP1_PROOF) {
            _verifyProofInclusionAligned(
                sp1MerkleProofsList[i],
                verificationKeys[commitHash][SP1_VERIFIER_ID],
                publicInputs
            );
        }

        if (REQUIRE_RISC0_PROOF) {
            _verifyProofInclusionAligned(
                risc0MerkleProofsList[i],
                verificationKeys[commitHash][RISC0_VERIFIER_ID],
                publicInputs
            );
        }
    }
}
Aligned Proof Inclusion Verification:
function _verifyProofInclusionAligned(
    bytes32[] calldata merkleProofsList,
    bytes32 verificationKey,
    bytes memory publicInputsList
) internal view {
    bytes memory callData = abi.encodeWithSignature(
        "verifyProofInclusion(bytes32[],bytes32,bytes)",
        merkleProofsList,
        verificationKey,
        publicInputsList
    );

    (bool callResult, bytes memory response) = ALIGNEDPROOFAGGREGATOR.staticcall(callData);
    require(callResult, "00y");  // Call to ALIGNEDPROOFAGGREGATOR failed

    bool proofVerified = abi.decode(response, (bool));
    require(proofVerified, "00z");  // Aligned proof verification failed
}
Public Inputs Structure
The public inputs for proof verification are reconstructed from batch commitments:
Fixed-size fields (256 bytes):
├── bytes 0-32:    Initial state root (from last verified batch)
├── bytes 32-64:   Final state root (from current batch)
├── bytes 64-96:   Withdrawals merkle root
├── bytes 96-128:  Processed privileged transactions rolling hash
├── bytes 128-160: Blob KZG versioned hash
├── bytes 160-192: Last block hash
├── bytes 192-224: Chain ID
└── bytes 224-256: Non-privileged transactions count

Variable-size fields:
├── For each balance diff:
│   ├── Chain ID (32 bytes)
│   ├── Value (32 bytes)
│   └── Asset diffs + Message hashes
└── For each L2 message rolling hash:
    ├── Chain ID (32 bytes)
    └── Rolling hash (32 bytes)
Configuration
Sequencer Configuration
#![allow(unused)]
fn main() {
pub struct AlignedConfig {
    /// Enable Aligned mode
    pub aligned_mode: bool,

    /// Interval (ms) between verification checks
    pub aligned_verifier_interval_ms: u64,

    /// Beacon client URLs for blob verification
    pub beacon_urls: Vec<Url>,

    /// Aligned network (devnet, testnet, mainnet)
    pub network: Network,

    /// Fee estimation type ("instant" or "default")
    pub fee_estimate: String,

    /// Timeout in seconds before resending a proof not yet verified on-chain
    pub resubmission_timeout_secs: u64,
}
}
CLI Flags
| Flag | Description |
|---|---|
--aligned | Enable Aligned mode |
--aligned-network | Network for Aligned SDK (devnet/testnet/mainnet) |
--aligned.beacon-url | Beacon client URL supporting /eth/v1/beacon/blobs |
--aligned.resubmission-timeout | Timeout (seconds) before resending an unverified proof (e.g. 86400 for 24h) |
Environment Variables
Node Configuration:
| Variable | Description |
|---|---|
ETHREX_ALIGNED_MODE | Enable Aligned mode |
ETHREX_ALIGNED_BEACON_URL | Beacon client URL |
ETHREX_ALIGNED_NETWORK | Aligned network |
ETHREX_ALIGNED_RESUBMISSION_TIMEOUT_SECS | Timeout (seconds) before resending an unverified proof |
Deployer Configuration:
| Variable | Description |
|---|---|
ETHREX_L2_ALIGNED | Enable Aligned during deployment |
ETHREX_DEPLOYER_ALIGNED_AGGREGATOR_ADDRESS | Address of AlignedProofAggregatorService |
Behavioral Differences
Standard Mode vs Aligned Mode
| Aspect | Standard Mode | Aligned Mode |
|---|---|---|
| Proof Format | Groth16 (EVM-friendly) | Compressed STARK |
| Submission Target | OnChainProposer contract | Aligned Batcher (WebSocket) |
| Verification Method | verifyBatches() | verifyBatchesAligned() |
| Verifier Contract | SP1Verifier/RISC0Verifier | AlignedProofAggregatorService |
| Batch Verification | Multiple batches per tx | Multiple batches per tx (aggregated) |
| Gas Cost | Higher (per-proof verification) | Lower (amortized via aggregation) |
| Additional Component | None | L1ProofVerifier process |
| Proof Tracking | Via rollup store | Via Aligned SDK |
Prover Differences
Standard Mode:
- Generates Groth16 proof (calldata format)
- Proof sent directly to
OnChainProposer.verifyBatches()
Aligned Mode:
- Generates Compressed STARK proof (bytes format)
- Proof submitted to Aligned Batcher via SDK
- Must wait for Aligned aggregation before on-chain verification
Verification Flow Differences
Standard Mode:
Prover → ProofCoordinator → L1ProofSender → OnChainProposer.verifyBatches()
                                                    │
                                                    ▼
                                          SP1Verifier/RISC0Verifier
Aligned Mode:
Prover → ProofCoordinator → L1ProofSender → Aligned Batcher
                                                     │
                                                     ▼
                                            Aligned Aggregation
                                                     │
                                                     ▼
L1ProofVerifier  ←  (polls for aggregation)  ←  AlignedProofAggregatorService
        │
        ▼
OnChainProposer.verifyBatchesAligned()
        │
        ▼
AlignedProofAggregatorService.verifyProofInclusion()
Error Handling
Proof Sender Errors
| Error | Description | Recovery |
|---|---|---|
AlignedGetNonceError | Failed to get nonce from batcher | Retry with backoff |
AlignedFeeEstimateError | Fee estimation failed | Retry all RPC URLs |
AlignedWrongProofFormat | Proof is not compressed | Re-generate proof in Aligned mode |
InvalidProof | Aligned rejected the proof | Delete proof, regenerate |
Proof Verifier Errors
| Error | Description | Recovery |
|---|---|---|
MismatchedPublicInputs | Proofs have different public inputs | Investigation required |
UnsupportedProverType | Prover type not supported by Aligned | Use SP1 or RISC0 |
BeaconClient | Beacon URL failed | Try next beacon URL |
EthereumProviderError | RPC URL failed | Try next RPC URL |
Monitoring
Key Metrics
batch_verification_gas: Gas used per batch verificationlatest_verified_batch_proof: Last batch proof verified on-chainlast_verified_batch: Last batch verified on L1
Log Messages
Proof Sender:
INFO ethrex_l2::sequencer::l1_proof_sender: Sending batch proof(s) to Aligned Layer batch_number=1
INFO ethrex_l2::sequencer::l1_proof_sender: Submitted proof to Aligned prover_type=SP1 batch_number=1
Proof Verifier:
INFO ethrex_l2::sequencer::l1_proof_verifier: Proof aggregated by Aligned batch_number=1 merkle_root=0x... commitment=0x...
INFO ethrex_l2::sequencer::l1_proof_verifier: Batches verified in OnChainProposer, with transaction hash 0x...
References
- Aligned Layer Documentation
- Aligned SDK API Reference
- Aligned Contract Addresses
- Running Ethrex in Aligned Mode
- Aligned Failure Recovery Guide
- ethrex L2 Deployment Guide
- ethrex Prover Documentation
Distributed Proving
Overview
Distributed proving enables running multiple prover instances in parallel, each working on different batches simultaneously. It has two key aspects:
- Parallel batch assignment: the proof coordinator assigns different batches to different provers, so multiple provers work simultaneously.
- Multi-batch verification: the proof sender collects consecutive proven batches and submits them in a single
verifyBatches()L1 transaction, saving gas.
Architecture
┌──────────────┐     ┌──────────────┐     ┌──────────────┐
│   Prover 1   │     │   Prover 2   │     │   Prover 3   │
│    (sp1)     │     │    (sp1)     │     │   (risc0)    │
└──────┬───────┘     └──────┬───────┘     └──────┬───────┘
       │                    │                    │
       │    TCP             │    TCP             │    TCP
       │                    │                    │
       └────────────┬───────┘────────────────────┘
                    │
          ┌─────────▼──────────┐
          │  Proof Coordinator │  (part of L2 sequencer)
          │  tcp://0.0.0.0:3900│
          └─────────┬──────────┘
                    │
          ┌─────────▼──────────┐
          │   Proof Sender     │  Batches proofs → single L1 tx
          └─────────┬──────────┘
                    │
              ┌─────▼─────┐
              │    L1      │
              └────────────┘
Multiple provers connect to the same proof coordinator over TCP. The coordinator tracks assignments per (batch_number, prover_type), so:
- Two
sp1provers get assigned different batches. - An
sp1prover and arisc0prover can work on the same batch simultaneously (they produce different proof types).
Batch assignment
When a prover sends a BatchRequest, it includes its prover_type. The coordinator:
- Scans batches starting from the oldest unverified one.
- Skips batches that already have a proof for this
prover_type. - Skips batches currently assigned to another prover of the same type (unless the assignment has timed out).
- Assigns the first available batch and records
(batch_number, prover_type) → Instant::now().
The assignment map is in-memory only — it is lost on restart. On restart, the coordinator simply reassigns batches from scratch, which is safe because storing a duplicate proof is a no-op.
Prover timeout
If a prover doesn’t submit a proof within prover-timeout (default 10 minutes), its assignment expires and the batch becomes available for reassignment to another prover. This handles prover crashes, network issues, or slow provers without manual intervention.
Multi-batch verification
The proof sender runs on a periodic tick (every send-interval ms). On each tick it:
- Queries the on-chain
lastVerifiedBatchandlastCommittedBatch. - Collects all consecutive proven batches starting from
lastVerifiedBatch + 1, checking that every required proof type is present for each batch. - Sends them in a single
verifyBatches()call to L1.
For example, if batches 5, 6, 7 are fully proven but batch 8 is missing a proof, only batches 5–7 are sent. Batch 8 waits for its proof.
Fallback to single-batch sending
On any multi-batch error (gas limit exceeded, calldata too large, invalid proof, etc.), the proof sender falls back to sending each batch individually. Since on-chain verification is sequential (batchNumber == lastVerifiedBatch + 1), the fallback stops at the first failing batch — remaining batches are retried on the next tick.
During single-batch fallback, if the revert indicates an invalid proof, that proof is deleted from the store so a prover can re-prove it.
Configuration reference
Proof coordinator (sequencer side)
| Flag | Env Variable | Default | Description |
|---|---|---|---|
--proof-coordinator.addr | ETHREX_PROOF_COORDINATOR_LISTEN_ADDRESS | 127.0.0.1 | Listen address |
--proof-coordinator.port | ETHREX_PROOF_COORDINATOR_LISTEN_PORT | 3900 | Listen port |
--proof-coordinator.send-interval | ETHREX_PROOF_COORDINATOR_SEND_INTERVAL | 5000 | How often (ms) the proof sender collects and sends proofs to L1 |
--proof-coordinator.prover-timeout | ETHREX_PROOF_COORDINATOR_PROVER_TIMEOUT | 600000 | Timeout (ms) before reassigning a batch to another prover (default: 10 min) |
Prover client
| Flag | Env Variable | Default | Description |
|---|---|---|---|
--proof-coordinators | PROVER_CLIENT_PROOF_COORDINATOR_URL | tcp://127.0.0.1:3900 | Space-separated coordinator URLs |
--backend | PROVER_CLIENT_BACKEND | exec | Backend: exec, sp1, risc0, zisk, openvm |
--proving-time | PROVER_CLIENT_PROVING_TIME | 5000 | Wait time (ms) between requesting new work |
Testing locally
1. Start L1
cd crates/l2
make init-l1
2. Deploy contracts
cd crates/l2
make deploy-l1
3. Start L2 with a long proof send interval
Set a long send interval so that multiple batch proofs accumulate before the proof sender submits them to L1 in a single transaction. The default is 5 seconds (5000ms).
cd crates/l2
ETHREX_PROOF_COORDINATOR_SEND_INTERVAL=120000 make init-l2
This sets the interval to 120 seconds, giving provers time to complete multiple batches before verification.
4. Start multiple provers
Once some batches have been committed, start multiple prover instances in separate terminals. They all connect to the same coordinator at tcp://127.0.0.1:3900.
# Terminal A
cd crates/l2
make init-prover-exec

# Terminal B
cd crates/l2
make init-prover-exec
Each prover will be assigned a different batch. When both finish, the proof sender will collect the consecutive proven batches and submit them in a single verifyBatches transaction on L1.
Developer docs
Welcome to the ethrex developer docs!
This section contains documentation on the internals of the project.
To get started first, read the developer installation guide to learn about ethrex and its features. Then you can look into the L1 developer docs or the L2 developer docs
Setting up a development environment for ethrex
Prerequisites
Cloning the repo
The full code of ethrex is available at GitHub and can be cloned using git
git clone https://github.com/lambdaclass/ethrex && cd ethrex
Building the ethrex binary
Ethrex can be built using cargo
To build the client run
cargo build --release --bin ethrex
the following features can be enabled with --features <features>
| Feature | Description |
|---|---|
| default | Enables “rocksdb”, “c-kzg”, “rollup_storage_sql”, “dev”, “metrics” features |
| debug | Enables debug mode for LEVM |
| dev | Makes the –dev flag available |
| metrics | Enables metrics gathering for use with a monitoring stack |
| c-kzg | Enables the c-kzg crate instead of kzg-rs |
| rocksdb | Enables rocksdb as the database for the ethereum state |
| rollup_storage_sql | Enables sql as the database for the L2 batch data |
| sp1 | Enables the sp1 backend for the L2 prover |
| risc0 | Enables the risc0 backend for the L2 prover |
| gpu | Enables CUDA support for the zk backends risc0 and sp1 |
Bolded are features enabled by default
Additionally the environment variable COMPILE_CONTRACTS can be set to true to enable embedding the solidity contracts used by the rollup, into the binary to enable the L2 dev mode.
Building the docker image
The Dockerfile is located at the root of the repository and can be built by running
docker build -t ethrex .
Build arguments:
PROFILE: Cargo profile to use (default:release). Example:release-with-debug-assertionsBUILD_FLAGS: Additional cargo flags (features, etc.)
# Custom profile
docker build -t ethrex --build-arg PROFILE="release-with-debug-assertions" .

# With features
docker build -t ethrex --build-arg BUILD_FLAGS="--features l2" .

# Both
docker build -t ethrex --build-arg PROFILE="release-with-debug-assertions" --build-arg BUILD_FLAGS="--features l2" .
L1 Developer Docs
Welcome to the ethrex L1 developer documentation!
This section provides information about the internals of the L1 side of the project.
Table of contents
Ethrex as a local development node
Prerequisites
This guide assumes you’ve read the dev installation guide
Dev mode
In dev mode ethrex acts as a local Ethereum development node. It can be run with the following command
ethrex --dev
Then you can use a tool like rex to make sure that the network is advancing
rex block-number
Rich account private keys are listed at the folder fixtures/keys/private_keys_l1.txt located at the root of the repo. You can then use these keys to deploy contracts and send transactions in the localnet.
Importing blocks from a file
Importing blocks
The simplest task a node can do is import blocks offline. We would do so like this:
Prerequisites
This guide assumes you’ve read the dev installation guide
Import blocks
# Execute the import
# Notice that the .rlp file is stored with Git LFS, it needs to be downloaded before importing
ethrex --network fixtures/genesis/perf-ci.json import  fixtures/blockchain/l2-1k-erc20.rlp
- The network argument is common to all ethrex commands. It specifies the genesis file, or a public network like holesky. This is the starting state of the blockchain.
- The import command means that this node will not start rpc endpoints or peer to peer communication. It will just read a file, parse the blocks, execute them, and save the EVM state (accounts info and storage) after each execution.
- The file is an RLP encoded file with a list of blocks.
Block execution
The CLI import subcommand executes cmd/ethrex/cli.rs:import_blocks, which can be summarized as:
#![allow(unused)]
fn main() {
let store = init_store(&datadir, network).await;
let blockchain = init_blockchain(evm, store.clone());
for block in parse(rlp_file) {
    blockchain.add_block(block)
}
}
The blockchain struct is our main point of interaction with our data. It contains references to key structures like our store (key-value db) and the EVM engine (knows how to execute transactions).
Adding a block is performed in crates/blockchain/blockchain.rs:add_block, and performs several tasks:
- Block execution (
execute_block).- Pre-validation. Checks that the block parent is present, that the base fee matches the parent’s expectations, timestamps, header number, transaction root and withdrawals root.
- VM execution. The block contains all the transactions, which is all needed to perform a state transition. The VM has a reference to the store, so it can get the current state to apply transactions on top of it.
- Post execution validations: gas used, receipts root, requests hash.
- The VM execution does not mutate the store itself. It returns a list of all changes that happened in execution so they can be applied in any custom way.
- Post-state storage (
store_block)apply_account_updatesgets the pre-state from the store, applies the updates to get an updated post-transition-state, calculates the root and commits the new state to disk.- The state root is a merkle root, a cryptographic summary of a state. The one we just calculated is compared with the one in the block header. If it matches, it proves that your node’s post-state is the same as the one the block producer reached after executing that same block.
- The block and the receipts are saved to disk.
States
In ethereum the first state is determined by the genesis file. After that, each block represents a state transition. To be formal about it, if we have a state and a block , we can define as the application of a state transition function.
This means that a blockchain, internally, looks like this.
flowchart LR
    Sg["Sg (genesis)"]
    S1a["S1"]
    S2a["S2"]
    S3a["S3"]

    Sg -- "f(Sg, B1)" --> S1a
    S1a -- "f(S1, B2)" --> S2a
    S2a -- "f(S2, B3)" --> S3a
We start from a genesis state, and each time we add a block we generate a new state. We don’t only save the current state (), we save all of them in the DB after execution. This seems wasteful, but the reason will become more obvious very soon. This means that we can get the state for any block number. We say that if we get the state for block number one, we actually are getting the state right after applying B1.
Due to the highly available nature of ethereum, sometimes multiple different blocks can be proposed for a single state. This creates what we call “soft forks”.
flowchart LR
    Sg["Sg (genesis)"]
    S1a["S1"]
    S2a["S2"]
    S3a["S3"]
    S1b["S1'"]
    S2b["S2'"]
    S3b["S3'"]

    Sg -- "f(Sg, B1)" --> S1a
    S1a -- "f(S1, B2)" --> S2a
    S2a -- "f(S2, B3)" --> S3a

    Sg -- "f(Sg, B1')" --> S1b
    S1b -- "f(S1', B2')" --> S2b
    S2b -- "f(S2', B3')" --> S3b
This means that for a single block number we actually have different post-states, depending on which block we executed. In turn, this means that using a block number is not a reliable way of getting a state. To fix this, what we do is calculate the hash of a block, which is unique, and use that as an identifier for both the block and its corresponding block state. In that way, if I request the DB the state for hash(B1) it understands that I’m looking for S1, whereas if I request the DB the state for hash(B1') I’m looking for S1'.
How we determine which is the right fork is called Fork choice, which is not done by the execution client, but by the consensus client. What concerns us is that if we currently think we are on S3 and the consensus client notifies us that actually S3' is the current fork, we need to change our current state to that one. That means that we need to save every post-state in case we need to change forks. This changing of the nodes perception of the correct soft fork to a different one is called reorg.
VM - State interaction
As mentioned in the previous point, the VM execution doesn’t directly mutate the store. It just calculates all necessary updates. There’s an important clarification we need to go through about the starting point for that calculation.
This is a key piece of code in Blockchain.execute_block:
#![allow(unused)]
fn main() {
let vm_db = StoreVmDatabase::new(self.storage.clone(), parent_header)?;
let mut vm = Evm::new(vm_db);
let execution_result = vm.execute_block(block)?;
let account_updates = vm.get_state_transitions()?;
}
The VM is a transient object. It is created with an engine/backend (LEVM or REVM) and a db reference. It is discarded after executing each block.
The StoreVmDatabase is just an implementation of the VmDatabase trait, using our Store (reference to a key-value store). It’s an adapter between the store and the vm and allows the VM to not depend on a concrete DB.
The main piece of context a VM DB needs to be created is the parent_hash, which is the hash of the parent’s block. As we mentioned previously, this hash uniquely identifies an ethereum state, so we are basically telling the VM what it’s pre-state is. If we give it that, plus the block, the VM can execute the state-transition function previously mentioned.
The VmDatabase context just requires the implementation of the following methods:
#![allow(unused)]
fn main() {
fn get_account_info(&self, address: Address) -> Result<Option<AccountInfo>, EvmError>;
fn get_storage_slot(&self, address: Address, key: H256) -> Result<Option<U256>, EvmError>;
fn get_block_hash(&self, block_number: u64) -> Result<H256, EvmError>;
fn get_chain_config(&self) -> Result<ChainConfig, EvmError>;
fn get_account_code(&self, code_hash: H256) -> Result<Bytes, EvmError>;
}
That is, it needs to know how to get information about accounts, about storage, get a block hash according to a specific number, get the config, and the account code for a specific hash.
Internally, the StoreVmDatabase implementation just calls the db for this. For example:
#![allow(unused)]
fn main() {
fn get_account_info(&self, address: Address) -> Result<Option<AccountInfo>, EvmError> {
    self.store
        .get_account_info_by_hash(self.block_hash, address)
        .map_err(|e| EvmError::DB(e.to_string()))
}
}
You may note that the get_account_info_by_hash receives not only the address, but also the block hash. That is because it doesn’t get the account state for the “current” state, it gets it for the post-state of the parent block. That is, the pre-state for the state transition. And this makes sense: we don’t want to apply a transaction anywhere, we want to apply it precisely on top of the parent’s state, so that’s where we’ll be getting all of our state.
What is state anyway
The ethereum state is, logically, two things: accounts and their storage slots. If we were to represent them in memory, they would be something like:
#![allow(unused)]
fn main() {
pub struct VmState {
    accounts: HashMap<H256, Option<AccountState>>,
    storage: HashMap<H256, HashMap<H256, Option<U256>>>,
}
}
The accounts are indexed by the hash of their address. The storage has a two level lookup: an index by account address hash, and then an index by hashed slot. The reason why we use hashes of the addresses and slots instead of using them directly is an implementation detail.
This flat key-value representation is what we usually call a snapshot. To write and get state, it would be enough and efficient to have a table in the db with some snapshot in the past and then the differences in each account and storage each block. These are precisely the account updates, and this is precisely what we do in our snapshots implementation.
However, we also need to be able to efficiently summarize a state, which is done using a structure called the Merkle Patricia Trie (MPT). This is a big topic, not covered by this document. A link to an in-detail document will be added soon. The most important part of it is that it’s a merkle tree and we can calculate its root/hash to summarize a whole state. When a node proposes a block, the root of the post-state is included as metadata in the header. That means that after executing a block, we can calculate the root of the resulting post-state MPT and compare it with the metadata. If it matches, we have a cryptographic proof that both nodes arrived at the same conclusion.
This means that we will need to maintain both a snapshot (for efficient reads) and a trie (for efficient summaries) for every state in the blockchain. Here’s an interesting blogpost by the go ethereum (geth) team explaining this need in detail: https://blog.ethereum.org/2020/07/17/ask-about-geth-snapshot-acceleration
TODO
Imports
- Add references to our code for MPT and snapshots.
- What account updates are. What does it mean to apply them.
Live node block execution
- Engine api endpoints (fork choice updated with no attrs, new payload).
- applying fork choice and reorg.
- JSON RPC endpoints to get state.
Block building
- Mempool and P2P.
- Fork choice updated with attributes and get_payload.
- Payload building.
Syncing on node startup
- Discovery.
- Getting blocks and headers via p2p.
- Snap sync.
Quick Start (L1 localnet)
This page will show you how to quickly spin up a local development network with ethrex.
Prerequisites
Starting a local devnet
make localnet
This make target will:
- Build our node inside a docker image.
- Fetch our fork ethereum package, a private testnet on which multiple ethereum clients can interact.
- Start the localnet with kurtosis.
If everything went well, you should be faced with our client’s logs (ctrl-c to leave).
Stopping a local devnet
To stop everything, simply run:
make stop-localnet
Metrics
Quickstart
For a high level quickstart guide, please refer to Monitoring.
Ethereum Metrics Exporter
We use the Ethereum Metrics Exporter, a Prometheus metrics exporter for Ethereum execution and consensus nodes, as an additional tool to gather metrics during L1 execution. The exporter uses the prometheus data source to create a Grafana dashboard and display the metrics.
L1 Metrics Dashboard
We provide a pre-configured Grafana dashboard to monitor Ethrex L1 nodes. For detailed information on the provided dashboard, see our L1 Dashboard document.
Running the execution node on other networks with metrics enabled
As shown in Monitoring docker-compose is used to bundle prometheus and grafana services, the *overrides files define the ports and mounts the prometheus’ configuration file.
If a new dashboard is designed, it can be mounted only in that *overrides file.
A consensus node must be running for the syncing to work.
To run the execution node on any network with metrics, the next steps should be followed:
-
Build the
ethrexbinary for the network you want (see node options in CLI Commands) with themetricsfeature enabled. -
Enable metrics by using the
--metricsflag when starting the node. -
Set the
--metrics.portcli arg of the ethrex binary to match the port defined inmetrics/provisioning/prometheus/prometheus_l1_sync_docker.yaml, which is3701right now. -
Run the docker containers:
cd metrics

docker compose -f docker-compose-metrics.yaml -f docker-compose-metrics-l1.overrides.yaml up
Ethrex L1 Performance Dashboard (Dec 2025)
Our Grafana dashboard provides a comprehensive overview of key metrics to help developers and operators ensure optimal performance and reliability of their Ethrex nodes. The only configured datasource today is prometheus, and the job variable defaults to ethrex L1, which is the job configured by default in our provisioning.
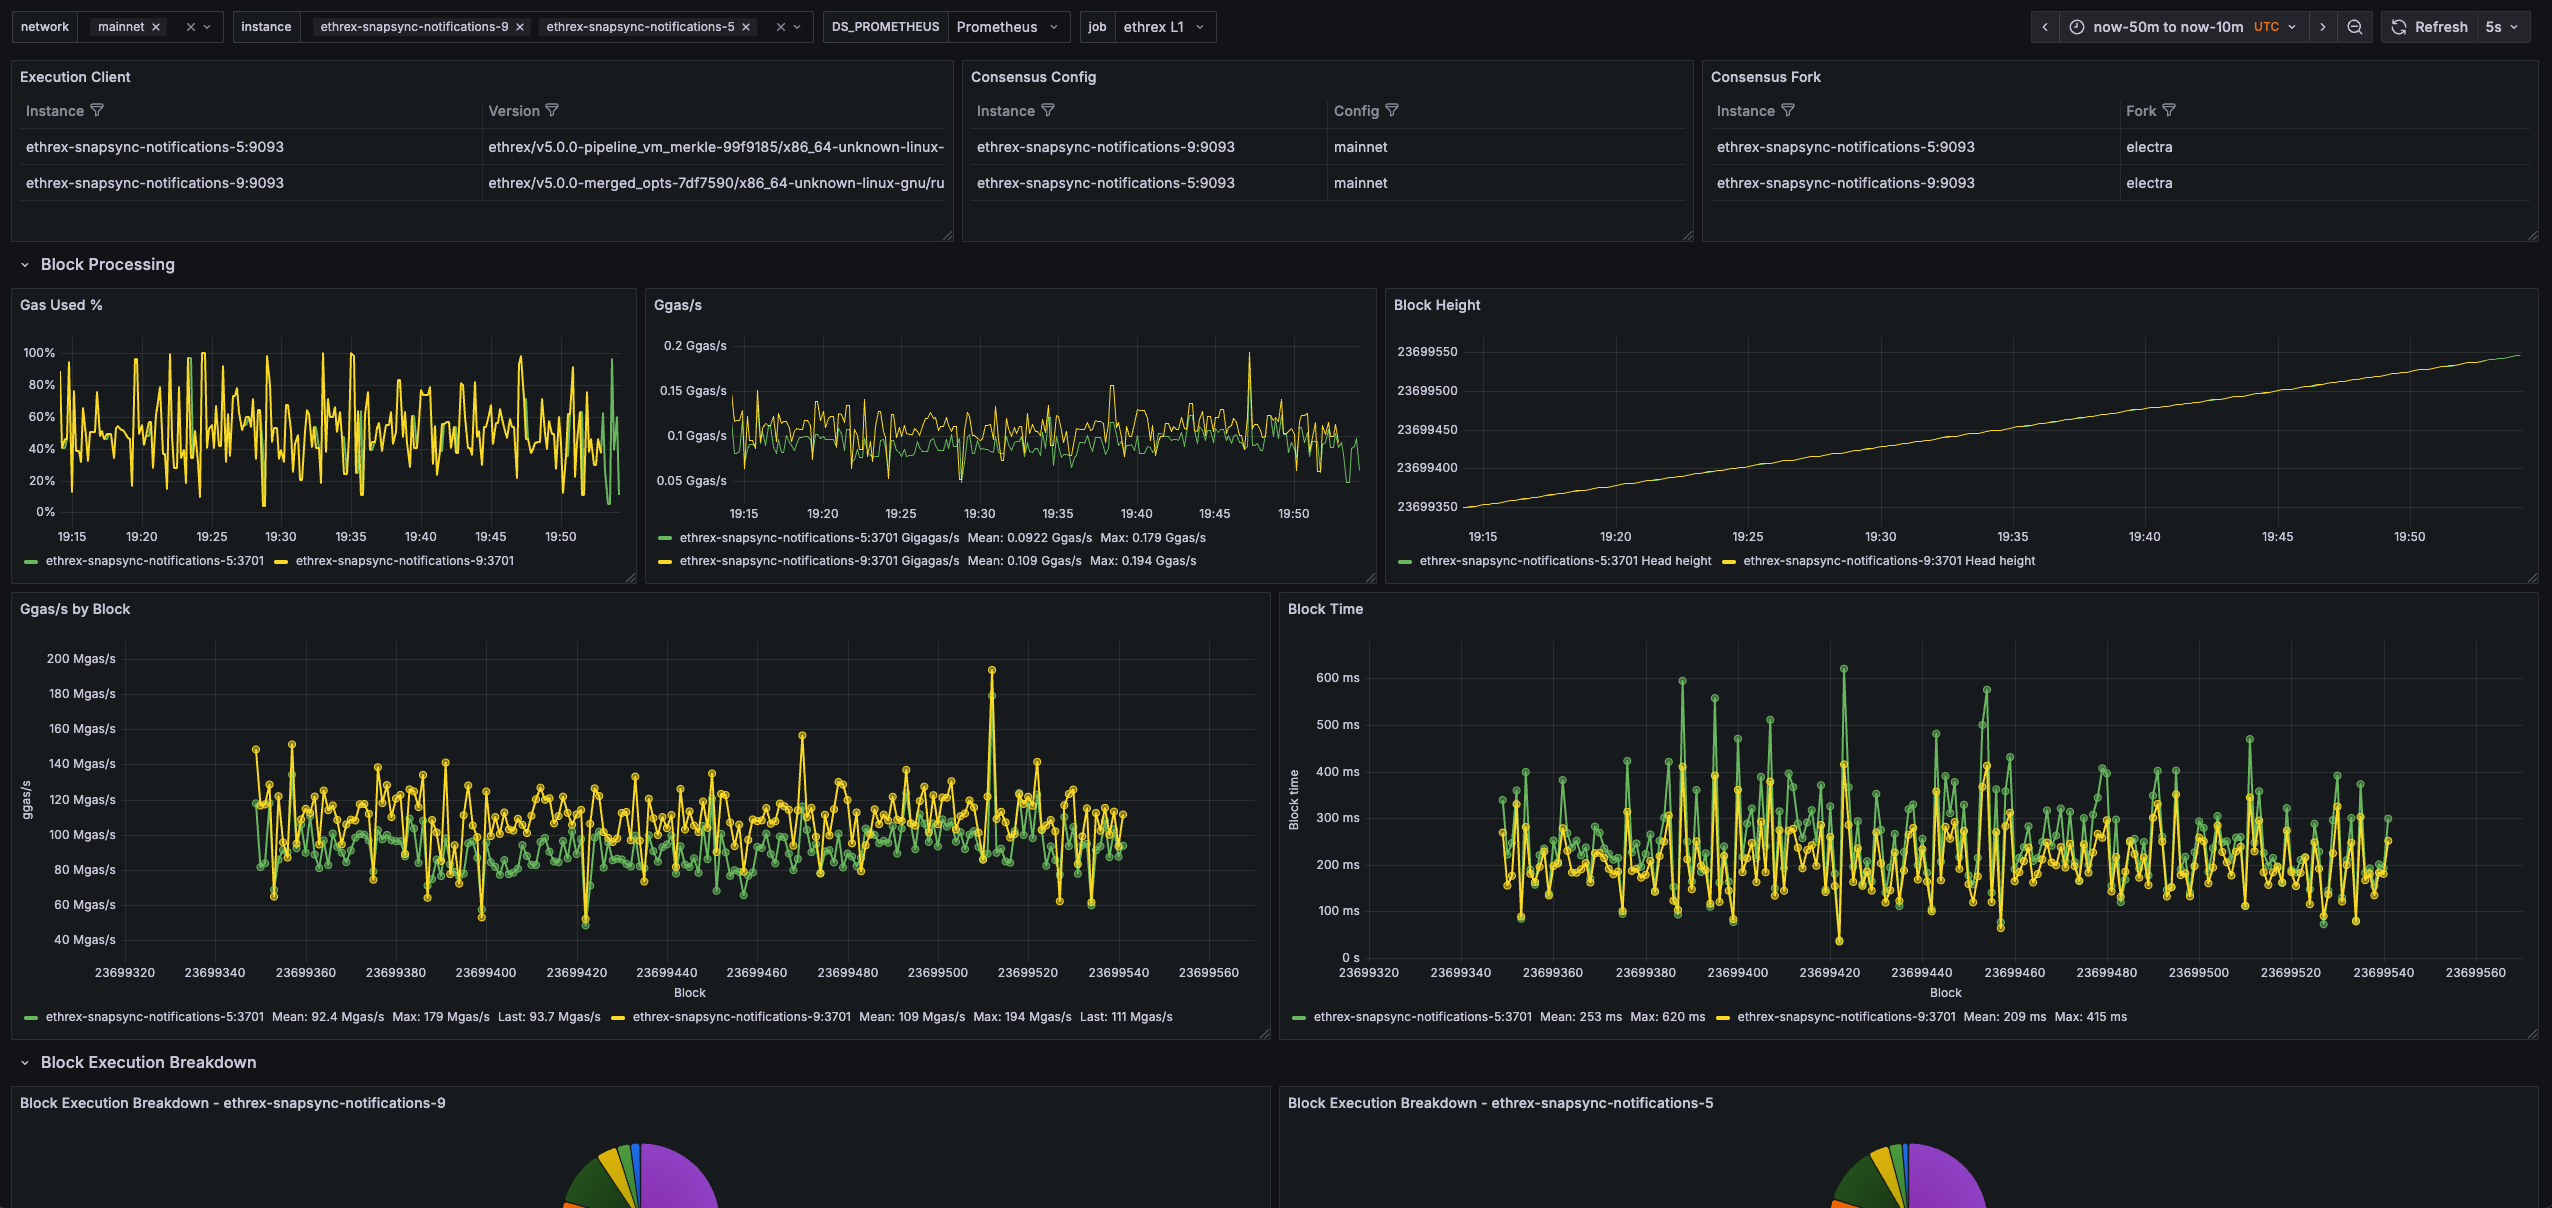
How to use it
Use the network variable (discovered via the consensus config metric) to scope the view by network, then pick one or more instance entries. Every panel honors these selectors. Tip: several panels rely on Grafana transforms such as Organize fields, Join by field, Filter by value, and Group by—keep those in mind if you customize the layout.

Execution and consensus summary
Execution Client
Confirms the execution client name, build and network that each monitored instance is running so you can spot mismatched deployments quickly.
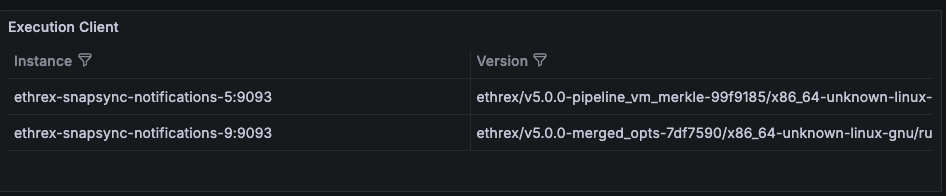
Consensus Fork
Highlights the active fork reported by ethereum-metrics-exporter, which is a useful signal during planned upgrades.
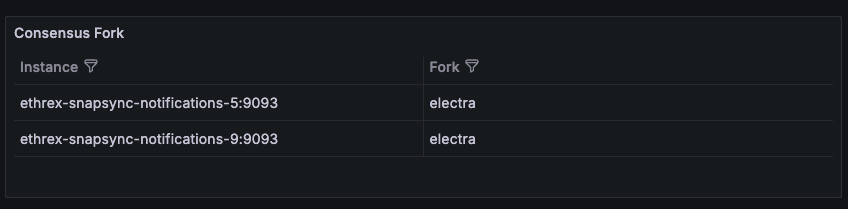
Logs
Collapsed row that allows you to view the logs of the selected instances directly within the dashboard. This is useful for correlating metrics with log events without leaving Grafana.

Block processing
Row panels showing key block processing metrics across all selected instances.
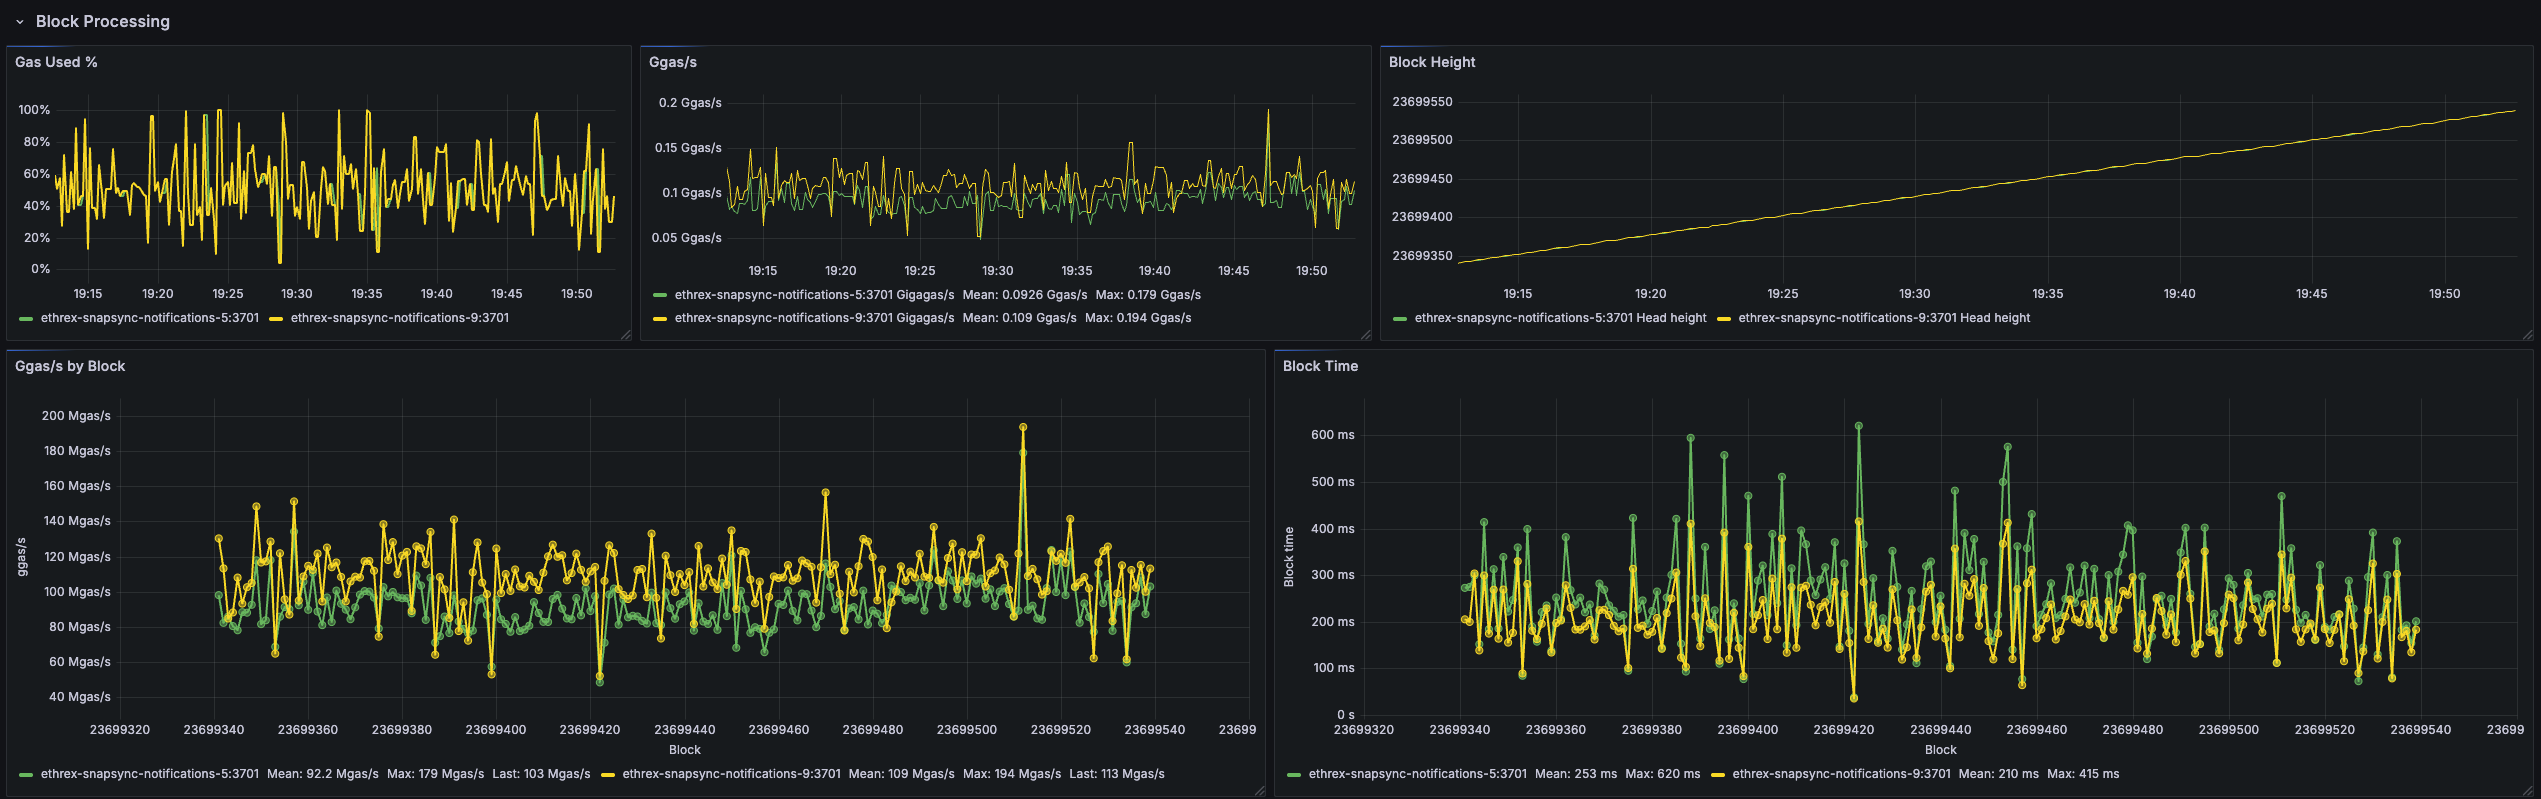
Gas Used %
Tracks how much of the block gas limit is consumed across instances, surfacing heavy traffic or underfilled blocks at a glance.
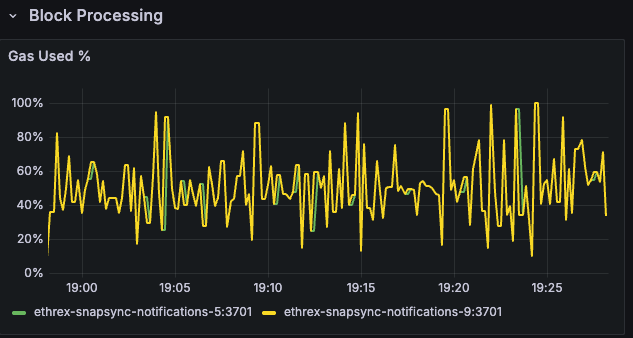
Ggas/s
Charts gigagas per second to compare execution throughput between nodes and reveal sustained load versus isolated spikes.
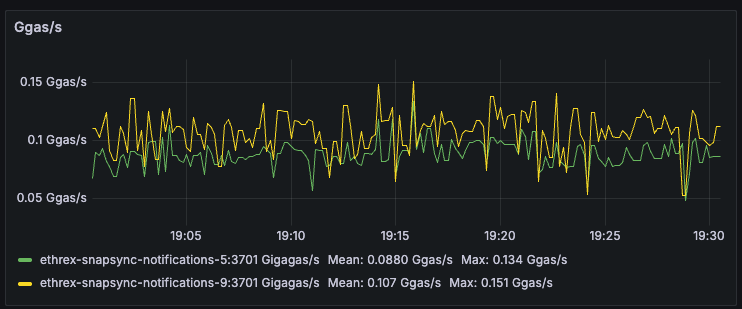
Block Height
Plots the head block seen by each instance so you can immediately detect stalled sync or lagging nodes.
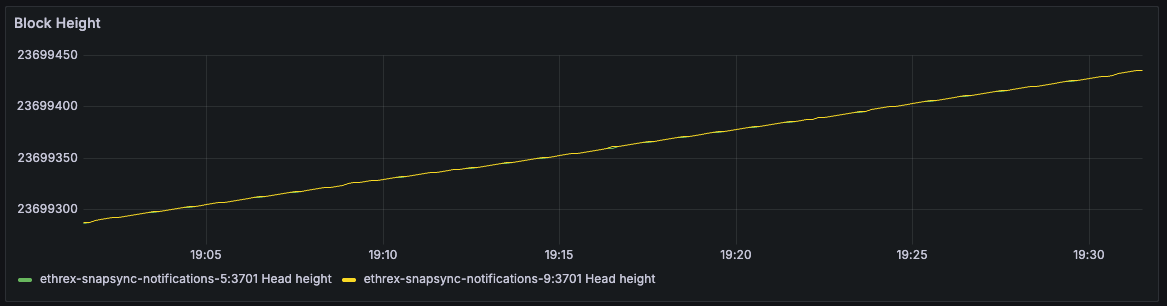
Ggas/s by Block
Scatter view that ties throughput to the specific block number once all selected instances agree on the same head, making block-level investigations straightforward.
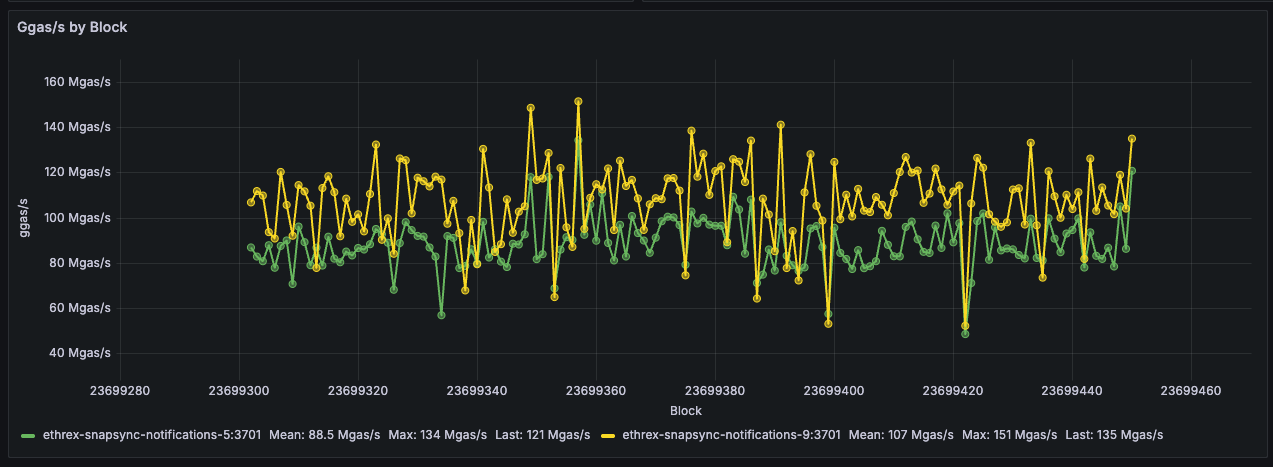
Limitations: This panel only shows data when all selected instances agree on the same head block, and it doesn’t handle reorgs gracefully. Here are a couple of things to have in mind when looking at it:
- During reorgs, we might see weird shapes in the data, with lines at a certain block connected to past ones when more than one slot reorgs happen.
- We could see double measurements for the same block number if reorgs on the same block occur.
- Mean could vary when adding or removing instances, as only blocks agreed upon by all selected instances are shown.
Block Time
Estimates per-block execution time and lines it up with block numbers, helping you correlate latency spikes with particular blocks.
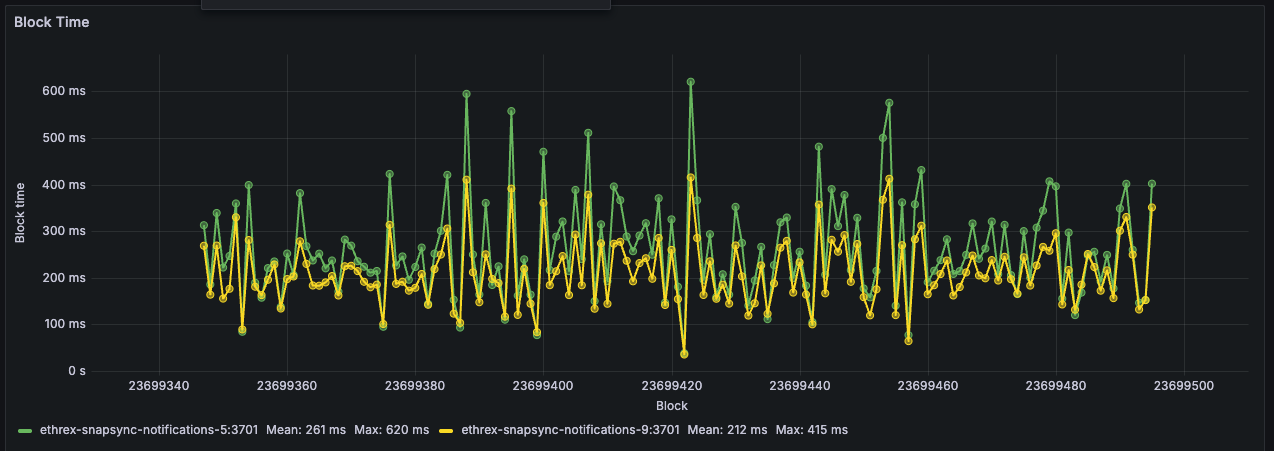
Limitations: This panel has the same limitations as the “Ggas/s by Block” panel above, as it relies on the same logic to align blocks across instances.
Block execution breakdown
Collapsed row that surfaces instrumentation from the add_block_pipeline and execute_block_pipeline timer series so you can understand how each instance spends time when processing blocks. Every panel repeats per instance vertically to facilitate comparisons.

Block Execution Breakdown pie
Pie chart showing how execution time splits between storage reads, account reads, and non-database work so you can confirm what are the bottlenecks outside of execution itself.
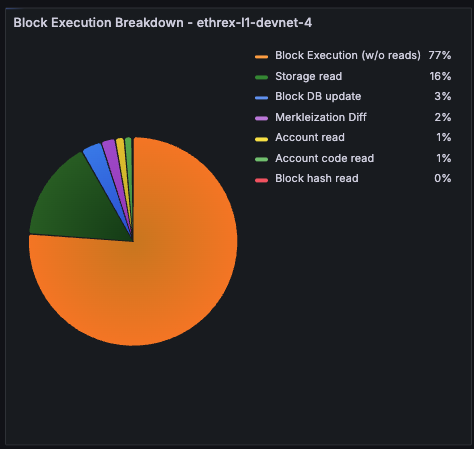
Execution vs Merkleization Diff %
Tracks how much longer we spend merkleizing versus running the execution phase inside execute_block_pipeline. Values above zero mean merkleization dominates; negative readings flag when pure execution becomes the bottleneck (which should be extremely rare). Both run concurrently and merkleization depends on execution, 99% of the actual execute_block_pipeline time is just the max of both.
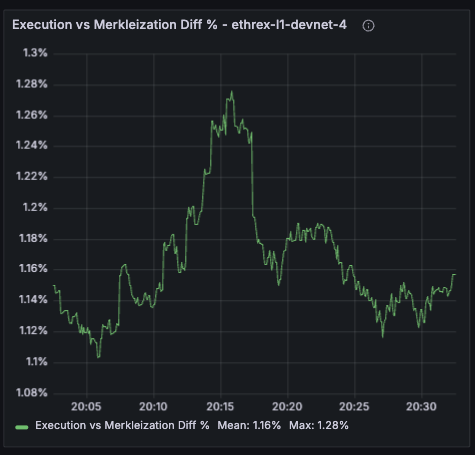
Block Execution Deaggregated by Block
Plots execution-stage timers (storage/account reads, execution without reads, merkleization) against the block number once all selected instances report the same head.
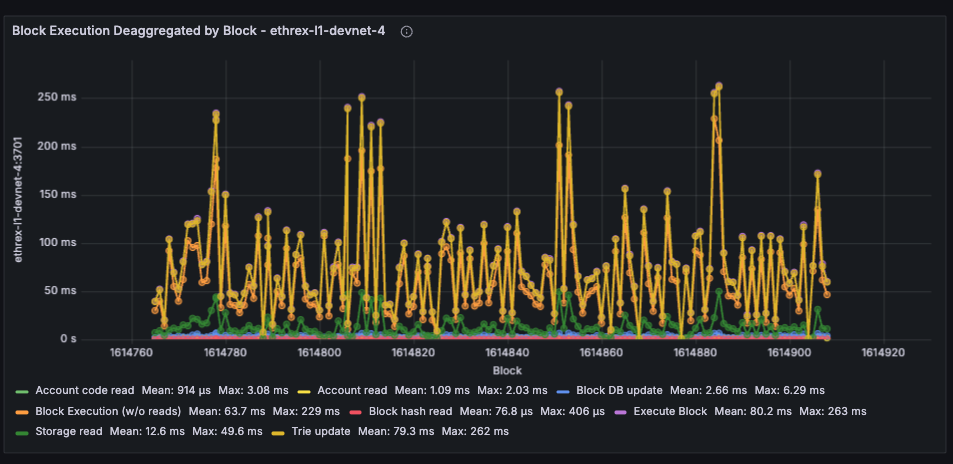
Limitations: This panel has the same limitations as the other by block panels, as it relies on the same logic to align blocks across instances. Can look odd during multi-slot reorgs
Engine API
Collapsed row that surfaces the namespace="engine" Prometheus timers so you can keep an eye on EL <> CL Engine API health. Each panel repeats per instance to be able to compare behaviour across nodes.
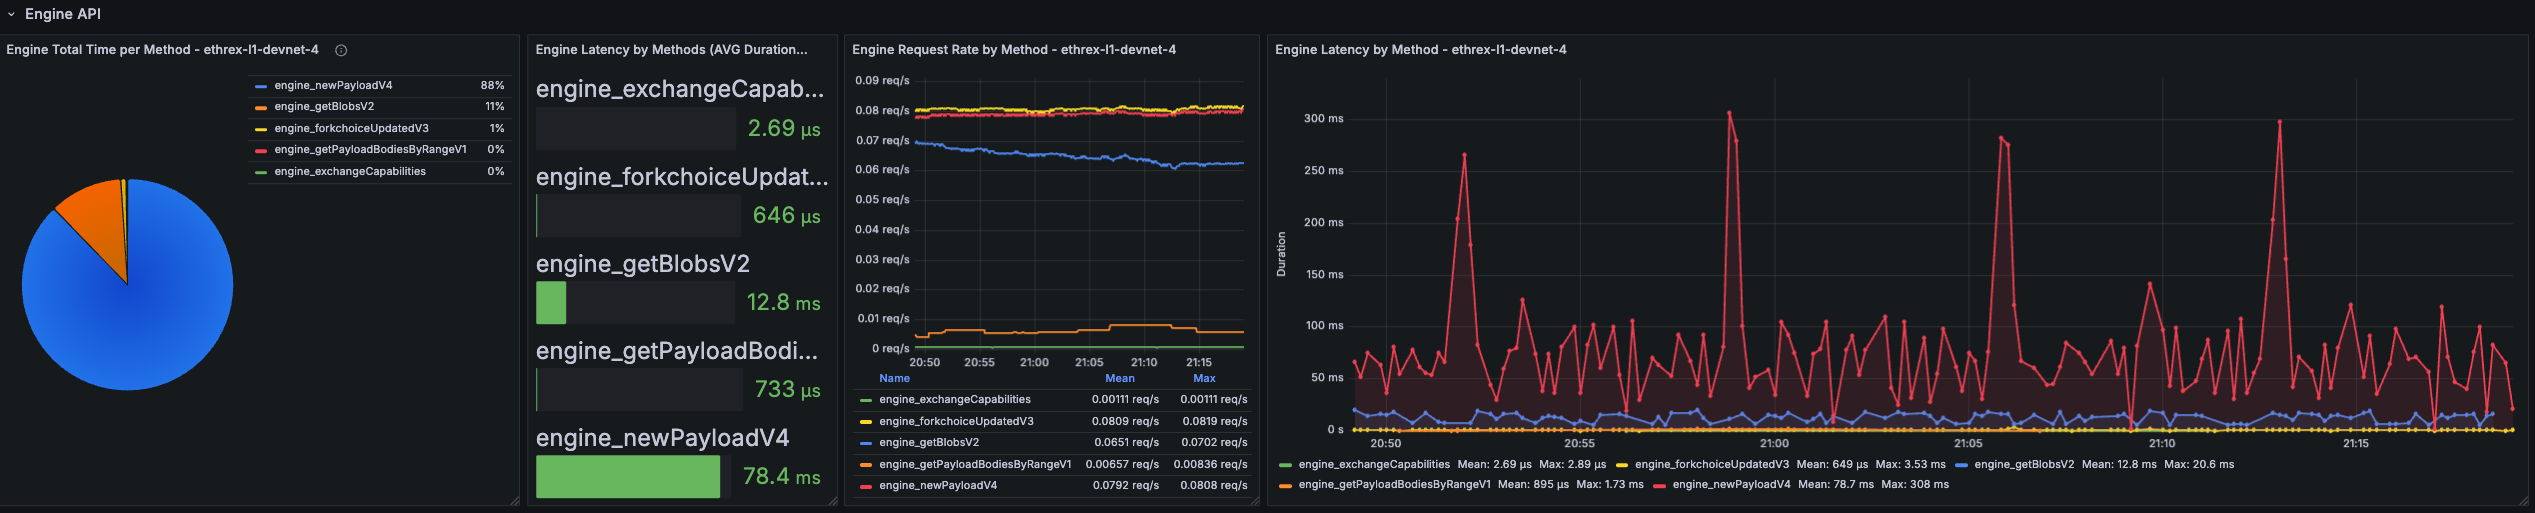
Engine Total Time per Method
Pie chart that shows where Engine time is spent across methods over the selected range. Quickly surfaces which endpoints dominate total processing time.
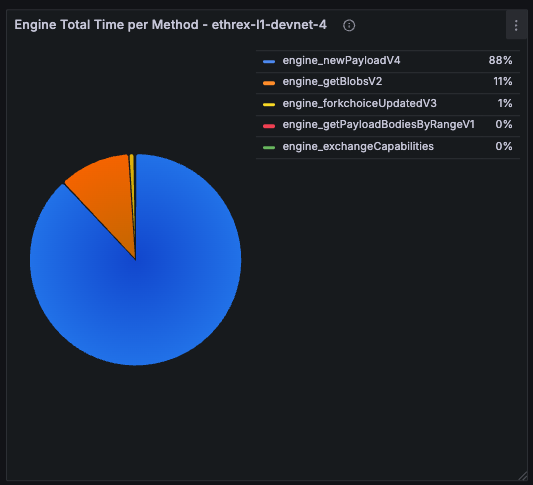
Engine Latency by Methods (Avg Duration)
Bar gauge of the historical average latency per Engine method over the selected time range.
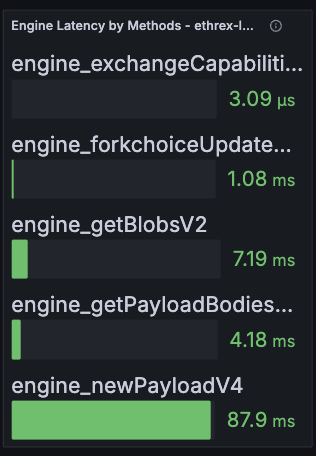
Engine Request Rate by Method
Shows how many Engine API calls per second we process, split by JSON-RPC method and averaged across the currently selected dashboard range.
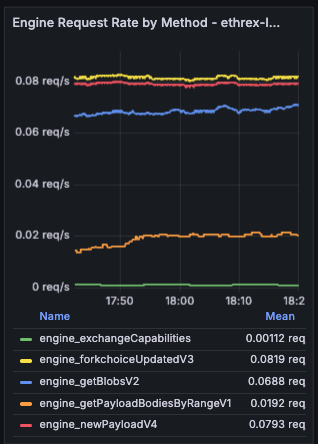
Engine Latency by Method
Live timeseries that tries to correlate to the per-block execution time by showing real-time latency per Engine method with an 18 s lookback window.
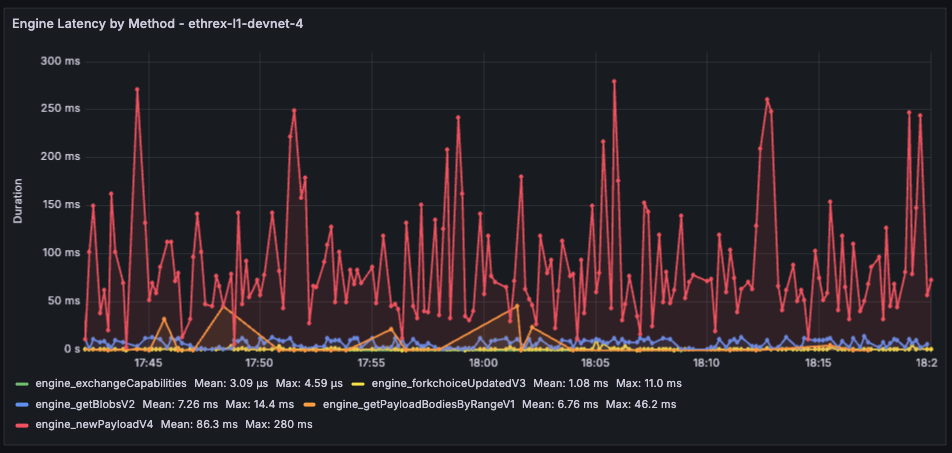
Limitations: The aggregated panels pull averages across the current dashboard range, so very short ranges can look noisy while long ranges may smooth out brief incidents. The live latency chart still relies on an 18 s window to calculate the average, which should be near-exact per-block executions but we can lose some intermediary measure.
RPC API
Another collapsed row focused on the public JSON-RPC surface (namespace="rpc"). Expand it when you need to diagnose endpoint hotspots or validate rate limiting. Each panel repeats per instance to be able to compare behaviour across nodes.
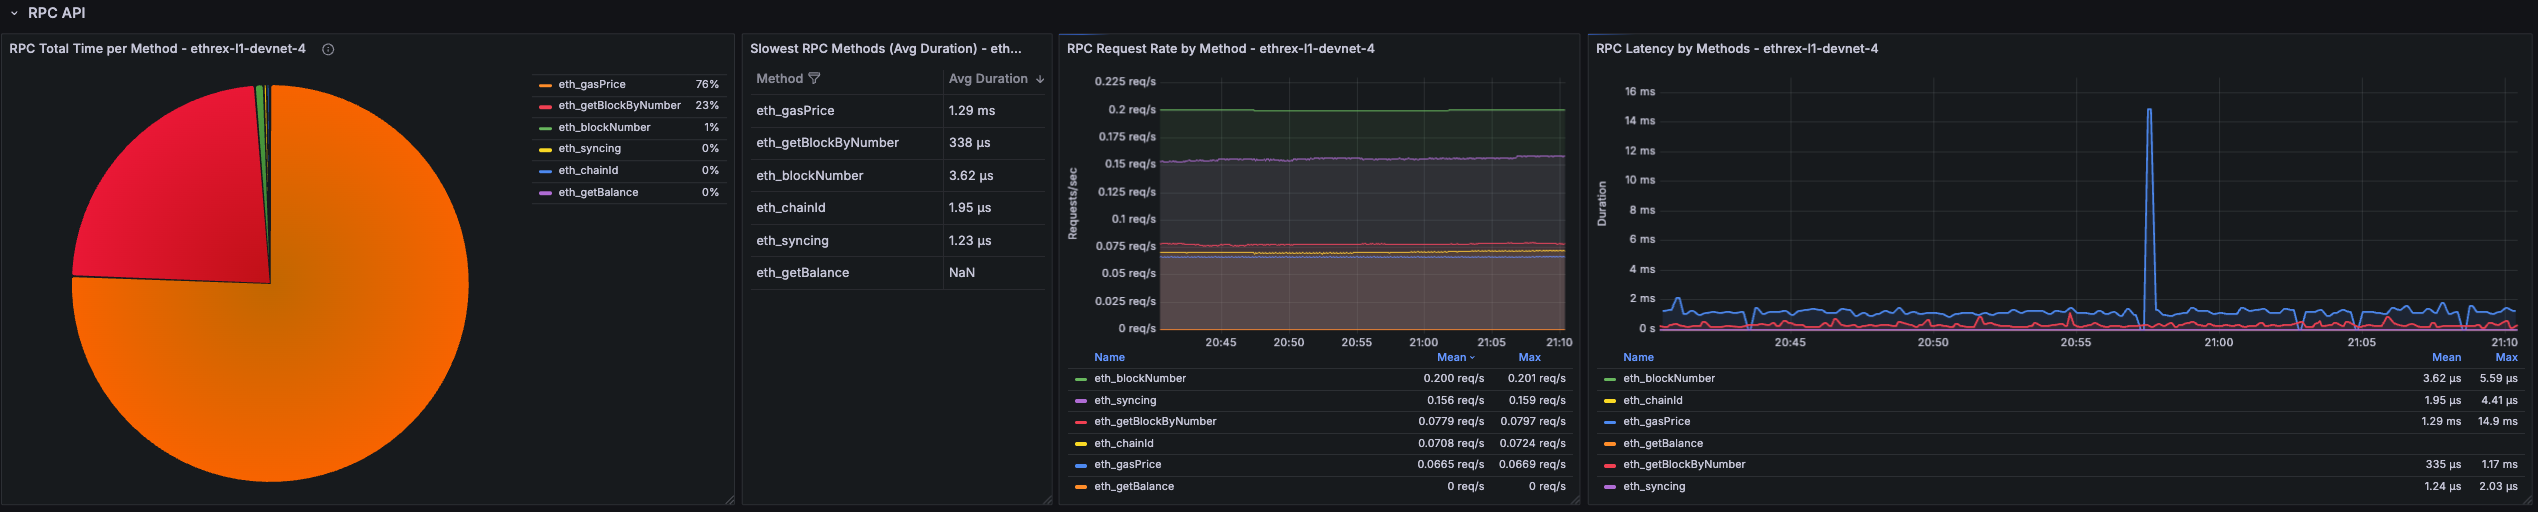
RPC Total Time per Method
Pie chart that shows where RPC time is spent across methods over the selected range. Quickly surfaces which endpoints dominate total processing time.
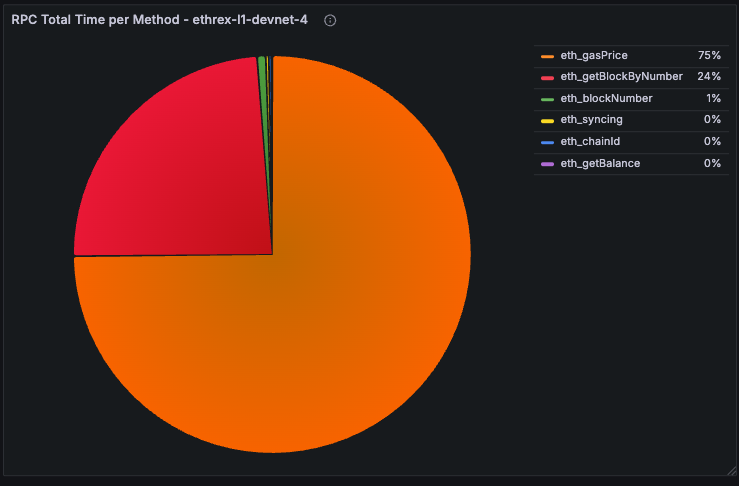
Slowest RPC Methods
Table listing the highest average-latency methods over the active dashboard range. Used to prioritise optimisation or caching efforts.
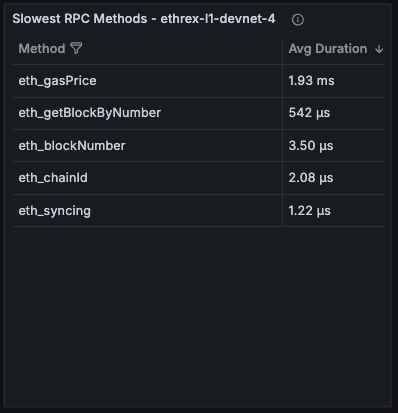
RPC Request Rate by Method
Timeseries showing request throughput broken down by method, averaged across the selected range.
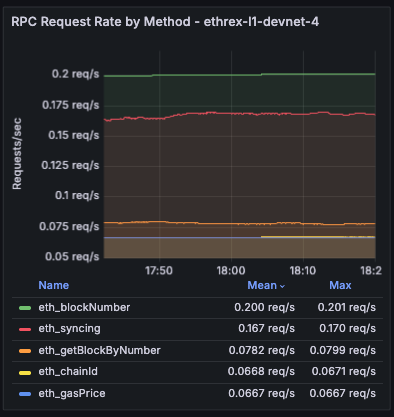
RPC Latency by Methods
Live timeseries that tries to correlate to the per-block execution time by showing real-time latency per Engine method with an 18 s lookback window.
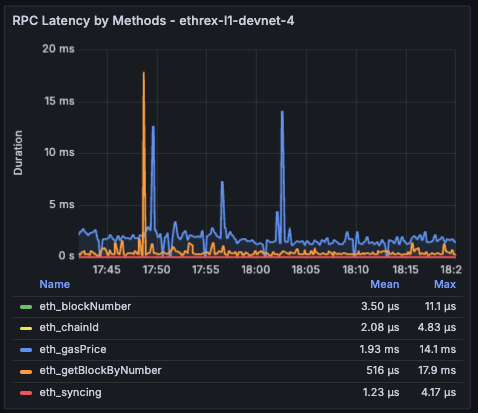
Limitations: The RPC latency views inherit the same windowing caveats as the Engine charts: averages use the dashboard time range while the live chart relies on an 18 s window.
Engine and RPC Error rates
Collapsed row showing error rates for both Engine and RPC APIs side by side and a disaggregated panel by method and kind of error. Each panel repeats per instance to be able to compare behaviour across nodes.
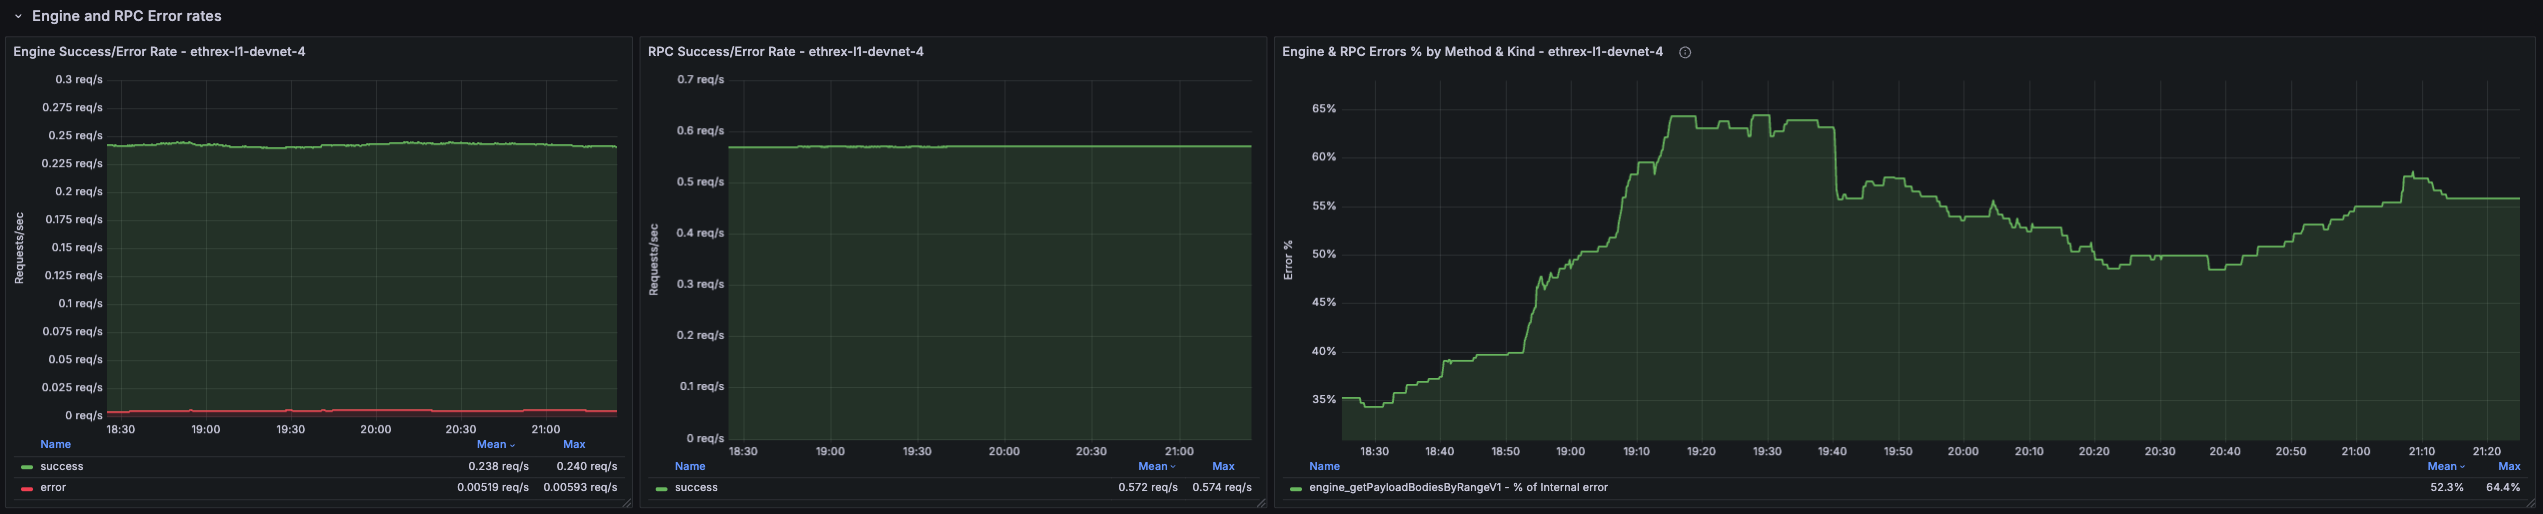
Engine Success/Error Rate
Shows the rate of successful vs. failed Engine API requests per second.
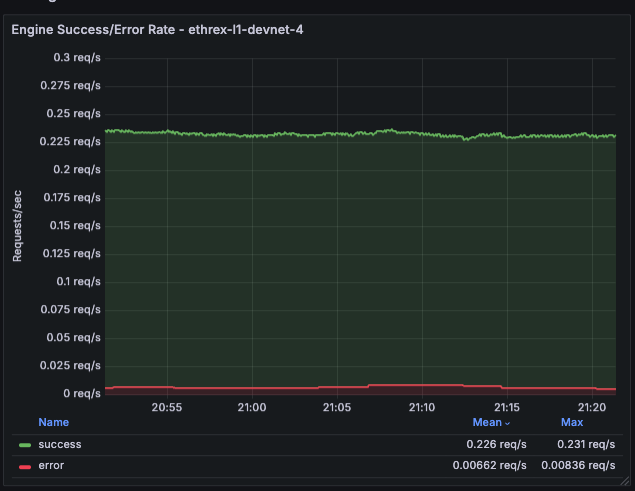
RPC Success/Error Rate
Shows the rate of successful vs. failed RPC API requests per second.
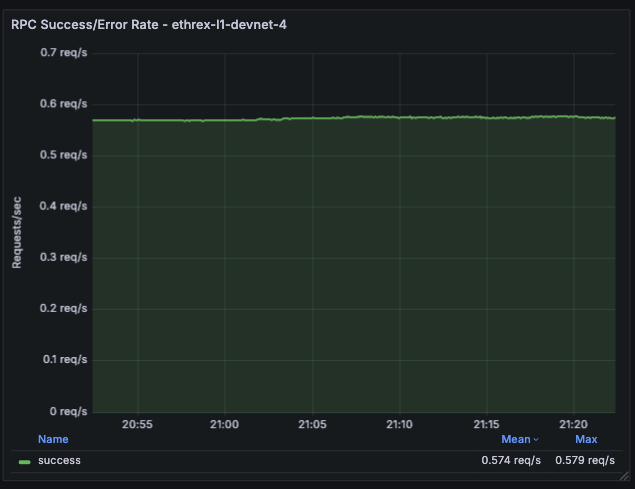
Engine and RPC Errors % by Method and Kind
Deaggregated view of error percentages split by method and error kind for both Engine and RPC APIs. The % are calculated against total requests for a particular method, so all different error percentage for a method should sum up to the percentage of errors for that method.

Peer Info
Collapsed row providing visibility into the P2P networking layer. Surfaces peer counts, client distribution, and disconnection events to help diagnose connectivity issues and monitor network health. Each panel repeats per instance to compare behaviour across nodes.

Peer Count
Timeseries showing the number of connected peers over time. Useful for detecting connectivity issues or confirming that the node is maintaining a healthy peer set.
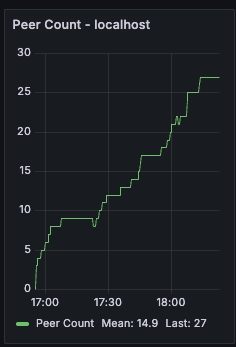
Peer Clients Distribution
Pie chart breaking down connected peers by client type (e.g., Geth, Nethermind, Besu). Helps understand the diversity of the peer set and spot any client-specific connectivity patterns.
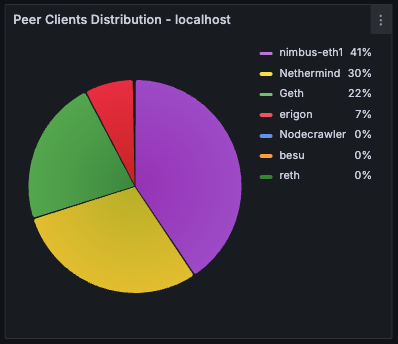
Peer Clients
Timeseries view of peer counts by client type over time. Useful for tracking how the peer composition evolves and detecting sudden drops in connections to specific client types.
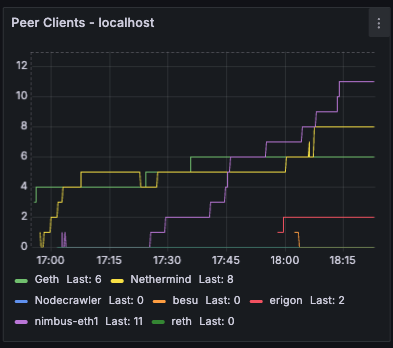
Peer Disconnection Events
Bar chart showing disconnection events grouped by reason. Helps identify patterns in peer churn and diagnose whether disconnections are due to protocol errors, timeouts, or other causes.
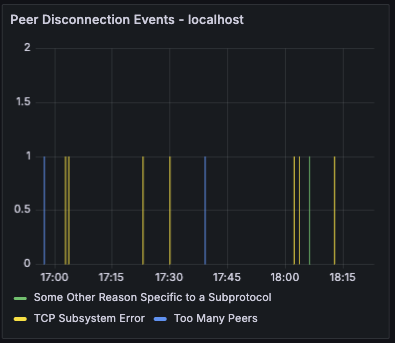
Disconnections Details
Table providing a detailed breakdown of disconnections by client type and reason over the selected time range. Useful for investigating which clients are disconnecting most frequently and why.
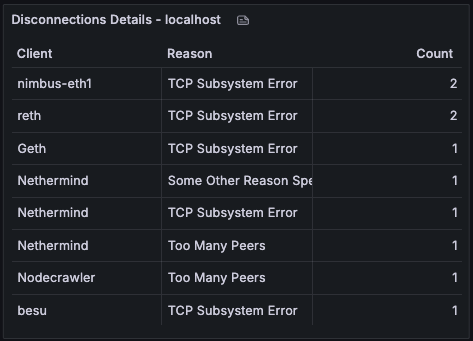
Process and server info
Row panels showing process-level and host-level metrics to help you monitor resource usage and spot potential issues.
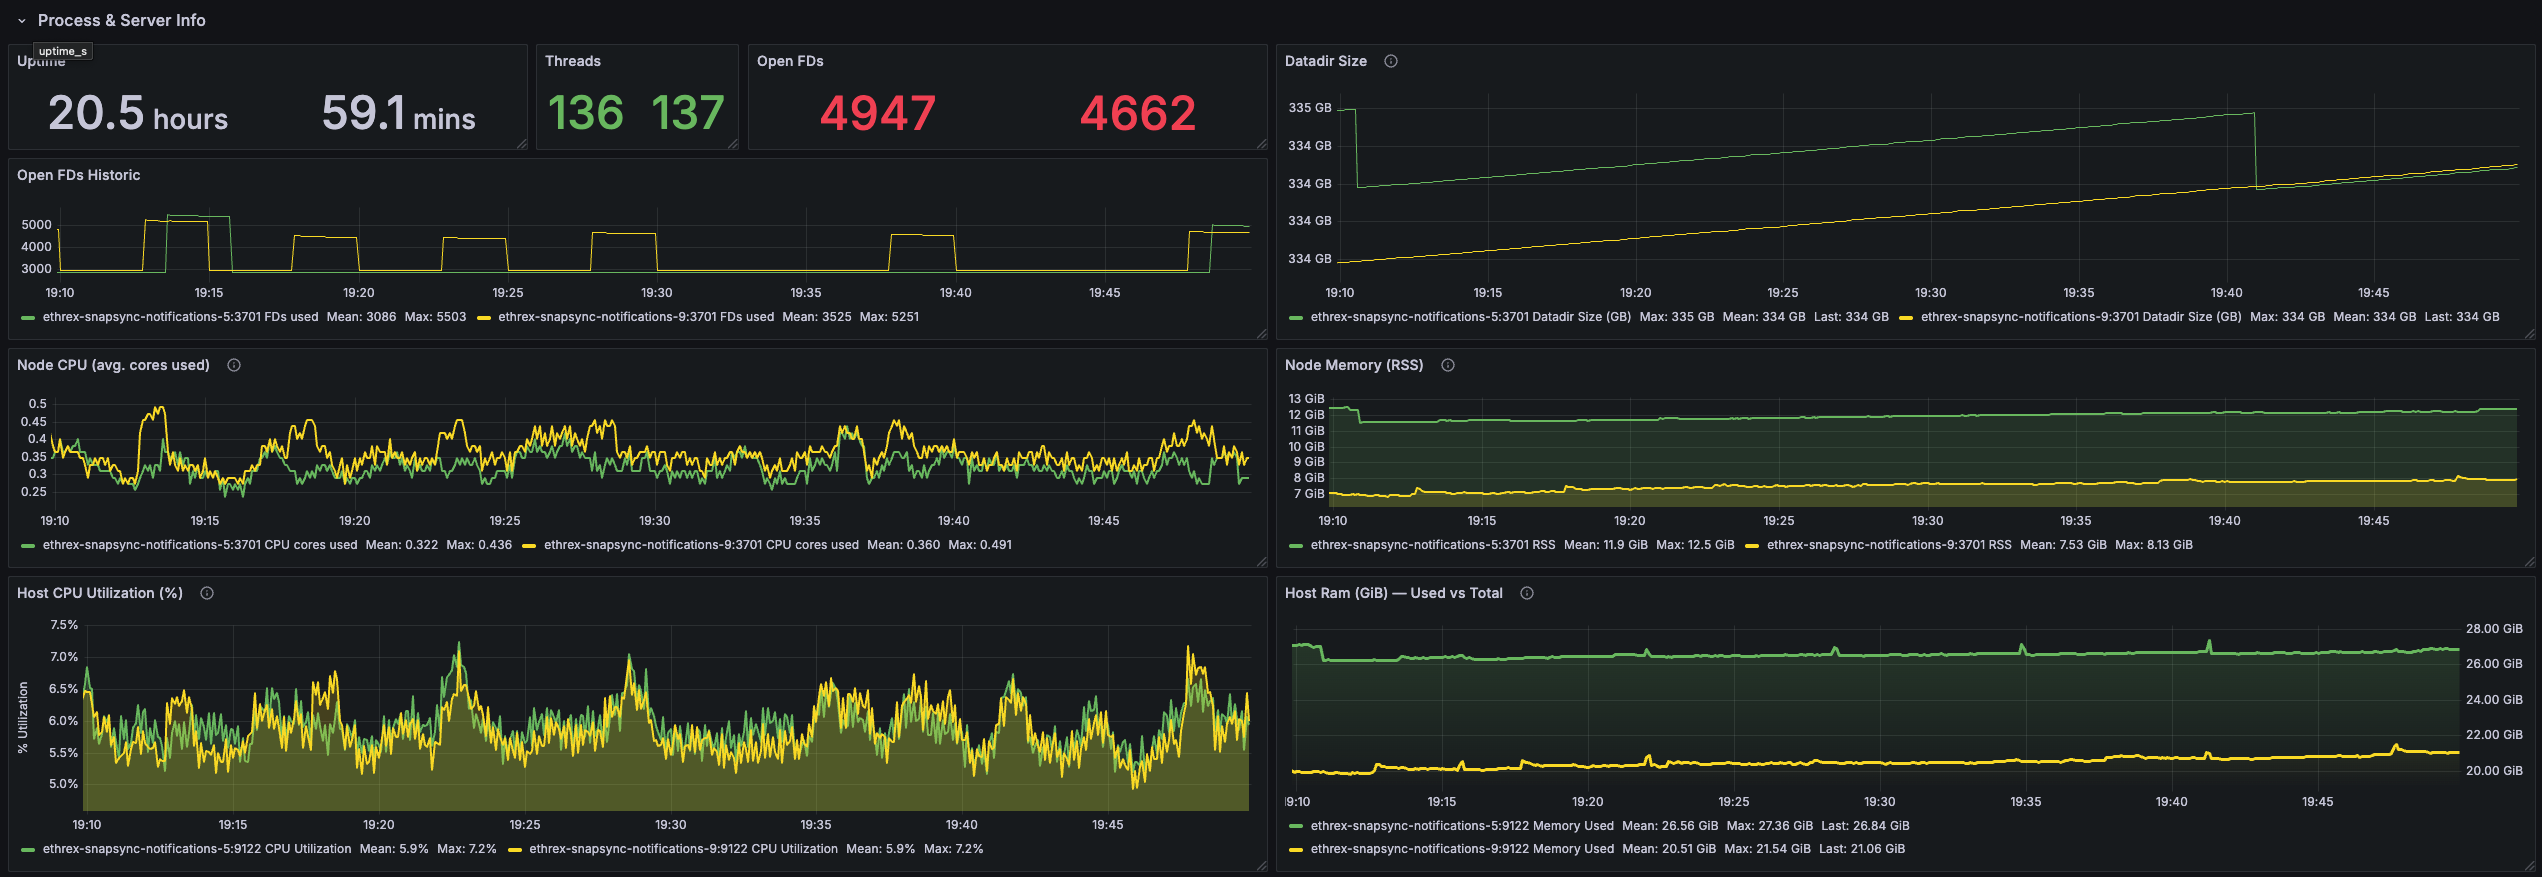
Uptime
Displays time since the Ethrex process started. [need proper instance labels]
Threads
Shows the number of tokio process threads in use. [need proper instance labels]
Open FDs
Reports current file descriptor usage so you can compare against limits. [need proper instance labels]
Open FDs Historic
Time-series view of descriptor usage to spot gradual leaks or sudden bursts tied to workload changes.

Datadir Size
Tracks database footprint growth, helping you plan disk needs and confirming pruning/compaction behavior.

Node CPU (avg. cores used)
Shows effective CPU cores consumed by each instance, separating sustained computation from short-lived bursts.

Node Memory (RSS)
Follows the resident memory footprint of the Ethrex process so you can investigate leaks or pressure.

Host CPU Utilization (%)
Uses node exporter metrics to track whole-host CPU load and distinguish client strain from other processes on the server.
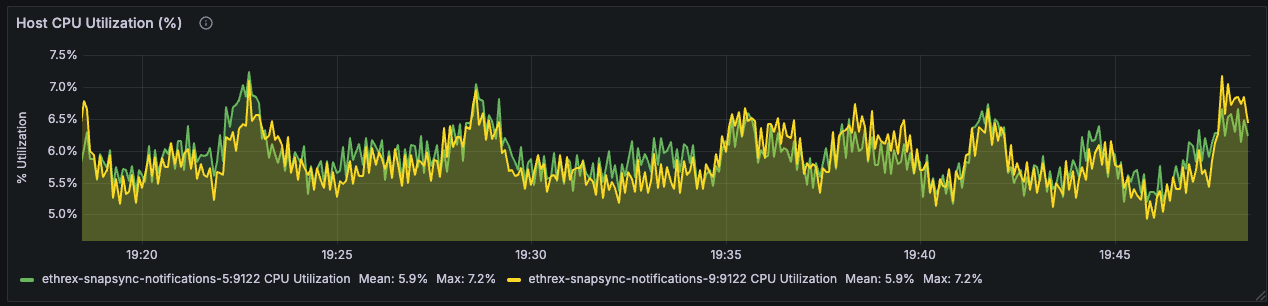
Host RAM (GiB) - Used vs Total
Compares used versus total RAM to highlight when machines approach memory limits and need attention.
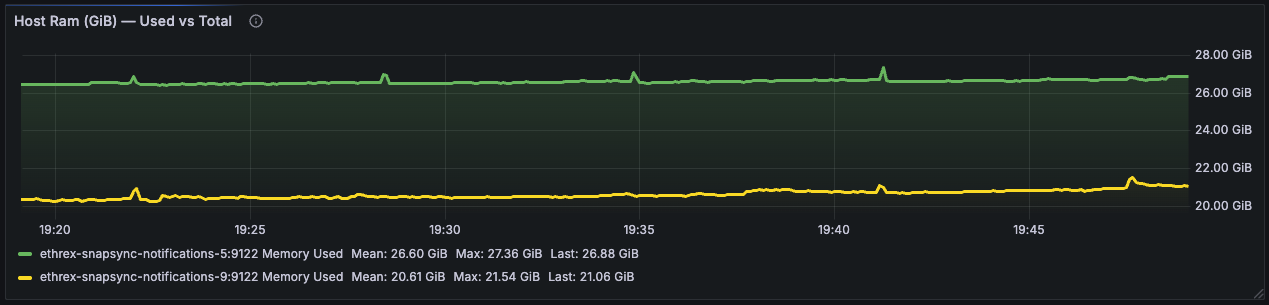
Block building (WIP)
This collapsed row offers a combined view of the block building base fee, gigagas per second during payload construction, and the time the builder spends assembling blocks. These panels are works in progress, collapsed by default, and may be refined over time.

Profiling
This guide covers the profiling tools available for ethrex developers, including CPU profiling and memory profiling.
CPU Profiling with pprof
Ethrex includes built-in CPU profiling via pprof-rs, gated behind the cpu_profiling feature flag. When enabled, a profiler starts at boot (1000 Hz sampling) and writes a profile.pb file to the current working directory at shutdown.
Prerequisites
To view the generated profiles you need one of:
- Go toolchain (
go tool pprof) — the standard pprof viewer - pprof CLI — standalone binary from google/pprof
Install the standalone CLI:
go install github.com/google/pprof@latest
Building with CPU profiling
# Debug build
cargo build -p ethrex --features cpu_profiling

# Release build (recommended for realistic profiles)
cargo build -p ethrex --release --features cpu_profiling
The cpu_profiling feature is opt-in (not in default) so normal builds are unaffected.
Collecting a profile
-
Start the node as usual:
./target/release/ethrex --authrpc.jwtsecret ./secrets/jwt.hex --network holeskyYou should see this log line near startup:
CPU profiling enabled (1000 Hz), will write profile.pb at shutdown -
Let the node run through the workload you want to profile.
-
Stop the node with
Ctrl+CorSIGTERM. The fileprofile.pbwill be written to the current working directory and the shutdown logs will include:CPU profile written to profile.pb
Analyzing the profile
Interactive web UI
go tool pprof -http=:8080 profile.pb
This opens a browser with flame graphs, call graphs, top functions, and source annotations.
Terminal top functions
go tool pprof profile.pb
# then at the (pprof) prompt:
(pprof) top 20
(pprof) top 20 -cum
Flame graph (SVG)
go tool pprof -svg profile.pb > flamegraph.svg
Focus on a specific function
go tool pprof -http=:8080 -focus=execute_block profile.pb
Tips
- Use release builds for profiling. Debug builds have very different performance characteristics due to missing optimizations and extra debug assertions.
- Profile with
release-with-debugif you want accurate profiles with full symbol names. This gives optimized code with debug symbols:cargo build -p ethrex --profile release-with-debug --features cpu_profiling - Combine with jemalloc — the
cpu_profilingfeature is orthogonal tojemallocandjemalloc_profiling. You can enable both:cargo build -p ethrex --release --features cpu_profiling,jemalloc - Sampling rate — the profiler samples at 1000 Hz (once per millisecond). This is high enough to get good resolution without significant overhead.
- File location —
profile.pbis written to whichever directory you run the binary from. If you want it elsewhere,cdto that directory before starting the node, or move the file after shutdown.
Memory Profiling with jemalloc
Ethrex supports memory profiling through jemalloc, gated behind the jemalloc_profiling feature flag. This enables jemalloc’s built-in heap profiling (prof:true) and exposes /debug/pprof/allocs and /debug/pprof/allocs/flamegraph RPC endpoints for on-demand heap dumps.
Building with memory profiling
cargo build -p ethrex --release --features jemalloc_profiling
Note:
jemalloc_profilingimplies thejemallocfeature, so you don’t need to specify both.
External memory profilers
You can also use external tools with the jemalloc feature (without jemalloc_profiling):
Bytehound
Requires Bytehound and jemalloc installed on the system.
cargo build -p ethrex --release --features jemalloc

export MEMORY_PROFILER_LOG=warn
LD_PRELOAD=/path/to/libbytehound.so:/path/to/libjemalloc.so ./target/release/ethrex [ARGS]
Heaptrack (Linux only)
Requires Heaptrack and jemalloc installed on the system.
cargo build -p ethrex --release --features jemalloc

LD_PRELOAD=/path/to/libjemalloc.so heaptrack ./target/release/ethrex [ARGS]
heaptrack_print heaptrack.ethrex.<pid>.gz > heaptrack.stacks
Profiling with Samply
Samply is a sampling CPU profiler that works on macOS and Linux and produces profiles viewable in the Firefox Profiler.
cargo build -p ethrex --profile release-with-debug
samply record ./target/release-with-debug/ethrex [ARGS]
This will open the Firefox Profiler UI in your browser when the process exits.
Feature flags summary
| Feature | What it does | Platform |
|---|---|---|
cpu_profiling | Built-in pprof CPU profiling, writes profile.pb | Linux/macOS |
jemalloc | Use jemalloc allocator (enables external profilers) | Linux/macOS |
jemalloc_profiling | jemalloc heap profiling + RPC endpoint | Linux/macOS |
Storage Backend API
We use a thin, minimal interface for storage backends:
- Thin: Minimal set of operations that databases must provide
- Simple: Avoids type-system complexity and focuses on core functionality
Rather than implementing business logic in each database backend, this API provides low-level primitives that higher-level code can build upon. This eliminates code duplication and makes adding new database backends trivial.
The API differentiates between three types of database access:
- Read views
StorageReadView: read-only views of the database, with no atomicity guarantees between operations. - Write batches
StorageWriteBatch: write batch functionality, with atomicity guarantees at commit time. - Locked views
StorageLockedView: read-only views of a point in time (snapshots), right now it’s only used during snap-sync.
Testing
The ethrex project runs several suites of tests to ensure proper protocol implementation
Table of contents
Ethereum foundation tests
These are the official execution spec tests. There are two kinds: state tests and blockchain tests, you can execute them with:
State tests
The state tests are individual transactions not related one to each other that test particular behavior of the EVM. Tests are usually run for multiple forks and the result of execution may vary between forks. See docs.
To run the test first:
cd tooling/ef_tests/state
then download the test vectors:
make download-evm-ef-tests
then run the tests:
make run-evm-ef-tests
Blockchain tests
The blockchain tests test block validation and the consensus rules of the Ethereum blockchain. Tests are usually run for multiple forks. See docs.
To run the tests first:
cd tooling/ef_tests/blockchain
then run the tests:
make test-levm
Hive Tests
End-to-End tests with Hive. Hive is a system which sends RPC commands to Ethereum clients and validates their responses. You can read more about it here.
Overview
This project uses three key repositories for Hive testing:
- ethereum/hive - The main Hive testing framework
- Current commit:
0921fb7833e3de180eacdc9f26de6e51dcab0dba
- Current commit:
- ethereum/execution-spec-tests - Test fixtures and vectors
- Current version:
bal@v5.5.1(Amsterdam fork support)
- Current version:
- ethereum/execution-specs - Fork specifications
- Current branch:
forks/amsterdam
- Current branch:
Prerequisites
Required Tools
-
Docker - Required for running containerized clients
# Install Docker following the official guide for your OS # Verify installation docker --version -
Go - Required to build the Hive framework
Using asdf:
asdf plugin add golang https://github.com/asdf-community/asdf-golang.gitUncomment the golang line in the
.tool-versionsfile:rust 1.90.0 golang 1.23.2Then install:
asdf installIf you need to set GOROOT, follow these instructions.
-
Rust - Required to build the ethrex client
# Already configured in .tool-versions
asdf install rust
Build the ethrex Docker Image
Before running Hive tests, you need to build the ethrex Docker image:
make build-image
Running Hive Tests
1. Setup Hive Framework
The first time you run tests, Hive will be automatically cloned and built. You can also set it up manually:
make setup-hive
This will:
- Clone the
ethereum/hiverepository at the configured commit - Build the Hive binary using Go
- Place it in the
./hivedirectory
2. Basic Test Execution
Run Specific Simulation
Hive tests are organized by “simulations”. To run a specific simulation:
make run-hive SIMULATION=<simulation-name> TEST_PATTERN="<pattern>"
Available Simulations:
ethereum/rpc-compat- RPC API compatibility testsdevp2p- P2P networking tests (Discovery V4, Eth, Snap)ethereum/engine- Engine API tests (Paris, Auth, Cancun, Withdrawals)ethereum/sync- Node synchronization testsethereum/eels/consume-engine- EVM Execution Layer tests (Engine format)ethereum/eels/consume-rlp- EVM Execution Layer tests (RLP format)ethereum/eels/execute-blobs- Blob execution tests
Example: RPC Compatibility Tests
This is an example of a Hive simulation called ethereum/rpc-compat, which will specifically run chain id and transaction by hash rpc tests:
make run-hive SIMULATION=ethereum/rpc-compat TEST_PATTERN="/eth_chainId|eth_getTransactionByHash"
Run all RPC tests:
make run-hive SIMULATION=ethereum/rpc-compat TEST_PATTERN="*"
Run All Simulations
To run every available simulation:
make run-hive-all
3. Debug Mode
For detailed debug output including Docker container logs:
make run-hive-debug SIMULATION=ethereum/rpc-compat TEST_PATTERN="*"
Debug mode sets:
--sim.loglevel 4(maximum verbosity)--docker.output(shows Docker container output)
4. Amsterdam Fork Tests (EELS)
To test Amsterdam fork compatibility using the Ethereum Execution Layer Specification tests:
Run Engine Format Tests
Tests all forks including Amsterdam:
make run-hive-eels-engine
Test specific forks:
make run-hive-eels EELS_SIM=ethereum/eels/consume-engine TEST_PATTERN_EELS=".*fork_Amsterdam.*"
Test multiple forks:
make run-hive-eels EELS_SIM=ethereum/eels/consume-engine TEST_PATTERN_EELS=".*fork_Prague.*|.*fork_Amsterdam.*"
Run RLP Format Tests
make run-hive-eels-rlp
Or test specific forks:
make run-hive-eels EELS_SIM=ethereum/eels/consume-rlp TEST_PATTERN_EELS=".*fork_Amsterdam.*"
Run Blob Execution Tests
make run-hive-eels-blobs
5. Customizing Test Execution
Adjust Parallelism
Control how many tests run in parallel (default: 16):
make run-hive SIMULATION=ethereum/rpc-compat SIM_PARALLELISM=8
Adjust Log Level
Set log verbosity from 1 (least verbose) to 4 (most verbose):
make run-hive SIMULATION=ethereum/rpc-compat SIM_LOG_LEVEL=1
Test Pattern Examples
Match specific test names:
TEST_PATTERN="/eth_chainId"                    # Single test
TEST_PATTERN="/eth_chainId|eth_blockNumber"    # Multiple tests
TEST_PATTERN="/eth_get.*"                       # Regex pattern
TEST_PATTERN="*"                                # All tests
For fork-specific EELS tests:
TEST_PATTERN_EELS=".*fork_Amsterdam.*"                                    # Amsterdam only
TEST_PATTERN_EELS=".*fork_Paris.*|.*fork_Shanghai.*|.*fork_Cancun.*"     # Multiple forks
Viewing Results
Hive Web Interface
After running tests, view results in a web interface:
make view-hive
This starts a local server at http://127.0.0.1:8080 showing:
- Test pass/fail status
- Detailed logs for each test
- Client information and errors
The web interface is automatically opened after make run-hive completes.
Command Line Results
Results are also available in the terminal output and in:
./hive/workspace/logs/
Log files include:
*.json- Test results in JSON format*.log- Detailed execution logs- Client-specific logs for debugging failures
Generate Hive Report
To generate a formatted report from test results:
cargo run --manifest-path tooling/Cargo.toml -p hive_report
This reads all JSON files in hive/workspace/logs/ and produces:
- Summary by category (Engine, P2P, RPC, Sync, EVM)
- Pass/fail statistics per simulation
- Fork-specific results (Paris, Shanghai, Cancun, Prague, Amsterdam)
Cleaning Up
Remove Hive logs and workspace:
make clean-hive-logs
Remove the entire Hive directory to force a fresh clone:
rm -rf ./hive
Repository Configuration
The project pins specific versions of the three repositories for Amsterdam fork support:
Makefile Configuration
# ethereum/hive branch
HIVE_BRANCH ?= master
Workflow Configuration (.github/workflows/daily_hive_report.yaml)
The workflow uses fork-specific fixtures to ensure comprehensive test coverage:
# Amsterdam tests use fixtures_bal (includes BAL-specific tests)
if [[ "$SIM_LIMIT" == *"fork_Amsterdam"* ]]; then
  FLAGS+=" --sim.buildarg fixtures=https://github.com/ethereum/execution-spec-tests/releases/download/bal%40v6.0.0/fixtures_bal.tar.gz"
  FLAGS+=" --sim.buildarg branch=devnets/bal/4"
else
  # Other forks use fixtures_develop (comprehensive coverage including static tests)
  FLAGS+=" --sim.buildarg fixtures=https://github.com/ethereum/execution-spec-tests/releases/download/v5.3.0/fixtures_develop.tar.gz"
  FLAGS+=" --sim.buildarg branch=forks/osaka"
fi
Fixtures URL Files
tooling/ef_tests/blockchain/.fixtures_url— Used byrun-hive-eelsMakefile target (non-Amsterdam forks)tooling/ef_tests/blockchain/.fixtures_url_amsterdam— Amsterdam-specific fixtures with BAL support
Contents:
# .fixtures_url
https://github.com/ethereum/execution-spec-tests/releases/download/v5.3.0/fixtures_develop.tar.gz

# .fixtures_url_amsterdam
https://github.com/ethereum/execution-spec-tests/releases/download/bal%40v6.0.0/fixtures_bal.tar.gz
Note: The CI workflow uses fixtures_bal with branch=devnets/bal/4 for Amsterdam tests, and fixtures_develop with branch=forks/osaka for other forks.
Updating Repository Versions
To update to a different fork or newer versions:
-
Update Hive commit in
Makefile:HIVE_BRANCH ?= <new-commit-hash> -
Update execution-spec-tests versions in
.github/workflows/daily_hive_report.yaml:For Amsterdam tests (fixtures_bal):
FLAGS+=" --sim.buildarg fixtures=https://github.com/ethereum/execution-spec-tests/releases/download/bal%40<version>/fixtures_bal.tar.gz" FLAGS+=" --sim.buildarg branch=devnets/bal/4"For other forks (fixtures_develop):
FLAGS+=" --sim.buildarg fixtures=https://github.com/ethereum/execution-spec-tests/releases/download/v<version>/fixtures_develop.tar.gz" FLAGS+=" --sim.buildarg branch=forks/<fork-name>" -
Update fixtures URL files:
# For Amsterdam fixtures echo "https://github.com/ethereum/execution-spec-tests/releases/download/bal%40<version>/fixtures_bal.tar.gz" > tooling/ef_tests/blockchain/.fixtures_url_amsterdam # For other forks echo "https://github.com/ethereum/execution-spec-tests/releases/download/v<version>/fixtures_develop.tar.gz" > tooling/ef_tests/blockchain/.fixtures_url -
Update fork references in code if switching to a different fork:
.github/workflows/daily_hive_report.yaml- Test names and patternstooling/hive_report/src/main.rs- Fork ranking and result processing
Troubleshooting
Docker Permission Errors
If you encounter Docker permission errors:
sudo usermod -aG docker $USER
newgrp docker
Hive Build Failures
If Go build fails:
# Clean and rebuild
rm -rf ./hive
make setup-hive
Missing Test Fixtures
If EELS tests fail due to missing fixtures:
# Verify fixtures URL is accessible
curl -I $(cat tooling/ef_tests/blockchain/.fixtures_url)
# Re-download fixtures (they're downloaded automatically during test execution)
Client Container Failures
If the ethrex client container fails to start:
# Rebuild the Docker image
make build-image
# Check Docker images
docker images | grep ethrex
CI/CD Integration
The project runs Hive tests automatically via GitHub Actions:
- Daily runs:
.github/workflows/daily_hive_report.yaml- Comprehensive test coverage - PR validation:
.github/workflows/pr-main_l1.yaml- Subset of critical tests
Results are posted to Slack and available in GitHub Actions artifacts.
Additional Resources
- Hive Documentation
- Execution Spec Tests
- Ethereum Execution APIs
- Amsterdam Fork (Glamsterdam) Details
Assertoor tests
We run some assertoor checks on our CI, to execute them locally you can run the following:
make localnet-assertoor-tx
# or
make localnet-assertoor-blob
Those are two different sets of assertoor checks the details are as follows:
assertoor-tx
assertoor-blob
For reference on each individual check see the assertoor-wiki
Run
Example run:
cargo run --bin ethrex -- --network fixtures/genesis/kurtosis.json
The network argument is mandatory, as it defines the parameters of the chain.
For more information about the different cli arguments check out the next section.
Rust tests
Crate Specific Tests
Rust unit tests that you can run like this:
make test CRATE=<crate>
For example:
make test CRATE="ethrex-blockchain"
Load tests
Before starting, consider increasing the maximum amount of open files for the current shell with the following command:
ulimit -n 65536
To run a load test, first run the node using a command like the following in the root folder:
cargo run --bin ethrex --release -- --network fixtures/genesis/load-test.json --dev
There are currently three different load tests you can run:
The first one sends regular transfers between accounts, the second runs an EVM-heavy contract that computes fibonacci numbers, the third a heavy IO contract that writes to 100 storage slots per transaction.
# Eth transfer load test
make load-test
# ERC 20 transfer load test
make load-test-erc20
# Tests a contract that executes fibonacci (high cpu)
make load-test-fibonacci
# Tests a contract that makes heavy access to storage slots
make load-test-io
L2 Developer Docs
Welcome to the ethrex L2 developer documentation!
This section provides information about the internals of the L2 side of the project.
Table of contents
Ethrex as a local L2 development node
Prerequisites
- This guide assumes you’ve read the dev installation guide
- An Ethereum utility tool like rex
Dev mode
In dev mode ethrex acts as a local Ethereum development node and a local layer 2 rollup
ethrex l2 --dev
after running the command the ethrex monitor will open with information about the status of the local L2.
The default port of the L1 JSON-RPC is 8545 you can test it by running
rex block-number http://localhost:8545
The default port of the L2 JSON-RPC is 1729 you can test it by running
rex block-number http://localhost:1729
Guides
For more information on how to perform certain operations, go to Guides.
Running integration tests
In this section, we will explain how to run integration tests for ethrex L2 with the objective of validating the correct functioning of our stack in our releases. For this, we will use ethrex as a local L2 dev node.
Prerequisites
- Install the latest ethrex release or pre-release binary following the instructions in the Install ethrex (binary distribution) section.
- For running the tests, you’ll need a fresh clone of ethrex.
- (Optional for troubleshooting)
Setting up the environment
Our integration tests assume that there is an ethrex L1 node, an ethrex L2 node, and an ethrex L2 prover up and running. So before running them, we need to start the nodes.
Running ethrex L2 dev node
For this, we are using the ethrex l2 --dev command, which does this job for us. In one console, run the following:
./ethrex l2 --dev \
--committer.commit-time 150000 \
--block-producer.block-time 1000 \
--block-producer.base-fee-vault-address 0x000c0d6b7c4516a5b274c51ea331a9410fe69127 \
--block-producer.operator-fee-vault-address 0xd5d2a85751b6F158e5b9B8cD509206A865672362 \
--block-producer.l1-fee-vault-address 0x45681AE1768a8936FB87aB11453B4755e322ceec \
--block-producer.operator-fee-per-gas 1000000000 \
--no-monitor
Read the note below for explanations about the flags used.
Note
ethrex’s MPT implementation is path-based, and the database commit threshold is set to
128. In simple words, the latter implies that the database only stores the state 128 blocks before the current one (e.g., if the current block is block 256, then the database stores the state at block 128), while the state of the blocks within lives in in-memory diff layers (which are lost during node shutdowns). In ethrex L2, this has a direct impact since if our sequencer seals batches with more than 128 blocks, it won’t be able to retrieve the state previous to the first block of the batch being sealed because it was pruned; therefore, it won’t be able to create new batches to send to L1. To solve this, after a batch is sealed, we create a checkpoint of the database at that point to ensure the state needed at the time of commitment is available for the sequencer. For this test to be valuable, we need to ensure this edge case is covered. To do so, we set up an L2 with batches of approximately 150 blocks. We achieve this by setting the flag--block-producer.block-timeto 1 second, which specifies the interval in milliseconds for our builder to build an L2 block. This means the L2 block builder will build blocks every 1 second. We also set the flag--committer.commit-timeto 150 seconds (2 minutes and 30 seconds), which specifies the interval in milliseconds in which we want to commit to the L1. This ensures that enough blocks are included in each batch. The L2’s gas pricing mechanism is tested in the integration tests, so we need to set the following flags to ensure the L2 gas pricing mechanism is active:
--block-producer.base-fee-vault-address--block-producer.operator-fee-vault-address--block-producer.l1-fee-vault-address--block-producer.operator-fee-per-gasRead more about ethrex L2 gas pricing mechanism here. We set the flag
--no-monitorto disable the built-in monitoring dashboard since it is not needed for running the integration tests.
So far, we have an ethrex L1 and an ethrex L2 node up and running. We only miss the ethrex L2 prover, which we are going to spin up in exec mode, meaning that it won’t generate ZK proofs.
Running ethrex L2 prover
In another terminal, run the following to spin up an ethrex L2 prover in exec mode:
./ethrex l2 prover \
--backend exec \
--proof-coordinators http://localhost:3900
Note
The flag
--proof-coordinatorsis used to specify one or more proof coordinator URLs. This is so because the prover is capable of proving ethrex L2 batches from multiple sequencers. We are particularly setting it tolocalhost:3900because theethrex l2 --devcommand uses the port3900for the proof coordinator by default.
To see more about the proof coordinator, read the ethrex L2 sequencer and ethrex L2 prover sections.
Running the integration tests
During the execution of ethrex l2 --dev, a .env file is created and filled with environment variables containing contract addresses. This .env file is always needed for dev environments, so we need it for running the integration tests. Therefore, before running the integration tests, copy the .env file into ethrex/cmd:
cp .env ethrex/cmd
Finally, in another terminal (should be a third one at this point), change your current directory to ethrex/crates/l2 and run:
make test
FAQ
What should I expect?
Once you run make test, you should see the output of the tests being executed one after another. The tests will interact with the ethrex L2 node and the ethrex L2 prover that you started previously. If everything is set up correctly, all tests should pass successfully.
How long do the tests take to run?
The current configuration of the L2 node (with a block time of 1 second and a commit time of 150 seconds) means that each batch will contain approximately 150 blocks. Given this setup, the integration tests typically take around 30 to 45 minutes to complete, depending on the timing in which you performed the steps.
I think my tests are taking too long, how can I debug this?
If your tests are taking significantly longer than expected, you are likely watching the Retrying to get message proof for tx ... counter in the tests terminal increase without progressing. Let’s unveil what is happening here. This message indicates that the transaction has been included in an L2 block, but that block has not yet been included in a batch. There’s no current way to fairly estimate when the block including the transaction will be included in a batch, but we can see how far the block is from being included.
Using the hash of the transaction shown in the log message, you can check the status of the transaction using an Ethereum utility tool like rex. Run the following commands in a new terminal:
- Get the block number where the transaction was included (replace
<TX_HASH>with the actual transaction hash):rex l2 tx <TX_HASH> - As the block is assumed to not be included in a batch yet, we need to check which blocks have been included in the latest batch.
rexdoes not have a command for this yet, so we will usecurlto make a JSON-RPC call to the ethrex L2 node. Run the following command:curl -X POST http://localhost:1729 \ -H "Content-Type: application/json" \ -d '{ "jsonrpc":"2.0", "method":"ethrex_batchNumber", "params": [], "id":1 }' | jq .result - Once you have the batch number, you can get the range of blocks included in that batch by running the following command (replace
<BATCH_NUMBER>with the actual batch number obtained in the previous step, in hex format, e.g.,0x1):curl -X POST http://localhost:1729 \ -H "Content-Type: application/json" \ -d '{ "jsonrpc":"2.0", "method":"ethrex_getBatchByNumber", "params": ["<BATCH_NUMBER>", false], "id":1 }' | jq .result.first_block,.result.last_block - Compare the block number obtained in step 1 with the range of blocks obtained in step 3 to see how far the block is from being included in a batch. To have a rough estimate, take into account the mean of blocks that are being included into the batches and consider that a batch is sealed approximately every 150 seconds (2 minutes and 30 seconds) based on the current configuration.
Should I worry about the periodic warning logs of the L2 prover?
Logs are being constantly improved to provide better clarity. However, during the execution of the integration tests, you might notice periodic warning logs from the L2 prover indicating that there are no new batches to prove. These warnings are expected behavior in this testing scenario and can be safely ignored.
The tests are failing, what should I do?
If the tests are failing, first ensure that both the ethrex L2 node and the ethrex L2 prover are running correctly without any errors. Check their logs for any issues. If everything seems fine, try restarting both services and rerun the tests. Ensure that your configuration files (e.g., .env) are correctly set up and that all required environment variables are defined. If the problem persists, consider reaching out to the ethrex community or support channels for further assistance.
How do I run the tests with ethrex running from docker?
To run the integration tests with ethrex running on Docker, pass --net=host to docker run so it binds all ports in localhost:
docker run --net=host <other_docker_flags> ghcr.io/lambdaclass/ethrex:<tag>-l2 <ethrex_flags>
For “Running ethrex L2 dev node”, with the latest image, the full command would be:
docker run --net=host ghcr.io/lambdaclass/ethrex:latest-l2 l2 --dev \
--committer.commit-time 150000 \
--block-producer.block-time 1000 \
--block-producer.base-fee-vault-address 0x000c0d6b7c4516a5b274c51ea331a9410fe69127 \
--block-producer.operator-fee-vault-address 0xd5d2a85751b6F158e5b9B8cD509206A865672362 \
--block-producer.l1-fee-vault-address 0x45681AE1768a8936FB87aB11453B4755e322ceec \
--block-producer.operator-fee-per-gas 1000000000 \
--no-monitor
For “Running ethrex L2 prover”, with the latest image, the full command would be:
docker run --net=host ghcr.io/lambdaclass/ethrex:latest-l2 l2 prover \
--backend exec \
--proof-coordinators http://localhost:3900
Troubleshooting
Note
This is a placeholder for future troubleshooting tips. Please report any issues you encounter while running the integration tests to help us improve this section.
Running the Prover
This guide provides instructions for setting up and running the Ethrex L2 prover for development and testing purposes.
Dependencies
Before you begin, ensure you have the following dependencies installed:
- RISC0
curl -L https://risczero.com/install | bashrzup install
- SP1
curl -L https://sp1up.succinct.xyz | bashsp1up --version 5.0.8
- SOLC (v0.8.31)
After installing the toolchains, a quick test can be performed to check if we have everything installed correctly.
L1 block proving
ethrex-prover is able to generate execution proofs of Ethereum Mainnet/Testnet blocks. An example binary was created for this purpose in crates/l2/prover/bench. Refer to its README for usage.
Dev Mode
To run the blockchain (proposer) and prover in conjunction, start the Prover, use the following command:
make init-prover-<sp1|risc0|exec> # optional: GPU=true
Run the whole system with the prover - In one Machine
Note
Used for development purposes.
cd crates/l2make rm-db-l2 && make down- It will remove any old database, if present, stored in your computer. The absolute path of SQL is defined by datadir.
make init- Make sure you have the
solccompiler installed in your system. - Init the L1 in a docker container on port
8545. - Deploy the needed contracts for the L2 on the L1.
- Start the L2 locally on port
1729.
- Make sure you have the
- In a new terminal →
make init-prover-<sp1|risc0|exec> # GPU=true.
After this initialization we should have the prover running in dev_mode → No real proofs.
GPU mode
Steps for Ubuntu 22.04 with Nvidia A4000:
- Install
docker→ using the Ubuntu apt repository- Add the
useryou are using to thedockergroup → command:sudo usermod -aG docker $USER. (needs reboot, doing it after CUDA installation) id -nGafter reboot to check if the user is in the group.
- Add the
- Install Rust
- Install RISC0
- Install CUDA for Ubuntu
- Install
CUDA Toolkit Installerfirst. Then thenvidia-opendrivers.
- Install
- Reboot
- Run the following commands:
sudo apt-get install libssl-dev pkg-config libclang-dev clang
echo 'export PATH=/usr/local/cuda/bin:$PATH' >> ~/.bashrc
echo 'export LD_LIBRARY_PATH=/usr/local/cuda/lib64:$LD_LIBRARY_PATH' >> ~/.bashrc
Run the whole system with a GPU Prover
Two separate machines are recommended for running the Prover and the sequencer to avoid resource contention. However, for development, you can run them in two separate terminals on the same machine.
- Machine 1 (or Terminal 1): For the
Prover(GPU is recommended). - Machine 2 (or Terminal 2): For the
sequencer/L2 node.
-
Prover/zkvmSetupcd ethrex/crates/l2- You can set the following environment variables to configure the prover:
PROVER_CLIENT_PROVER_SERVER_ENDPOINT: The address of the server where the client will request the proofs from.PROVER_CLIENT_PROVING_TIME_MS: The amount of time to wait before requesting new data to prove.
- To start the
Prover/zkvm, run:make init-prover-<sp1|risc0|exec> # optional: GPU=true
-
ProofCoordinator/sequencerSetupcd ethrex/crates/l2- Create a
.envfile with the following content:# Should be the same as ETHREX_COMMITTER_L1_PRIVATE_KEY and ETHREX_WATCHER_L2_PROPOSER_PRIVATE_KEY ETHREX_DEPLOYER_L1_PRIVATE_KEY=<private_key> # Should be the same as ETHREX_COMMITTER_L1_PRIVATE_KEY and ETHREX_DEPLOYER_L1_PRIVATE_KEY ETHREX_WATCHER_L2_PROPOSER_PRIVATE_KEY=<private_key> # Should be the same as ETHREX_WATCHER_L2_PROPOSER_PRIVATE_KEY and ETHREX_DEPLOYER_L1_PRIVATE_KEY ETHREX_COMMITTER_L1_PRIVATE_KEY=<private_key> # Should be different from ETHREX_COMMITTER_L1_PRIVATE_KEY and ETHREX_WATCHER_L2_PROPOSER_PRIVATE_KEY ETHREX_PROOF_COORDINATOR_L1_PRIVATE_KEY=<private_key> # Used to handle TCP communication with other servers from any network interface. ETHREX_PROOF_COORDINATOR_LISTEN_ADDRESS=0.0.0.0 # Set to true to randomize the salt. ETHREX_DEPLOYER_RANDOMIZE_CONTRACT_DEPLOYMENT=true # Set to true if you want SP1 proofs to be required ETHREX_L2_SP1=true # Check if the verification contract is present on your preferred network. Don't define this if you want it to be deployed automatically. ETHREX_DEPLOYER_SP1_VERIFIER_ADDRESS=<address> # Set to true if you want proofs to be required ETHREX_L2_RISC0=true # Check if the contract is present on your preferred network. You shall deploy it manually if not. ETHREX_DEPLOYER_RISC0_VERIFIER_ADDRESS=<address> # Set to any L1 endpoint. ETHREX_ETH_RPC_URL=<url> source .env
Note
Make sure to have funds, if you want to perform a quick test
0.2[ether]on each account should be enough.
-
Finally, to start theproposer/l2 node, run:make rm-db-l2 && make downmake deploy-l1 && make init-l2(if running a risc0 prover, see the next step before invoking the L1 contract deployer)
-
If running with a local L1 (for development), you will need to manually deploy the risc0 contracts by following the instructions here.
-
For a local L1 running with ethrex, we do the following:
- clone the risc0-ethereum repo
- edit the
risc0-ethereum/contracts/deployment.tomlfile by adding[chains.ethrex] name = "Ethrex local devnet" id = 9 - export env. variables (we are using an ethrex’s rich L1 account)
the last two variables need to be defined with some value even if not used, else the deployment script fails.export VERIFIER_ESTOP_OWNER="0x4417092b70a3e5f10dc504d0947dd256b965fc62" export DEPLOYER_PRIVATE_KEY="0x941e103320615d394a55708be13e45994c7d93b932b064dbcb2b511fe3254e2e" export DEPLOYER_ADDRESS="0x4417092b70a3e5f10dc504d0947dd256b965fc62" export CHAIN_KEY="ethrex" export RPC_URL="http://localhost:8545" export ETHERSCAN_URL="dummy" export ETHERSCAN_API_KEY="dummy" - cd into
risc0-ethereum/ - run the deployment script
bash contracts/script/manage DeployEstopGroth16Verifier --broadcast - if the deployment was successful you should see the contract address in the output of the command, you will need to pass this as an argument to the L2 contract deployer, or via the
ETHREX_DEPLOYER_RISC0_VERIFIER_ADDRESS=<address>env. variable. if you get an error likerisc0-ethereum/contracts/../lib/forge-std/src/Script.sol": No such file or directory (os error 2), try to update the git submodules (foundry dependencies) withgit submodule update --init --recursive.
Configuration
Configuration is done through environment variables or CLI flags.
You can see a list of available flags by passing --help to the CLI, or checkout CLI.
Generate blobs for the state reconstruction test
The test in test/tests/l2/state_reconstruct.rs replays a fixed set of blobs to reconstruct. The fixtures need to be regenerated whenever the genesis file changes, because a new genesis alters the hash of the very first block and, by extension, all descendant blocks. Our stored blobs encode parent pointers, so stale hashes make the fixtures unusable. If you ever need to regenerate those blobs, you need to change the files payload_builder.rs and l1_committer.rs and run the sequencer to capture fresh blobs.
Summary
- Limit every block to ten transactions to make the batches predictable.
- Store each blob locally whenever the committer submits a batch.
- Run the dev stack long enough to capture six blobs and move them into
fixtures/blobs/.
1. Cap block payloads at 10 transactions
Edit crates/l2/sequencer/block_producer/payload_builder.rs and, inside the fill_transactions loop, add the early exit that forces every L2 block to contain at most ten transactions:
#![allow(unused)]
fn main() {
if context.payload.body.transactions.len() >= 10 {
println!("Reached max transactions per block limit");
break;
}
}That guarantees we have transactions in each block for at least 6 batches.
2. Persist every blob locally when the committer sends a batch
Still in the sequencer, open crates/l2/sequencer/l1_committer.rs:
-
Add this helper function:
#![allow(unused)] fn main() { fn store_blobs(blobs: Vec<Blob>, current_blob: u64) { let blob = blobs.first().unwrap(); fs::write(format!("{current_blob}-1.blob"), blob).unwrap(); } } -
At the end of
send_commitment(after logging the transaction hash) dump the blob that was just submitted:#![allow(unused)] fn main() { // Rest of the code ... info!("Commitment sent: {commit_tx_hash:#x}"); store_blobs(batch.blobs_bundle.blobs.clone(), batch.number); Ok(commit_tx_hash) ``` }
Running the node with the deposits of the rich accounts will create N-1.blob files (you can move them into fixtures/blobs/ afterwards).
3. Run the L2 and capture six blobs
Important: Start the prover first, then the sequencer. This prevents the committer from getting stuck waiting for deposits to be verified.
In the first terminal, start the prover:
make init-prover-exec
In another terminal, start the L2 with a 20 seconds per commit so we have at least 6 batches with transactions:
COMPILE_CONTRACTS=true cargo run --release --bin ethrex --features l2,l2-sql -- l2 --dev --no-monitor --committer.commit-time 20000
Once the sequencer has produced six batches you will see six files named 1-1.blob through 6-1.blob. Copy them into fixtures/blobs/ (overwriting the existing files).
ethrex-prover
The prover leverages ethrex’s stateless execution to generate zero-knowledge proofs of a block (or batch of blocks) execution. Stateless execution works by asking a synced node for an execution witness (the minimal state data needed to execute that block or batch) and using the L1 client code to re-execute it. See Stateless execution for more details.
The main interface to try the prover is ethrex-replay, we also use it as a component of ethrex’s L2 stack, to deploy zk-rollups or zk-validiums (a rollup publishes state information to L1 to reconstruct the L2 state if sequencing were to fail, a validium does not). Because of this the prover also supports some L2 specific checks.
How do you prove block execution?
Now that general purpose zero-knowledge virtual machines (zkVMs) exist, most people have little trouble with the idea that you can prove execution. Just take the usual EVM code you wrote in Rust, compile to some zkVM target instead and you’re mostly done. You can now prove it.
What’s usually less clear is how you prove state. Let’s say we want to prove a new L2 batch of blocks that were just built. Running the ethrex execute_block function on a Rust zkVM for all the blocks in the batch does the trick, but that only proves that you ran the VM correctly on some previous state/batch. How do you know it was the actual previous state of the L2 and not some other, modified one?
In other words, how do you ensure that:
- Every time the EVM reads from some account state or storage slot (think an account balance, some contract’s bytecode), the value returned matches the actual value present on the previous state of the chain.
- When all writes are done to account states or storage slots after execution, the final state matches what the (last executed) block header specified is the state at that block (the header contains the final state MPT root).
Stateless execution and execution witness
Ethrex implements a way to execute a block (or a batch of blocks) without having access to the entire blockchain state, but only the necessary subset for that particular execution. This subset is called the execution witness, and running a block this way is called stateless execution (stateless in the sense that you don’t need a database with hundreds of gigabytes of the entire state data to execute).
The execution witness is composed of all MPT nodes which are relevant to the execution, so that for each read and write we have all the nodes that form a path from the root to the relevant leaf. This path is a proof that this particular value we read/wrote is part (or not) of the initial or final state MPT.
So, before initiating block execution, we can verify each proof for each state value read from. After execution, we can verify each proof for each state value written to. After these steps we authenticated all state data to two MPT root hashes (initial and final state roots), which later can be compared against reference values to check that the execution started from and arrived to the correct state. If you were to change a single bit, this comparison would fail.
In a zkVM environment
After stateless execution was done, the initial and final state roots can be committed as public values of the zk proof. By verifying the proof we know that blocks were executed from an initial state and arrived into a final state, and we know the root hashes of the MPT of each one. If the initial root is what we expected (equal to the root of the latest validated state), then we trustlessly verified that the chain advanced its state correctly, and we can authenticate the new, valid state using the final state root.
By proving the execution of L2 blocks and verifying the zk proof (alongside with the initial state root) in an Ethereum smart contract validators attest the new state and the L2 inherits the security of Ethereum (assuming no bugs in the whole pipeline). This is the objective of an Ethereum L2.
Validators themselves could verify L1 block execution proofs to attest Ethereum instead of re-executing.
L2 specific checks
Apart from stateless execution, the prover does some extra checks needed for L2 specific features.
Data availability
Rollups publish state diffs as blob data to the L1 so that users can reconstruct the L2 state and rescue their funds if the sequencing were to fail or censors data. This published data needs to be part of the zk proof the prover generated. For this it calculates the valid state diffs and verifies a KZG proof, whose commitment can later be compared to the one published to the L1 using the BLOBHASH EVM opcode. See data availability for more details.
L1<->L2 messaging
This is a fundamental feature of an L2, used mainly for bridging assets between the L1 and the L2 or between L2s using the ethrex stack. Messages need to be part of the proof to make sure the sequencer included them correctly.
Messages are compressed into a hash or a Merkle tree root which then are stored in an L1 contract together with the rest of the L2 state data. The prover retrieves the transactions or events that the messages produced in the L2, reconstructs the message data and recomputes the hashes or Merkle tree roots, which are then committed as a public input of the zk proof. At verification we can compare these hashes with the ones stored in the L1. This is the same concept used for state data.
For more details checkout deposits and withdrawals
See also
- Guest program for the detailed steps of the program that the prover generates a proof of.
- Distributed proving for running multiple provers in parallel with multi-batch L1 verification.
ethrex-prover guest program
The guest program is the code that is compiled into a zkVM-compatible binary (e.g., RISC-V), to then generate a zero-knowledge proof of its execution.
Program inputs
The inputs for the blocks execution program (also called prover inputs) are:
blocks: The blocks to be proven (header and body).execution_witness: A structure containing the necessary state data (like account and storage values with their Merkle proofs) required for the execution of the blocks. It includes the parent header of the first block.elasticity_multiplier: A parameter for block validation.fee_configs: L2-specific fee configurations for each block.blob_commitmentandblob_proof: L2-specific data for verifying the state diff blob.
These inputs are required for proof generation. The public values of the proof (also called program outputs), which are needed for proof verification, are:
initial_state_hash: The state root from the parent header of the first block.final_state_hash: The state root from the header of the last block.l1messages_merkle_root: The Merkle root of L1 messages (withdrawals) generated during block execution.privileged_transactions_hash: A hash representing all privileged transactions processed in the blocks.blob_versioned_hash: The versioned hash of the state diff blob, derived from its KZG commitment.last_block_hash: The hash of the last block in the batch.chain_id: The chain ID of the network.non_privileged_count: The number of non-privileged transactions in the batch.
Blocks execution program
The program leverages ethrex-common primitives and ethrex-vm methods. ethrex-prover implements a program that uses the existing execution logic and generates a proof of its execution using a zkVM. Some L2-specific logic and input validation are added on top of the basic blocks execution.
The following sections outline the steps taken by the execution program.
Prelude 1: state trie basics
We recommend learning about Merkle Patricia Tries (MPTs) to better understand this section.
Each executed block transitions the Ethereum state from an initial state to a final state. State values are stored in MPTs:
- Each account has a Storage Trie containing its storage values.
- The World State Trie contains all account information, including each account’s storage root hash (linking storage tries to the world trie).
Hashing the root node of the world state trie generates a unique identifier for a particular Ethereum state, known as the “state hash”.
There are two kinds of MPT proofs:
- Inclusion proofs: Prove that
key: valueis a valid entry in the MPT with root hashh. - Exclusion proofs: Prove that
keydoes not exist in the MPT with root hashh. These proofs allow verifying that a value is included (or its key doesn’t exist) in a specific state.
Prelude 2: privileged transactions, L1 messages and state diffs
These three components are specific additions for ethrex’s L2 protocol, layered on top of standard Ethereum execution logic. They each require specific validation steps within the program.
For more details, refer to Overview, Withdrawals, and State diffs.
Step 1: initial state validation
The program validates the initial state by converting the ExecutionWitness into a GuestProgramState and verifying that its trie structure correctly represents the expected state. This involves checking that the calculated state trie root hash matches the initial state hash (obtained from the first block’s parent block header).
The validation happens in several steps:
- The
ExecutionWitness(collected during pre-execution) is converted toGuestProgramState. - A
GuestProgramStateWrapperis created to provide database functionality. - For each state value in the database (account state and storage slots), the program verifies merkle proofs of the inclusion (or exclusion, in the case of accounts that didn’t exist before this batch) of the value in the state trie
- The state trie root is compared against the first block’s parent state root.
This validation ensures that all state values needed for execution are properly linked to the initial state via their MPT proofs. Having the initial state proofs (paths from the root to each relevant leaf) is equivalent to having a relevant subset of the world state trie and storage tries - a set of “pruned tries”. This allows operating directly on these pruned tries (adding, removing, modifying values) during execution.
Step 2: blocks execution
After validating the initial state, the program executes the blocks sequentially. This leverages the existing ethrex-vm execution logic. For each block, it performs validation checks and then executes the transactions within it. State changes from each block are applied before executing the next one.
Step 3: final state validation
During execution, state values are updated (modified, created, or removed). After executing all blocks, the program calculates the final state by applying all state updates to the initial pruned tries.
Applying the updates results in a new world state root node for the pruned tries. Hashing this node yields the calculated final state hash. The program then verifies that this calculated hash matches the expected final state hash (from the last block header), thus validating the final state.
Step 4: privileged transactions hash calculation
After execution and final state validation, the program calculates a hash encompassing all privileged transactions (like L1 to L2 deposits) processed within the blocks. This hash is committed as a public input, required for verification on the L1 bridge contract.
Step 5: L1 messages Merkle root calculation
Similarly, the program constructs a binary Merkle tree of all L2->L1 messages (withdrawals) initiated in the blocks and calculates its root hash. This hash is also committed as a public input. Later, L1 accounts can claim their withdrawals by providing a Merkle proof of inclusion that validates against this root hash on the L1 bridge contract.
Step 6: state diff calculation and commitment
Finally, the program calculates the state diffs (changes between initial and final state) intended for publication to L1 as blob data. It then verifies the provided blob_commitment and blob_proof against the calculated state diff. The resulting blob_versioned_hash (derived from the KZG commitment) is committed as a public input for verification on the L1 contract.
Rich Accounts
When running ethrex in dev mode (ethrex --dev and ethrex l2 --dev), a bunch of rich accounts are available to make testing of contracts and transactions easy. These are the private keys
0x941e103320615d394a55708be13e45994c7d93b932b064dbcb2b511fe3254e2e (0x4417092B70a3E5f10Dc504d0947DD256B965fc62)
0xbcdf20249abf0ed6d944c0288fad489e33f66b3960d9e6229c1cd214ed3bbe31 (0x8943545177806ED17B9F23F0a21ee5948eCaa776)
0x39725efee3fb28614de3bacaffe4cc4bd8c436257e2c8bb887c4b5c4be45e76d (0xE25583099BA105D9ec0A67f5Ae86D90e50036425)
0x53321db7c1e331d93a11a41d16f004d7ff63972ec8ec7c25db329728ceeb1710 (0x614561D2d143621E126e87831AEF287678B442b8)
0xab63b23eb7941c1251757e24b3d2350d2bc05c3c388d06f8fe6feafefb1e8c70 (0xf93Ee4Cf8c6c40b329b0c0626F28333c132CF241)
0x5d2344259f42259f82d2c140aa66102ba89b57b4883ee441a8b312622bd42491 (0x802dCbE1B1A97554B4F50DB5119E37E8e7336417)
0x27515f805127bebad2fb9b183508bdacb8c763da16f54e0678b16e8f28ef3fff (0xAe95d8DA9244C37CaC0a3e16BA966a8e852Bb6D6)
0x7ff1a4c1d57e5e784d327c4c7651e952350bc271f156afb3d00d20f5ef924856 (0x2c57d1CFC6d5f8E4182a56b4cf75421472eBAEa4)
0x3a91003acaf4c21b3953d94fa4a6db694fa69e5242b2e37be05dd82761058899 (0x741bFE4802cE1C4b5b00F9Df2F5f179A1C89171A)
0xbb1d0f125b4fb2bb173c318cdead45468474ca71474e2247776b2b4c0fa2d3f5 (0xc3913d4D8bAb4914328651C2EAE817C8b78E1f4c)
0x850643a0224065ecce3882673c21f56bcf6eef86274cc21cadff15930b59fc8c (0x65D08a056c17Ae13370565B04cF77D2AfA1cB9FA)
0x94eb3102993b41ec55c241060f47daa0f6372e2e3ad7e91612ae36c364042e44 (0x3e95dFbBaF6B348396E6674C7871546dCC568e56)
0xdaf15504c22a352648a71ef2926334fe040ac1d5005019e09f6c979808024dc7 (0x5918b2e647464d4743601a865753e64C8059Dc4F)
0xeaba42282ad33c8ef2524f07277c03a776d98ae19f581990ce75becb7cfa1c23 (0x589A698b7b7dA0Bec545177D3963A2741105C7C9)
0x3fd98b5187bf6526734efaa644ffbb4e3670d66f5d0268ce0323ec09124bff61 (0x4d1CB4eB7969f8806E2CaAc0cbbB71f88C8ec413)
0x5288e2f440c7f0cb61a9be8afdeb4295f786383f96f5e35eb0c94ef103996b64 (0xF5504cE2BcC52614F121aff9b93b2001d92715CA)
0xf296c7802555da2a5a662be70e078cbd38b44f96f8615ae529da41122ce8db05 (0xF61E98E7D47aB884C244E39E031978E33162ff4b)
0xbf3beef3bd999ba9f2451e06936f0423cd62b815c9233dd3bc90f7e02a1e8673 (0xf1424826861ffbbD25405F5145B5E50d0F1bFc90)
0x6ecadc396415970e91293726c3f5775225440ea0844ae5616135fd10d66b5954 (0xfDCe42116f541fc8f7b0776e2B30832bD5621C85)
0xa492823c3e193d6c595f37a18e3c06650cf4c74558cc818b16130b293716106f (0xD9211042f35968820A3407ac3d80C725f8F75c14)
0xc5114526e042343c6d1899cad05e1c00ba588314de9b96929914ee0df18d46b2 (0xD8F3183DEF51A987222D845be228e0Bbb932C222)
0x04b9f63ecf84210c5366c66d68fa1f5da1fa4f634fad6dfc86178e4d79ff9e59 (0xafF0CA253b97e54440965855cec0A8a2E2399896)
0x00f3c6e26fe106334befc354dcf4a08d2d947625f6968920759ec6630de1c3a3 (0x0002869e27c6FaEe08cCA6b765a726E7a076Ee0F)
0x029227c59d8967cbfec97cffa4bcfb985852afbd96b7b5da7c9a9a42f92e9166 (0x000130badE00212bE1AA2F4aCFe965934635C9cD)
0x031f8b6155ab7f04aa6d5cd424bfc1c3ad65f911ced9e1f863c9bc118eb5228d (0x000a523148845bEe3EE1e9F83df8257a1191C85B)
0x0480559965a26c68396f8d76957d86bcf41d4798d6354a213d67d3c77ab9dd02 (0x0001E8Ff6406a7cd9071F46B8255Db6C16178448)
0x05ec2a3cbcee946efc4a581d508c13bfc1fe2c40410a018b859319ffbb81b741 (0x000f2AbaA7581fAA2ad5C82b604C77ef68c3eAD9)
0x060a9e0d4ee57e31c7b5f8c0496dd9ef7412917d0b430987ff17e7df59348f08 (0x00057714949aD700733C5b8E6cF3e8c6B7D228a2)
0x07794b7d64b91127316f6ffcdaddd797bcd9bd826f64d09e400e1d0a9b63c672 (0x000798832bb08268dB237898b95A8DaE9D58b62c)
0x08372a029a6d3026d62d7a1afc40e487d2a95ac4558d8f5745b8f76ee2aebba1 (0x00002132cE94eEfB06eB15898C1AABd94feb0AC2)
0x08f7bd756bf8bf0aae93401c44ad6f8a059c6ee8b6bbcb8b67f71d437f4bbe0f (0x000b681738e1f8aF387c41b2b1f0A04E0C33e9DB)
0x098622f6492b1986dba92341fd8b1886f5059f45573ee5e7d8deda1e18057f13 (0x000E90875aC71eD46A11dc1b509d2B35E2c9C31F)
0x09f3b5d7a1b8e0c141d47c585170eaeda2deeef8fe8d548946e31e39e6557d97 (0x0005f132597da3152a6Da6beDB7C10bcC9B1B7f5)
0x0ae566c7c3db3611107b876eff2dd4a27e6513642bcd4fab418a7595a14240e4 (0x000D06C23EeD09A7Fa81cADd7eD5C783E8a25635)
0x0f718cb64094032dfa5051446704ae6706744330784fb4dbc1bae22581a2de05 (0x000c877a5D9b9De61e5318B3f4330c56ecdC0865)
0x113771bcca4d3ce8ad9f896a4d07114abf97c68a01b2401f4a0659dcb825a7d6 (0x000fA71E446e1EcFd74d835b5bD6fA848A770d26)
0x1587881856d95ab64fb8470f46fd1d8ee0c3e1a7298de9da82e9d74dd24e9601 (0x000d0576AdEf7083d53F6676bfc7c30d03b6Db1B)
0x174d4a903e9e9fe1bccf4fc56218ca463edce7e26f7a7a1c3d1ac76f28e38a7d (0x000E3388598A0534275104Ad44745620AF31EC7E)
0x175c219128dc61f8b96df198d35f52936343d42f0b71bc8c6eb3b4c00d41eae4 (0x0007514395022786B59ff91408692462C48d872c)
0x179d83566464d67417493a54f6b1a164153be0515adb1a83309d1c255e63ed5b (0x000F76B2Fe7cCC13474de28586A877664EBA16B4)
0x17bb02f6d7d7a00282db9ab76c2384afd7219352c8149f9abc92416d42fe7d4d (0x000F7cFBa0B176Afc2eBadA9d4764d2eA6BBC5a1)
0x180ba7fc7455b07afdf408722b32945e018ed2d5b6865915c185c733ab1f3459 (0x000b59AeD48ADCd6c36Ae5f437AbB9CA730a2c43)
0x19668868eaffec5a2fdeae892e51bffdba2ce033f42181fdb999cfb55483256f (0x00087C666bf7f52758DE186570979C4C79747157)
0x1a48fc41c5bff2f5ab755fad70eafb0d92c7aa4b176752ce36b974c611475c74 (0x000C47c771A8db282eC233b28AD8525dc74D13FE)
0x1bc8b78019f35d4447a774e837d414a3db9e1dea5cfc4e9dc2fc3904969ab51f (0x00044cbfb4Ef6054667994C37c0fe0B6BB639718)
0x1f7918165177ac75620e17524b261329a26d23ae67e6ad4bbe064a25d265dd3f (0x0005E815c1A3F40011Bd70C76062bbcBc51c546B)
0x24805dc4d67e7d1d518227607544b663435b6db0398968024b222ff886884712 (0x0003E72436Ff296B3d39339784499D021b72Aca5)
0x255e46ec0e4051f97108915628d3414f379da711a70741f5c4574e23811ae71a (0x00031dE95353DeE86dc9B1248e825500DE0B39aF)
0x27240f4892ad31223d97c2e40089e0d0069c3b8f40093f6265dce69da2e25105 (0x000511B42328794337D8b6846E5cFFef30c2d77A)
0x274442f0dabd2d7f8ce904e7f2616d9c10807e5856266d160bc6a89ec08150cf (0x000791D3185781e14eBb342E5df3BC9910f62E6F)
0x2875b9d5a0b251168ddae14d3e7491865f0a57c9fa4edc3cc1b2b253f978e9b3 (0x000883A40409Fa2193b698928459CB9E4DD5f8D8)
0x28aab647d7271fc200449ed8f42f4a16d6b23248cb91c02860642cfe95d0a27f (0x000055acf237931902ceBf4B905BF59813180555)
0x2bf2fe73d721086dde4fa564e3452fa8346d9b73badc58b331931c761c1c68d8 (0x000B05E15C62CBC266A4DD1804b017d1f6dB078b)
0x2c4cca9e2f73dc42c0fb35c785e1da6b3731979e5ec651f65d2ce62f12b8174d (0x000cE6740261E297FaD4c975D6D8F89f95C29add)
0x2e2f73b2cca221f5b7995cc0b703aae40598182c13ad83d0ee7ef9030f8f9535 (0x0000E101815A78EbB9FBBa34F4871aD32d5eb6CD)
0x2f409116f384216d02106ec9d73437ab056ce6665747668293a9359101f309c3 (0x000c95f1D83De53B76a0828F1bCdB1DfE12C0ab3)
0x31950b39d586c6d3e37bc37233880ab3266505165be34c628fe5ee6746a3afec (0x0003Ea7fDFCdb89E9ddAb0128ec5C628F8D09D45)
0x31c23065cd63d53ddfc3b0c0816dcfcef4646c72cc8e37315fee069d76c9db8a (0x00031470def99c1d4dfE1fd08DD7A8520Ce21DB7)
0x33e16098bd4020a1c57a980d578e0866785f009125d5c8d99b8cc5e8345e554d (0x000Df55E76cf6dfD9598DD2b54948dE937f50f2B)
0x37243a93a5717e19a933dd465ae911e00b270263903fcf78ecb318465275058c (0x000029bD811D292E7f1CF36c0FA08fd753C45074)
0x3991bd50444f2476e4d71ff594941b622a2492094a8117e519d9dd44314f5f62 (0x0006A070bAC6195b59d4bC7f73741DCBe4e16b5e)
0x3c0924743b33b5f06b056bed8170924ca12b0d52671fb85de1bb391201709aaf (0x000f1EB7F258D4A7683E5D0FC3C01058841DDC6f)
0x3d05b7d615ad30421a0e27e4641260ff48d8e8f5c4a4fa2fbd144f146584303e (0x000784B47aC2843419Df4cAd697d4e7b65CE1F93)
0x3e944a0db91bee398192fcd8e7f1b796416e6a4c329f8f74bb71742040866a86 (0x000541653a96ABAdDba52fAA8D118e570d529543)
0x401fdd734f1803715ba4b07505c7b4e557e5ed39af76e21c9d228ecb5a3837b8 (0x000e1a554572dd96fF3d1F2664832F3E4a66E7b7)
0x41443995d9eb6c6d6df51e55db2b188b12fe0f80d32817e57e11c64acff1feb8 (0x000425E97fC6692891876012824a210451cC06C4)
0x422674ecdc2167979b772269e42b890d46e0ece426718a70d321cf3659e2ad77 (0x0003dDe6f01e3B755e24891a5B0f2463BaD83e15)
0x4366847d055ff7eb7faeb6f818c95015b985d14d6ddfdfb26e494066fcc38519 (0x00094cc0653B52406170105F4eb96C5e2f31Ab74)
0x4458623aa1b3c87043fa01600d29cdc1652148536bb4fc5bffb6e953359cd40d (0x0006E80d584cbF9EB8C41CF2b009C607744a70F6)
0x46d73bc96b8138c33c5d2e5d4c40dc39554cb6da450c3a220fc5738f9b5afd6b (0x000635BCbB109781Cea0Cd53e9f1370Dbac9937f)
0x471c7b13744d5c0637df466a5eda148d97f484f20f907015db4e03159f4d1610 (0x000c2de896E4a92e796d6A9c1E4B01feB3e6Ed61)
0x474cc442ecc2fbc63890b5289382ed9f503bdbd7708b1bf8a5c9d62ba1c84289 (0x0001533C6C5b425815b2BaDdCdd42DFF3be04BCb)
0x4875a27ca99d78b38a5f7b25a512a5dd6474c476eff9c64f641bb39df2741c38 (0x000d35f8cd11bd989216b3669cBaac6fd8c07196)
0x488ed13eb34b7eb99985b8bcfd5f361c059a4b07d62220b50f7ef4f8d2b8f7bf (0x00021C20F3e68F930077Cca109Ca3C044E8B39bD)
0x49313fda2b97355cefc68fd4760672c565040c9a78dfc8dfc973c28d9f56826e (0x0002D79686DeF20a0aB43FEA4a41a1Ad56529621)
0x494ea60e318be249a6e7d6b99f045537089cd91c5271543058828b68446f12cc (0x000e06626Bb8618D9A1867362D46ddb1bF95ad75)
0x49e0796492218e9e971b18ba1612dcbab6bfac6795583f9f326f2e4586cb141f (0x000815A8A659a51A8EF01F02441947Ea99182568)
0x4bd0341e3ae366713a377b033e27c0cc70c21b64e616c8ee478e86c92ed2783a (0x000e65342176C7dac47bc75113F569695d6A113C)
0x4c2b88ba1146b2d18dcb8f2332bb697ff1ba27c47ce243107a6983d278cfe54d (0x0004Aa0442d0d43222431b3017912EC6a099771C)
0x4d636f9a9c60a4329360d48f6fdc4a2cdc40518af238e68bf59df3d31f9cef8a (0x00010AB05661Bfde304A4d884DF99d3011A83C54)
0x4e64d2cc477b31e0597fb4e3489c89777771b168cee98c8a4d2978c36e298ebb (0x000E5DE0a0175866d21F4Ec6c41F0422A05f14D6)
0x547ba217be53dfe01f7d6a4af1452f8e0ba7755ca43ba8bad731d3da77fe1de7 (0x0005C34d7B8b06CE8019C3Bb232dE82B2748A560)
0x553eaa0a8107daf55a8b198065e37d8ee231396a8819483f95da0a762633d8d0 (0x0008Bd31Ee6A758e168844cBEA107Ca4d87251aF)
0x556a4c63c314bf2a1734f34bcc2c45941b41afe3e4827d205092f3cc8d3ab11b (0x0004b0C6de796fD980554cc7ff7B062b3B5079E1)
0x5a10921bc5815991dd35f29b4a11177c10a1f3f0493f9b6baee20cb7a8187f4e (0x0001a2c749FE0Ab1C09f1131BA17530f9D764fBC)
0x5b959cd3e5eb4fdfb46d11d5e5891ecd9c66eae8e00d98f0d17f43657b16a9af (0x000305CD7184aB37fdd3D826B92A640218D09527)
0x5bb463c0e64039550de4f95b873397b36d76b2f1af62454bb02cf6024d1ea703 (0x0009aEFF154De37C8e02E83f93D2FeC5EC96f8a3)
0x5d3564ded68562c6fffe5a92a3ec540b015db1bde8744544012c95462f28b24a (0x0002AfCC1B0B608E86b5a1Dc45dE08184E629796)
0x5f332f1fa6c7c5773bba744dcc9027e07294c1a9a84c27caef8b89296db248fa (0x000882c5FbD315801e4C367BCB04dBD299B9F571)
0x63f6a20cc1d77dd3a602e43f564ca9b4d3b6da8a7227b052827542811c195071 (0x000f17eB09AA3f28132323E6075C672949526d5A)
0x658edfde371c42f7dbdafdb73b9d28b87fff929753f74eb7c9888c2f25b02ea6 (0x00025eea83bA285532F5054b238c938076833d13)
0x6650f803ba48956d66dc723673026b2fa1f932cdb9e2eaafd7fa33a872f1929b (0x00069dC0cc6b9d7B48B5348b12F625E8aB704104)
0x6a781d90721009565792b0429d474b12fdfa31aafbc3faec0d49585174f60dac (0x00032C03f3b02D816128Fb5D2752398E2919a03c)
0x6aeeda1e7eda6d618de89496fce01fb6ec685c38f1c5fccaa129ec339d33ff87 (0x000aC79590dCc656c00c4453f123AcBf10DBb086)
0x6c9c5b48ed5fea8389fd77cc2b83d3c0693eb0ee7ddd19dec8f86f928a33b345 (0x0005e37296348571bd3604f7E56B67a7022801f6)
0x6dbfe7f740aaedf790b92a6b694e1f8885aea1eb2661b349e513c3a3d8ee3487 (0x00030da862690D170F096074e9E8b38db7D6f037)
0x6de4602623b568df6fa9a4e06bb6a1548435633baae11ae286874b7ff6f8c22d (0x000279CB54E00B858774afEA4601034Db41c1A05)
0x6ded84f43b5c521bc7ac18b74c3f405e923a045fa814fa784b35d59cbf297270 (0x000688AA0fBfB3F1e6554A63dF13bE08cB671b3b)
0x6ef568220d33d8181ad89b82cbcfb8bb929949e5699a7e4af28f989e6862f8b5 (0x00075af7E665F3Ca4A4b05520CD6d5c13BbFEAf8)
0x6f6a26a8d3ca35c80bd9c9e48f2d043df9c3a18835ebf622735928e87de6fb91 (0x000E67E4b1A23A3826304099cb24f337c916CF4b)
0x6fbf0095f80c61a80b7908b4696f00336b53be0f2d975d92920d5c02ff595a46 (0x000701F7d594Fb146e4d1c71342012e48A788055)
0x70d20e53ec0f10409564c6a486fa92e905dc87f7dbcab159e367ecf70d94eae9 (0x0009Bf72AF31A4E6B8Ef6FbbFcb017823E4d2aF2)
0x75d7a0ff700a9e8844b7ad81578c4dfbe55c09d1c5dc3f4ab3bf95e8d0cb643c (0x000b4C43cce938dfD3420F975591Ee46D872C136)
0x78ccd4d2698c9967804a23b8e5df6ac980cfc4480c0be9c6d0ab07538f062b7f (0x000a3fC3BFD55b37025E6F4f57B0B6121F54e5bF)
0x7a738a3a8ee9cdbb5ee8dfc1fc5d97847eaba4d31fd94f89e57880f8901fa029 (0x000eA2e72065A2ceCA7f677Bc5E648279c2D843d)
0x7be5365bd828f6d6f686189330f10b7466adca1cd9da226556dfa677f39684b8 (0x000A073dAC5ec2058a0De0e175874D5E297E086E)
0x7d5fa86623f012ce3f1dab8db7ea6516c4105d43e0dc01af9efea9380bf2e92f (0x000e490f26249951F8527779399aa8F281509aC0)
0x7e3d5296f53c67e0c378944f2d909a7234b7ee584d355cd70daf685dbe74b5bf (0x0002d9b2a816717C4d70040D66A714795F9B27a4)
0x814987df97349c4939d5ac6bc7f4f4e245752313f09e5d16047f8fe0984f2d50 (0x000Ebf88AE1BA960B06b0a9bbE576baa3B72E92E)
0x827318914f784ef7fccf70df962ec8e67fc9da68d7490e37b3fc78a42bb916f7 (0x000Aa0154ed6560257d222B5dbE6ce4b66c48979)
0x82ca942cdf86f17c5d3271b4306afc7d5b70d717f12614a1a29f19beb88f6325 (0x000B9Ea41A9dF00b7ae597afc0D10AF42666081F)
0x843a15a6506faad9474eec6822a1bb76db6623522e0e2890731777f2bd78ba20 (0x0005c6BeD054FEad199D72C6f663fC6fBf996153)
0x844ea11663c3f05d6d99896538314a5e5a053fa06db7378f49d99053db2dc5dc (0x000c53b37fA4977B59FD3Efdb473D8069844aDeA)
0x890921816813f30aab7142df0dfda056ddf64e5da309394ec87f8a4666b2a7bc (0x000EBd066B6FEBB9d7f3B767DF06C08e369Dc20F)
0x8929c1621173bddc7dd2fbf6a4321af67b2b818eaf2d6c70080ee1cdb0a28783 (0x0001d0bAE8B1B9fe61d0B788E562A987813cbD98)
0x8a50caa0a1a688918ec563ba04e365c737be607ca339aa4b62a2f921a3ace975 (0x000d72403c18B2516d8ada074E1E7822bF1084DB)
0x8aa2fb5b6d584e759f42861d9fefc3740255044bb2b0e82c6faacd67a74db880 (0x000995137728C7C2a9142F4628f95c98Cac433d7)
0x8cd87153b35b6c40571993a5afcad176c05f6a44d92abdfd47ac377b6cc3b8ec (0x0009e10C0D2F1a7A2b00b61c476aa8b608c60aDc)
0x8cfe380955165dd01f4e33a3c68f4e08881f238fbbea71a2ab407f4a3759705b (0x000a52D537c4150ec274dcE3962a0d179B7E71B0)
0x8f87d3aca3eff8132256f69e17df5ba3c605e1b5f4e2071d56f7e6cd66047cc2 (0x0001c94c108BcE19CDb36b00F867A1798A81DedA)
0x8fd234df35c11c8d32771f9d2f78933b1841af85f2ee25638a513e7353ea22bb (0x000E0ea540095B3853c4cb09E5Cdd197330D3B55)
0x91a2a2b0dca9e807182fc5eecdd361a74d1d0475c3ac406fbdeacea84e0fa31a (0x00054e17Db8C8Db028B19cB0f631888AdEb35E4b)
0x92e52bf06451126362882960e5ff4faa03d5f9d790c5af6a539def14c425923f (0x000A7Bbde38Fc53925D0De9cc1beE3038d36c2d2)
0x93f858b35ed88cf4dce086ab4c61ebcea89769753c8cdf1d5655d18ecdb38edb (0x000c6c1D8F778D981968F9904772B0c455E1C17c)
0x961eb4e04c2129ea9f00b069173cbdf7258948b65cdc038ee638e2b2b987e6fc (0x0003Ffc1f09d39FBFE87eD63E98249039C7b1d9A)
0x97fc4b0fa5f035a29e5c271f189aa2253a4e1959c132b1348881bd2c02102cbe (0x000796370C839773893a2cEFA5fc81f2332936fB)
0x985d0bdcb4d9fb224a69378c301db3b5f683ddb4781f366ed3f275e37d0a95be (0x000AEBc2568796FDB763CAB67B31e0feE58Fe17d)
0x9cdef989f3d75139bc39165c96a23b054f749b317ee625637700e4b7d28faf6d (0x00065fC4337dF331242bEE738031dAf35817Ee9e)
0x9e7a754d717c70645a24ea7bd81e736de854e2611ceccdab741af00a7f46a616 (0x000Ec60762AD0425A04C40c118Db5B9710Aa639e)
0x9ebcc1d015fe749685e5bb5d0063c92101a921d3d92e5ba44092597454227587 (0x00085D9D1a71acf1080cED44CB501B350900627f)
0x9f16862c8609dd08abfed5e19f63b18dd4f804433a9c79ab0440f1d374e6e432 (0x000D268F322F10925cdB5d2AD527E582259Da655)
0xa0110c3eeba2c945e846a286361662f0ce8d948486071cef5f09abada2ddb99c (0x0008D608884cd733642ab17aCa0c8504850B94fA)
0xa6c04c59fafd2a968cc6846a4734aa0264b3879a322494369476ab3e8f0f98a0 (0x000ea86B4A3d7e4AF8CFab052c8b9a040149b507)
0xa7cded2e2b7c46f15c70496e3f39b2411656fa8a6991a97cc1e93bbce5ee1be6 (0x000D66A7706f2DD5F557d5b68e01E07E8FFDfaf5)
0xa836542701576e61c7011fc44db20b9808a22c9783cb5828c9ff93ab364c564d (0x000b1db69627F04688aA47951d847c8BFAB3fFaE)
0xab1853bb4f429804b01d9078f166c073fbe14d7bb4af4e76e197cc16dffb53a2 (0x0004351AD413792131011CC7ed8299dd783C6487)
0xabea088cc1a18dda221851da62d00bdc3724368e47ae0a2516727871554859bd (0x000352E93fe11f9B715fdc61864315970B3DC082)
0xae618ad0dae41d158ef6ce4deec8fb3b7de9dd0a1dd185a2821734ec70bddfb8 (0x000A0191cf913E03bd594bC8817FC3B2895C0a25)
0xb03d7b8f6da932c4e55baaaed1b22f75185a6115210f7a70d7b882326381d749 (0x0001Ebe3a3bA36f57F5989B3F0e5BEEBc710569C)
0xb142300756f21d04354cd336fb01138767825d50c1d91cf751236bdd7cf522ab (0x000cD1537A823Ae7609E3897DA8d95801B557a8a)
0xb370bbc515b99c5c8f7a2bc4306bc4ccc4db49742fc8f173218c0c662dd3b62f (0x0002590DD45738F909115B163F1322A8A24a8B4E)
0xb49cfe28461b3dc8aba0fa8af6087d268360bdfff54e56c742fc6d32179f51de (0x00009074D8fc5Eeb25f1548Df05AD955E21FB08D)
0xb7afc4852985be9d0268236a30c6b90a10891beeac1b5ccaecf074386e5f2904 (0x0006264bf7E3395309F728222641Ff8D0e1ad2C0)
0xb826451d3ab95251746556a3ab193191a63f3848e2461bbc4cfa0de21137ee51 (0x000036e0f87f8Cd3e97f9cfDB2e4E5Ff193c217a)
0xb8a8d6b97b1fffd09b876c51236cc09a89114e75f2882ac5004fb8bc3a1ef4d4 (0x0005b34eB0d99dE72DB14d466f692009c4049D46)
0xb8c8285116055d94644aaf1a6596b25540f4fe0e6aeb803e76aa37e1209fd6db (0x0004ad0D0823e3d31C6ECA2A3495373fA76c43aC)
0xba73c72b16553dbba5a275f541c06e77dcf7773514898dc0f3ddfe13c44f9e11 (0x0006d77295a0260ceAC113c5Aa15CFf0d28d9723)
0xbe2677fadaa3d16debd067c3679a0c1338f420c83f69a4591358d4f2a95933c0 (0x000F74AA6EE08C15076b3576eE33Ed3a80c9A1AD)
0xbfc2079f3da2470011be8f27d2b067ff2a933c7e701237d71b7e6be002b8a31a (0x0008a02d3E8507621f430345b98478058cDca79A)
0xc048f3e8fd5ff23148988025eee03064e6b0c503465b025fe9fea753a3185a17 (0x000ed6E0F4Fdc3615663BF4A601E35e7A8d66E1c)
0xc0f7f797c767e0917a03c115feaab813995ddeeefa4f35a1cd4edac84513cb63 (0x000086Eeea461Ca48e4D319F9789F3Efd134E574)
0xc1354d508b68dc33e1dab6cfbe3ce46302285a245642a0be71a655dd1a925be1 (0x0008a52c83D34f0791D07FfeD04Fb6b14f94E2D4)
0xc339484638efe005997b94978147b5ab6116e0e5def378b6282a875d154cfe88 (0x00029637dA962294449549f804f8184046F5fbB0)
0xc549116c70f6b7ccbadd7b6e195b1a739fb67ff78012f1cbb7bb3105ad66ec12 (0x000dFE27e1b71a49B641ad762aB95558584878D1)
0xc64a7834b476dcc257873670840a10bfbf34f364f001bd7dd55c43815cf63253 (0x000885A4932ebeD6D760EA381e4EdAe51A53db05)
0xc889c7625e6d463c6864a165234d0f29a854c5fbb04a9af4412626b4beda26d7 (0x000EDC52118DadB4B81f013005b6db2665B682ac)
0xcba5cf8ff0d1c75f2125fc4d631922f51584473bec8fc9f05884497e102f9e3d (0x00079f33619F70F1DCE64EB6782E45D3498d807C)
0xce4ead486ce4c05525554cdf6b2278a9d37d2fd4e184af1a9e37345b12158498 (0x00056bde49E3cAA9166C2a4C4951d0Cf067956A0)
0xcfe8dfcd96dcc59dd4a4df47c83437130fb02404a5701fe65fa978981649a92e (0x000C1C05dBFf111c79D5c9E91420DFBEA1c31716)
0xd09dd1b86312497051ca2e8ec38df9c758e47d91e6d2c369403cb95916e40d20 (0x0003B1aB565508e095a543C89531e3fbc4a349DA)
0xd0aaf5554b03c2c6b08edfa2c61272732f99c8f86a18552b9102ff1bad57c1dc (0x0006ed38815a9439c59bD917c12f77a9A7D39BCE)
0xd0f6fc4f6c8fc182c2ebc48329103c15b217453c7383c7315dff723236f9fa0b (0x000212949b4866db43bAF7c4e0975426710ED081)
0xd104400f3401ab2cb8a579d6aa5c5958e7f39d50b3a647e48db4dfd510dd864c (0x0007d272a1f7Dfe862b030adE2922D149f3bDe3B)
0xd288e8ef1fd56420009d02b416946229a074884c68aca08253e4a1b1b2655da4 (0x000A997c1ceCB1DA78C16249e032e77d1865646a)
0xd5c791cbdf1ceb7aea8b112f7598481d1da6ab70ecb3ce486b15fe23635c7a3e (0x0004e4dfCed9d798767A4d7BA2B03495cE80A2b7)
0xd640aab82f34d30047a2ddd34de8f062cd56b875792ed2a792bd4c9958178666 (0x0007316aEDc52EB35c9B5c2E44e9fD712d1DF887)
0xd6d05cc8f2de48565af906295762428f4a52442e920ed36b0b9371ef24869972 (0x00096af89fd96f0d6E1721d9145944e813317d46)
0xd75f886ceee43cc8cb50ce83c6ae9c3062ba4fe74b318a5817d711fc25318084 (0x000A390975F21371F1Cf3C783a4A7C1aF49074Fe)
0xd82f2e030a83e1ee6508b0476495c64fb0f519e3abe4eb83cbae21e85b7d8200 (0x000C1aE5FeCf09595C0C76Db609FEB2a5Af0962E)
0xd9cc048d3b472758b7750698f5cddf671d5faeb12668ee05a3edb4544b4cf9b7 (0x0006cEE23d8E9BC8d99E826cDa50481394aD9bDD)
0xdb2d6a3ec90c30bc7f2e57338979c28e783138ad3da7b6b13e58a2de4a20bfcd (0x000db74a3da16609F183ACE7AF65B43D896349CE)
0xdbbbf42fe6a05bbc0c1d4b99211e2ed72faf45a020843ec154eb9cec821d7e5e (0x0009d862F87F26c638AAd14F2cc48FCa54DBf49d)
0xdc8501a1d8ed67a24ca333e86b02c279fb8aca7610a7d8b07121a28d924d9e3e (0x000C8FC4132881c31f67638c3941dF8D94a92299)
0xdcd4917cd06c0d1be10b97cf6a44a89b978f835f6b8be978e58dba7d1070628b (0x0003135C47c441506b58483Ec6173F767182670B)
0xdf2e10539394549c10eb0a459efcc2eb4b417a7729c0a6e78367d0fc39b45dce (0x00077A336FCA40F933a7A301F4a39C26594F3EB5)
0xe06ad4b90a6d8eab21cef3efe96e0e57db709aa6b4aa778a93520f624ac6ea66 (0x00069DA530A71Dc92D02090d7f5f63e326e9beD0)
0xe188fda09aac7f922732f12865928b506223c8374a75b5dc451b11ef9fbeb133 (0x000b3F6da04b6261B4154C8FaEd119632C49DBd5)
0xe4f7dc8b199fdaac6693c9c412ea68aed9e1584d193e1c3478d30a6f01f26057 (0x0000bd19F707CA481886244bDd20Bd6B8a81bd3e)
0xe556d12479cde2e345ba952bdae2a47f6179f4f03a491ecda414970bab5c8005 (0x000A341763112a5E3452c7AEE45c382a3fb7dc78)
0xe76b962fc2d87e124bba333e6ff90a258760260f24f8a3c4fbceaeac68157f6e (0x000577bDc84B4019F77D9D09BDD8ED6145E0e890)
0xe88d9382e5e4914469a23dcc27271e05aa7715ddeaee66b857a455c1fd51104a (0x0002Bf507275217c9E5EE250bC1B5ca177bb4f74)
0xea016edc3a0dda43660a83cd7dddddfed87f34fe2849ab5c4339e9b8660e9553 (0x0000638374f7dB166990BDc6aBeE884Ee01a8920)
0xeaa700570abf8ad30abc2c4d922f4a76475e0bf37bdc9b434faff602bfe3847b (0x000C5e39879228A1Fc8dF2470822CB8ce2Af8e07)
0xeac93dc1957553f0816bc3a26d62f5ec475ecf2f02ee2a92bf9ff0214fc1fdd9 (0x00097B4463159340Ac83B9bdf657C304cD70c11c)
0xef75cca9bc31f62e7ab5823856dbe3187a6d34ba8a7a9381067b06b2c4d4d447 (0x0006Bd0469166f63D0A1c33F71898D2b2E009b9b)
0xf5c1ce10ff6233f88d700acd5bbd5b4ea00947df74d771bce8951b119bc23dbd (0x000e64e0a2Fd76B4883c800833c82c5F2420b813)
0xf666815790e3f448dc47f90aa0661dc3b0181fa41ff987b893cf1ef46ba52661 (0x00000A8d3f37af8DeF18832962Ee008d8dCa4F7b)
0xfa12d9f4e1eada2bbac5e2b9de0899a18ab07905c833529956a4789d10effa37 (0x0004b230511F921934F33E8B4425E43295232680)
0xfc412094d6bdac3ede9db1979975db0c613da7e4a550a663dacb0074e852eed5 (0x0004C8da21c68dED2F63efD9836De7D43e7cDa10)
0xfc8ae6457da1052f379f9a7eb925e11d10d3fc1dc0b59fe93658704babcfe78c (0x000990B05481b1661bc6211298f6429451B09425)
0xfdb73112480f2b033ff2fe2e6f5bd358fc46307a3fc2aeb70c79e77a8704ad82 (0x000cDF8Dba2393a40857cbCB0FCD9b998a941078)
0xffd790338a2798b648806fc8635ac7bf14af15425fed0c8f25bcc5febaa9b192 (0x000e73282F60E2CdE0D4FA9B323B6D54d860f330)
Debugging solidity with ethrex
Debug Mode
Debug mode currently enables printing in solidity by using a print() function that does an MSTORE with a specific offset to toggle the “print mode”. If the VM is in debug mode it will recognize the offset as the “key” for enabling/disabling print mode. If print mode is enabled, MSTORE opcode stores into a buffer the data that the user wants to print, and when there is no more data left to read it prints it and disables the print mode so that execution continues normally.
You can find the solidity code in the fixtures of this repository. It can be tested with the PrintTest contract and it can be imported into another contracts.
ethrex-replay
A tool for executing and proving Ethereum blocks, transactions, and L2 batches — inspired by starknet-replay.
Features
L1
| Feature | Description |
|---|---|
ethrex-replay block | Replay a single block. |
ethrex-replay blocks | Replay a list of specific block numbers, a range of blocks, or from a specific block to the latest (see ethrex-replay blocks --help) |
ethrex-replay block-composition | |
ethrex-replay custom | Build your block before replaying it. |
ethrex-replay transaction | Replay a single transaction of a block. |
ethrex-replay cache | Generate witness data prior to block replay (see ethrex-replay cache --help) |
L2
| Feature | Description |
|---|---|
ethrex-replay l2 batch | |
ethrex-replay l2 block | |
ethrex-replay l2 custom | |
ethrex-replay l2 transaction |
Supported Clients
| Client | ethrex-replay block | notes |
|---|---|---|
| ethrex | ✅ | debug_executionWitness |
| reth | ✅ | debug_executionWitness |
| geth | ✅ | eth_getProof |
| nethermind | ✅ | eth_getProof |
| erigon | ❌ | V3 supports eth_getProof only for latest block |
| besu | ❌ | Doesn’t return proof for non-existing accounts |
We support any other client that is compliant with eth_getProof or debug_executionWitness endpoints.
You can set the max requests per second to the RPC url with the environment variable REPLAY_RPC_RPS. This is particularly useful when using eth_getProof. Default is 10.
Execution of some particular blocks with the eth_getProof method won’t work with zkVMs. But without using these it should work for any block. Read more about this in FAQ. Also, when running against a full node using eth_getProof if for some reason information retrieval were to take longer than 25 minutes it would probably fail because the node may have pruned its state (128 blocks * 12 seconds = 25,6 min), normally it doesn’t take that much but be wary of that.
Supported zkVM Replays (execution & proving)
✅: supported. ⚠️: supported, but flaky. 🔜: to be supported.
| zkVM | Hoodi | Sepolia | Mainnet | Public ethrex L2s |
|---|---|---|---|---|
| RISC0 | ✅ | ✅ | ✅ | ✅ |
| SP1 | ✅ | ✅ | ✅ | ✅ |
| OpenVM | ⚠️ | 🔜 | 🔜 | 🔜 |
| ZisK | 🔜 | 🔜 | ⚠️ | 🔜 |
| Jolt | 🔜 | 🔜 | 🔜 | 🔜 |
| Nexus | 🔜 | 🔜 | 🔜 | 🔜 |
| Pico | 🔜 | 🔜 | 🔜 | 🔜 |
| Ziren | 🔜 | 🔜 | 🔜 | 🔜 |
Getting Started
Dependencies
These dependencies are optional, install them only if you want to run with the features risc0 or sp1 respectively.
Make sure to use the correct versions of these.
RISC0
curl -L https://risczero.com/install | bash
rzup install cargo-risczero 3.0.3
rzup install risc0-groth16
rzup install rust
SP1
curl -L https://sp1up.succinct.xyz | bash
sp1up --version 5.0.8
Installation
From Cargo
# L1 Replay
## Install without features for vanilla execution (no prover backend)
cargo install --locked --git https://github.com/lambdaclass/ethrex.git ethrex-replay
## Install for CPU execution/proving with SP1
cargo install --locked --git https://github.com/lambdaclass/ethrex.git ethrex-replay --features sp1
## Install for CPU execution/proving with RISC0
cargo install --locked --git https://github.com/lambdaclass/ethrex.git ethrex-replay --features risc0
## Install for GPU execution/proving with SP1
cargo install --locked --git https://github.com/lambdaclass/ethrex.git ethrex-replay --features sp1,gpu
## Install for GPU execution/proving with RISC0
cargo install --locked --git https://github.com/lambdaclass/ethrex.git ethrex-replay --features risc0,gpu
# L2 Replay
## Install without features for vanilla execution (no prover backend)
cargo install --locked --git https://github.com/lambdaclass/ethrex.git ethrex-replay --features l2
## Install for CPU execution/proving with SP1
cargo install --locked --git https://github.com/lambdaclass/ethrex.git ethrex-replay --features l2,sp1
## Install for CPU execution/proving with RISC0
cargo install --locked --git https://github.com/lambdaclass/ethrex.git ethrex-replay --features l2,risc0
## Install for GPU execution/proving with SP1
cargo install --locked --git https://github.com/lambdaclass/ethrex.git ethrex-replay --features l2,sp1,gpu
## Install for GPU execution/proving with RISC0
cargo install --locked --git https://github.com/lambdaclass/ethrex.git ethrex-replay --features l2,risc0,gpu
Run from Source
git clone git@github.com:lambdaclass/ethrex.git
cd ethrex
# L1 replay
## Vanilla execution (no prover backend)
cargo r -r -p ethrex-replay -- <COMMAND> [ARGS]
## SP1 backend
cargo r -r -p ethrex-replay --features sp1 -- <COMMAND> [ARGS]
## SP1 backend + GPU
cargo r -r -p ethrex-replay --features sp1,gpu -- <COMMAND> [ARGS]
## RISC0 backend
cargo r -r -p ethrex-replay --features risc0 -- <COMMAND> [ARGS]
## RISC0 backend + GPU
cargo r -r -p ethrex-replay --features risc0,gpu -- <COMMAND> [ARGS]
# L2 replay
## Vanilla execution (no prover backend)
cargo r -r -p ethrex-replay --features l2 -- <COMMAND> [ARGS]
## SP1 backend
cargo r -r -p ethrex-replay --features l2,sp1 -- <COMMAND> [ARGS]
## SP1 backend + GPU
SP1_PROVER=cuda cargo r -r -p ethrex-replay --features l2,sp1,gpu -- <COMMAND> [ARGS]
## RISC0 backend
cargo r -r -p ethrex-replay --features l2,risc0 -- <COMMAND> [ARGS]
## RISC0 backend + GPU
cargo r -r -p ethrex-replay --features l2,risc0,gpu -- <COMMAND> [ARGS]
Features
The following table lists the available features for ethrex-replay. To enable a feature, use the --features flag with cargo install, specifying a comma-separated list of features.
| Feature | Description |
|---|---|
gpu | Enables GPU support with SP1 or RISC0 backends (must be combined with one of these features, e.g. sp1,gpu or risc0,gpu) |
risc0 | Execution and proving is done with RISC0 backend |
sp1 | Execution and proving is done with SP1 backend |
l2 | Enables L2 batch execution and proving (can be combined with SP1 or RISC0 and GPU features, e.g. sp1,l2,gpu, risc0,l2,gpu, sp1,l2, risc0,l2) |
jemalloc | Use jemalloc as the global allocator. This is useful to combine with tools like Bytehound and Heaptrack for memory profiling |
profiling | Useful to run with tools like Samply. |
Running Examples
Examples ToC
- Execute a single block from a public network
- Prove a single block
- Execute an L2 batch
- Prove an L2 batch
- Execute a transaction
- Plot block composition
Important
The following instructions assume that you’ve installed
ethrex-replayas described in the Getting Started section.
Execute a single block from a public network
Note
- If
BLOCK_NUMBERis not provided, the latest block will be executed.- If
ZKVMis not provided, no zkVM will be used for execution.- If
RESOURCEis not provided, CPU will be used for execution.- If
ACTIONis not provided, only execution will be performed.
ethrex-replay block <BLOCK_NUMBER> --zkvm <ZKVM> --resource <RESOURCE> --action <ACTION> --rpc-url <RPC_URL>
Prove a single block
Note
- If
BLOCK_NUMBERis not provided, the latest block will be executed and proved.- Proving requires a prover backend to be enabled during installation (e.g.,
sp1orrisc0).- Proving with GPU requires the
gpufeature to be enabled during installation.- If proving with SP1, add
SP1_PROVER=cudato the command to enable GPU support.
ethrex-replay block <BLOCK_NUMBER> --zkvm <ZKVM> --resource gpu --action prove --rpc-url <RPC_URL>
Execute an L2 batch
ethrex-replay l2 batch --batch <BATCH_NUMBER> --execute --rpc-url <RPC_URL>
Prove an L2 batch
Note
- Proving requires a prover backend to be enabled during installation (e.g.,
sp1orrisc0). Proving with GPU requires thegpufeature to be enabled during installation.- If proving with SP1, add
SP1_PROVER=cudato the command to enable GPU support.- Batch replay requires the binary to be run/compiled with the
l2feature.
ethrex-replay l2 batch --batch <BATCH_NUMBER> --prove --rpc-url <RPC_URL>
Execute a transaction
Note
L2 transaction replay requires the binary to be run/compiled with the
l2feature.
ethrex-replay transaction <TX_HASH> --execute --rpc-url <RPC_URL>
ethrex-replay l2 transaction <TX_HASH> --execute --rpc-url <RPC_URL>
Plot block composition
ethrex-replay block-composition --start-block <START_BLOCK> --end-block <END_BLOCK> --rpc-url <RPC_URL> --network <NETWORK>
Benchmarking & Profiling
Run Samply
We recommend building in release-with-debug mode so that the flamegraph is the most accurate.
cargo build -p ethrex-replay --profile release-with-debug --features <FEATURES>
On zkVMs
Important
- For profiling zkVMs like SP1 the
ethrex-replaybinary must be built with theprofilingfeature enabled.- The
TRACE_SAMPLE_RATEenvironment variable controls the sampling rate (in milliseconds). Adjust it according to your needs.
TRACE_FILE=output.json TRACE_SAMPLE_RATE=1000 target/release-with-debug/ethrex-replay <COMMAND> [ARGS]
Execution without zkVMs
samply record target/release-with-debug/ethrex-replay <COMMAND> --no-zkvm [OTHER_ARGS]
Run Bytehound
Important
export MEMORY_PROFILER_LOG=warn
LD_PRELOAD=/path/to/bytehound/preload/target/release/libbytehound.so:/path/to/libjemalloc.so ethrex-replay <COMMAND> [ARGS]
Run Heaptrack
Important
LD_PRELOAD=/path/to/libjemalloc.so heaptrack ethrex-replay <COMMAND> [ARGS]
heaptrack_print heaptrack.<program>.<pid>.gz > heaptrack.stacks
Check All Available Commands
Run:
cargo r -r -p ethrex-replay -- --help
FAQ
FAQ
What’s the difference between eth_getProof and debug_executionWitness?
eth_getProof gets the proof for a particular account and the chosen storage slots.
debug_executionWitness gets the whole execution witness necessary to execute a block in a stateless manner.
The former endpoint is implemented by all execution clients and you can even find it in RPC Providers like Alchemy, the latter is only implemented by some execution clients and you can’t find it in RPC Providers.
When wanting to execute a historical block we tend to use the eth_getProof method with an RPC Provider because it will be the most reliable, another way is using it against a Hash-Based Archive Node but this would be too heavy to host ourselves (20TB at least). This method is slow because it performs many requests but it’s very flexible.
If instead we want to execute a recent block we use it against synced ethrex or reth nodes that expose the debug_executionWitness endpoint, this way retrieval of data will be instant and it will be way faster than the other method, because it won’t be doing thousands of RPC requests, just one.
More information regarding the execution witness in the prover docs.
Why stateless execution of some blocks doesn’t work with eth_getProof
With this method of execution we get the proof of all the accounts and storage slots accessed during execution, but the problem arises when we want to delete a node from the Merkle Patricia Trie (MPT) when applying the account updates of the block. This is for a particular case in which a tree restructuring happens and we have a missing node that wasn’t accessed but we need to know in order to restructure the trie.
The problem can be explained with a simple example: a Branch node has 2 child nodes and only one was accessed and removed, this branch node should stop existing because they shouldn’t have only one child. It will be either replaced by a leaf node or by an extension node, this depends on its child.
This problem is wonderfully explained in zkpig docs, they also have a very good intro to the MPT. Here they mention two different solutions that we have to implement in order to fix this. The first one works when the missing node is a Leaf or Extension and the second one works when the missing node is a Branch.
In our code we only applied the first solution by injecting all possible nodes to the execution witness that we build when using eth_getProof, that’s why the witness when using this method will be larger than the witness obtained with debug_executionWitness.
We didn’t apply the second change because it needs a change to the MPT that we don’t want in our code. However we were able to solve it for execution without using a zkVM by injecting some “fake nodes” to the trie just before execution that have the expected hash but their RLP content doesn’t match to it. This way we can “trick” the Trie into thinking that it has the branch nodes when in fact, it doesn’t.
Interactive REPL
The ethrex REPL is an interactive Read-Eval-Print Loop for Ethereum JSON-RPC. It lets you query any Ethereum node directly from your terminal using a concise namespace.method syntax.
Quick Start
# Via the ethrex binary
ethrex repl
# Connect to a specific endpoint
ethrex repl -e https://eth.llamarpc.com
# Execute a single command and exit
ethrex repl -x "eth.blockNumber"
CLI Options
ethrex repl [OPTIONS]
Options:
-e, --endpoint <URL> JSON-RPC endpoint [default: http://localhost:8545]
--history-file <PATH> Path to command history file [default: ~/.ethrex/history]
-x, --execute <COMMAND> Execute a single command and exit
RPC Commands
Type namespace.method with arguments separated by spaces or in parentheses:
> eth.blockNumber
68943
> eth.getBalance 0xd8dA6BF26964aF9D7eEd9e03E53415D37aA96045
1000000000000000000
> eth.getBalance("0xd8dA6BF26964aF9D7eEd9e03E53415D37aA96045", "latest")
1000000000000000000
> eth.getBlockByNumber 100 true
┌─────────────────────────────────────────┐
│ number 100 │
│ timestamp 1438270128 │
│ ... │
└─────────────────────────────────────────┘
Supported Namespaces
| Namespace | Methods | Description |
|---|---|---|
eth | 30 | Accounts, blocks, transactions, filters, gas, proofs |
debug | 8 | Raw headers/blocks/transactions/receipts, tracing |
admin | 4 | Node info, peers, log level, add peer |
net | 2 | Network ID, peer count |
web3 | 1 | Client version |
txpool | 2 | Transaction pool content and status |
Type .help to list all namespaces, .help eth to list methods in a namespace, or .help eth.getBalance for detailed method documentation.
ENS Name Resolution
Any command that accepts an address also accepts ENS names:
> eth.getBalance vitalik.eth
Resolved vitalik.eth -> 0xd8dA6BF26964aF9D7eEd9e03E53415D37aA96045
1000000000000000000
Resolution is done on-chain by querying the ENS registry at 0x00000000000C2E074eC69A0dFb2997BA6C7d2e1e. This works against any endpoint connected to Ethereum mainnet.
Utility Functions
| Function | Example | Description |
|---|---|---|
toWei | toWei 1.5 ether → 1500000000000000000 | Convert to wei |
fromWei | fromWei 1000000000 gwei → 1 | Convert from wei |
toHex | toHex 255 → 0xff | Decimal to hex |
fromHex | fromHex 0xff → 255 | Hex to decimal |
keccak256 | keccak256 0x68656c6c6f → 0x1c8a... | Keccak-256 hash |
toChecksumAddress | toChecksumAddress 0xd8da... → 0xd8dA... | EIP-55 checksum |
isAddress | isAddress 0xd8dA... → true | Validate address format |
Units for toWei/fromWei: wei, gwei, ether (or eth).
Built-in Commands
| Command | Description |
|---|---|
.help [namespace|command] | Show help |
.exit / .quit | Exit the REPL |
.clear | Clear the screen |
.connect <url> | Show or change endpoint |
.history | Show history file path |
Other Features
- Tab completion for namespaces, methods, block tags, and utilities
- Parameter hints shown after typing a full method name
- Multi-line input — unbalanced
{}or[]automatically continues to the next line - Persistent history saved to
~/.ethrex/history - Formatted output — addresses, hashes, hex quantities, and nested objects are colored and auto-formatted
Using with ethrex dev mode
The REPL pairs well with ethrex dev mode. Start a local node, then connect the REPL to it:
# Terminal 1: start ethrex in dev mode
ethrex --dev
# Terminal 2: connect the REPL (default endpoint is localhost:8545)
ethrex repl
Running from source
# As an ethrex subcommand
cargo run -p ethrex -- repl
# Or directly
cargo run -p ethrex-repl
# Run tests
cargo test -p ethrex-repl
CLI Commands
ethrex
ethrex Execution client
Usage: ethrex [OPTIONS] [COMMAND]
Commands:
removedb Remove the database
import Import blocks to the database
import-bench Import blocks to the database for benchmarking
export Export blocks in the current chain into a file in rlp encoding
compute-state-root Compute the state root from a genesis file
repl Interactive REPL for Ethereum JSON-RPC
help Print this message or the help of the given subcommand(s)
Options:
-h, --help
Print help (see a summary with '-h')
-V, --version
Print version
Node options:
--network <GENESIS_FILE_PATH>
Alternatively, the name of a known network can be provided instead to use its preset genesis file and include its preset bootnodes. The networks currently supported include sepolia, hoodi and mainnet. If not specified, defaults to mainnet.
[env: ETHREX_NETWORK=]
--datadir <DATABASE_DIRECTORY>
Base directory for the database. For public networks a subdirectory named after the network is appended (e.g. ~/.local/share/ethrex/mainnet). If the value is `memory`, the InMemory Engine is used instead.
[env: ETHREX_DATADIR=]
[default: /home/runner/.local/share/ethrex]
--force
Delete the database without confirmation.
--metrics.addr <ADDRESS>
[env: ETHREX_METRICS_ADDR=]
[default: 0.0.0.0]
--metrics.port <PROMETHEUS_METRICS_PORT>
[env: ETHREX_METRICS_PORT=]
[default: 9090]
--metrics
Enable metrics collection and exposition
[env: ETHREX_METRICS=]
--dev
If set it will be considered as `true`. If `--network` is not specified, it will default to a custom local devnet. The Binary has to be built with the `dev` feature enabled.
[env: ETHREX_DEV=]
--log.level <LOG_LEVEL>
Possible values: info, debug, trace, warn, error
[env: ETHREX_LOG_LEVEL=]
[default: INFO]
--log.color <LOG_COLOR>
Possible values: auto, always, never
[env: ETHREX_LOG_COLOR=]
[default: auto]
--no-migrate
Do not migrate an existing database to the network-specific subdirectory.
[env: ETHREX_NO_MIGRATE=]
--skip-genesis-validation
Trust a pre-existing datadir's genesis instead of recomputing the genesis state root from the genesis alloc. Use only when booting against a database produced out-of-band (e.g. by a state generator) whose state root you vouch for; has no effect on a fresh datadir.
[env: ETHREX_SKIP_GENESIS_VALIDATION=]
--no-precompile-cache
Disable the per-block precompile result cache (benchmarking only).
[env: ETHREX_NO_PRECOMPILE_CACHE=]
--no-bal-parallel-exec
Disable BAL-driven parallel transaction execution on Amsterdam+ blocks (falls back to sequential).
[env: ETHREX_NO_BAL_PARALLEL_EXEC=]
--no-bal-prefetch
Disable the BAL-driven state prefetch warmer thread on Amsterdam+ blocks.
[env: ETHREX_NO_BAL_PREFETCH=]
--no-bal-parallel-trie
Disable BAL-driven optimistic trie merkleization on Amsterdam+ blocks (falls back to streaming AccountUpdates from the executor).
[env: ETHREX_NO_BAL_PARALLEL_TRIE=]
--log.dir <LOG_DIR>
Directory to store log files.
[env: ETHREX_LOG_DIR=]
--mempool.maxsize <MEMPOOL_MAX_SIZE>
Maximum size of the mempool in number of transactions
[env: ETHREX_MEMPOOL_MAX_SIZE=]
[default: 10000]
--precompute-witnesses
Once synced, computes execution witnesses upon receiving newPayload messages and stores them in local storage
[env: ETHREX_PRECOMPUTE_WITNESSES=]
P2P options:
--bootnodes <BOOTNODE_LIST>...
Comma separated enode URLs for P2P discovery bootstrap.
[env: ETHREX_BOOTNODES=]
--syncmode <SYNC_MODE>
Can be either "full" or "snap" with "snap" as default value.
[env: ETHREX_SYNCMODE=]
[default: snap]
--p2p.disabled
[env: ETHREX_P2P_DISABLED=]
--p2p.addr <ADDRESS>
The address to bind P2P sockets to. Defaults to the local IP. Use 0.0.0.0 (IPv4) or :: (IPv6) to listen on all interfaces. See also --nat.extip to announce a different external address.
[env: ETHREX_P2P_ADDR=]
--nat.extip <IP>
The IP address advertised to other nodes via discovery and ENR. Use this when the node is behind NAT and --p2p.addr is a private/unspecified address. Defaults to the value of --p2p.addr (or the auto-detected local IP if neither is set).
[env: ETHREX_P2P_NAT_EXTIP=]
--p2p.port <PORT>
TCP port for the P2P protocol.
[env: ETHREX_P2P_PORT=]
[default: 30303]
--discovery.port <PORT>
UDP port for P2P discovery.
[env: ETHREX_P2P_DISCOVERY_PORT=]
[default: 30303]
--p2p.discv4 <DISCV4_ENABLED>
Enable discv4 discovery.
[default: true]
[possible values: true, false]
--p2p.discv5 <DISCV5_ENABLED>
Enable discv5 discovery.
[default: true]
[possible values: true, false]
--p2p.tx-broadcasting-interval <INTERVAL_MS>
Transaction Broadcasting Time Interval (ms) for batching transactions before broadcasting them.
[env: ETHREX_P2P_TX_BROADCASTING_INTERVAL=]
[default: 1000]
--p2p.target-peers <MAX_PEERS>
Max amount of connected peers.
[env: ETHREX_P2P_TARGET_PEERS=]
[default: 100]
--p2p.lookup-interval <INITIAL_LOOKUP_INTERVAL>
Initial Lookup Time Interval (ms) to trigger each Discovery lookup message and RLPx connection attempt.
[env: ETHREX_P2P_LOOKUP_INTERVAL=]
[default: 100]
Storage options:
--rocksdb.block-cache-size <BYTES>
RocksDB shared block cache size in bytes. With cache_index_and_filter_blocks enabled it holds data blocks plus the per-SST index and bloom-filter blocks, so it is the effective ceiling on RocksDB's resident memory.
Default 12 GiB keeps the filter/index working set resident plus hot EVM state. A sweep on a synced mainnet node (32 GiB cap) found 8-16 GiB all keep up with head-following (filters resident, disk near-idle, no slow blocks); larger gives no gain because the OS page cache backstops the uncompressed state CFs, and ~8 GiB is the floor where the filter set starts to thrash.
Lower only on memory-constrained hosts, accepting reduced throughput. ETHREX_ROCKSDB_BLOCK_CACHE_SIZE sets the same value.
[env: ETHREX_ROCKSDB_BLOCK_CACHE_SIZE=]
[default: 12884901888]
RPC options:
--http.addr <ADDRESS>
Listening address for the HTTP JSON-RPC server. Defaults to 127.0.0.1 so the endpoint is only reachable from localhost; pass 0.0.0.0 to bind on all interfaces (only recommended when the node sits behind a trusted firewall or reverse proxy).
[env: ETHREX_HTTP_ADDR=]
[default: 127.0.0.1]
--http.port <PORT>
Listening port for the http rpc server.
[env: ETHREX_HTTP_PORT=]
[default: 8545]
--http.api <NAMESPACES>
Comma-separated list of JSON-RPC namespaces exposed on the public HTTP and WebSocket endpoints. Defaults to `eth,net,web3`. Enable `admin`, `debug` or `txpool` only when needed; the `engine` namespace is served on the authenticated RPC port and cannot be toggled here.
[env: ETHREX_HTTP_API=]
[default: eth,net,web3]
--ws.enabled
Enable websocket rpc server. Disabled by default.
[env: ETHREX_ENABLE_WS=]
--ws.addr <ADDRESS>
Listening address for the websocket rpc server.
[env: ETHREX_WS_ADDR=]
[default: 0.0.0.0]
--ws.port <PORT>
Listening port for the websocket rpc server.
[env: ETHREX_WS_PORT=]
[default: 8546]
--authrpc.addr <ADDRESS>
Listening address for the authenticated rpc server.
[env: ETHREX_AUTHRPC_ADDR=]
[default: 127.0.0.1]
--authrpc.port <PORT>
Listening port for the authenticated rpc server.
[env: ETHREX_AUTHRPC_PORT=]
[default: 8551]
--authrpc.jwtsecret <JWTSECRET_PATH>
Receives the jwt secret used for authenticated rpc requests.
[env: ETHREX_AUTHRPC_JWTSECRET_PATH=]
[default: jwt.hex]
Block building options:
--builder.extra-data <EXTRA_DATA>
Block extra data message.
[env: ETHREX_BUILDER_EXTRA_DATA=]
[default: "ethrex 18.0.0"]
--builder.gas-limit <GAS_LIMIT>
Target block gas limit.
[env: ETHREX_BUILDER_GAS_LIMIT=]
[default: 60000000]
--builder.max-blobs <MAX_BLOBS>
EIP-7872: Maximum blobs per block for local building. Minimum of 1. Defaults to protocol max.
[env: ETHREX_BUILDER_MAX_BLOBS=]
ethrex l2
Usage: ethrex l2 [OPTIONS]
ethrex l2 <COMMAND>
Commands:
prover Initialize an ethrex prover [aliases: p]
removedb Remove the database [aliases: rm, clean]
blobs-saver Launch a server that listens for Blobs submissions and saves them offline.
reconstruct Reconstructs the L2 state from L1 blobs.
revert-batch Reverts unverified batches.
pause Pause L1 contracts
unpause Unpause L1 contracts
deploy Deploy in L1 all contracts needed by an L2.
help Print this message or the help of the given subcommand(s)
Options:
--osaka-activation-time <UINT64>
Block timestamp at which the Osaka fork is activated on L1. If not set, it will assume Osaka is already active.
[env: ETHREX_OSAKA_ACTIVATION_TIME=]
-t, --tick-rate <TICK_RATE>
time in ms between two ticks
[default: 1000]
--batch-widget-height <BATCH_WIDGET_HEIGHT>
-h, --help
Print help (see a summary with '-h')
Node options:
--network <GENESIS_FILE_PATH>
Alternatively, the name of a known network can be provided instead to use its preset genesis file and include its preset bootnodes. The networks currently supported include holesky, sepolia, hoodi and mainnet. If not specified, defaults to mainnet.
[env: ETHREX_NETWORK=]
--datadir <DATABASE_DIRECTORY>
If the datadir is the word `memory`, ethrex will use the `InMemory Engine`.
[env: ETHREX_DATADIR=]
[default: "/home/runner/.local/share/ethrex"]
--force
Delete the database without confirmation.
--metrics.addr <ADDRESS>
[env: ETHREX_METRICS_ADDR=]
[default: 0.0.0.0]
--metrics.port <PROMETHEUS_METRICS_PORT>
[env: ETHREX_METRICS_PORT=]
[default: 9090]
--metrics
Enable metrics collection and exposition
[env: ETHREX_METRICS=]
--dev
If set it will be considered as `true`. If `--network` is not specified, it will default to a custom local devnet. The Binary has to be built with the `dev` feature enabled.
[env: ETHREX_DEV=]
--log.level <LOG_LEVEL>
Possible values: info, debug, trace, warn, error
[env: ETHREX_LOG_LEVEL=]
[default: INFO]
--log.color <LOG_COLOR>
Possible values: auto, always, never
[env: ETHREX_LOG_COLOR=]
[default: auto]
--mempool.maxsize <MEMPOOL_MAX_SIZE>
Maximum size of the mempool in number of transactions
[env: ETHREX_MEMPOOL_MAX_SIZE=]
[default: 10000]
P2P options:
--bootnodes <BOOTNODE_LIST>...
Comma separated enode URLs for P2P discovery bootstrap.
[env: ETHREX_BOOTNODES=]
--syncmode <SYNC_MODE>
Can be either "full" or "snap" with "snap" as default value.
[env: ETHREX_SYNCMODE=]
[default: snap]
--p2p.disabled
[env: ETHREX_P2P_DISABLED=]
--p2p.addr <ADDRESS>
The address to bind P2P sockets to. Defaults to the local IP. Use 0.0.0.0 (IPv4) or :: (IPv6) to listen on all interfaces. See also --nat.extip to announce a different external address.
[env: ETHREX_P2P_ADDR=]
--nat.extip <IP>
The IP address advertised to other nodes via discovery and ENR. Use this when the node is behind NAT and --p2p.addr is a private/unspecified address. Defaults to the value of --p2p.addr (or the auto-detected local IP if neither is set).
[env: ETHREX_P2P_NAT_EXTIP=]
--p2p.port <PORT>
TCP port for the P2P protocol.
[env: ETHREX_P2P_PORT=]
[default: 30303]
--discovery.port <PORT>
UDP port for P2P discovery.
[env: ETHREX_P2P_DISCOVERY_PORT=]
[default: 30303]
--p2p.tx-broadcasting-interval <INTERVAL_MS>
Transaction Broadcasting Time Interval (ms) for batching transactions before broadcasting them.
[env: ETHREX_P2P_TX_BROADCASTING_INTERVAL=]
[default: 1000]
--target.peers <MAX_PEERS>
Max amount of connected peers.
[env: ETHREX_P2P_TARGET_PEERS=]
[default: 100]
RPC options:
--http.addr <ADDRESS>
Listening address for the HTTP JSON-RPC server. Defaults to 127.0.0.1 so the endpoint is only reachable from localhost; pass 0.0.0.0 to bind on all interfaces (only recommended when the node sits behind a trusted firewall or reverse proxy).
[env: ETHREX_HTTP_ADDR=]
[default: 127.0.0.1]
--http.port <PORT>
Listening port for the http rpc server.
[env: ETHREX_HTTP_PORT=]
[default: 8545]
--http.api <NAMESPACES>
Comma-separated list of JSON-RPC namespaces exposed on the public HTTP and WebSocket endpoints. Defaults to `eth,net,web3`. Enable `admin`, `debug` or `txpool` only when needed; the `engine` namespace is served on the authenticated RPC port and cannot be toggled here.
[env: ETHREX_HTTP_API=]
[default: eth,net,web3]
--ws.enabled
Enable websocket rpc server. Disabled by default.
[env: ETHREX_ENABLE_WS=]
--ws.addr <ADDRESS>
Listening address for the websocket rpc server.
[env: ETHREX_WS_ADDR=]
[default: 0.0.0.0]
--ws.port <PORT>
Listening port for the websocket rpc server.
[env: ETHREX_WS_PORT=]
[default: 8546]
--authrpc.addr <ADDRESS>
Listening address for the authenticated rpc server.
[env: ETHREX_AUTHRPC_ADDR=]
[default: 127.0.0.1]
--authrpc.port <PORT>
Listening port for the authenticated rpc server.
[env: ETHREX_AUTHRPC_PORT=]
[default: 8551]
--authrpc.jwtsecret <JWTSECRET_PATH>
Receives the jwt secret used for authenticated rpc requests.
[env: ETHREX_AUTHRPC_JWTSECRET_PATH=]
[default: jwt.hex]
Block building options:
--builder.extra-data <EXTRA_DATA>
Block extra data message.
[env: ETHREX_BUILDER_EXTRA_DATA=]
[default: "ethrex 18.0.0"]
--builder.gas-limit <GAS_LIMIT>
Target block gas limit.
[env: ETHREX_BUILDER_GAS_LIMIT=]
[default: 60000000]
Eth options:
--eth.rpc-url <RPC_URL>...
List of rpc urls to use.
[env: ETHREX_ETH_RPC_URL=]
--eth.maximum-allowed-max-fee-per-gas <UINT64>
[env: ETHREX_MAXIMUM_ALLOWED_MAX_FEE_PER_GAS=]
[default: 10000000000]
--eth.maximum-allowed-max-fee-per-blob-gas <UINT64>
[env: ETHREX_MAXIMUM_ALLOWED_MAX_FEE_PER_BLOB_GAS=]
[default: 10000000000]
--eth.max-number-of-retries <UINT64>
[env: ETHREX_MAX_NUMBER_OF_RETRIES=]
[default: 10]
--eth.backoff-factor <UINT64>
[env: ETHREX_BACKOFF_FACTOR=]
[default: 2]
--eth.min-retry-delay <UINT64>
[env: ETHREX_MIN_RETRY_DELAY=]
[default: 96]
--eth.max-retry-delay <UINT64>
[env: ETHREX_MAX_RETRY_DELAY=]
[default: 1800]
L1 Watcher options:
--l1.bridge-address <ADDRESS>
[env: ETHREX_WATCHER_BRIDGE_ADDRESS=]
--watcher.watch-interval <UINT64>
How often the L1 watcher checks for new blocks in milliseconds.
[env: ETHREX_WATCHER_WATCH_INTERVAL=]
[default: 12000]
--watcher.max-block-step <UINT64>
[env: ETHREX_WATCHER_MAX_BLOCK_STEP=]
[default: 5000]
--watcher.block-delay <UINT64>
Number of blocks the L1 watcher waits before trusting an L1 block.
[env: ETHREX_WATCHER_BLOCK_DELAY=]
[default: 10]
Block producer options:
--watcher.l1-fee-update-interval-ms <ADDRESS>
[env: ETHREX_WATCHER_L1_FEE_UPDATE_INTERVAL_MS=]
[default: 60000]
--block-producer.block-time <UINT64>
How often does the sequencer produce new blocks to the L1 in milliseconds.
[env: ETHREX_BLOCK_PRODUCER_BLOCK_TIME=]
[default: 5000]
--block-producer.coinbase-address <ADDRESS>
[env: ETHREX_BLOCK_PRODUCER_COINBASE_ADDRESS=]
--block-producer.base-fee-vault-address <ADDRESS>
[env: ETHREX_BLOCK_PRODUCER_BASE_FEE_VAULT_ADDRESS=]
--block-producer.operator-fee-vault-address <ADDRESS>
[env: ETHREX_BLOCK_PRODUCER_OPERATOR_FEE_VAULT_ADDRESS=]
--block-producer.operator-fee-per-gas <UINT64>
Fee that the operator will receive for each unit of gas consumed in a block.
[env: ETHREX_BLOCK_PRODUCER_OPERATOR_FEE_PER_GAS=]
--block-producer.l1-fee-vault-address <ADDRESS>
[env: ETHREX_BLOCK_PRODUCER_L1_FEE_VAULT_ADDRESS=]
Proposer options:
--elasticity-multiplier <UINT64>
[env: ETHREX_PROPOSER_ELASTICITY_MULTIPLIER=]
[default: 2]
L1 Committer options:
--committer.l1-private-key <PRIVATE_KEY>
Private key of a funded account that the sequencer will use to send commit txs to the L1.
[env: ETHREX_COMMITTER_L1_PRIVATE_KEY=]
--committer.remote-signer-url <URL>
URL of a Web3Signer-compatible server to remote sign instead of a local private key.
[env: ETHREX_COMMITTER_REMOTE_SIGNER_URL=]
--committer.remote-signer-public-key <PUBLIC_KEY>
Public key to request the remote signature from.
[env: ETHREX_COMMITTER_REMOTE_SIGNER_PUBLIC_KEY=]
--l1.on-chain-proposer-address <ADDRESS>
[env: ETHREX_COMMITTER_ON_CHAIN_PROPOSER_ADDRESS=]
--committer.commit-time <UINT64>
How often does the sequencer commit new blocks to the L1 in milliseconds.
[env: ETHREX_COMMITTER_COMMIT_TIME=]
[default: 60000]
--committer.batch-gas-limit <UINT64>
Maximum gas limit for the batch
[env: ETHREX_COMMITTER_BATCH_GAS_LIMIT=]
--committer.first-wake-up-time <UINT64>
Time to wait before the sequencer seals a batch when started. After committing the first batch, `committer.commit-time` will be used.
[env: ETHREX_COMMITTER_FIRST_WAKE_UP_TIME=]
--committer.arbitrary-base-blob-gas-price <UINT64>
[env: ETHREX_COMMITTER_ARBITRARY_BASE_BLOB_GAS_PRICE=]
[default: 1000000000]
Proof coordinator options:
--proof-coordinator.l1-private-key <PRIVATE_KEY>
Private key of a funded account that the sequencer will use to send verify txs to the L1. Has to be a different account than --committer-l1-private-key.
[env: ETHREX_PROOF_COORDINATOR_L1_PRIVATE_KEY=]
--proof-coordinator.tdx-private-key <PRIVATE_KEY>
Private key of a funded account that the TDX tool will use to send the tdx attestation to L1.
[env: ETHREX_PROOF_COORDINATOR_TDX_PRIVATE_KEY=]
--proof-coordinator.qpl-tool-path <QPL_TOOL_PATH>
Path to the QPL tool that will be used to generate TDX quotes.
[env: ETHREX_PROOF_COORDINATOR_QPL_TOOL_PATH=]
[default: ./tee/contracts/automata-dcap-qpl/automata-dcap-qpl-tool/target/release/automata-dcap-qpl-tool]
--proof-coordinator.remote-signer-url <URL>
URL of a Web3Signer-compatible server to remote sign instead of a local private key.
[env: ETHREX_PROOF_COORDINATOR_REMOTE_SIGNER_URL=]
--proof-coordinator.remote-signer-public-key <PUBLIC_KEY>
Public key to request the remote signature from.
[env: ETHREX_PROOF_COORDINATOR_REMOTE_SIGNER_PUBLIC_KEY=]
--proof-coordinator.addr <IP_ADDRESS>
Set it to 0.0.0.0 to allow connections from other machines.
[env: ETHREX_PROOF_COORDINATOR_LISTEN_ADDRESS=]
[default: 127.0.0.1]
--proof-coordinator.port <UINT16>
[env: ETHREX_PROOF_COORDINATOR_LISTEN_PORT=]
[default: 3900]
--proof-coordinator.send-interval <UINT64>
How often does the proof coordinator send proofs to the L1 in milliseconds.
[env: ETHREX_PROOF_COORDINATOR_SEND_INTERVAL=]
[default: 5000]
Based options:
--state-updater.sequencer-registry <ADDRESS>
[env: ETHREX_STATE_UPDATER_SEQUENCER_REGISTRY=]
--state-updater.check-interval <UINT64>
[env: ETHREX_STATE_UPDATER_CHECK_INTERVAL=]
[default: 1000]
--block-fetcher.fetch_interval_ms <UINT64>
[env: ETHREX_BLOCK_FETCHER_FETCH_INTERVAL_MS=]
[default: 5000]
--fetch-block-step <UINT64>
[env: ETHREX_BLOCK_FETCHER_FETCH_BLOCK_STEP=]
[default: 5000]
--based
[env: ETHREX_BASED=]
Aligned options:
--aligned
[env: ETHREX_ALIGNED_MODE=]
--aligned-verifier-interval-ms <ETHREX_ALIGNED_VERIFIER_INTERVAL_MS>
[env: ETHREX_ALIGNED_VERIFIER_INTERVAL_MS=]
[default: 5000]
--aligned.beacon-url <BEACON_URL>...
List of beacon urls to use.
[env: ETHREX_ALIGNED_BEACON_URL=]
--aligned-network <ETHREX_ALIGNED_NETWORK>
L1 network name for Aligned sdk
[env: ETHREX_ALIGNED_NETWORK=]
[default: devnet]
--aligned.from-block <BLOCK_NUMBER>
Starting L1 block number for proof aggregation search. Helps avoid scanning blocks from before proofs were being sent.
[env: ETHREX_ALIGNED_FROM_BLOCK=]
--aligned.resubmission-timeout <SECONDS>
Timeout in seconds before resending a proof not yet verified on-chain. Required when --aligned is enabled. Aligned typically aggregates once per day, so this value should be set accordingly (e.g. 86400 for 24h).
[env: ETHREX_ALIGNED_RESUBMISSION_TIMEOUT_SECS=]
--aligned.fee-estimate <FEE_ESTIMATE>
Fee estimate for Aligned sdk
[env: ETHREX_ALIGNED_FEE_ESTIMATE=]
[default: instant]
Admin server options:
--admin-server.addr <IP_ADDRESS>
[env: ETHREX_ADMIN_SERVER_LISTEN_ADDRESS=]
[default: 127.0.0.1]
--admin-server.port <UINT16>
[env: ETHREX_ADMIN_SERVER_LISTEN_PORT=]
[default: 5555]
L2 options:
--validium
If true, L2 will run on validium mode as opposed to the default rollup mode, meaning it will not publish blobs to the L1.
[env: ETHREX_L2_VALIDIUM=]
--sponsorable-addresses <SPONSORABLE_ADDRESSES_PATH>
Path to a file containing addresses of contracts to which ethrex_SendTransaction should sponsor txs
[env: ETHREX_SPONSORABLE_ADDRESSES_PATH=]
--sponsor-private-key <SPONSOR_PRIVATE_KEY>
The private key of ethrex L2 transactions sponsor.
[env: SPONSOR_PRIVATE_KEY=]
[default: 0xffd790338a2798b648806fc8635ac7bf14af15425fed0c8f25bcc5febaa9b192]
--sponsored-gas-limit <GAS_LIMIT>
Maximum gas limit for sponsored transactions. Transactions that estimate more gas than this will be rejected.
[env: ETHREX_SPONSORED_GAS_LIMIT=]
[default: 500000]
--http.api.ethrex <BOOLEAN>
Expose L2-specific ethrex_* RPC methods over HTTP/WS. Enabled by default for L2 nodes.
[env: ETHREX_HTTP_API_ETHREX=]
[default: true]
Monitor options:
--no-monitor
[env: ETHREX_NO_MONITOR=]
ethrex l2 prover
Initialize an ethrex prover
Usage: ethrex l2 prover [OPTIONS] --proof-coordinators <URL>...
Options:
-h, --help
Print help (see a summary with '-h')
Prover client options:
--backend <BACKEND>
[env: PROVER_CLIENT_BACKEND=]
[default: exec]
[possible values: exec, sp1, risc0]
--proof-coordinators <URL>...
URLs of all the sequencers' proof coordinator
[env: PROVER_CLIENT_PROOF_COORDINATOR_URL=]
--proving-time <PROVING_TIME>
Time to wait before requesting new data to prove
[env: PROVER_CLIENT_PROVING_TIME=]
[default: 5000]
--log.level <LOG_LEVEL>
Possible values: info, debug, trace, warn, error
[env: PROVER_CLIENT_LOG_LEVEL=]
[default: INFO]
--sp1-server <URL>
Url to the moongate server to use when using sp1 backend
[env: ETHREX_SP1_SERVER=]
How to Release an ethrex version
Releases are prepared from dedicated release branches and tagged using versioning.
1st - Create release branch
Branch name must follow the format release/vX.Y.Z.
Examples:
release/v1.2.0release/v3.0.0release/v3.2.0
2nd - Bump version
The version must be updated to X.Y.Z in the release branch. There are multiple Cargo.toml and Cargo.lock files that need to be updated.
First, we need to update the version of the workspace package. You can find it in the Cargo.toml file in the root directory, under the [workspace.package] section. This is also the version the library crates are published under on crates.io when the release is finalized, so it must be a clean semver version (the -rc.W suffix lives only on the git tag).
Then, we need to update five more Cargo.toml files that are not part of the workspace but fulfill the role of packages in the monorepo. These are located in the following paths:
crates/guest-program/bin/sp1/Cargo.tomlcrates/guest-program/bin/risc0/Cargo.tomlcrates/guest-program/bin/zisk/Cargo.tomlcrates/guest-program/bin/openvm/Cargo.tomlcrates/l2/tee/quote-gen/Cargo.toml
After updating the version in the Cargo.toml files, we need to update the Cargo.lock files to reflect the new versions. Run make update-cargo-lock from the root directory to update all the Cargo.lock files in the repository. You should see changes in at most the following paths:
- In the root directory
crates/guest-program/bin/sp1/Cargo.lockcrates/guest-program/bin/risc0/Cargo.lockcrates/guest-program/bin/zisk/Cargo.lockcrates/guest-program/bin/openvm/Cargo.lockcrates/l2/tee/quote-gen/Cargo.lockcrates/vm/levm/bench/revm_comparison/Cargo.locktooling/Cargo.lock
Then, go to the CLI.md file located in docs/ and update the version of the --builder.extra-data flag default value to match the new version (for both ethrex and ethrex l2 sections).
Finally, stage and commit the changes to the release branch.
An example of a PR that bumps the version can be found here.
3rd - Create & Push Tag
Create a tag with a format vX.Y.Z-rc.W where X.Y.Z is the semantic version and W is a release candidate version. Other names for subversions are also accepted. Example of valid tags:
v0.1.3-rc.1v0.0.2-alpha
git tag <release_version>
git push origin <release_version>
After pushing the tag, a CI job will compile the binaries for different architectures and create a pre-release with the version specified in the tag name. Along with the binaries, a tar file is uploaded with the contracts and the verification keys. The following binaries are built:
| name | L1 | L2 stack | Provers | CUDA support |
|---|---|---|---|---|
| ethrex-linux-x86-64 | ✅ | ❌ | - | - |
| ethrex-linux-aarch64 | ✅ | ❌ | - | - |
| ethrex-linux-macos-aarch64 | ✅ | ❌ | - | - |
| ethrex-l2-linux-x86-64 | ✅ | ✅ | SP1 - RISC0 - Exec | ❌ |
| ethrex-l2-linux-x86-64-gpu | ✅ | ✅ | SP1 - RISC0 - Exec | ✅ |
| ethrex-l2-linux-aarch64 | ✅ | ✅ | SP1 - Exec | ❌ |
| ethrex-l2-linux-aarch64-gpu | ✅ | ✅ | SP1 - Exec | ✅ |
| ethrex-l2-macos-aarch64 | ✅ | ✅ | Exec | ❌ |
Also, two docker images are built and pushed to the Github Container registry:
ghcr.io/lambdaclass/ethrex:X.Y.Z-rc.Wghcr.io/lambdaclass/ethrex:X.Y.Z-rc.W-l2
A changelog will be generated based on commit names (using conventional commits) from the last stable tag.
4th - Test & Publish Release
Testing checklist
Before publishing the release, run through the following checks using the pre-release binaries:
- Upgrade
ethrex-ethdocker-mainnet - Upgrade
ethrex-mainnet-1 - Upgrade
ethrex-minimum-mainnet - Launch multisync on
ethrex-multisync-main - Upgrade a local L2 created with the previous version and run the integration tests
- Run the L2 integration tests with a SP1 prover on the GPU server (
l2-gpu)
Publish
Once the pre-release is created and you want to publish the release, go to the release page and follow the next steps:
-
Click on the edit button of the last pre-release created
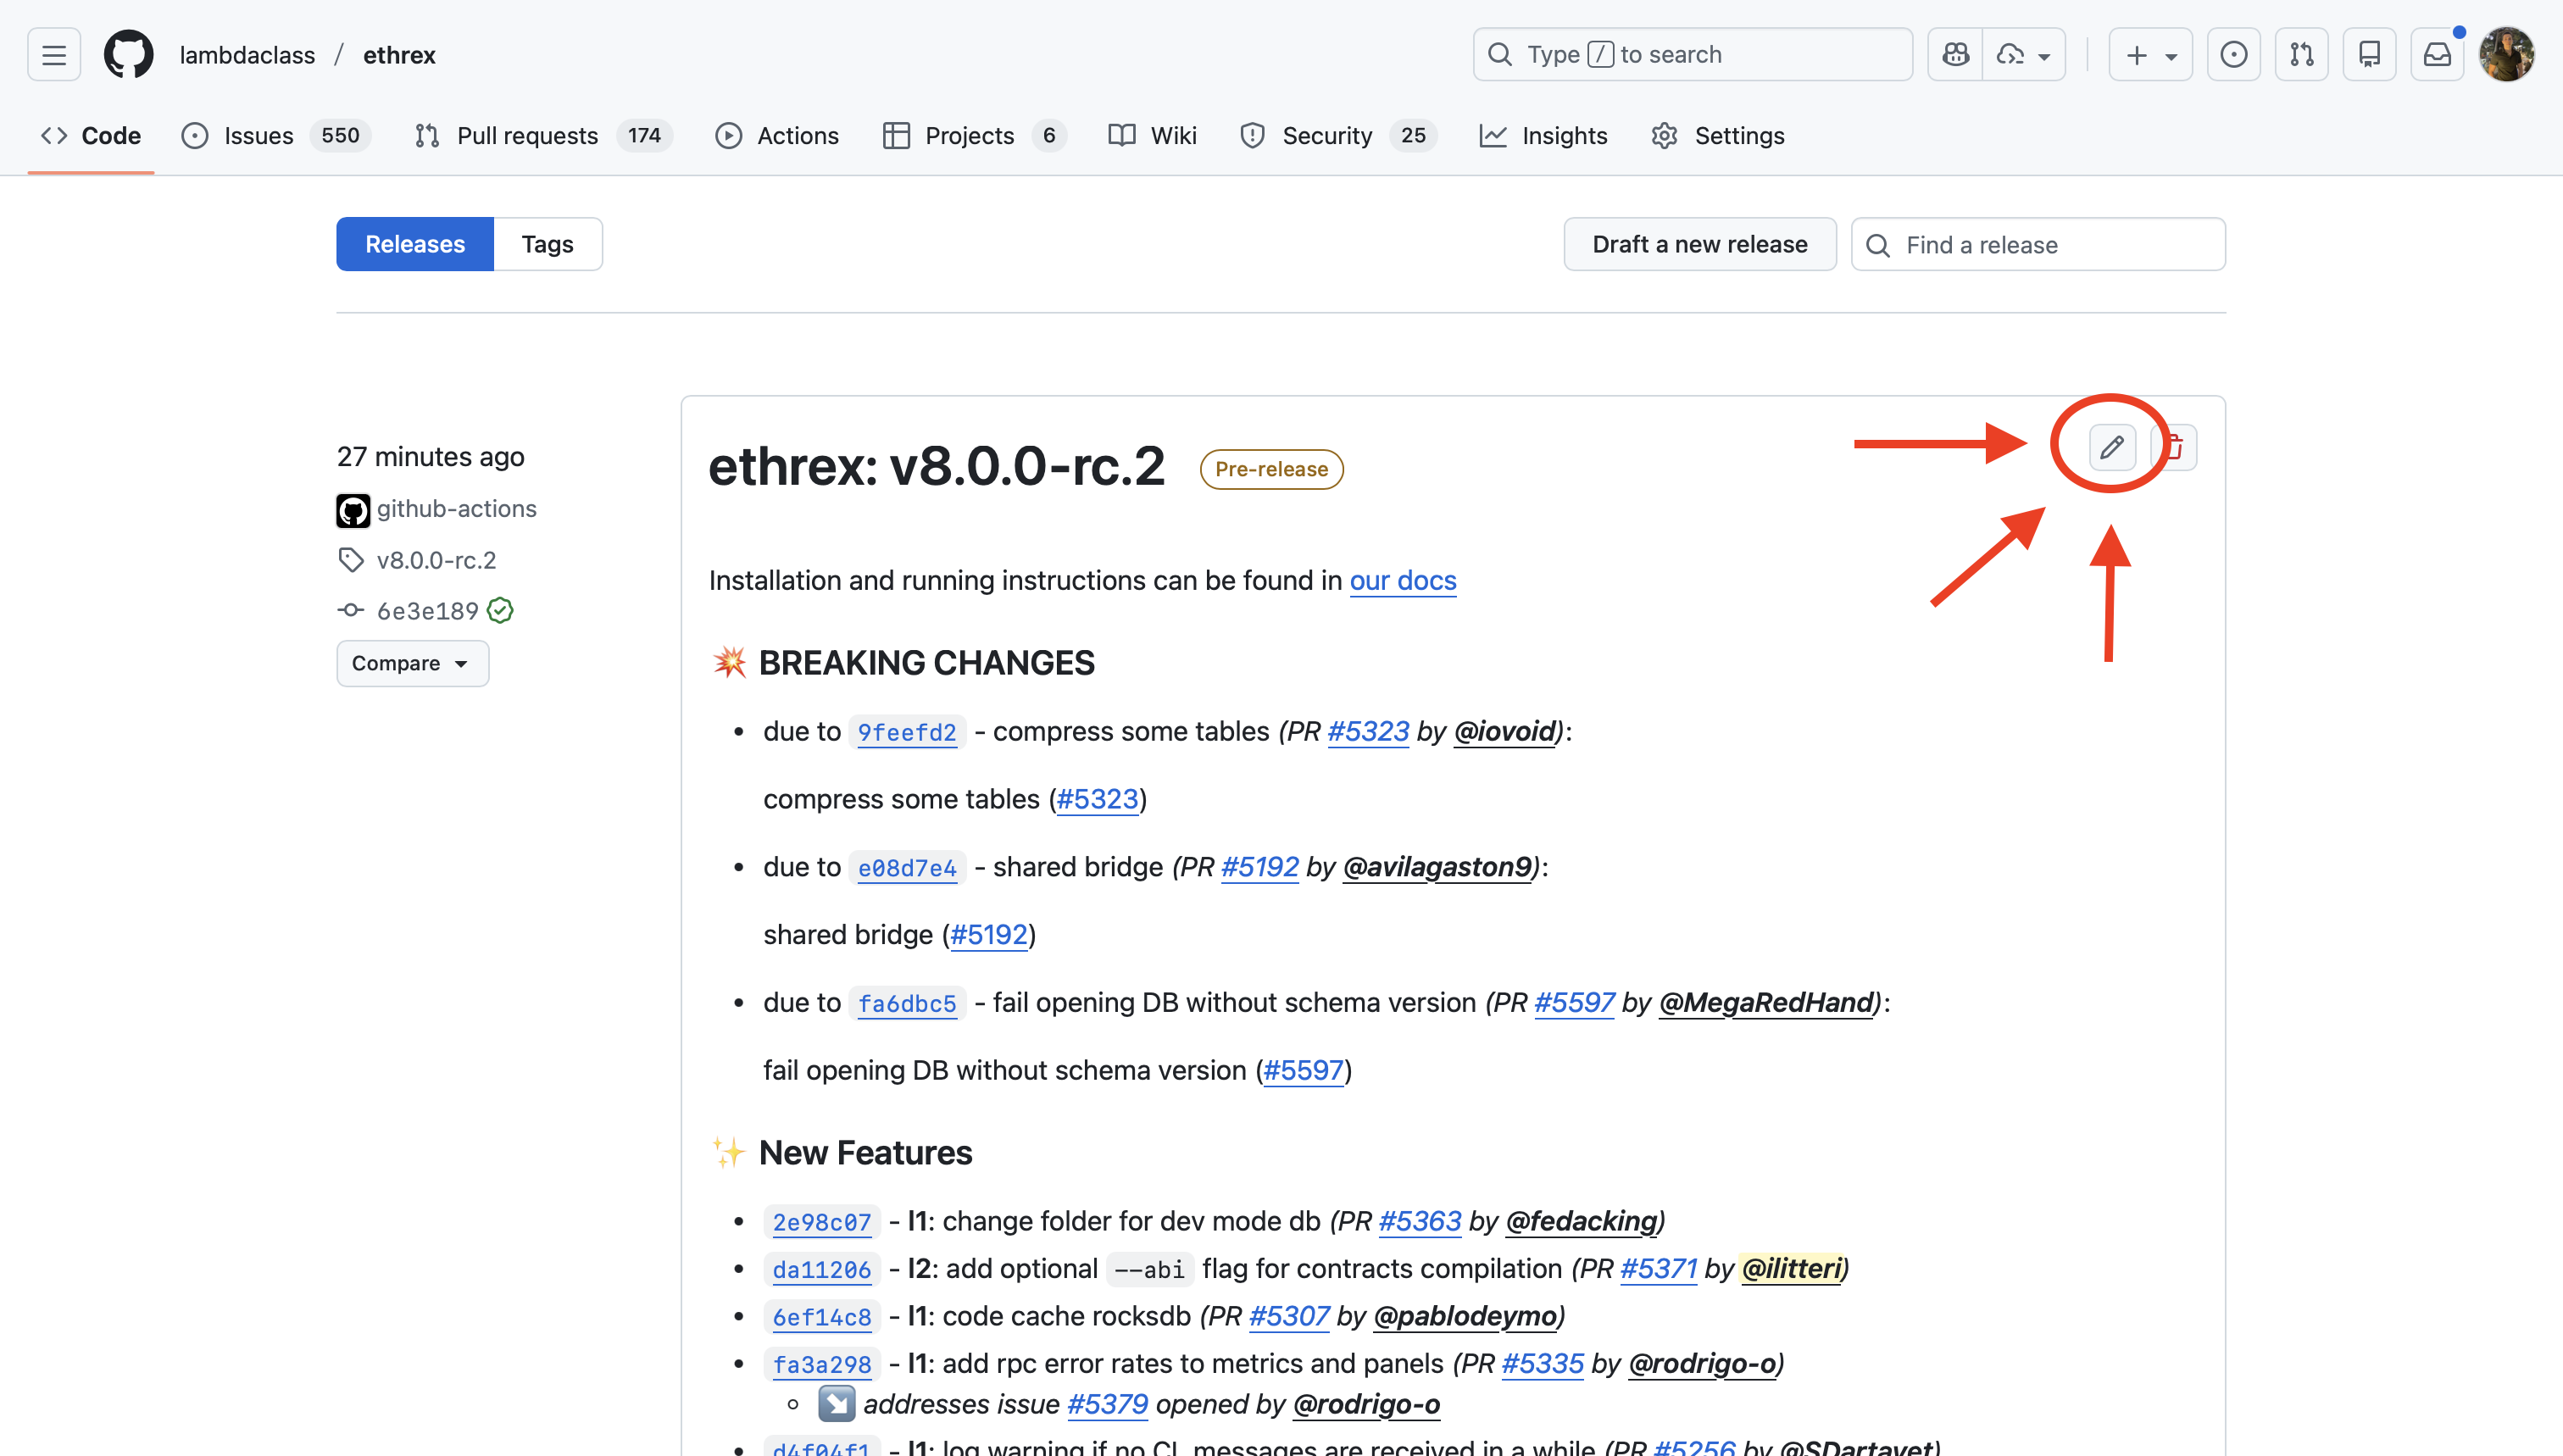
-
Manually create the tag
vX.Y.Z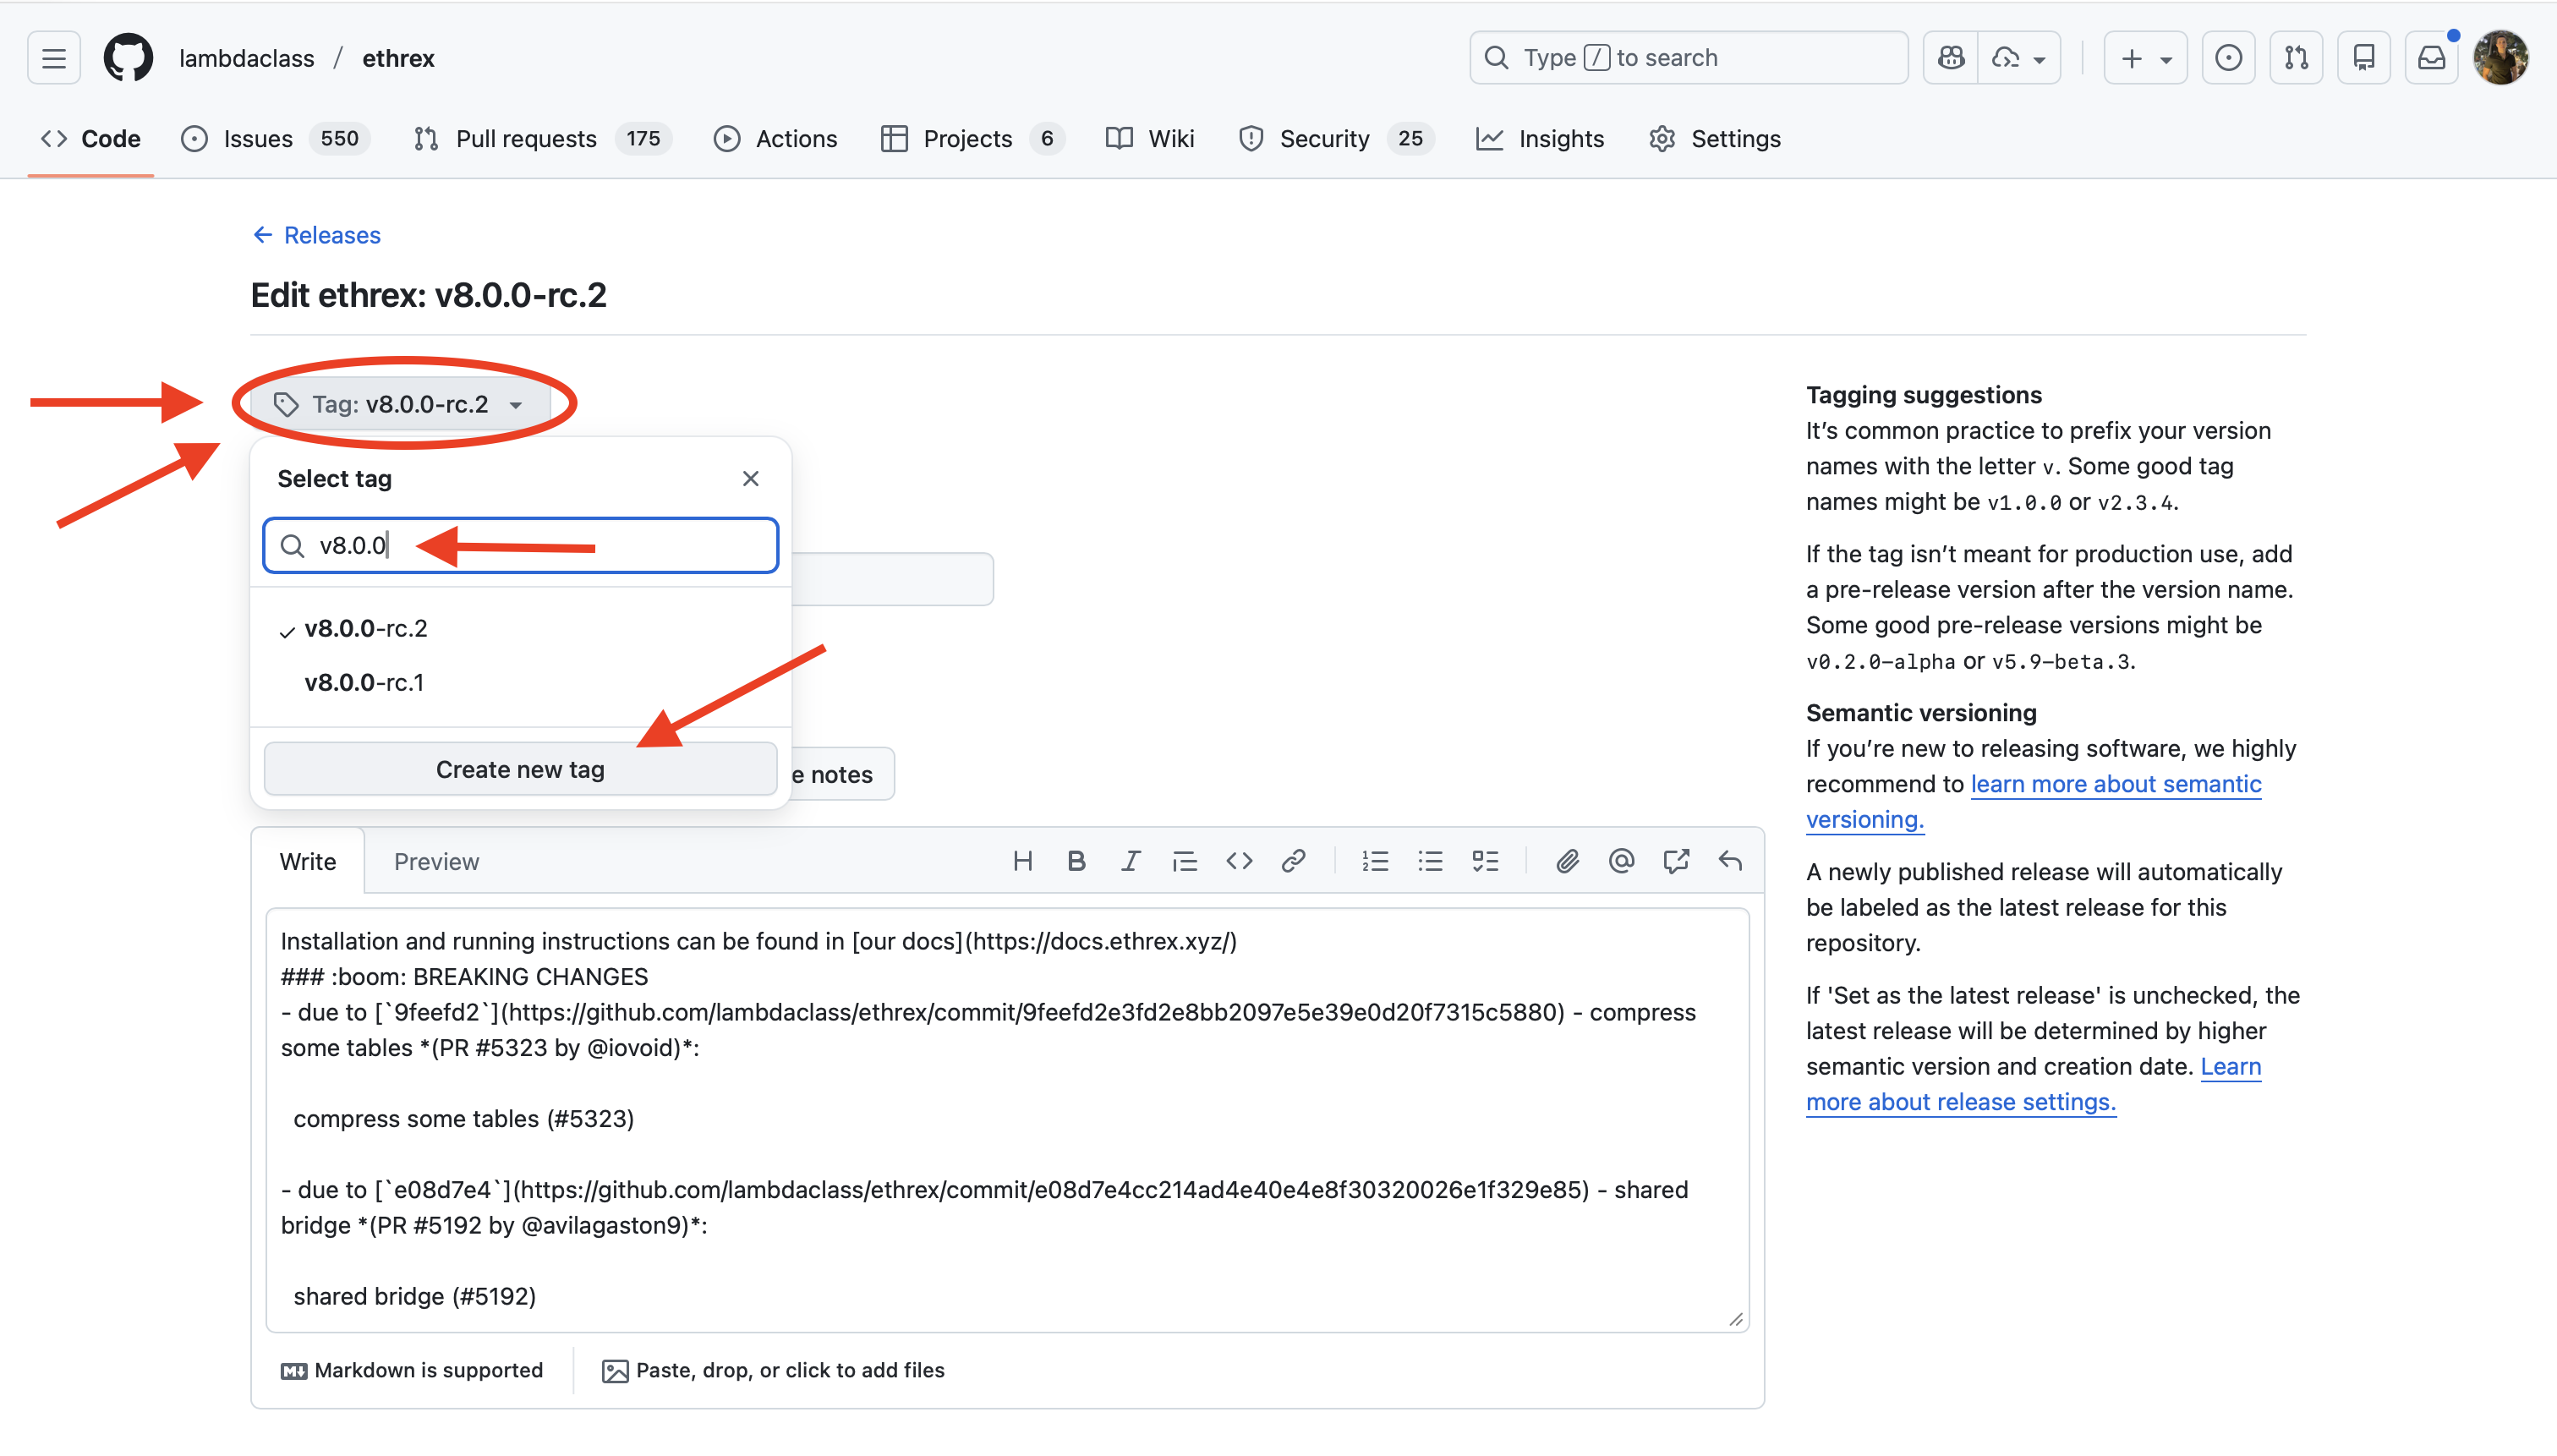
-
Update the release title
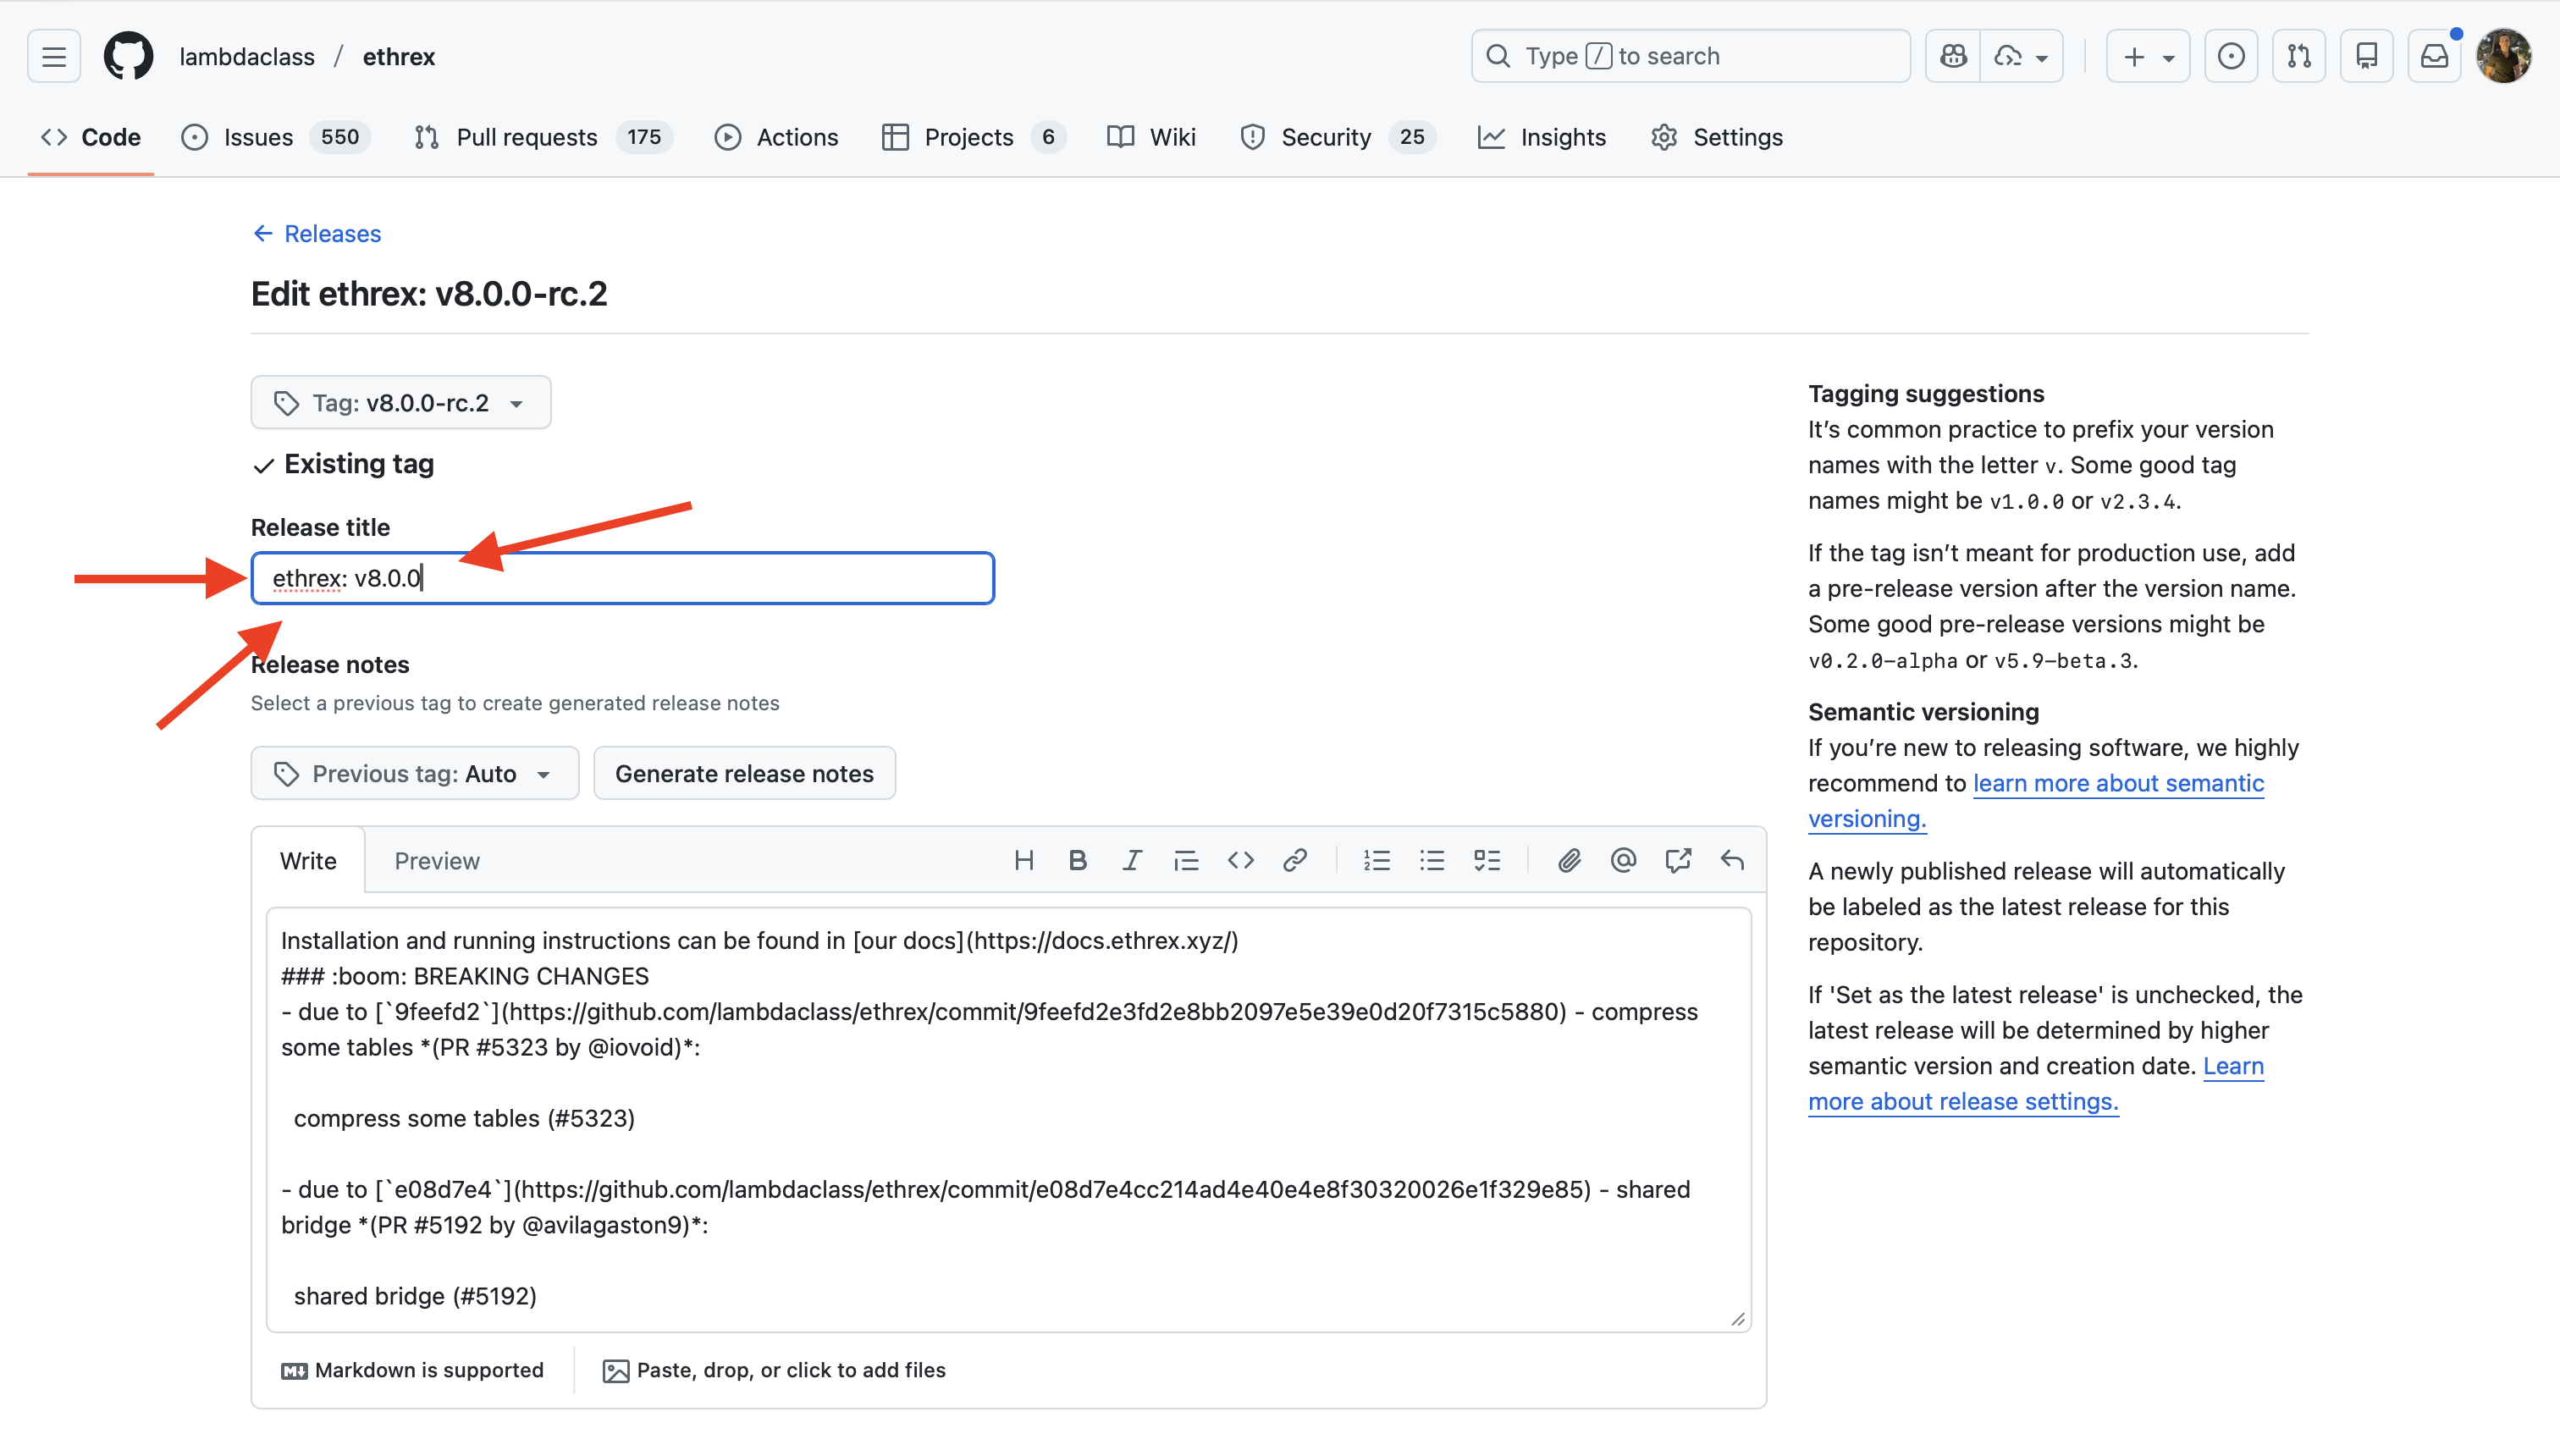
-
Customize the release notes.
The auto-generated changelog lists every commit, but it doesn’t tell operators what actually matters in this release. Above the auto-generated changelog, add a hand-written summary using GitHub alerts. Pick boxes by what the operator needs to decide, in this order:
> [!IMPORTANT]— only when the release carries critical security or correctness fixes. One line stating that upgrading is strongly recommended for all operators.> [!WARNING]— only when the upgrade can’t be cleanly undone or carries a breaking change the operator must account for: a database schema migration you can’t roll back from, a required resync, removed or renamed CLI flags / config options, changed defaults, breaking RPC/API changes, or new minimum requirements (disk, dependency, consensus-client version). State what changes and what the operator must do.> [!NOTE]— always. A What’s new list of the highlights (new features, important fixes), plus a line saying whether a resync is needed (if not already covered above).
Keep the space after
>(> [!NOTE], not>[!NOTE]) and leave a blank line between boxes so each renders separately. Drop the[!IMPORTANT]/[!WARNING]boxes when they don’t apply — a routine release needs only the[!NOTE].> [!IMPORTANT] > This release contains critical fixes. Upgrading is strongly recommended for all operators. > [!WARNING] > This release changes the database schema; once you upgrade you can't roll back to a previous version. The migration runs automatically. > [!NOTE] > **What's new** > - <highlight> > - <highlight> > > No resync is needed. -
Set the release as the latest release (you will need to uncheck the pre-release first). And finally, click on
Update release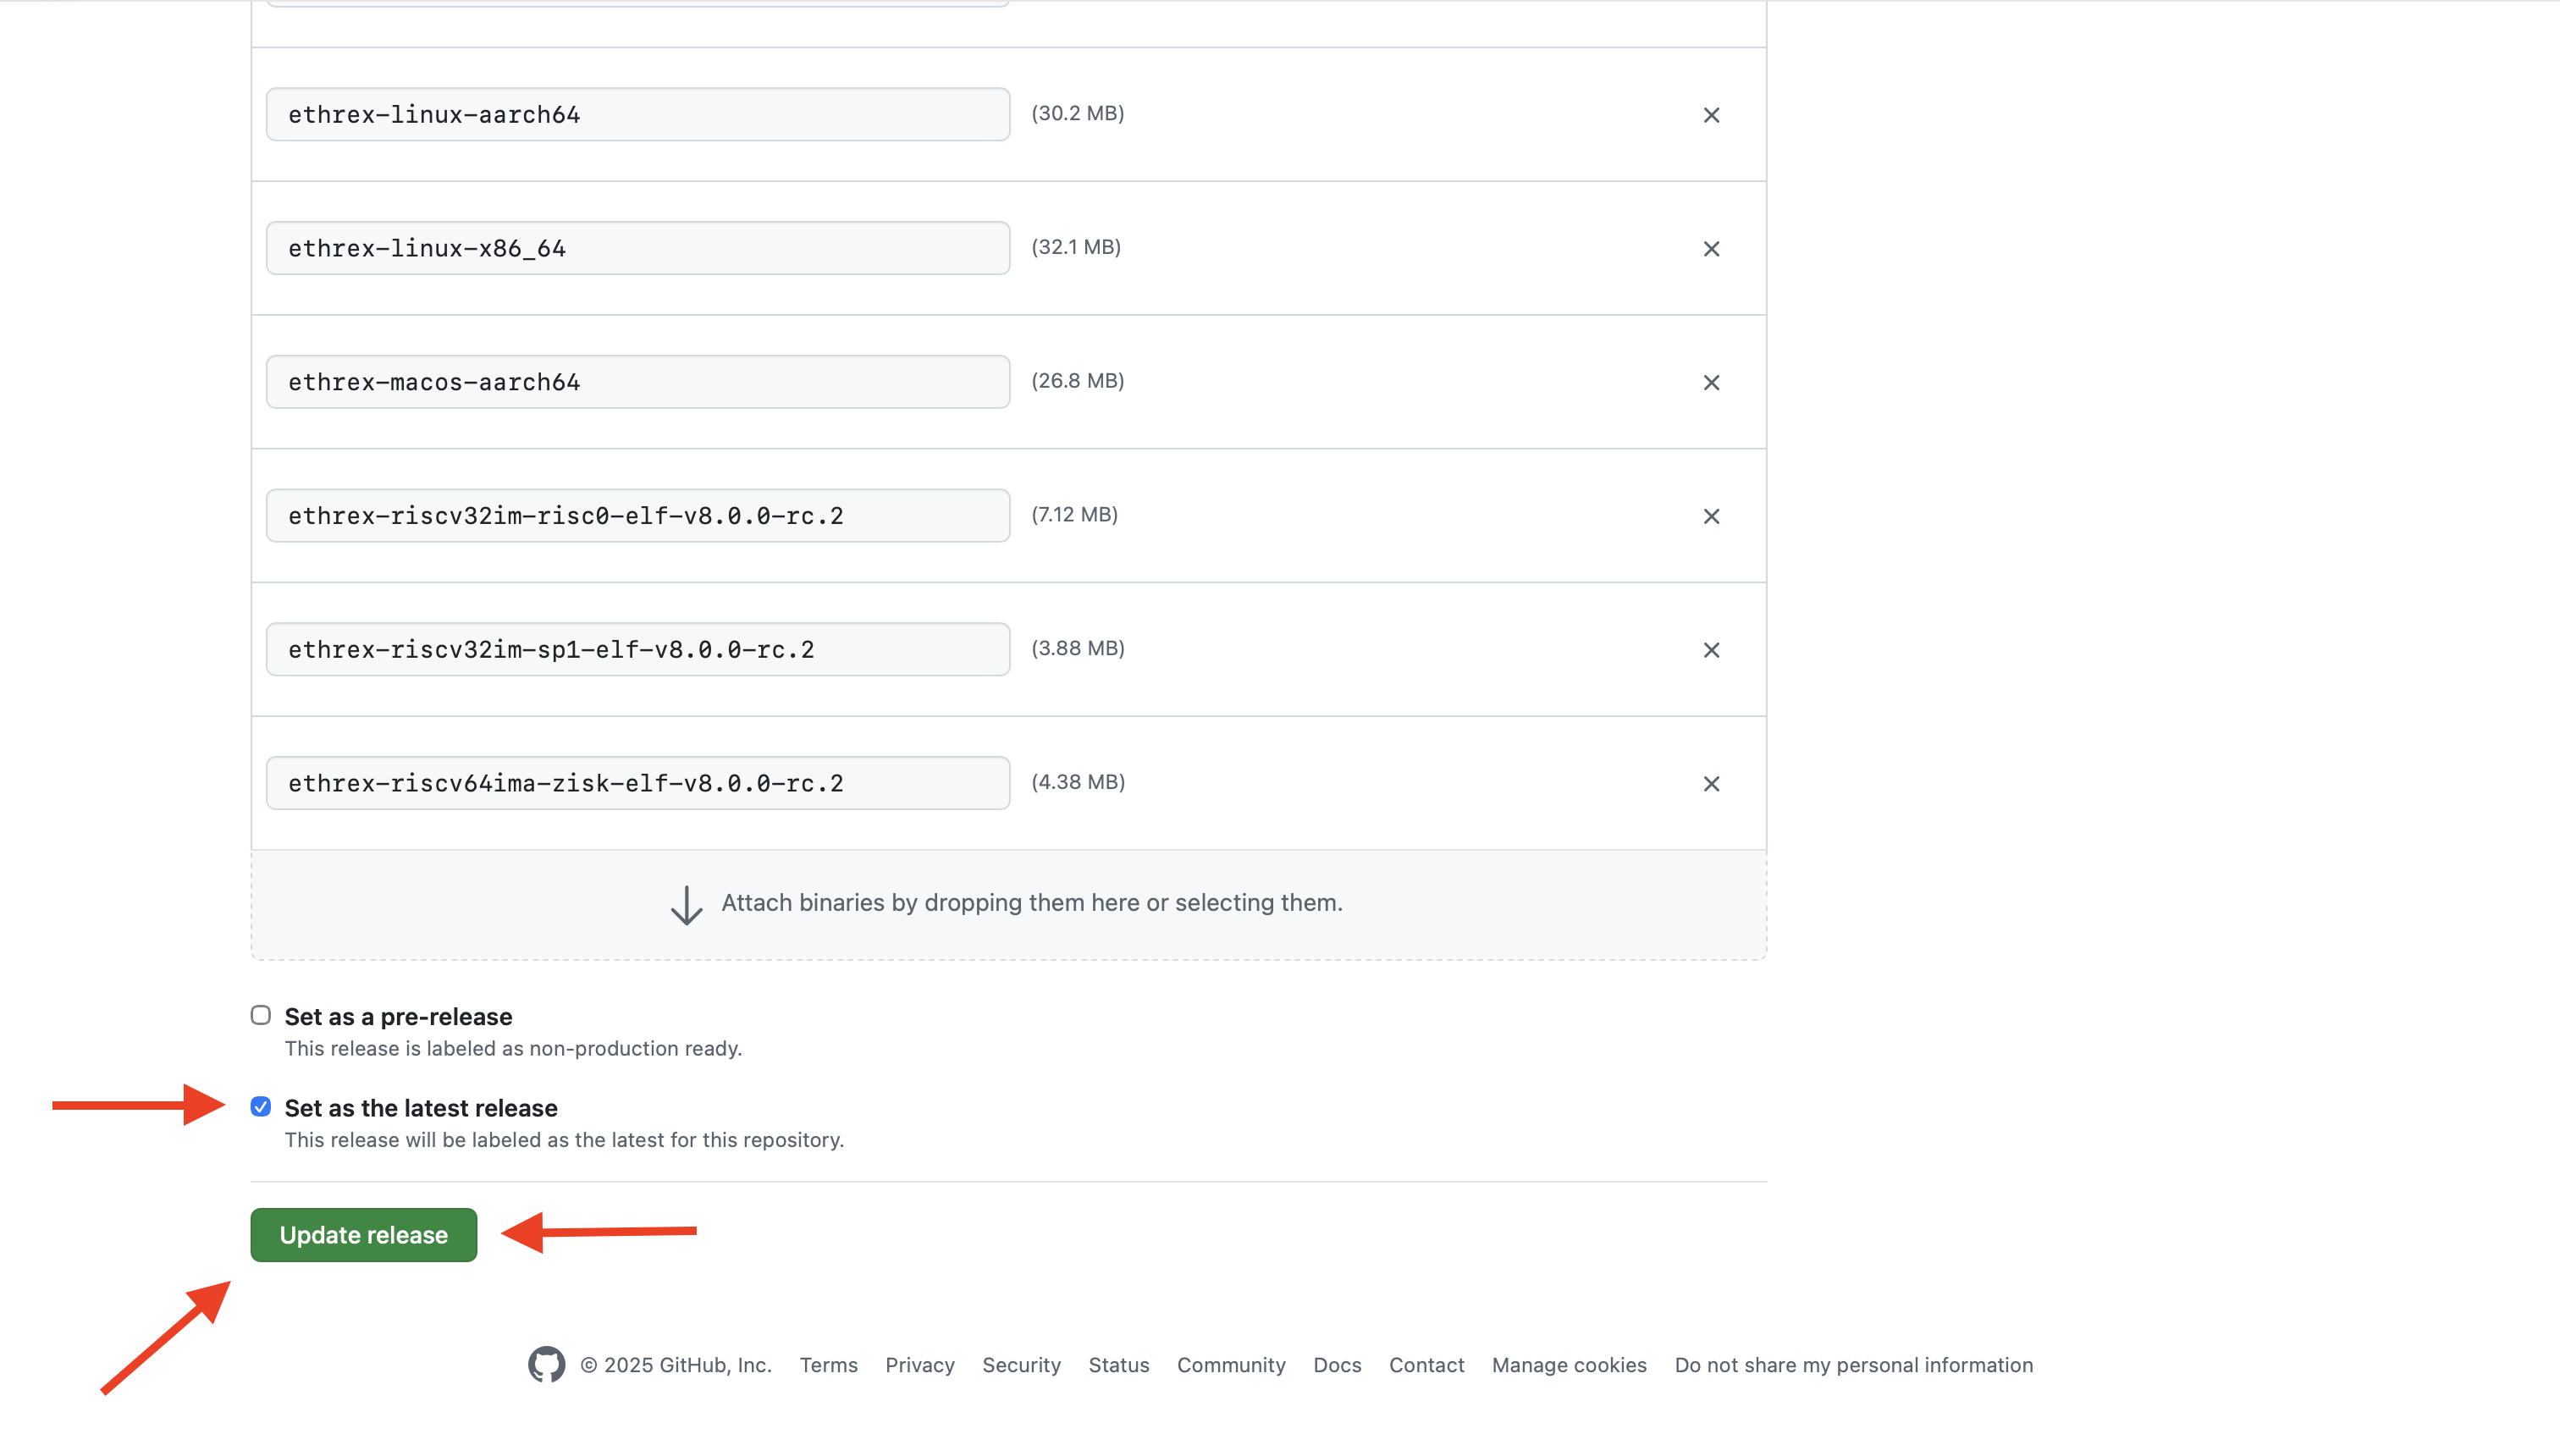
Important
Do the tag rename (
vX.Y.Z-rc.W→vX.Y.Z) and unchecking pre-release in a singleUpdate releaseedit. The automatic promotion fires on that one edit because it both renames the tag and clears the pre-release flag; splitting it across two saves means neither edit carries both signals and thelatesttag is not moved. If that happens, use the manual recovery in Troubleshooting.
Once done, the Ethrex Latest Release workflow (triggered by that edit) will publish new tags for the already compiled docker images:
ghcr.io/lambdaclass/ethrex:X.Y.Z,ghcr.io/lambdaclass/ethrex:latestghcr.io/lambdaclass/ethrex:X.Y.Z-l2,ghcr.io/lambdaclass/ethrex:l2
Promoting the pre-release to a full release also publishes ethrex’s library crates to crates.io — see the next section.
Publishing to crates.io
Promoting the pre-release to a full release (the released event from the step above) triggers the publish.yml workflow, which runs cargo publish for ethrex’s publishable library crates in dependency order, at the workspace version X.Y.Z.
Note
Only the final release publishes to crates.io. Pre-release (
vX.Y.Z-rc.W) tags do not: thereleasedevent does not fire for pre-releases, and crates.io versions are immutable, so a release candidate must never claim the version before it has been tested.
The crates are published at the [workspace.package].version bumped in step 2; the -rc.W suffix lives only on the git tag and never reaches crates.io.
This requires a one-time organizational setup before the first release that publishes:
- A
CRATES_IO_TOKENrepository secret with publish rights for the crates. - A
crates-release-prodGitHub environment (the workflow runs inside it). - crates.io ownership of the crate names (the first publish under the token claims them).
The workflow is idempotent: a crate version already on crates.io is skipped, so re-running after a partial failure is safe. To validate without publishing, run it manually from the Actions tab (the workflow_dispatch trigger) with the dry-run input checked — it lists each crate’s package contents instead of publishing.
5th - Update Homebrew
Disclaimer: We should automate this
- Commit a change in https://github.com/lambdaclass/homebrew-tap/ bumping the ethrex version (like this one).
-
The first SHA is the hash of the
.tar.gzfrom the release. You can get it by downloading theSource code (tar.gz)from the ethrex release and runningshasum -a 256 ethrex-v3.0.0.tar.gz -
For the second one:
-
First download the
ethrex-l2-macos-aarch64binary from the ethrex release -
Give exec permissions to binary
chmod +x ethrex-l2-macos-aarch64 -
Create a dir
ethrex/3.0.0/bin(replace the version as needed) -
Move (and rename) the binary to
ethrex/3.0.0/bin/ethrex(the lastethrexis the binary) -
Remove quarantine flags (in this case,
ethrexis the root dir mentioned before):xattr -dr com.apple.metadata:kMDItemWhereFroms ethrex xattr -dr com.apple.quarantine ethrex -
Tar the dir with the following name (again,
ethrexis the root dir):tar -czf ethrex-3.0.0.arm64_sonoma.bottle.tar.gz ethrex -
Get the checksum:
shasum -a 256 ethrex-3.0.0.arm64_sonoma.bottle.tar.gz -
Use this as the second hash (the one in the
bottlesection)
-
-
- Push the commit
- Create a new release with tag
v3.0.0. IMPORTANT: attach theethrex-3.0.0.arm64_sonoma.bottle.tar.gzto the release
6th - Merge the release branch via PR
Once the release is verified, merge the branch via PR.
Dealing with hotfixes
If hotfixes are needed before the final release, commit them to release/vX.Y.Z, push, and create a new pre-release tag. The final tag vX.Y.Z should always point to the exact commit you will merge via PR.
Troubleshooting
Failure on “latest release” workflow
If the latest / l2 Docker tags don’t get updated after step 5 (the Ethrex Latest Release run skipped the retag, or its assert-latest-promoted job failed), recover with the workflow’s manual path — no local Docker or PAT needed:
- Go to Actions → Ethrex Latest Release → Run workflow.
- Set
rc_tagto the tested release candidate (e.g.v18.0.0-rc.1) andversionto the final version (e.g.v18.0.0). - Run it. The run retags
latest/l2/performance/X.Y.Zfrom the RC image, publishes the apt package, and theverify-latestjob confirms:latestresolves to:X.Y.Z(the run goes red if it doesn’t).
If the registry itself is unreachable through Actions and you must promote by hand, do it server-side so the multi-arch image index is preserved. (A docker pull --platform linux/amd64 … && docker tag && docker push collapses :latest to a single architecture, silently dropping arm64.)
- Create a new Github Personal Access Token (PAT) from the settings.
- Check
write:packagespermission (this will auto-checkrepopermissions too), give a name and a short expiration time. - Save the token securely.
- Click on
Configure SSObutton and authorize LambdaClass organization. - Log in to Github Container Registry:
docker login ghcr.io. Put your Github’s username and use the token as your password. - Retag the RC images to the release tags (server-side, multi-arch index preserved — same operation the workflow performs):
docker buildx imagetools create \
-t ghcr.io/lambdaclass/ethrex:X.Y.Z \
-t ghcr.io/lambdaclass/ethrex:latest \
-t ghcr.io/lambdaclass/ethrex:performance \
ghcr.io/lambdaclass/ethrex:X.Y.Z-rc.W
docker buildx imagetools create \
-t ghcr.io/lambdaclass/ethrex:X.Y.Z-l2 \
-t ghcr.io/lambdaclass/ethrex:l2 \
-t ghcr.io/lambdaclass/ethrex:performance-l2 \
ghcr.io/lambdaclass/ethrex:X.Y.Z-rc.W-l2
- Delete the PAT for security (here)
Failure on the crates.io publish workflow
If publish.yml fails partway through, fix the cause and re-run the workflow. Crates already published at the release version are skipped (the run tolerates an “already exists” error), so it resumes from the first crate that has not been published yet. Because crates are published in dependency order, a metadata or ordering error in one crate blocks the crates that depend on it, while the ones published before it stay published (crates.io versions cannot be unpublished or overwritten — a fix requires a new version).
Short– to Mid-Term Roadmap
This document represents the short- to mid-term roadmap. Items listed here are actionable, concrete, and intended to be worked on in the coming weeks. Long-term research directions and second-order ideas are intentionally out of scope.
Priority reflects relative urgency, not effort.
This is a WIP document and it requires better descriptions; it’s supposed to be used internally.
Priority Legend
| Priority | Meaning |
|---|---|
| 0 | Highest priority, low effort with potential win |
| 1 | High. Should be addressed soon |
| 2 | Medium. Important but not blocking |
| 3 | Low. Useful improvement |
| 4 | Very low. Nice to have |
| 5 | Deprioritized for now |
| 6 | Long tail / hygiene |
| — | Not yet prioritized |
Execution
| Item | Issue | Priority | Status | Description |
|---|---|---|---|---|
| Replace BTreeMap with FxHashMap | #5757 | 0 | Discarded (small regression) | Replace BTreeMap/BTreeSet with FxHashMap/FxHashSet |
| Use FxHashset for access lists | #5800 | 0 | Done (8% improvement) | Replace HashSet with FxHashset |
| Skip Zero-Initialization in Memory Resize | #5755 | 0 | Measure #5774 | Use unsafe set_len (EVM spec says expanded memory is zero) |
| Remove RefCell from Memory | #5756 | 0 | Measure #5793 | Consider using UnsafeCell with manual safety guarantees, or restructure to avoid shared ownership. |
| Try out PEVM | 0 | Done. Simple integration caused regression. | Benchmark again against pevm | |
| Inline Hot Opcodes | #5752 | 0 | Done. 0 to 20% speedup depending on the time. | Opcodes call a function in a jump table when some of the most used ones could perform better being inlined instead |
| Test ECPairing libraries | #5758 | 0 | Done (#5792). Used Arkworks. 2x speedup on those specific operations. | Benchmark arkworks pairing in levm |
| PGO/BOLT | #5759 | 0 | In progress (#5775) | Try out both PGO and BOLT to see if we can improve perf |
| Use an arena allocator for substate tracking | #5754 | 0 | Discarded (#5791). Regression of 10% in mainnet. | Substates are currently a linked list allocated through boxing. Consider using an arena allocator (e.g. bumpalo) for them |
| ruint | #5760 | 0 | Discarded simple approach. Regression. | Try out ruint as the U256 library to see if it improves performance. Part of SIMD initiative |
| Nibbles | #5801 | 1 | Measure #5912 and #5932 | Nibbles are currently stored as a byte (u8), when they could be stored compactly as actual nibbles in memory and reduce by half their representation size. Also we may stack-allocate their buffers instead of heap-allocated vecs. |
| RLP Duplication | #5949 | 1 | Pending | Check whether we are encoding/decoding something twice (clearly unnecessary) |
| Object pooling | #5934 | 2 | Pending | Reuse EVM stack frames to reduce allocations and improve performance |
| Avoid clones in hot path | #5753 | 2 | Measure #5809 on mainnet | Avoid Clone on Account Load and check rest of the hot path |
| SIMD Everywhere | 2 | Pending | There are some libraries that can be replaced by others that use SIMD instructions for better performance | |
| EXTCODESIZE without full bytecode | 1 | Done (#6034). Improvement of 25%. | EXTCODESIZE loads entire bytecode just to get length. Add get_account_code_size() or store code length alongside code (crates/vm/levm/src/opcode_handlers/environment.rs:260-274) | |
| TransactionQueue data structure | 1 | Discarded. It is not significant within the critical path. | TransactionQueue uses Vec with remove(0) which is O(n). Replace with BinaryHeap/BTreeSet or VecDeque for O(log n) or O(1) operations (crates/blockchain/payload.rs:708-820) |
IO
| Item | Issue | Priority | Status | Description |
|---|---|---|---|---|
| Add Block Cache (RocksDB) | #5935 | 0 | Discarded. Did not improve (#6195). | Currently there is no explicit block cache, relying on OS page cache. Also try row cache |
| Use Two-Level Index (RocksDB) | #5936 | 0 | Discarded. Performance regressed by two orders of magnitude on both throughput and latency (#6196). | Use Two-Level Index with Partitioned Filters |
| Enable unordered writes for State (RocksDB) | #5937 | 0 | Pending | For ACCOUNT_TRIE_NODES, STORAGE_TRIE_NODES cf_opts.set_unordered_write(true); Faster writes when we don’t need strict ordering |
| Increase Bloom Filter (RocksDB) | #5938 | 0 | Pending | Change and benchmark higher bits per key for state tables |
| Consider LZ4 for State Tables (RocksDB) | #5939 | 0 | Pending | Trades CPU for smaller DB and potentially better cache utilization |
| Page caching + readahead | #5940 | 0 | Pending | Use for trie iteration, sync operations |
| Optimize for Point Lookups (RocksDB) | #5941 | 0 | Pending | Adds hash index inside FlatKeyValue for faster point lookups |
| Modify block size (RocksDB) | #5942 | 0 | Pending | Benchmark different block size configurations |
| Memory-Mapped Reads (RocksDB) | #5943 | 0 | Pending | Can be an improvement on high-RAM systems |
| Increase layers commit threshold | #5944 | 0 | Pending | For read-heavy workloads with plenty of RAM |
| Remove locks | #5945 | 1 | Pending | Check if there are still some unnecessary locks, e.g. in the VM we have one |
| Benchmark bloom filter | #5946 | 1 | Pending | Review trie layer’s bloom filter, remove it or test other libraries/configurations |
| Use multiget on trie traversal | #4949 | 1 | Pending | Using multiget on trie traversal might reduce read time |
| Bulk reads for block bodies | 1 | Pending | Implement multi_get for get_block_bodies and get_block_bodies_by_hash which currently loop over per-key reads (crates/storage/store.rs:388-454) | |
| Canonical tx index | 1 | Pending | Transaction location lookup does O(k) prefix scans. Add a canonical-tx index table or DUPSORT layout for O(1) lookups (crates/storage/store.rs:562-606) | |
| Reduce trie cache Mutex contention | 1 | Pending | trie_cache is behind Arc<Mutex<Arc<TrieLayerCache>>>. Use ArcSwap or RwLock for lock-free reads (crates/storage/store.rs:159,1360) | |
| Reduce LatestBlockHeaderCache contention | 1 | Pending | LatestBlockHeaderCache uses Mutex for every read. Use ArcSwap for atomic pointer swaps (crates/storage/store.rs:2880-2894) | |
| Use Bytes/Arc in trie layer cache | 2 | Pending | Trie layer cache clones Vec<u8> values on every read. Use Bytes or Arc<[u8]> to reduce allocations (crates/storage/layering.rs:57,63) | |
| Split hot vs cold data | 2 | Pending | Geth “freezer/ancients” pattern: store recent state in fast KV store, push old bodies/receipts to append-only ancient store to reduce compaction pressure | |
| Configurable cache budgets | 2 | Pending | Expose cache split for DB/trie/snapshot as runtime config. Currently hardcoded in ethrex | |
| Toggle compaction during sync | 2 | Pending | Disable RocksDB compaction during snap sync for higher write throughput, then compact after (Nethermind pattern). Wire disable_compaction/enable_compaction into sync stages | |
| Spawned | #5947 | 3 | Pending | Spawnify io intensive components/flows. Mempool and Snapsync are top priorities |
RPC
| Item | Priority | Status | Description |
|---|---|---|---|
| Parallel tx decoding | 0 | Discarded | Use rayon to decode transactions in parallel. Currently sequential at ~5-10μs per tx |
| simd-json | 0 | Discarded | Replace serde_json with simd-json for SIMD-accelerated JSON parsing |
| Remove payload.clone() | 0 | Pending | Avoid cloning ExecutionPayload in get_block_from_payload (crates/networking/rpc/engine/payload.rs:674). Use references or owned values directly |
| Remove params.clone() | 0 | Pending | Avoid cloning params before serde_json::from_value(). Use references instead of params[i].clone() in RPC handlers (crates/networking/rpc/engine/payload.rs) |
| Use Bytes instead of String | 0 | Pending | Change HTTP body extraction from String to Bytes and use serde_json::from_slice() instead of from_str() to avoid UTF-8 validation overhead (crates/networking/rpc/rpc.rs:536,563) |
| RawValue for params | 1 | Pending | Use Option<Vec<serde_json::value::RawValue>> instead of Option<Vec<Value>> in RpcRequest to defer parsing until needed (crates/networking/rpc/utils.rs:242) |
| Parallel tx root | 1 | Pending | Parallelize compute_transactions_root which computes ~400 keccak256 hashes for 200 txs (crates/blockchain/payload.rs:671) |
| phf method routing | 2 | Pending | Replace match statements with phf::Map for O(1) RPC method dispatch instead of O(n) string comparisons (crates/networking/rpc/rpc.rs:652-765) |
| Pre-create JWT decoder | 2 | Pending | Cache DecodingKey and Validation at startup instead of creating them on every auth request (crates/networking/rpc/authentication.rs:43-46) |
| HTTP/2 support | 3 | Pending | Add HTTP/2 support for reduced latency through multiplexing |
| Direct response serialization | 3 | Pending | Serialize responses directly to the output buffer instead of intermediate Value |
| TCP tuning | 3 | Pending | Tune TCP settings (nodelay, buffer sizes) for lower latency |
ZK + L2
| Item | Priority | Status | Description |
|---|---|---|---|
| ZK API | 1 | Pending | Improve prover API to unify multiple backends |
| Native Rollups | 2 | Pending | Add EXEC Precompile POC |
| Based Rollups | 2 | Pending | Based Rollups Roadmap |
| Zisk | 2 | In Progress | Integrate full Zisk Proving on the L2 |
| zkVMs | 2 | In Progress | Make GuestProgramState more strict when information is missing |
SnapSync
| Item | Priority | Status | Description |
|---|---|---|---|
| Download receipts and blocks | 1 | Pending | After snap sync is finished and the node is executing blocks, it should download all historical blocks and receipts in the background |
| Download headers in background (no rewrite) | 1 | Pending | Download headers in background |
| Avoid copying trie leaves when inserting (no rewrite) | 1 | Pending | Avoid copying trie leaves when inserting |
| Rewrite snapsync | 4 | Pending | Use Spawned for snapsync |
UX / DX
| Item | Priority | Status | Description |
|---|---|---|---|
| Improve internal documentation | 0 | In Progress | Improve internal docs for developers, add architecture |
| geth db migration tooling | 0 | In Progress | As we don’t support pre-merge blocks we need a tool to migrate other client’s DB to ours at a specific block |
| Add MIT License | 0 | Pending | Add dual license |
| Add Tests | 1 | In Progress | Improve coverage |
| Add Fuzzing | 1 | In Progress | Add basic fuzzing scenarios |
| Add Prop test | 1 | In Progress | Add basic property testing scenarios |
| Add security runs to CI | 1 | In Progress | Add fuzzing and every security tool we have to the CI |
| CLI Documentation | 1 | Pending | Review CLI docs and flags |
| API Documentation | 1 | Pending | Add API documentation to docs. Add compliance matrix |
| IPv6 support | 1 | Pending | IPv6 is not fully supported |
| P2P leechers | 1 | Pending | Improve scoring heuristic and kick leechers |
| Custom Deterministic Benchmark | 1 | In Progress | We have a tool to run certain mainnet blocks, integrate that tool into our pipeline for benchmarking (not easy with DB changes) |
| Benchmark contract call & simple transfers | 1 | Pending | Create a new benchmark with contract call & simple transfers |
| Improve Error handling | 1 | In Progress | Avoid panic, unwrap and expect |
| Websocket subscriptions | 2 | Pending | Add subscription support for websocket |
| Not allow empty blocks in dev mode | 2 | Pending | For L2 development it’s useful not to have empty blocks |
| P2P rate limiting | 3 | Pending | Improve scoring heuristic and DDoS protection |
| Migrations | 4 | Pending | Add DB Migration mechanism for ethrex upgrades |
| No STD | 5 | Pending | Support WASM target for some crates related to proving and execution. Useful for dApp builders and light clients |
New Features
| Item | Priority | Status | Description |
|---|---|---|---|
| Block-Level Access Lists | 2 | Done | Implement EIP-7928 |
| Disc V5 | 2 | In Progress | Add discV5 Support |
| Sparse Blobpool | — | Pending | Implement EIP-8070 |
| Pre merge blocks | — | Pending | Be able to process pre merge blocks |
| Archive node | — | Pending | Allow archive node mode |
zkVM Integrations
ethrex integrates with multiple zero-knowledge virtual machines (zkVMs), giving you flexibility in how you prove Ethereum execution. This page provides an overview of each integration, its status, and links to deployment documentation.
Integration Overview
| zkVM | Organization | Status | L1 Proving | L2 Prover | Documentation |
|---|---|---|---|---|---|
| SP1 | Succinct | Production | ✓ | ✓ | SP1 Prover Guide |
| RISC Zero | RISC Zero | Production | ✓ | ✓ | RISC0 Prover Guide |
| ZisK | Polygon | Experimental | ✓ | Planned | Coming soon |
| OpenVM | Axiom | Experimental | ✓ | Planned | Coming soon |
| TEE (TDX) | Intel | Production | — | ✓ | TDX Prover Guide |
SP1 (Succinct)
SP1 is a zkVM developed by Succinct Labs that enables efficient proving of arbitrary Rust programs.
Status: Production-ready for both L1 proving and L2 prover deployments.
Key Features:
- GPU acceleration via CUDA
- Proof aggregation support
- Extensive precompile patches for Ethereum operations
- Active development and community support
Integration Details:
- ethrex uses SP1’s precompile patches for optimized cryptographic operations
- Supports both CPU and GPU proving modes
- Compatible with Aligned Layer for proof aggregation
Get Started:
RISC Zero
RISC Zero is a zkVM built on the RISC-V architecture, providing a general-purpose proving environment.
Status: Production-ready for both L1 proving and L2 prover deployments.
Key Features:
- GPU acceleration support
- Bonsai proving network for distributed proving
- Strong developer tooling and documentation
Integration Details:
- ethrex integrates with risc0-ethereum for optimized trie operations
- Supports CUDA acceleration for faster proving
- Some precompiles (Keccak, BLS12-381) require the “unstable” feature flag
Get Started:
ZisK (Polygon)
ZisK is Polygon’s zkVM designed for high-performance proving with GPU acceleration.
Status: Experimental. L1 proving is functional; L2 integration is planned.
Key Features:
- Native GPU support with custom CUDA kernels
- Unique MODEXP precompile implementation
- Optimized for high-throughput proving
Integration Details:
- ethrex supports ZisK for L1 block proving via ethrex-replay
- Most Ethereum precompiles are supported with patches
- P256 verification is not yet available (no patch exists)
Current Limitations:
- L2 prover integration is not yet complete
- Requires manual installation from source for GPU support
OpenVM (Axiom)
OpenVM is Axiom’s modular zkVM framework designed for flexibility and extensibility.
Status: Experimental. Initial integration for L1 proving.
Key Features:
- Modular architecture for custom extensions
- Support for multiple proving backends
- Designed for composability
Integration Details:
- Basic integration for L1 block proving
- Precompile support is being expanded
- L2 prover integration is planned
TEE (Intel TDX)
Intel Trust Domain Extensions (TDX) provides hardware-based trusted execution for block proving.
Status: Production-ready for L2 prover deployments.
Key Features:
- Hardware-based security guarantees
- No cryptographic proving overhead
- Fast execution within trusted enclave
Integration Details:
- Supported as an L2 prover option
- Can run alongside zkVM provers for redundancy
- Requires TDX-capable hardware
Get Started:
Multi-Prover Deployments
ethrex supports running multiple provers simultaneously, providing redundancy and flexibility:
┌─────────────┐
│ ethrex │
│ Sequencer │
└──────┬──────┘
│
┌───────────────┼───────────────┐
│ │ │
┌────┴────┐ ┌────┴────┐ ┌────┴────┐
│ SP1 │ │ RISC0 │ │ TDX │
│ Prover │ │ Prover │ │ Prover │
└────┬────┘ └────┬────┘ └────┬────┘
│ │ │
└───────────────┼───────────────┘
│
┌──────┴──────┐
│ Aligned │
│ Layer │
└─────────────┘
See Multi-prover deployment guide for configuration details.
Ecosystem Integrations
Aligned Layer
Aligned Layer provides proof aggregation and verification services for ethrex L2 deployments.
Features:
- Aggregates proofs from multiple zkVM backends
- Reduces L1 verification costs
- Supports SP1, RISC Zero, and other proof systems
Documentation: ethrex <> Aligned integration
Choosing a zkVM
| Consideration | Recommendation |
|---|---|
| Production L2 | SP1 or RISC Zero (most mature) |
| Maximum performance | SP1 with GPU acceleration |
| Hardware security | TEE (TDX) |
| Experimentation | ZisK or OpenVM |
| Redundancy | Multi-prover with SP1 + RISC Zero + TEE |
Performance Comparison
See zkVM Comparison for detailed benchmark data comparing proving times across backends.
zkVM Comparison
This page provides benchmark comparisons between ethrex and other implementations, along with a feature matrix for supported zkVM backends.
ethrex vs RSP (SP1)
RSP (RISC Zero/SP1 Prover) is Succinct’s implementation for proving Ethereum blocks. Here’s how ethrex compares on mainnet blocks:
| Block | Gas Used | ethrex (SP1) | RSP | Difference |
|---|---|---|---|---|
| 23769082 | 7.9M | 2m 23s | 1m 27s | +63% |
| 23769083 | 44.9M | 12m 24s | 7m 49s | +59% |
| 23769084 | 27.1M | 8m 40s | Failed | — |
| 23769085 | 22.2M | 6m 40s | Failed | — |
| 23769086 | 28.4M | 7m 36s | 4m 45s | +60% |
| 23769087 | 17.5M | 6m 02s | Failed | — |
| 23769088 | 17.5M | 4m 50s | 2m 59s | +61% |
| 23769089 | 23.9M | 8m 14s | 4m 44s | +74% |
| 23769090 | 24.2M | 8m 11s | 4m 40s | +75% |
| 23769091 | 24.4M | 7m 02s | Failed | — |
| 23769092 | 21.7M | 6m 35s | 4m 01s | +64% |
Note
RSP failed on several blocks with
block gas used mismatcherrors. ethrex successfully proved all blocks.
Hardware:
- ethrex: AMD EPYC 7713 64-Core, 128GB RAM, RTX 4090
- RSP: AMD EPYC 7F72 24-Core, 64GB RAM, RTX 4090
zkVM Backend Comparison
ethrex supports multiple zkVM backends with varying features and maturity levels:
| Feature | SP1 | RISC Zero | ZisK | OpenVM |
|---|---|---|---|---|
| Status | Production | Production | Experimental | Experimental |
| GPU Acceleration | ✓ | ✓ | ✓ | ✓ |
| L2 Prover | ✓ | ✓ | Planned | Planned |
| Proof Aggregation | ✓ | ✓ | ✓ | ✓ |
Precompile Support
ZK proving of Ethereum precompiles varies by backend:
| Precompile | SP1 | RISC Zero | ZisK |
|---|---|---|---|
| ecrecover | ✓ | ✓ | ✓ |
| SHA256 | ✓ | ✓ | ✓ |
| RIPEMD160 | ✓ | ✓ | ✓ |
| identity | ✓ | ✓ | ✓ |
| modexp | ✓ | ✓ | ✓ |
| ecAdd | ✓ | ✓ | ✓ |
| ecMul | ✓ | ✓ | ✓ |
| ecPairing | ✓ | ✓ | ✓ |
| blake2f | ✓ | ✓ | ✓ |
| KZG point evaluation | ✓ | ⚠️ | ⚠️ |
| BLS12-381 | ✓ | ⚠️ | ✓ |
| P256 verify | ✓ | ✓ | ⚠️ |
Legend: ✓ = Supported with patches, ⚠️ = Limited or requires unstable features
Optimization Impact
ethrex has undergone significant optimization for zkVM proving:
| Optimization | Impact | Description |
|---|---|---|
| Jumpdest analysis | -15% cycles | Optimized jump destination validation |
| Trie caching | -50% hash calls | Cache initial node hashes during trie construction |
| Trie hashing | -75% trie cycles | Improved traversal and RLP encoding |
| Trie operations | -93% get/insert cycles | Eliminated unnecessary node cloning |
| Serialized tries | -22% total cycles | Pre-serialize resolved tries, skip decoding |
| ecPairing patch | -10% total cycles | 138k → 6k cycles per operation |
| ecMul patch | -10% total cycles | Accelerated scalar multiplication |
See prover_performance.md for detailed optimization history.
Reproduction Instructions
ethrex Benchmarks
- Clone ethrex-replay
- Run the prover:
cargo r -r -F "sp1,gpu" -p ethrex-replay -- blocks \
--action prove \
--zkvm sp1 \
--from 23769082 \
--to 23769092 \
--rpc-url <RPC_WITH_DEBUG_EXECUTIONWITNESS>
RSP Benchmarks
- Clone rsp
- Run with CUDA:
SP1_PROVER=cuda cargo r -r \
--manifest-path bin/host/Cargo.toml \
--block-number <BLOCK> \
--rpc-url <RPC> \
--prove
Hardware Recommendations
| Use Case | Minimum | Recommended |
|---|---|---|
| Development | 32GB RAM, 8 cores | 64GB RAM, 16 cores |
| Production (CPU) | 64GB RAM, 32 cores | 128GB RAM, 64 cores |
| Production (GPU) | 64GB RAM, RTX 3090 | 128GB RAM, RTX 4090 |
GPU proving is significantly faster and recommended for production workloads. All modern NVIDIA GPUs with 24GB+ VRAM are supported.
ethrex-prover performance
Latest benchmarks against rsp
- ethrex commit:
42073248334a6f517c22bd7b8faf30787724d9da(#5224) - rsp commit:
2c5718029e7c0b24a34b011088fef221489fc714
| Block (mainnet) | Gas Used | ethrex (SP1) | rsp | (ethrex - rsp) / rsp * 100% |
|---|---|---|---|---|
| 23769082 | 7,949,562 | 02m 23s | 01m 27s | 63.2% |
| 23769083 | 44,943,006 | 12m 24s | 07m 49s | 58.7% |
| 23769084 | 27,075,543 | 08m 40s | Failed | - |
| 23769085 | 22,213,854 | 06m 40s | Failed | - |
| 23769086 | 28,364,699 | 07m 36s | 04m 45s | 60.0% |
| 23769087 | 17,523,985 | 06m 02s | Failed | - |
| 23769088 | 17,527,759 | 04m 50s | 02m 59s | 61.4% |
| 23769089 | 23,854,094 | 08m 14s | 04m 44s | 73.9% |
| 23769090 | 24,238,029 | 08m 11s | 04m 40s | 75.4% |
| 23769091 | 24,421,216 | 07m 02s | Failed | - |
| 23769092 | 21,714,227 | 06m 35s | 04m 01s | 64.3% |
Benchmark server hardware:
For ethrex:
- AMD EPYC 7713 64-Core Processor
- 128 GB RAM
- RTX 4090 24 GB
For rsp:
- AMD EPYC 7F72 24-Core Processor
- 64 GB RAM
- RTX 4090 24 GB
Note
rsp exited with a
block gas used mismatcherror on the failed cases
How to reproduce for ethrex:
- Clone ethrex-replay
- Optionally, edit
Cargo.tomlto change theethrexlibraries to a specific branch/commit you want to benchmark. - Run
cargo updateif you do change it.
- Optionally, edit
- Run
cargo r -r -F "sp1,gpu" -p ethrex-replay -- blocks --action prove --zkvm sp1 --from 23769082 --to 23769092 --rpc-url <RPC>- For ethrex, an RPC endpoint that implements
debug_executionWitness(like an ethrex or reth node) works best.
- For ethrex, an RPC endpoint that implements
How to reproduce for rsp:
- Clone rsp
- Make the following change so that we measure rsp’s proving time the same way we measure it for ethrex (duration of the
prove()call), you can then grep the stdout forproving_time:
diff --git a/crates/executor/host/src/full_executor.rs b/crates/executor/host/src/full_executor.rs
index 99a0478..d42a1d2 100644
--- a/crates/executor/host/src/full_executor.rs
+++ b/crates/executor/host/src/full_executor.rs
@@ -123,6 +123,7 @@ pub trait BlockExecutor<C: ExecutorComponents> {
.map_err(|err| eyre::eyre!("{err}"))??;
let proving_duration = proving_start.elapsed();
+ println!("proving time: {}", proving_duration.as_secs());
let proof_bytes = bincode::serialize(&proof.proof).unwrap();
hooks
- Run
SP1_PROVER=cuda cargo r -r --manifest-path bin/host/Cargo.toml --block-number <BLOCK NUMBER> --rpc-url <RPC> --prove- For rsp, an alchemy RPC endpoint works best.
Optimizations
| Name | PR | tl;dr |
|---|---|---|
| jumpdest opt. | https://github.com/lambdaclass/ethrex/pull/4608 | Cuts 15% total zkvm cycles |
| trie opt. 1 | https://github.com/lambdaclass/ethrex/pull/4648 | Halves trie hashing calls |
| trie opt. 2 | https://github.com/lambdaclass/ethrex/pull/4723 | Trie hashing zkVM cycles reduced 1/4, faster than risc0-trie |
| trie opt. 3 | https://github.com/lambdaclass/ethrex/pull/4763 | Trie get and insert ops. reduced cycles by 1/14. |
| trie opt. 4 | https://github.com/lambdaclass/ethrex/pull/5224 | Serialize resolved tries and removes decoding, 22% total cycles reduced |
| ecpairing precompile | https://github.com/lambdaclass/ethrex/pull/4809 | Reduced ecpairing cycles from 138k to 6k (10% total proving cycles gone) |
| ecmul precompile | https://github.com/lambdaclass/ethrex/pull/5133 | Reduces another 10% of total cycles |
Trie operations are one of the most expensive in our prover right now. We are using risc0-trie as a fast zkVM trie reference to optimize our own. ethrex-trie optimization for zkvm see for a detailed exploration of our trie vs risc0’s.
Detailed proving times (SP1)
Benchmark server hardware:
- AMD EPYC 7713 64-Core Processor
- 128 GB RAM
- RTX 4090 24 GB
Absolute times
| Block (Mainnet) | Gas | ethrex main (70fc63) | ethrex (jumpdest opt.) | ethrex (ecpairing precompile) | ethrex (trie opt1.) | ethrex (trie opt2.) | ethrex (trie opt3.) | ethrex (trie opt1. + trie opt2. + trie opt3.) | ethrex (all opts, our trie) | ethrex (risc0_trie) | rsp main (9a7048) |
|---|---|---|---|---|---|---|---|---|---|---|---|
| 23426993 | 35.7M | 20m 40s | 20m 04s | 20m 10s | 20m 12s | 19m 31s | 17m 20s | 16m 24s | 14m 38s | 14m 32s | 08m 39s |
| 23426994 | 20.7M | 13m 24s | 12m 55s | 12m 32s | 13m 08s | 12m 48s | 11m 31s | 10m 53s | 09m 18s | 10m 04s | 05m 39s |
| 23426995 | 16.6M | 10m 14s | 09m 54s | 09m 56s | 09m 56s | 09m 52s | 08m 39s | 08m 06s | 07m 20s | 07m 19s | 04m 33s |
| 23426996 | 22.5M | 16m 58s | 16m 37s | 15m 48s | 16m 50s | 15m 42s | 14m 44s | 14m 08s | 12m 25s | 12m 59s | 06m 39s |
Relative improvement vs ethrex main ((opt - base)/base * 100)
| Block (Mainnet) | Gas | ethrex (jumpdest opt.) | ethrex (ecpairing precompile) | ethrex (trie opt1.) | ethrex (trie opt2.) | ethrex (trie opt3.) | ethrex (trie opt1+2+3) | ethrex (all opts, our trie) | ethrex (risc0_trie) |
|---|---|---|---|---|---|---|---|---|---|
| 23426993 | 35.7M | -2.9% | -2.4% | -2.3% | -5.6% | -16.1% | -20.6% | -29.2% | -29.7% |
| 23426994 | 20.7M | -3.6% | -6.5% | -2.0% | -4.5% | -14.1% | -18.8% | -30.6% | -24.9% |
| 23426995 | 16.6M | -3.3% | -2.9% | -2.9% | -3.6% | -15.5% | -20.8% | -28.3% | -28.5% |
| 23426996 | 22.5M | -2.1% | -6.9% | -0.8% | -7.5% | -13.2% | -16.7% | -26.8% | -23.5% |
Relative to RSP main ((opt - rsp) / rsp * 100)
| Block | Gas | ethrex main | ethrex (jumpdest opt.) | ethrex (ecpairing precompile) | ethrex (trie opt1.) | ethrex (trie opt2.) | ethrex (trie opt3.) | ethrex (trie opt1+2+3) | ethrex (all opts, our trie) | ethrex (risc0_trie) |
|---|---|---|---|---|---|---|---|---|---|---|
| 23426993 | 35.7M | 138.9% | 132.0% | 133.1% | 133.5% | 125.6% | 100.4% | 89.6% | 69.2% | 68.0% |
| 23426994 | 20.7M | 137.2% | 128.6% | 121.8% | 132.4% | 126.5% | 103.8% | 92.6% | 64.6% | 78.2% |
| 23426995 | 16.6M | 124.9% | 117.6% | 118.3% | 118.3% | 116.8% | 90.1% | 78.0% | 61.2% | 60.8% |
| 23426996 | 22.5M | 155.1% | 149.9% | 137.6% | 153.1% | 136.1% | 121.6% | 112.5% | 86.7% | 95.2% |
ethrex-trie optimization for zkvm
Overview
Using the risc0-trie we get the next perf. gains in cycle count over our ethrex-trie:
rebuild_storage_trie()218.999 -> 64.435 (x3.4)rebuild_state_trie()119.510 -> 37.426 (x3.2)apply_account_updates()139.519 -> 16.702 (x8.4)state_trie_root()63.482 -> 17.276 (x3.7)validate_receipts_root()13.068 -> 2.013 (x6.5)
our goal is to have our trie perform as close as possible to risc0’s.
Flamegraph overview
ethrex-trie (filtering for ethrex_trie functions)

risc0-trie (filtering for risc0_ethereum_trie functions)
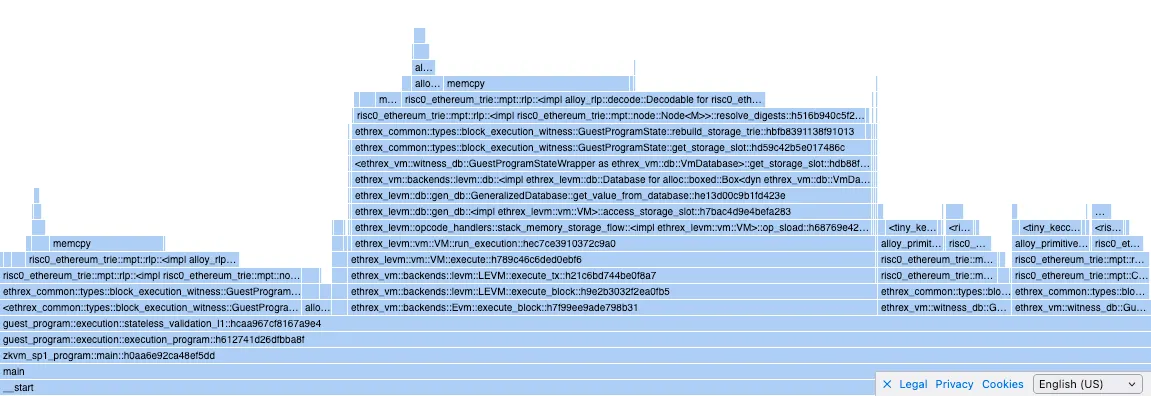
Optimizations to our trie
1. Caching the initial node hashes
https://github.com/lambdaclass/ethrex/pull/4648
We were calculating all the hashes of the initial state trie (and storage) nodes, but we weren’t caching them when building the tries, so there was double hashing. https://github.com/lambdaclass/ethrex/pull/4648 fixes it by introducing a function to manually set the cached hash of a node, and caching whenever building a trie using Trie::from_nodes .
Calls to compute_hash were reduced by half after those changes:
before
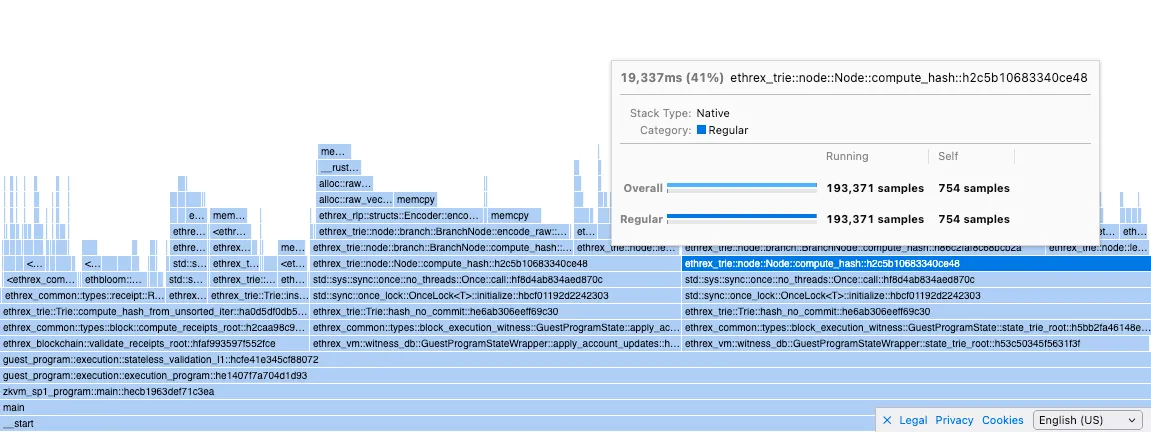
after
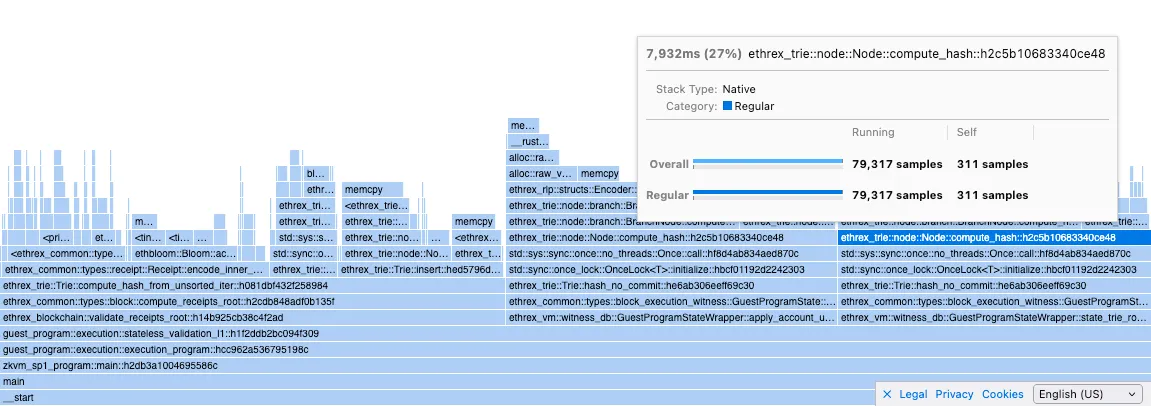
although the total proving time didn’t change that much:
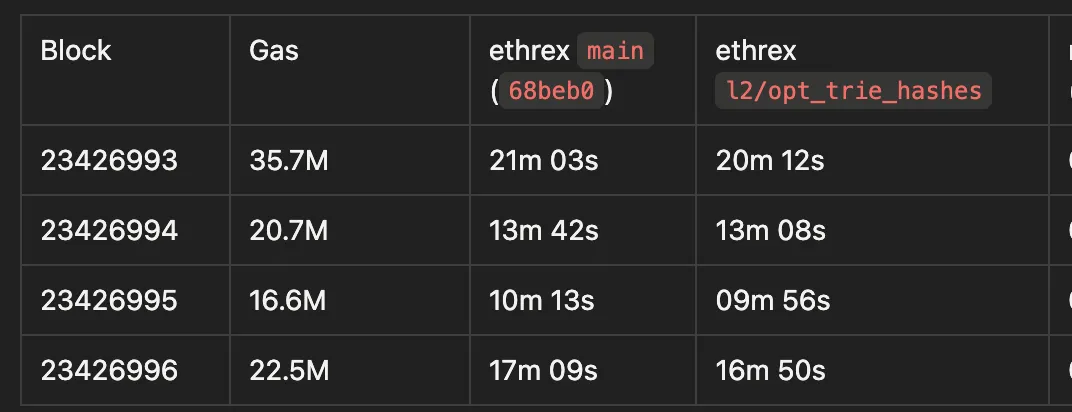
(proved with SP1 in l2-gpu-3, RTX 4090)
2. memcpy calls on trie hashing
ethrex-trie:
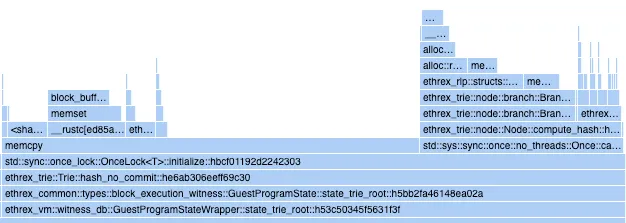
risc0-trie:
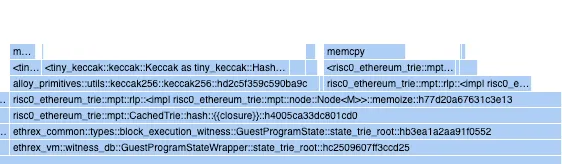
our Node::compute_hash is almost on par with risc0’s Node::memoize (hashes and caches the hash) but we have a big memcpy call that’s almost twice as long in cycles as the actual hashing.
initially I thought this was an overhead of OnceLock::initialize because risc0 uses an Option to cache the hash, but apparently that’s not the case as I ran a small experiment in which I compared initialization cycles for both and got the next results:
Report cycle tracker: {"oncelock": 3830000, "option": 3670000}
Experiment code
lib
```rust
use std::sync::OnceLock;
pub struct OnceLockCache {
pub inner: OnceLock<u128>,
}
impl OnceLockCache {
pub fn init(&self, inner: u128) {
println!("cycle-tracker-report-start: oncelock");
self.inner.get_or_init(|| compute_inner(inner));
println!("cycle-tracker-report-end: oncelock");
}
}
pub struct OptionCache {
pub inner: Option<u128>,
}
impl OptionCache {
pub fn init(&mut self, inner: u128) {
println!("cycle-tracker-report-start: option");
self.inner = Some(compute_inner(inner));
println!("cycle-tracker-report-end: option");
}
}
pub fn compute_inner(inner: u128) -> u128 {
inner.pow(2)
}
```
guest program
```rust
#![no_main]
sp1_zkvm::entrypoint!(main);
use std::sync::OnceLock;
use fibonacci_lib::{OnceLockCache, OptionCache};
pub fn main() {
let mut oncelocks = Vec::with_capacity(10000);
let mut options = Vec::with_capacity(10000);
for i in (1 << 64)..((1 << 64) + 10000) {
let oncelock_cache = OnceLockCache {
inner: OnceLock::new(),
};
oncelock_cache.init(i);
oncelocks.push(oncelock_cache);
}
for i in (1 << 64)..((1 << 64) + 10000) {
let mut option_cache = OptionCache { inner: None };
option_cache.init(i);
options.push(option_cache);
}
}
```
in the flamegraph it’s not clear where that memcpy is originating (any ideas?). The calls that are on top of it are encode_bytes() (from our RLP lib) and some sha3 calls.
Node hashing is composed of two operations: first the node is encoded into RLP, then we keccak hash the result.
RLP Encoding
Our RLP lib uses a temp buffer to write encoded payloads to, and in the end it finalizes the encoding by writing the payload prefix (which contains a length) to an output buffer, plus the actual payload. This means we are allocating two buffers, initializing them, and copying bytes to both of them for each node that’s being encoded and hashed.
First I tried preallocating the buffers (which are vecs) by estimating a node’s final RLP length.
This was done in the l2/opt_rlp_buffer, this had an influence on the memcpy length by reducing it almost 15%:
then I tried to bypass our RLP encoder altogether by implementing a small and fast encoding for the Branch node only (which is the majoritarian node type), this reduced memcpy further, 30% over main:
I didn’t test implementing fast RLP for the other node types as I was expecting a bigger reduction in memcpy from Branch alone.
Keccak
A difference between our trie and risc0’s is that they use the tiny-keccak crate instead of sha3 as we do. I tried replacing it in our trie but the memcpy got bigger.
Regarding memory, I also noticed that when hashing we are initializing a 32 byte array and writing the hash to it after. I wanted to test if this mattered so I experimented by creating an uninitialized buffer with MaybeUninit (unsafe rust) and writing the hash to it. This had no impact in memcpy’s length.
Both changes are in the l2/opt_keccak branch.
Final
At the end the problem was a combination of slow RLP encoding and that we did a preorder traversal while hashing a trie recursively. This was fixed in https://github.com/lambdaclass/ethrex/pull/4723.
3. Node cloning in NodeRef::get_node
Whenever we get, insert or remove from a trie we are calling NodeRef::get_node which clones the Node from memory and returns it, which means that for each operation over a trie we are cloning all the relevant nodes for that op.
This is fixed in https://github.com/lambdaclass/ethrex/pull/4763 see that PR desc. for details
Case Studies
This page showcases how teams are using ethrex in production and research environments.
Why Teams Choose ethrex
| Value Proposition | Description |
|---|---|
| Reduced Complexity | ~100k lines of Rust vs 500k+ in mature clients means faster audits and easier customization |
| Multi-prover Flexibility | Switch between SP1, RISC Zero, ZisK, or TEEs without changing your deployment |
| ZK-First Architecture | Optimized data structures that reduce proving costs from day one |
| Unified Codebase | Same client for L1 nodes and L2 rollups simplifies operations |
| Active Development | Rapid iteration with direct access to the development team |
Featured Case Studies
Case studies are coming soon. If you’re using ethrex and would like to share your experience, please reach out.
Submit Your Case Study
We’d love to feature your experience with ethrex. Case studies help the community understand real-world applications and inspire new use cases.
What we’re looking for:
- L1 node operators running ethrex on mainnet or testnets
- L2 builders deploying rollups with ethrex
- Research teams using ethrex for ZK experimentation
- Developers integrating ethrex into their infrastructure
To submit:
- Open an issue on GitHub with the label
case-study - Include your use case, challenges, solutions, and results
- We’ll work with you to write up the case study
Contact:
- GitHub: lambdaclass/ethrex
- Telegram: ethrex_client
- Email: hello@lambdaclass.com
Audits
Audit reports for ethrex are stored in the audits/ directory at the repository root. Each subdirectory’s name encodes the audited version and commit short hash.
To report a vulnerability, see the Security Policy.
Reports
| Auditor | Scope | Version | Commit | Report | Verification Response |
|---|---|---|---|---|---|
| Least Authority | Initial audit | v9.0.0 | e88175e2 | Read | |
| Least Authority | Final audit (verification of initial findings) | v11.0.0 | c63829a1 |
Least Authority Security Audit – Verification Response
Project: ethrex
Audit date: January 12 – January 30, 2026
Audit report delivered: February 3, 2026
Audit revision: e88175e2d49f1192cc9f2fdeae6fde1392d0759d
Response date: April 6, 2026
Original report: Least Authority - LambdaClass Ethrex Initial Audit Report (PDF)
Summary
The audit identified 20 issues (A–T) and 8 suggestions (1–8). Each finding is addressed below with links to the relevant PRs.
| Category | Count |
|---|---|
| Fixed (with PR) | 20 issues + 5 suggestions |
| Not applicable | 3 issues + 1 suggestion |
| Acknowledged (ongoing) | 2 suggestions |
| Remaining (latent, zero impact) | 1 issue (partial) |
Issues
Issue A: Aligned Layer Service Interruptions Can Result in Denial of Service
Finding: When running in aligned-mode, the sequencer advanced its proof cursor upon sending to Aligned Layer rather than upon on-chain confirmation. A proof lost by Aligned would never be resent, stalling batch verification indefinitely.
Resolution: PR #6313 introduces a dual-cursor architecture:
latest_sent_to_aligned– tracks what was dispatched to the Aligned gateway (written byL1ProofSender).latest_verified_batch_proof– tracks what was confirmed on-chain (written only byL1ProofVerifierafter on-chain verification succeeds).
A configurable --aligned.resubmission-timeout triggers automatic resend when aggregation is not observed within the timeout window, resetting the aligned cursor to last_verified_batch + 1. Checkpoint directories are only cleaned after on-chain verification.
PR #5869 adds operator-facing documentation covering 5 failure scenarios (temporary outage, lost proof, permanent shutdown, insufficient balance, invalid proof) with recovery procedures.
Issue B: Intrinsic Gas Error Can Result in Loss of Funds
| Field | Value |
|---|---|
| Severity | High |
| Status | Fixed |
| PR | #6324 |
Finding: In prepare_execution_privileged (l2_hook.rs), the sender’s balance was debited via decrease_account_balance before add_intrinsic_gas() validation completed. If that check failed, msg_value was zeroed, making undo_value_transfer a no-op and permanently burning the sender’s funds.
Resolution: The balance debit is now deferred to after all tx_should_fail checks complete (including add_intrinsic_gas). A regression test (privileged_tx_intrinsic_gas_failure_preserves_sender_balance) confirms that a privileged tx with insufficient gas preserves the sender’s full balance.
Issue C: Nonatomic Finalization Can Lead to Inconsistent State
| Field | Value |
|---|---|
| Severity | High |
| Status | Fixed |
| PR | #6330 |
Finding: finalize_non_privileged_execution applied sequential state mutations and returned early on error, leaving partial mutations committed without rollback.
Resolution: The function now has two phases:
- Phase 1 (fallible computations): All operations that can fail (e.g.,
get_fee_token_ratio) run before any state mutations. - Phase 2 (state mutations with rollback): All mutations are grouped in
apply_finalize_mutations. If any step fails,restore_cache_state()reverts all partial mutations.
transfer_fee_token now backs up original storage slot values before overwriting, and restore_cache_state also restores status and has_storage fields. Regression tests cover arithmetic overflow and contract revert failure modes.
Issue D: ERC-20 AssetDiffs Omitted in BalanceDiff Aggregation
| Field | Value |
|---|---|
| Severity | High |
| Status | Fixed |
| PR | #5882 |
Finding: In get_balance_diffs (messages.rs), decoded ERC-20 AssetDiff entries were never inserted into the value_per_token vector when no matching entry existed, leaving it empty.
Resolution: The aggregation logic now uses find() to locate an existing matching entry. If found, the value is incremented; otherwise, the decoded AssetDiff is pushed into the vector via an else branch. An integration test verifies L1 deposit accounting for ERC-20 cross-chain transfers.
Issue E: Permissionless Privileged Message Parameters Can Stall Verification
| Field | Value |
|---|---|
| Severity | High |
| Status | Fixed |
| PR | #6442 |
Finding: The sendToL2 function in CommonBridge.sol accepts user-controlled gasLimit and data without validation against L2 inclusion constraints. A malicious actor could create non-includable privileged transactions that expire and block verification.
Existing mitigation: _burnGas(sendValues.gasLimit) on L1 caps the effective gasLimit to approximately the L1 block gas limit (~30M gas per EIP-7825), providing economic deterrence.
Resolution: PR #6442 adds an l2GasLimit storage variable to CommonBridge, set via an initialize() parameter (deployer default: 30,000,000) and updatable post-deployment by the owner via setL2GasLimit(). _sendToL2() enforces sendValues.gasLimit <= l2GasLimit, rejecting privileged transactions that exceed the limit. The --block-producer.block-gas-limit CLI flag is removed; the sequencer now fetches l2GasLimit from the contract on startup, keeping the on-chain constraint and sequencer limit in sync.
Issue F: Underflow and Off-by-One in regenerate_state Target Handling
| Field | Value |
|---|---|
| Severity | High |
| Status | Fixed |
| PR | #6331 |
Finding: In regenerate_state (l1_committer.rs), target_block_number - 1 underflows when target is 0, and always shifts the replay range by one block.
Resolution: The function now uses a match expression with an explicit Some(0) arm that returns Ok(()) early, preventing the underflow. Documentation was updated to clarify the semantics: Some(n) regenerates state up to block n - 1 (exclusive), None regenerates up to the latest block (inclusive).
Issue G: Stateless L1 Validation Omits Transactions Root Check
| Field | Value |
|---|---|
| Severity | High |
| Status | Fixed |
| PR | #5608 |
Finding: The prover’s stateless_validation_l1 validated block headers without verifying that the header’s transactions root commits to the provided block body.
Resolution: A new validate_block_body function runs in the guest program before validate_block_pre_execution. It computes the transactions root from block_body.transactions and compares it to block_header.transactions_root, and validates the withdrawals root and ommers emptiness. validate_block was renamed to validate_block_pre_execution for clarity.
Issue H: Incomplete Gas Used Validation Allows Nonzero Gas in Empty Blocks
| Field | Value |
|---|---|
| Severity | High |
| Status | Fixed |
| PR | #5996 |
Finding: validate_gas_used relied on receipts.last().cumulative_gas_used. When the receipts list was empty (no transactions), the function returned Ok(()) without verifying that block_header.gas_used was 0.
Resolution: As part of the EIP-7778 implementation, validate_gas_used was redesigned to take block_gas_used: u64 directly from the VM execution result, rather than deriving it from receipts. The comparison block_gas_used != block_header.gas_used is now unconditional, so empty blocks with nonzero gas_used headers are correctly rejected.
Issue I: Missing Domain Separation on Guest Output Digest
| Field | Value |
|---|---|
| Severity | High |
| Status | Not applicable |
Finding: Guest programs (OpenVM, ZisK) hash ProgramOutput::encode() without a domain-separation tag, potentially allowing cross-context replay of output digests.
Response: The zkVM verification key (vkey) already provides domain separation. The vkey is a cryptographic commitment to the exact guest program binary, and the on-chain verifier binds each proof to a pinned vkey stored in OnChainProposer. A replayed output from a different program version would have a different vkey and be rejected. Adding an explicit domain tag would be redundant with this binding.
Issue J: Privileged Transaction Failure Path Can Be Bypassed
| Field | Value |
|---|---|
| Severity | Medium |
| Status | Fixed |
| PR | #6044 |
Finding: Privileged transactions forced to fail via INVALID opcode injection could still execute successfully when the destination was a precompile (which bypasses bytecode interpretation). Additionally, negative gas_remaining was cast to u64 via wrapping conversion, giving an effectively unbounded gas allowance.
Resolution: An early check at the top of run_execution() in vm.rs returns an OutOfGas revert when gas_remaining < 0, consuming the full gas limit. This fires before the precompile dispatch branch, preventing negative gas from reaching the as u64 cast. Three regression tests cover the failure and success paths.
Issue K: Privileged Transaction Inclusion Not Guaranteed in ALIGNED_MODE
| Field | Value |
|---|---|
| Severity | Medium |
| Status | Fixed |
| PR | #6332 |
Finding: verifyBatchesAligned() did not enforce the privileged transaction inclusion deadline, unlike verifyBatch().
Resolution: The same ExpiredPrivilegedTransactionDeadline check was added inside the verifyBatchesAligned() per-batch loop, mirroring verifyBatch(). Every batch in a multi-batch aligned verification is individually checked.
Issue L: Fee-Token Fees Can Be Locked for Transactions That Fail Validation
Finding: Fee-token deduction via db.get_account_mut bypassed the call-frame backup mechanism. If later validation failed, the fee-token lock persisted for the rejected transaction.
Resolution: The core fix (PR #6330) restructures finalization into two phases (see Issue C). transfer_fee_token now backs up changed storage slots via backup_storage_slot(), enabling rollback through restore_cache_state(). PRs #6333 and #6417 add regression tests verifying that fee-token storage slots revert when validation fails (nonce mismatch, priority fee exceeds max fee).
Issue M: Unvalidated Proof Persistence Halts Liveness
| Field | Value |
|---|---|
| Severity | Medium |
| Status | Not applicable (mitigated at contract level) |
| PR | #6334 (documentation) |
Finding: The proof coordinator stores submitted proofs without validation, potentially allowing a corrupted proof to be “sticky” and halt rollup progression.
Response: On-chain verification handles this. _verifyBatchInternal in OnChainProposer.sol wraps each verifier call in try/catch – invalid proofs revert with InvalidRisc0Proof, InvalidSp1Proof, or InvalidTdxProof. L1ProofSender has fallback logic (try_delete_invalid_proof) that detects invalid proofs from RPC error data, deletes them, and triggers re-proving.
An invalid proof wastes one L1 transaction and causes a delay, but cannot produce an invalid state transition or permanently halt liveness. PR #6334 documents this behavior.
Issue N: L1 Watcher Cursor Advances Before Processing, Dropping Privileged Logs
| Field | Value |
|---|---|
| Severity | Medium |
| Status | Fixed |
| PR | #6335 |
Finding: get_logs_l1() advanced last_block_fetched_l1 before processing logs. Failed add_transaction_to_pool calls were silently skipped via continue, permanently dropping those privileged transactions.
Resolution: get_logs_l1() now returns (new_cursor, logs) instead of setting the cursor immediately. The cursor is only assigned after process_privileged_transactions(logs) succeeds. Failed add_transaction_to_pool calls now propagate the error (map_err + ? instead of inspect_err + continue), so the batch retries from the same cursor. The privileged_transaction_already_processed check prevents duplicates on retry.
Issue O: Unbounded Read and Nonatomic Write in write_elf_file Enables Local DoS
| Field | Value |
|---|---|
| Severity | Medium |
| Status | Fixed |
| PR | #6441 |
Finding: write_elf_file reads the entire ELF file and writes it non-atomically via std::fs::write. A local attacker with control of ELF_PATH could cause resource exhaustion or file corruption.
Resolution: PR #6441 replaces the direct write with atomic write-to-temp-then-rename: the ELF is written to {ELF_PATH}.tmp, then std::fs::rename() swaps it into place. A metadata size check before reading prevents unbounded I/O on tampered files.
Issue P: Block Execution Pre-Rejects Transactions Based on Declared Gas Limit
| Field | Value |
|---|---|
| Severity | Medium |
| Status | Not applicable |
Finding: The executor rejects transactions when cumulative_gas_used + tx.gas_limit() exceeds the block gas limit, even if actual gas usage would fit.
Response: This matches Ethereum consensus rules. Both the execution specs and geth enforce cumulative_gas_used + tx.gas_limit <= block.gas_limit as a block validity condition. The auditor’s example of two 30M-limit transactions in a 30M block is also rejected by geth.
Issue Q: Fee-Token Ratio Fetched in Both Prepare and Finalize
| Field | Value |
|---|---|
| Severity | Low |
| Status | Fixed |
| PR | #6351 |
Finding: fee_token_ratio was fetched separately during transaction preparation and finalization. If the ratio changed during execution, lock and settlement amounts would be inconsistent.
Resolution: A cached_fee_token_ratio: Option<U256> field was added to L2Hook. The ratio is fetched once during prepare_execution_fee_token and reused in finalization. A regression test deploys a contract that modifies the ratio mid-execution and verifies the cached value is used.
Issue R: Unsanitized Boolean Leads to Nearby-Memory Blake2b Oracle
| Field | Value |
|---|---|
| Severity | Low |
| Status | Fixed |
| PR | #6439 |
Finding: The x86_64 Blake2b assembly does not sanitize the f (finalization flag) parameter. If f contains garbage in upper bits, a large offset could cause a read from nearby memory.
Existing mitigation: The Rust precompile code (precompiles.rs:893-897) validates f before calling the assembly. f is a Rust bool (guaranteed 0 or 1), and the function is unsafe and private.
Resolution: PR #6439 adds movzx r8d, r8b in the assembly to zero-extend the boolean parameter, clearing any garbage in upper bits. Defense-in-depth: the assembly is now safe regardless of caller validation.
Issue S: Zero Length Leads to Buffer Overflow Write in SHA3 Squeeze
| Field | Value |
|---|---|
| Severity | Low |
| Status | Fixed |
| PR | #6440 |
Finding: SHA3_squeeze and SHA3_squeeze_cext write out of bounds if the length passed is zero.
Existing mitigation: The Rust wrapper handles zero-length at the call site. SHA3_squeeze is only called with len = 32, and the function is unsafe and private.
Resolution: PR #6440 adds cbz early-exit instructions at the beginning of both SHA3_squeeze and SHA3_squeeze_cext, branching to the epilogue when output length is zero. Defense-in-depth: the assembly is now safe regardless of caller.
Issue T: Usage of Vulnerable Dependencies
| Field | Value |
|---|---|
| Severity | Undetermined |
| Status | Fixed (5/6), 1 remaining (zero impact) |
| PR | #6352 and dependency updates |
Finding: Six vulnerable crates were identified: protobuf, ring, rkyv, rsa, ruint, tracing-subscriber.
Resolution:
| Crate | Vulnerable Version | Current Version | Status |
|---|---|---|---|
| protobuf | 2.28.0 | 3.7.2 | Fixed (PR #6352, prometheus bump) |
| ring | 0.16.20 | 0.17.14 | Fixed (dependency update) |
| rkyv | 0.8.12 | 0.8.14 | Fixed (dependency update) |
| rsa | 0.9.9 | 0.9.10 | Fixed (dependency update) |
| ruint | 1.17.0 | 1.17.2 | Fixed (dependency update) |
| tracing-subscriber | 0.2.25 | 0.2.25 | Remaining (transitive) |
Remaining: tracing-subscriber v0.2.25 is a transitive dependency via ark-relations 0.5.1. The advisory concerns ANSI escape injection in logged user input; ark-relations only logs static compile-time metadata, never attacker-controlled text. Zero impact. Cannot update without an upstream ark-relations release.
Suggestions
Suggestion 1: Verify That Tokens Match in WithdrawERC20
| Field | Value |
|---|---|
| Status | Fixed |
| PR | #6003 |
Finding: withdrawERC20 accepts both tokenL1 and tokenL2 but does not verify they correspond. Users could lock their L2 funds with an unclaimable withdrawal proof.
Resolution: PR #6003 adds require(token.l1Address() == tokenL1, "CommonBridgeL2: L1 address mismatch") to withdrawERC20.
Suggestion 2: Add Router-Only Access Control to receiveETHFromSharedBridge
| Field | Value |
|---|---|
| Status | Fixed |
| PR | #6002 |
Finding: receiveETHFromSharedBridge accepted ETH from any caller, unlike the ERC-20 counterpart which restricted calls to SHARED_BRIDGE_ROUTER.
Resolution: Added require(msg.sender == SHARED_BRIDGE_ROUTER) to receiveETHFromSharedBridge, mirroring the access control in receiveERC20FromSharedBridge.
Suggestion 3: Accumulate the Substate Property Instead of Overwriting It
| Field | Value |
|---|---|
| Status | Fixed |
| PR | #6037 |
Finding: eip7702_set_access_code assigned substate.refunded_gas directly instead of accumulating, risking silent overwrite if execution order changed.
Resolution: Changed from direct assignment to checked_add with overflow protection:
#![allow(unused)]
fn main() {
self.substate.refunded_gas = self.substate.refunded_gas
.checked_add(refunded_gas)
.ok_or(InternalError::Overflow)?;
}Suggestion 4: Remove Deprecated “State Diffs” Feature
| Field | Value |
|---|---|
| Status | Fixed |
| PR | #5135 |
Finding: The prover maintained a HashMap of accounts modified by each transaction block, updated in stateless_validation_l1 and execute_stateless, as part of the deprecated “state diffs” feature.
Resolution: PR #5135 changed data availability from state diffs to full block commits. The StateDiff module (including modified_accounts: BTreeMap<Address, AccountStateDiff>) and the account_updates HashMap in StatelessResult were deleted. Blobs now carry RLP-encoded blocks instead of state diffs.
Suggestion 5: Improve Prover Code Quality
| Field | Value |
|---|---|
| Status | Partially fixed |
| PR | #6355 |
Finding: Three code quality items: (1) incorrect error message in request_new_input, (2) redundant l2 feature flag check, (3) comment mismatch in to_calldata.
Resolution: PR #6355 corrects the error messages (item 1). The l2 feature check (item 2) is intentional – it guards against misconfiguration where the prover binary is built without L2 support. Item 3 was not found in the current code (likely resolved in a prior refactor).
Suggestion 6: Improve Test Coverage
| Field | Value |
|---|---|
| Status | Acknowledged |
Ongoing effort. The audit fix PRs include regression tests for the found vulnerabilities. We continue expanding coverage, particularly for VM edge cases and contract invariants.
Suggestion 7: Improve Code Comments
| Field | Value |
|---|---|
| Status | Acknowledged |
Ongoing effort; too broad to attribute to a single PR.
Suggestion 8: Improve Blake2b Implementation
| Field | Value |
|---|---|
| Status | Not applicable |
Finding: Three items: (1) clamp rounds r to 0..12, (2) sanitize r=0 edge case, (3) zeroize shuffle buffer for keyed mode.
Response:
- Rounds clamping: The rounds parameter
rcan be arbitrarily large in the Ethereum Blake2 precompile (EIP-152). The gas cost scales linearly withr(rounds * 1 gas), andris parsed as au32from calldata. Clamping to 0..12 would break spec compliance. r=0handling: The assembly handlesr=0correctly:sub rdi, 0x01wraps, the carry flag jumps to exit, skipping all rounds. The final merge still executes, which is correct (Blake2 with 0 rounds still performs initialization and finalization).- Shuffle buffer zeroization: We do not use Blake2b in keyed mode. The Ethereum precompile takes
h,m,t,f, androundsas inputs – there is no key material. The first block never contains a key because keyed Blake2b is not part of the EIP-152 interface.
Contributing to the Documentation
We welcome contributions to the documentation! If you want to help improve or expand the docs, please follow these guidelines:
How to Edit the Docs
-
All documentation lives in this
docs/directory and its subfolders. -
The documentation is written in Markdown and rendered using mdBook.
-
To preview your changes locally, install the dependencies and run:
make docs-serveThis will start a local server and open the docs in your browser.
Adding or Editing Content
- To add a new page, create a new
.mdfile in the appropriate subdirectory and add a link to it inSUMMARY.md. - To edit an existing page, simply modify the relevant
.mdfile. - For style and formatting, try to keep a consistent tone and structure with the rest of the documentation.
Documentation dependencies
We use some mdBook preprocessors and backends for extra features:
mdbook-mermaidfor diagrams.mdbook-katexfor LaTeX math expressions.mdbook-linkcheck2for checking broken links during the build.
We also use lychee to check for broken links in CI.
You can install mdBook and all dependencies with:
make docs-deps
Submitting Changes
- Please open a Pull Request with your proposed changes.
- If you are adding new content, update
SUMMARY.mdso it appears in the navigation. - If you have questions, open an issue or ask in the community chat.
Thank you for helping improve the documentation!
Recommended lectures
Disclaimer: This section is under development. We’ll continue to expand it with more up-to-date materials over time.
For those interested in deepening their understanding of Ethereum internals, execution clients, and related zero-knowledge and distributed systems topics, we recommend the following materials: