Ethrex L2 prover
note
The shipping/deploying process and the Prover itself are under development.
Intro
The prover consists of two main components: handling incoming proving data from the L2 proposer, specifically from the ProofCoordinator component, and the zkVM. The Prover is responsible for this first part, while the zkVM serves as a RISC-V emulator executing code specified in crates/l2/prover/zkvm/interface/guest/src.
Before the zkVM code (or guest), there is a directory called interface, which indicates that we access the zkVM through the "interface" crate.
In summary, the Prover manages the inputs from the ProofCoordinator and then "calls" the zkVM to perform the proving process and generate the groth16 ZK proof.
Workflow
The ProofCoordinator monitors requests for new jobs from the Prover, which are sent when the prover is available. Upon receiving a new job, the Prover generates the proof, after which the Prover sends the proof back to the ProofCoordinator.
sequenceDiagram
    participant zkVM
    participant Prover
    participant ProofCoordinator
    Prover->>+ProofCoordinator: ProofData::Request
    ProofCoordinator-->>-Prover: ProofData::Response(batch_number, ProverInputs)
    Prover->>+zkVM: Prove(ProverInputs)
    zkVM-->>-Prover: Creates zkProof
    Prover->>+ProofCoordinator: ProofData::Submit(batch_number, zkProof)
    ProofCoordinator-->>-Prover: ProofData::SubmitAck(batch_number)
How
Dependencies:
- RISC0
curl -L https://risczero.com/install | bashrzup install cargo-risczero 2.3.1
- SP1
curl -L https://sp1up.succinct.xyz | bashsp1up --version 5.0.8
- SOLC
After installing the toolchains, a quick test can be performed to check if we have everything installed correctly.
L1 block proving
ethrex-prover is able to generate execution proofs of Ethereum Mainnet/Testnet blocks. An example binary was created for this purpose in crates/l2/prover/bench. Refer to its README for usage.
Dev Mode
To run the blockchain (proposer) and prover in conjunction, start the Prover, use the following command:
make init-prover T="prover_type (risc0,sp1) G=true"
Run the whole system with the prover - In one Machine
note
Used for development purposes.
cd crates/l2make rm-db-l2 && make down- It will remove any old database, if present, stored in your computer. The absolute path of libmdbx is defined by data_dir.
make init- Make sure you have the
solccompiler installed in your system. - Init the L1 in a docker container on port
8545. - Deploy the needed contracts for the L2 on the L1.
- Start the L2 locally on port
1729.
- Make sure you have the
- In a new terminal →
make init-prover T="(sp1,risc0)".
After this initialization we should have the prover running in dev_mode → No real proofs.
GPU mode
Steps for Ubuntu 22.04 with Nvidia A4000:
- Install
docker→ using the Ubuntu apt repository- Add the
useryou are using to thedockergroup → command:sudo usermod -aG docker $USER. (needs reboot, doing it after CUDA installation) id -nGafter reboot to check if the user is in the group.
- Add the
- Install Rust
- Install RISC0
- Install CUDA for Ubuntu
- Install
CUDA Toolkit Installerfirst. Then thenvidia-opendrivers.
- Install
- Reboot
- Run the following commands:
sudo apt-get install libssl-dev pkg-config libclang-dev clang
echo 'export PATH=/usr/local/cuda/bin:$PATH' >> ~/.bashrc
echo 'export LD_LIBRARY_PATH=/usr/local/cuda/lib64:$LD_LIBRARY_PATH' >> ~/.bashrc
Run the whole system with a GPU Prover
Two servers are required: one for the Prover and another for the sequencer. If you run both components on the same machine, the Prover may consume all available resources, leading to potential stuttering or performance issues for the sequencer/node.
- The number 1 simbolizes a machine with GPU for the
Prover. - The number 2 simbolizes a machine for the
sequencer/L2 node itself.
Prover/zkvm→ prover with gpu, make sure to have all the required dependencies described at the beginning of Gpu Mode section.cd ethrex/crates/l2- You can set the following environment variables to configure the prover:
- PROVER_CLIENT_PROVER_SERVER_ENDPOINT: The address of the server where the client will request the proofs from
- PROVER_CLIENT_PROVING_TIME_MS: The amount of time to wait before requesting new data to prove
Finally, to start theProver/zkvm, run:make init-prover T=(sp1,risc0) G=true
ProofCoordinator/sequencer→ this server just needs rust installed.-
cd ethrex/crates/l2 -
Create a
.envfile with the following content:// Should be the same as ETHREX_COMMITTER_L1_PRIVATE_KEY and ETHREX_WATCHER_L2_PROPOSER_PRIVATE_KEY ETHREX_DEPLOYER_L1_PRIVATE_KEY=<private_key> // Should be the same as ETHREX_COMMITTER_L1_PRIVATE_KEY and ETHREX_DEPLOYER_L1_PRIVATE_KEY ETHREX_WATCHER_L2_PROPOSER_PRIVATE_KEY=<private_key> // Should be the same as ETHREX_WATCHER_L2_PROPOSER_PRIVATE_KEY and ETHREX_DEPLOYER_L1_PRIVATE_KEY ETHREX_COMMITTER_L1_PRIVATE_KEY=<private_key> // Should be different from ETHREX_COMMITTER_L1_PRIVATE_KEY and ETHREX_WATCHER_L2_PROPOSER_PRIVATE_KEY ETHREX_PROOF_COORDINATOR_L1_PRIVATE_KEY=<private_key> // Used to handle TCP communication with other servers from any network interface. ETHREX_PROOF_COORDINATOR_LISTEN_ADDRESS=0.0.0.0 // Set to true to randomize the salt. ETHREX_DEPLOYER_RANDOMIZE_CONTRACT_DEPLOYMENT=true // Check if the contract is deployed in your preferred network or set to `true` to deploy it. ETHREX_DEPLOYER_SP1_DEPLOY_VERIFIER=true // Check the if the contract is present on your preferred network. ETHREX_DEPLOYER_RISC0_CONTRACT_VERIFIER=<address> // It can be deployed. Check the if the contract is present on your preferred network. ETHREX_DEPLOYER_SP1_CONTRACT_VERIFIER=<address> // Set to any L1 endpoint. ETHREX_ETH_RPC_URL=<url> -
source .env
-
note
Make sure to have funds, if you want to perform a quick test 0.2[ether] on each account should be enough.
-
Finally, to start theproposer/l2 node, run:make rm-db-l2 && make downmake deploy-l1 && make init-l2(if running a risc0 prover, see the next step before invoking the L1 contract deployer)
-
If running with a local L1 (for development), you will need to manually deploy the risc0 contracts by following the instructions here.
-
For a local L1 running with ethrex, we do the following:
- clone the risc0-ethereum repo
- edit the
risc0-ethereum/contracts/deployment.tomlfile by adding[chains.ethrex] name = "Ethrex local devnet" id = 9 - export env. variables (we are using an ethrex's rich L1 account)
the last two variables need to be defined with some value even if not used, else the deployment script fails.export VERIFIER_ESTOP_OWNER="0x4417092b70a3e5f10dc504d0947dd256b965fc62" export DEPLOYER_PRIVATE_KEY="0x941e103320615d394a55708be13e45994c7d93b932b064dbcb2b511fe3254e2e" export DEPLOYER_ADDRESS="0x4417092b70a3e5f10dc504d0947dd256b965fc62" export CHAIN_KEY="ethrex" export RPC_URL="http://localhost:8545" export ETHERSCAN_URL="dummy" export ETHERSCAN_API_KEY="dummy" - cd into
risc0-ethereum/ - run the deployment script
bash contracts/script/manage DeployEstopGroth16Verifier --broadcast - if the deployment was successful you should see the contract address in the output of the command, you will need to pass this as an argument to the L2 contract deployer, or via the
ETHREX_DEPLOYER_RISC0_CONTRACT_VERIFIER=<address>env. variable. if you get an error likerisc0-ethereum/contracts/../lib/forge-std/src/Script.sol": No such file or directory (os error 2), try to update the git submodules (foundry dependencies) withgit submodule update --init --recursive.
Configuration
Configuration is done through environment variables or CLI flags.
You can see a list of available flags by passing --help to the CLI.
The following environment variables are available to configure the Prover:
CONFIGS_PATH: The path where thePROVER_CLIENT_CONFIG_FILEis located at.PROVER_CLIENT_CONFIG_FILE: The.tomlthat contains the config for theProver.PROVER_ENV_FILE: The name of the.envthat has the parsed.tomlconfiguration.PROVER_CLIENT_PROVER_SERVER_ENDPOINT: Prover Server's Endpoint used to connect the Client to the Server.
The following environment variables are used by the ProverServer:
PROVER_SERVER_LISTEN_IP: IP used to start the Server.PROVER_SERVER_LISTEN_PORT: Port used to start the Server.PROVER_SERVER_VERIFIER_ADDRESS: The address of the account that sends the zkProofs on-chain and interacts with theOnChainProposerverify()function.PROVER_SERVER_VERIFIER_PRIVATE_KEY: The private key of the account that sends the zkProofs on-chain and interacts with theOnChainProposerverify()function.
note
The PROVER_SERVER_VERIFIER account must differ from the COMMITTER_L1 account.
How it works
The prover's sole purpose is to generate a block (or batch of blocks) execution proof. For this, ethrex-prover implements a blocks execution program and generates a proof of it using different RISC-V zkVMs (SP1, Risc0).
The prover runs a process that polls another for new jobs. The job must provide the program inputs. A proof of the program's execution with the provided inputs is generated by the prover and sent back.
Program inputs
The inputs for the blocks execution program (also called program inputs or prover inputs) are:
- the blocks to prove (header and body)
- the first block's parent header
- an execution witness
- the blocks' deposits hash
- the blocks' withdrawals Merkle root
- the blocks' state diff hash
The last three inputs are L2 specific.
These inputs are required for proof generation, but not all of them are committed as public inputs, which are needed for proof verification. The proof's public inputs (also called program outputs) will be:
- the initial state hash (from the first block's parent header)
- the final state hash (from the last block's header)
- the blocks' deposits hash
- the blocks' withdrawals Merkle root
- the blocks' state diff hash
Execution witness
The purpose of the execution witness is to allow executing the blocks without having access to the whole Ethereum state, as it wouldn't fit in a zkVM program. It contains only the state values needed during the execution.
An execution witness (represented by the ProverDB type) contains:
- all the initial state values (accounts, code, storage, block hashes) that will be read or written to during the blocks' execution.
- Merkle Patricia Trie (MPT) proofs that prove the inclusion or exclusion of each initial value in the initial world state trie.
An execution witness is created from a prior execution of the blocks. Before proving, we need to:
- execute the blocks (also called "pre-execution").
- log every initial state value accessed or updated during this execution.
- store each logged value in an in-memory key-value database (
ProverDB, implemented just using hash maps). - retrieve an MPT proof for each value, linking it (or its non-existence) to the initial state root hash.
Steps 1-3 are straightforward. Step 4 involves more complex logic due to potential issues when restructuring the pruned state trie after value removals. In sections initial state validation and final state validation we explain what are pruned tries and in which case they get restructured.
If a value is removed during block execution (meaning it existed initially but not finally), two pathological cases can occur where the witness lacks sufficient information to update the trie structure correctly:
Case 1
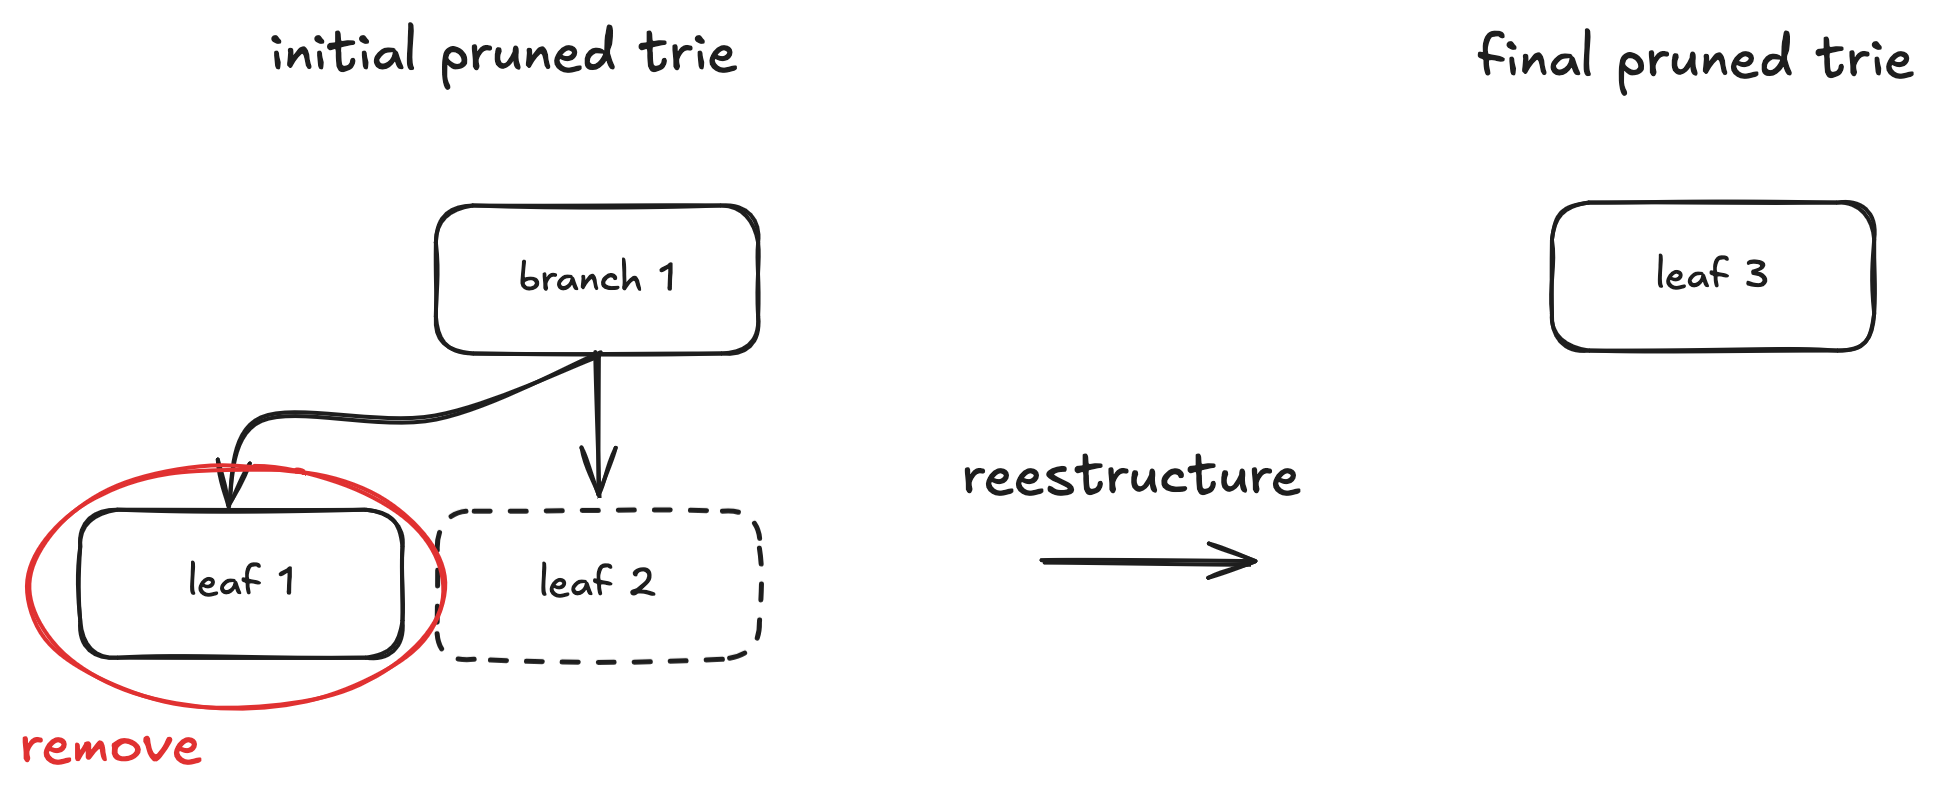
Here, only leaf 1 is part of the execution witness, so we lack the proof (and thus the node data) for leaf 2. After removing leaf 1, branch 1 becomes redundant. During trie restructuring, it's replaced by leaf 3, whose path is the path of leaf 2 concatenated with a prefix nibble (k) representing the choice taken at the original branch 1, and keeping leaf 2's value.
branch1 = {c_1, c_2, ..., c_k, ..., c_16} # Only c_k = hash(leaf2) is non-empty
leaf2 = {value, path}
leaf3 = {value, concat(k, path)} # New leaf replacing branch1 and leaf2
Without leaf 2's data, we cannot construct leaf 3. The solution is to fetch the final state proof for the key of leaf 2. This yields an exclusion proof containing leaf 3. By removing the prefix nibble k, we can reconstruct the original path and value of leaf 2. This process might need to be repeated if similar restructuring occurred at higher levels of the trie.
Case 2
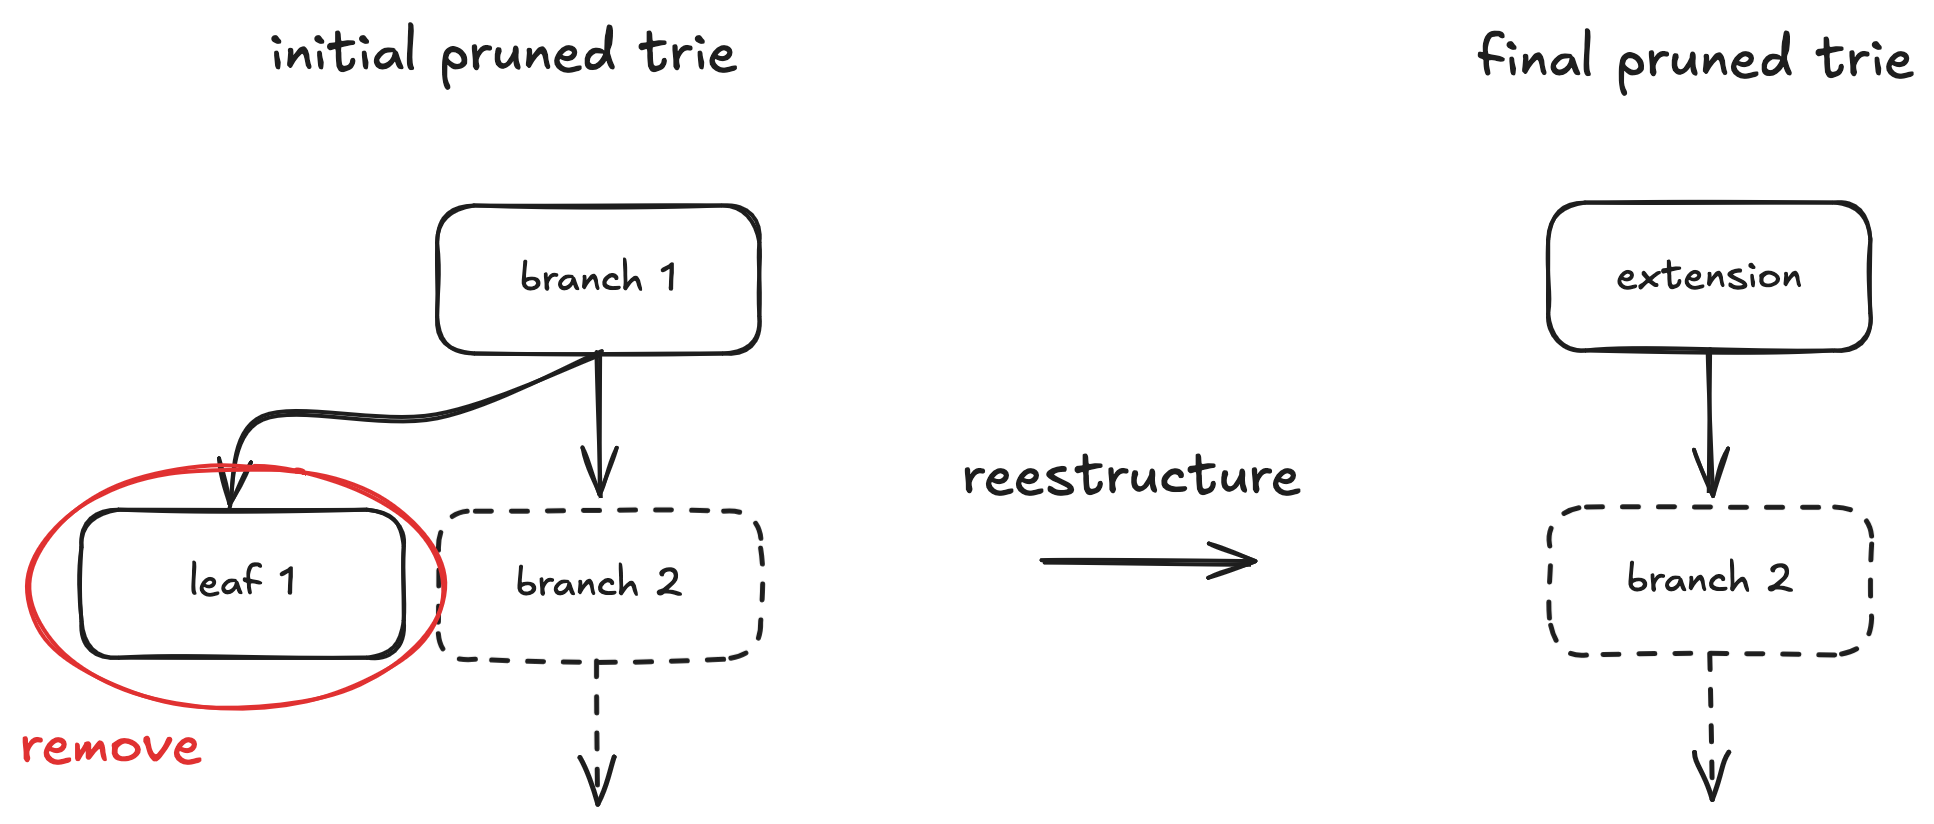
In this case, restructuring requires information about branch/ext 2 (which could be a branch or extension node), but this node might not be in the witness. Checking the final extension node might seem sufficient to deduce branch/ext 2 in simple scenarios. However, this fails if similar restructuring occurred at higher trie levels involving more removals, as the final extension node might combine paths from multiple original branches, making it ambiguous to reconstruct the specific missing branch/ext 2 node.
The solution is to fetch the missing node directly using a debug JSON-RPC method, like debug_dbGet (or debug_accountRange and debug_storageRangeAt if using a Geth node).
note
These problems arise when creating the execution witness solely from state proofs fetched via standard JSON-RPC. In the L2 context, where we control the sequencer, we could develop a protocol to easily retrieve all necessary data more directly. However, the problems remain relevant when proving L1 blocks (e.g., for testing/benchmarking).
Blocks execution program
The program leverages ethrex-common primitives and ethrex-vm methods. ethrex-prover implements a program that uses the existing execution logic and generates a proof of its execution using a zkVM. Some L2-specific logic and input validation are added on top of the basic blocks execution.
The following sections outline the steps taken by the execution program.
Prelude 1: state trie basics
We recommend learning about Merkle Patricia Tries (MPTs) to better understand this section.
Each executed block transitions the Ethereum state from an initial state to a final state. State values are stored in MPTs:
- Each account has a Storage Trie containing its storage values.
- The World State Trie contains all account information, including each account's storage root hash (linking storage tries to the world trie).
Hashing the root node of the world state trie generates a unique identifier for a particular Ethereum state, known as the "state hash".
There are two kinds of MPT proofs:
- Inclusion proofs: Prove that
key: valueis a valid entry in the MPT with root hashh. - Exclusion proofs: Prove that
keydoes not exist in the MPT with root hashh. These proofs allow verifying that a value is included (or its key doesn't exist) in a specific state.
Prelude 2: deposits, withdrawals and state diffs
These three components are specific additions for ethrex's L2 protocol, layered on top of standard Ethereum execution logic. They each require specific validation steps within the program.
For more details, refer to Overview, Withdrawals, and State diffs.
Step 1: initial state validation
The program validates the ProverDB by iterating over each provided state value (stored in hash maps) and verifying its MPT proof against the initial state hash (obtained from the first block's parent block header input). This is the role of the verify_db() function (to link the values with the proofs). We could instead directly decode the data from the MPT proofs on each EVM read/write, although this would incur performance costs.
Having the initial state proofs (paths from the root to each relevant leaf) is equivalent to having a relevant subset of the world state trie and storage tries - a set of "pruned tries". This allows operating directly on these pruned tries (adding, removing, modifying values) during execution.
Step 2: blocks execution
After validating the initial state, the program executes the blocks. This leverages the existing ethrex execution logic used by the L2 client itself.
Step 3: final state validation
During execution, state values are updated (modified, created, or removed). After execution, the program calculates the final state by applying these state updates to the initial pruned tries.
Applying the updates results in a new world state root node for the pruned tries. Hashing this node yields the calculated final state hash. The program then verifies that this calculated hash matches the expected final state hash (from the last block header), thus validating the final state.
As mentioned earlier, removing values can sometimes require information not present in the initial witness to correctly restructure the pruned tries. The Execution witness section details this problem and its solution.
Step 4: deposit hash calculation
After execution and final state validation, the program calculates a hash encompassing all deposits made within the blocks (extracting deposit info from PrivilegedL2Transaction type transactions). This hash is committed as a public input, required for verification on the L1 bridge contract.
Step 5: withdrawals Merkle root calculation
Similarly, the program constructs a binary Merkle tree of all withdrawals initiated in the blocks and calculates its root hash. This hash is also committed as a public input. Later, L1 accounts can claim their withdrawals by providing a Merkle proof of inclusion that validates against this root hash on the L1 bridge contract.
Step 6: state diff calculation and commitment
Finally, the program calculates the state diffs (changes between initial and final state) intended for publication to L1 as blob data. It creates a commitment to this data (a Merkle root hash), which is committed as a public input. Using proof of equivalence logic within the L1 bridge contract, this Merkle commitment can be verified against the KZG commitment of the corresponding blob data.